20 Fall Beach Nail Ideas for 2024: Stunning Designs for Every Beach Getaway
When it comes to fall beach vacations, your nails should be just as breathtaking as the ocean views. Whether you’re planning a romantic beach wedding, a spontaneous trip, or just want to bring some coastal vibes to your everyday look, we’ve got you covered. In this article, we’re diving into 20 stunning fall beach nail ideas that perfectly blend seasonal colors with beachy designs. From elegant and understated to bold and creative, these nail art ideas will make sure your manicure is the star of your beachside adventures in 2024. So, grab your polish and get ready to be inspired!
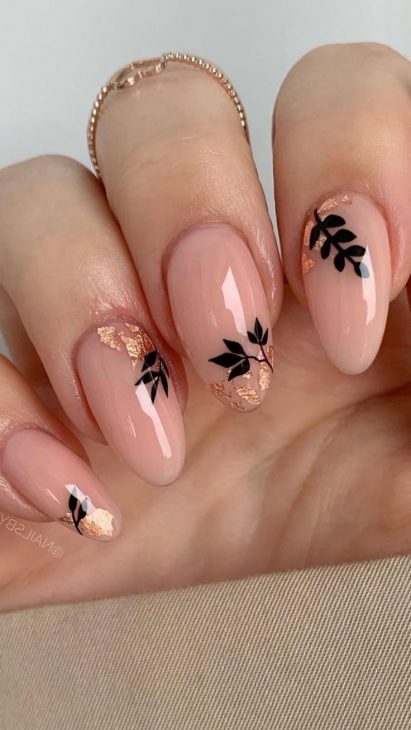
Elegant Nude with Gold Foil and Black Leaf Accents
This design is a subtle yet striking choice for fall beach nails. The soft, nude pink base is elegant and understated, providing the perfect backdrop for the delicate black leaf accents and gold foil. The combination of these elements creates a look that is both earthy and luxurious, reminiscent of autumn leaves scattered on the beach. The gold foil adds a touch of warmth, making this manicure ideal for transitioning from summer to fall.
Consumables:
- Base Coat: OPI Natural Nail Base Coat for a smooth and even application.
- Nude Polish: Essie “Ballet Slippers” for a classic, soft pink hue.
- Black Leaf Stickers: Maniology Black Leaf Stickers for precise and easy application.
- Gold Foil: Gold Leaf Flakes from Naio Nails to add a luxurious touch.
- Top Coat: Seche Vite Top Coat to seal in the design and add a glossy finish.
DIY Instructions:
- Start by applying the base coat to protect your natural nails.
- Apply two coats of the nude polish, allowing each coat to dry thoroughly.
- Carefully place the black leaf stickers on the nails, using tweezers for precision.
- Apply small pieces of gold foil to accent the design, pressing gently to adhere.
- Finish with a generous layer of top coat to seal the design and ensure longevity.
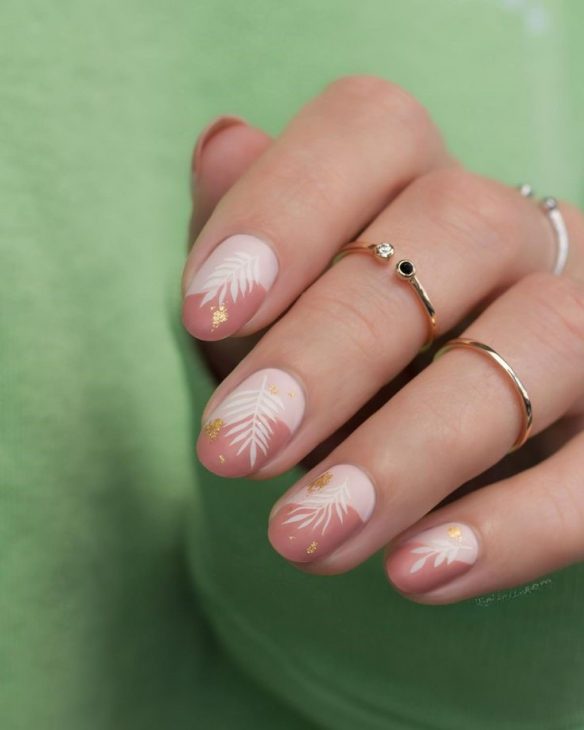
Soft Gradient with White Fern Patterns and Gold Accents
This fall-inspired nail design beautifully marries the warmth of autumn with the serenity of the beach. The gradient effect, transitioning from a soft nude to white, provides a dreamy base for the delicate white fern-like patterns. The addition of subtle gold flakes adds a touch of glamour, making this design perfect for both casual outings and special fall beach events.
Consumables:
- Base Coat: Orly Bonder Base Coat for a long-lasting manicure.
- Gradient Polishes: OPI “Bubble Bath” and “Alpine Snow” for the perfect ombre effect.
- White Nail Art Pen: Kiss Nail Art Paint in White for precise fern patterns.
- Gold Flakes: Born Pretty Gold Foil Flakes for a hint of shimmer.
- Top Coat: Sally Hansen Miracle Gel Top Coat for a durable, shiny finish.
DIY Instructions:
- Apply the base coat to all nails and let it dry.
- Create a gradient effect by using a makeup sponge to blend the nude and white polishes.
- Once dry, use the nail art pen to draw the fern-like patterns on each nail.
- Apply gold flakes sparingly to add a subtle sparkle.
- Seal the design with a top coat to protect your artwork and add shine.
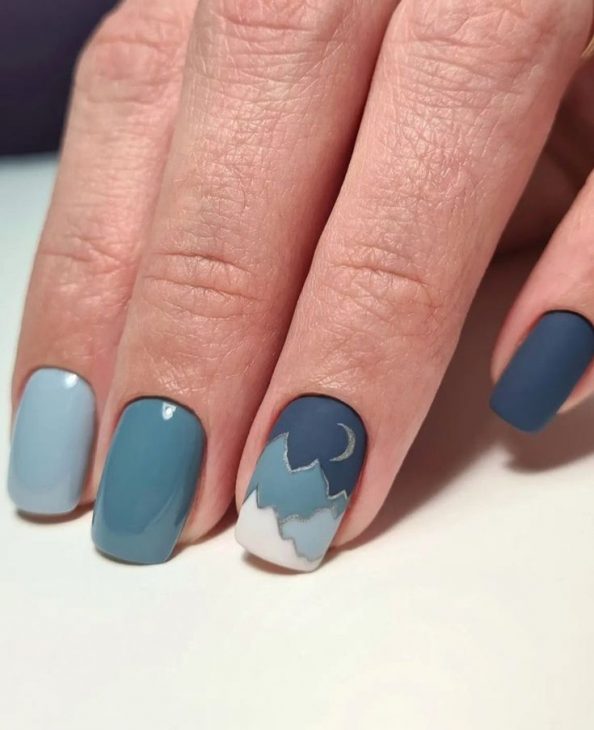
Matte Ocean Blues with Moonlit Wave Accent
This design is perfect for those who love the calm and cool vibes of the ocean, even as fall sets in. The varying shades of blue create a serene, beachy feel, while the matte finish adds a modern twist. The accent nail, featuring a moonlit night over ocean waves, ties the entire look together, making it both unique and seasonally appropriate.
Consumables:
- Base Coat: Zoya Anchor Base Coat for a strong foundation.
- Blue Polishes: Essie “Blossom Dandy,” “Butler Please,” and “Aruba Blue” for the gradient effect.
- Matte Top Coat: Essie Matte About You for a smooth matte finish.
- Nail Art Brush: Winstonia Nail Art Brush Set for creating the moon and wave design.
- Silver Polish: China Glaze “I’d Melt For You” to outline the moon and waves.
DIY Instructions:
- Start with the base coat to protect your nails.
- Apply each shade of blue to different nails, creating a gradient effect.
- Use a fine nail art brush to paint the moon and waves on the accent nail.
- Apply the matte top coat to all nails for a modern, muted finish.
- Ensure the design is dry before touching or using your hands.
Playful Mustard and Teal with Floral Designs
This playful design brings a splash of color to your fall beach nails. The combination of mustard yellow and teal is both unexpected and refreshing, evoking the vibrant hues of coastal flora. The floral design, detailed in blue and green, adds a touch of whimsy, making this manicure ideal for those looking to stand out with a fun yet sophisticated look.

Consumables:
- Base Coat: Deborah Lippmann All About That Base for a smooth start.
- Yellow Polish: China Glaze “Mustard the Courage” for a rich mustard tone.
- Teal Polish: Essie “Go Overboard” for the perfect teal shade.
- Nail Art Pen: Sally Hansen I Love Nail Art Pen in White for detailed floral work.
- Top Coat: CND Vinylux Weekly Top Coat for a long-lasting, glossy finish.
DIY Instructions:
- Begin by applying the base coat to all nails.
- Paint one or two nails in mustard yellow and the others in teal.
- Use the nail art pen to draw the floral design on the teal nails.
- Let the design dry completely before applying the top coat.
- Add a second layer of top coat if needed to ensure durability.
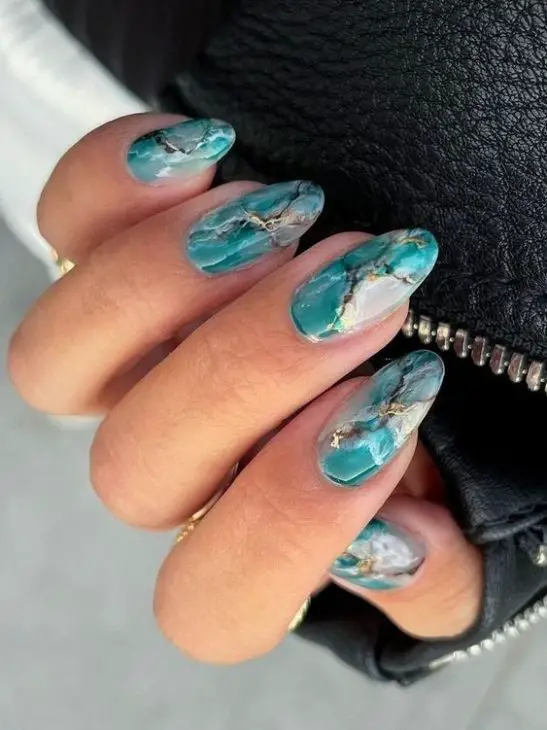
Luxurious Teal Marble with Gold Veining
This marbled design is a luxurious take on fall beach nails. The swirling patterns of teal and gray mimic the natural beauty of ocean waves crashing against rocks. The gold veining adds an opulent touch, making this design perfect for those who want to bring a bit of the ocean’s majesty into their fall look.
Consumables:
- Base Coat: Essie First Base for strong, healthy nails.
- Teal Polish: OPI “My Dogsled Is A Hybrid” for the main color.
- Gray Polish: Zoya “Dove” for the marbled effect.
- Gold Leaf: Gold Foil Flakes by Naio Nails for the luxurious veining.
- Top Coat: Orly Glosser for a high-shine finish.
DIY Instructions:
- Apply the base coat to prepare your nails.
- Use the teal polish as the base color on all nails.
- While the polish is still wet, apply small amounts of gray polish and use a thin brush to create the marbled effect.
- Add gold foil in fine lines to enhance the marble design.
- Seal the look with a top coat, ensuring the foil stays in place and the nails have a brilliant shine.
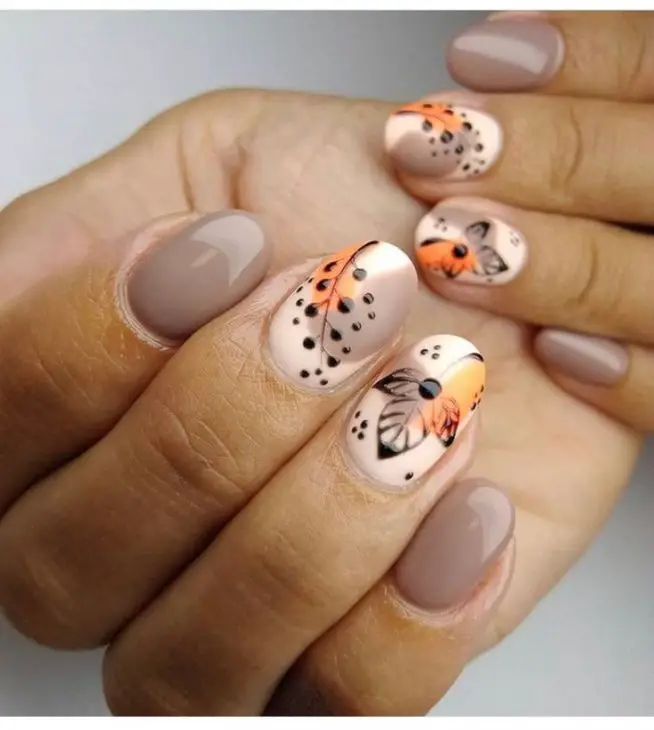
Autumn Butterfly Nails with Nude and Orange Tones
This design captures the delicate beauty of autumn butterflies with a vibrant orange and nude color scheme. The butterfly wings are intricately detailed with fine black lines and dots, creating a striking contrast against the soft nude base. The subtle addition of black dots adds dimension, making the nails appear as if they are adorned with real butterfly wings. This manicure is perfect for those who want to embrace the fall season with a touch of whimsy and elegance.
Consumables:
- Base Coat: OPI Nail Envy for a smooth, healthy base.
- Nude Polish: Essie “Topless & Barefoot” for a soft nude background.
- Orange Polish: OPI “A Good Man-darin Is Hard to Find” for the vibrant orange accents.
- Black Nail Art Pen: Sally Hansen I Love Nail Art Pen in Black for detailed lines and dots.
- Top Coat: Seche Vite Top Coat for a long-lasting, glossy finish.
DIY Instructions:
- Start with a base coat to protect your nails.
- Apply the nude polish as the base and allow it to dry completely.
- Use the black nail art pen to carefully draw the butterfly wing outlines and add the dots.
- Fill in the wing shapes with the orange polish, creating a gradient effect if desired.
- Finish with a top coat to seal the design and add shine.
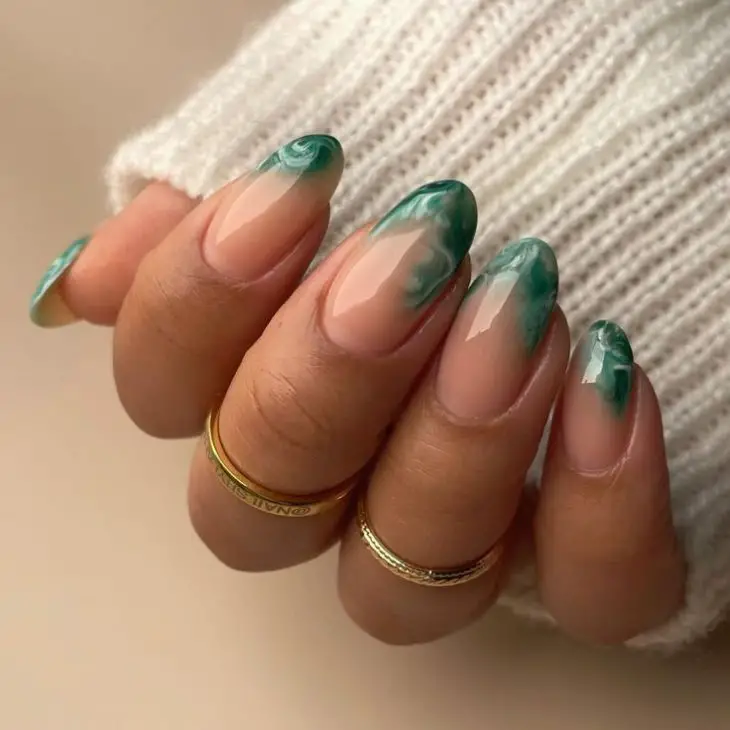
Green Marble Tips on a Nude Base
This elegant design features a nude base with sophisticated green marble tips, perfect for a fall beach-inspired look. The marbled effect is subtle yet captivating, evoking the natural beauty of ocean waves against a sandy shore. The translucent green adds depth and dimension to the nails, making them ideal for a chic, understated autumn manicure.
Consumables:
- Base Coat: Deborah Lippmann All About That Base for a smooth application.
- Nude Polish: OPI “Samoan Sand” for a neutral base.
- Green Polish: China Glaze “For Audrey” mixed with a clear polish for a marbled effect.
- Nail Art Brush: Winstonia Marbleizing Tool for creating the marble tips.
- Top Coat: Orly Glosser Top Coat for a shiny, protective finish.
DIY Instructions:
- Apply the base coat to all nails and let it dry.
- Paint the nails with the nude polish and allow them to dry completely.
- Mix the green polish with a bit of clear polish to create a translucent effect, then use the marbleizing tool to apply it to the tips of your nails.
- Create a marbled pattern by gently swirling the green polish on the tips.
- Seal the design with a top coat to protect the marble effect and add shine.
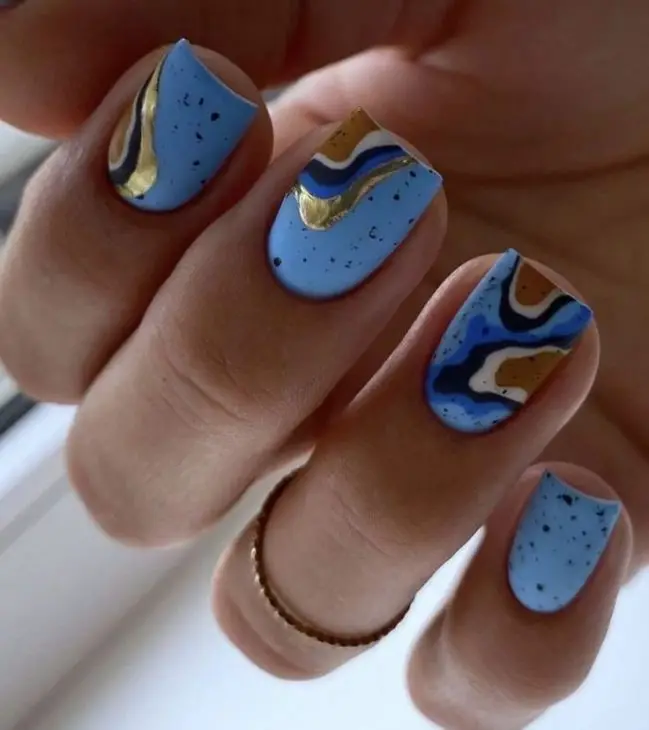
Abstract Blue and Gold Wave Nail Art
This bold and artistic design features abstract waves in blue, white, and gold, evoking the movement of ocean waves under a bright sky. The matte blue background serves as a perfect canvas for the striking wave patterns, while the gold accents add a touch of luxury. This design is perfect for those who love to experiment with color and texture, making it a standout look for fall.
Consumables:
- Base Coat: Essie First Base for a strong foundation.
- Blue Polish: Essie “Butler Please” for the base color.
- White and Gold Polishes: China Glaze “White on White” and Zoya “Goldie” for the wave patterns.
- Nail Art Brush: Winstonia Fine Line Brush for creating detailed wave designs.
- Matte Top Coat: Essie Matte About You for a modern, matte finish.
DIY Instructions:
- Begin by applying the base coat to all nails.
- Paint the nails with the blue polish and allow it to dry thoroughly.
- Use the nail art brush to create abstract wave patterns with the white and gold polishes.
- Add small black specks to mimic sand or splashes.
- Finish with a matte top coat to give the design a sleek, modern look.
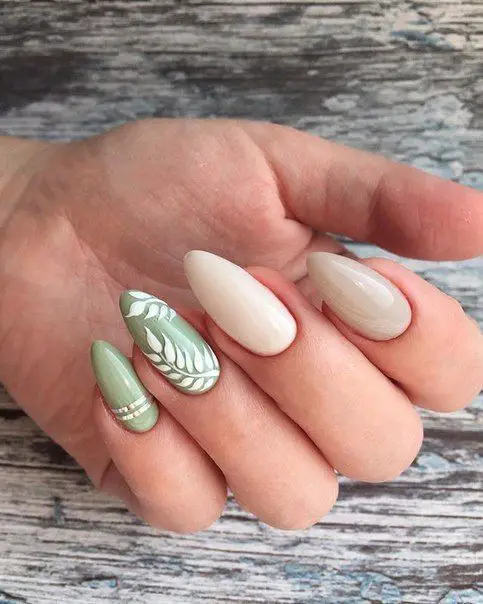
Sage Green and Nude with White Leaf Accents
This design combines a soft sage green with a nude base, accented by delicate white leaf patterns. The color combination is calming and elegant, reminiscent of a peaceful beach landscape during the fall. The white leaf detailing adds a natural element, making this manicure perfect for those who appreciate subtle yet sophisticated nail art.
Consumables:
- Base Coat: CND Stickey Base Coat for long-lasting wear.
- Sage Green Polish: Essie “Sew Psyched” for the green nails.
- Nude Polish: OPI “Be There in a Prosecco” for the nude nails.
- White Nail Art Pen: Kiss Nail Art Paint in White for the leaf designs.
- Top Coat: Sally Hansen Insta-Dri Top Coat for a quick-drying finish.
DIY Instructions:
- Apply the base coat to all nails.
- Paint some nails with the sage green polish and others with the nude polish.
- Use the nail art pen to draw the white leaf designs on the green nails.
- Add a metallic stripe at the base of the green nails for a chic touch.
- Seal the design with a top coat to protect your work and add a glossy finish.
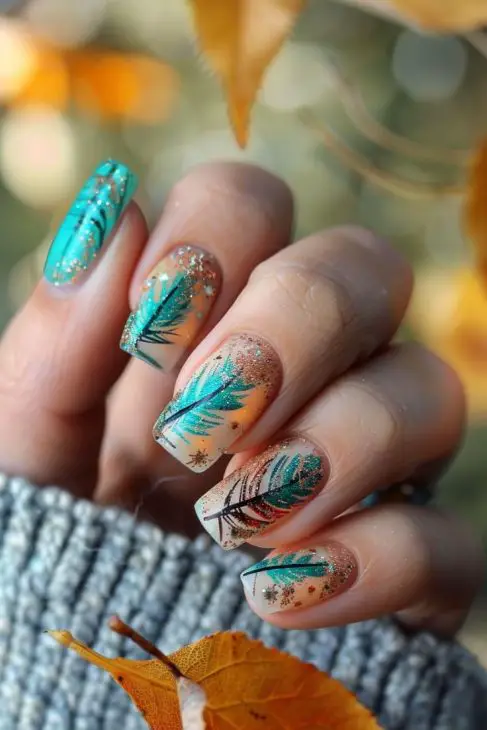
Teal and Glitter Ombre with Tropical Leaf Accents
This vibrant design blends a rich teal base with glitter ombre effects and tropical leaf accents, creating a manicure that is both festive and beach-inspired. The glitter transitions from the base to the tips, mimicking the shimmer of the ocean under the sun. The teal leaves add a pop of color and a tropical vibe, making this design perfect for a fall beach trip or a beach wedding.
Consumables:
- Base Coat: OPI Natural Nail Base Coat for a smooth foundation.
- Teal Polish: Zoya “Talia” for the main color.
- Glitter Polish: China Glaze “Fairy Dust” for the glitter ombre effect.
- Teal Nail Art Pen: Sally Hansen I Love Nail Art Pen in Teal for the leaf accents.
- Top Coat: Seche Vite Top Coat to seal the glitter and add shine.
DIY Instructions:
- Start with a base coat to protect your nails.
- Apply the teal polish as the base color and let it dry.
- Create an ombre effect by applying the glitter polish from the base of the nail towards the tip.
- Use the teal nail art pen to draw tropical leaf accents on the nails.
- Finish with a top coat to ensure the glitter and leaf designs stay in place.
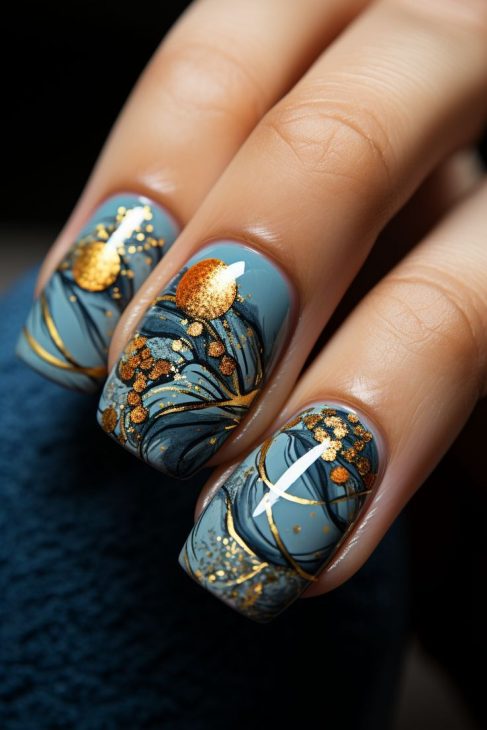
Abstract Blue and Gold Waves with Metallic Accents
This striking nail design showcases an artistic blend of blue, black, and gold, reminiscent of swirling ocean waves under a golden sunset. The intricate patterns create a sense of movement and depth, with the gold accents adding a luxurious touch. This manicure is perfect for making a bold statement while still embodying the serene beauty of the sea.
Consumables:
- Base Coat: OPI Nail Envy for a smooth, strong foundation.
- Blue Polish: Essie “Aruba Blue” for the primary background color.
- Black and Gold Polishes: China Glaze “Liquid Leather” and Zoya “Gilty” for the wave patterns and accents.
- Nail Art Brush: Winstonia Marbleizing Tool for creating the abstract wave designs.
- Top Coat: Seche Vite Top Coat for a glossy, protective finish.
DIY Instructions:
- Begin with a base coat to protect your natural nails.
- Apply the blue polish as the base color, ensuring full coverage.
- Use the nail art brush to create swirling wave patterns with the black and gold polishes.
- Add gold accents sparingly to highlight the design.
- Seal the design with a top coat to enhance the shine and longevity.
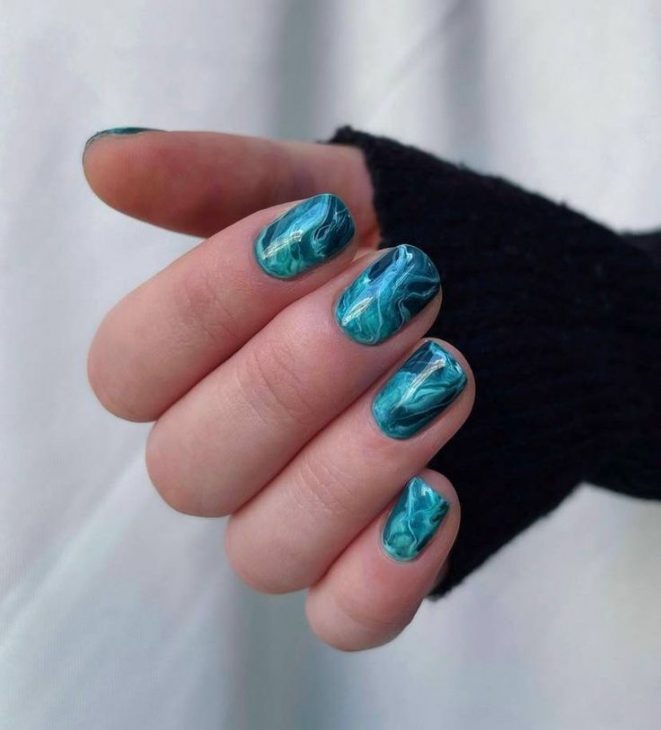
Deep Teal Marble Nails
This elegant nail design features a deep teal marble effect, capturing the tranquil and mysterious beauty of the ocean. The subtle swirls of lighter teal create a mesmerizing, almost ethereal look, making this design ideal for those who prefer a sophisticated and understated manicure that still stands out.
Consumables:
- Base Coat: Zoya Anchor Base Coat for long-lasting wear.
- Teal Polish: OPI “Teal the Cows Come Home” as the main color.
- White and Light Teal Polishes: Essie “Blanc” and OPI “Mermaid’s Tears” for the marble effect.
- Nail Art Brush: Winstonia Fine Detail Brush for creating the marbled swirls.
- Top Coat: Orly Glosser for a high-shine finish.
DIY Instructions:
- Start with the base coat to ensure a smooth application.
- Apply the teal polish as the base color and let it dry.
- Mix the white and light teal polishes to create a marbled effect, and apply using a fine brush.
- Gently swirl the colors together to achieve the marble look.
- Finish with a top coat to protect and shine.
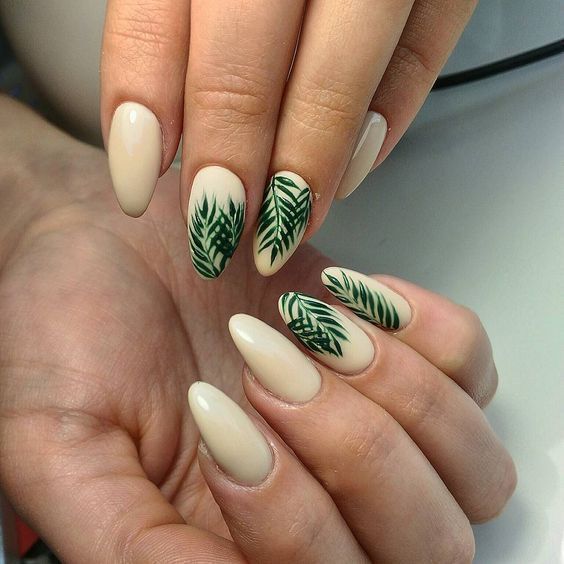
Nude and Green Tropical Leaves
This design is perfect for bringing a touch of the tropics to your fall look. The nude base provides a soft, natural backdrop for the detailed green leaf patterns, which add a fresh and lively contrast. The combination is both elegant and playful, making it suitable for everyday wear or a special occasion.
Consumables:
- Base Coat: Deborah Lippmann All About That Base for a smooth base.
- Nude Polish: Essie “Mademoiselle” for the soft, neutral background.
- Green Polish: OPI “Jade Is the New Black” for the leaf designs.
- Nail Art Pen: Sally Hansen I Love Nail Art Pen in Green for precise leaf detailing.
- Top Coat: CND Vinylux Weekly Top Coat for a durable, glossy finish.
DIY Instructions:
- Apply the base coat to protect your nails.
- Paint the nails with the nude polish and allow them to dry completely.
- Use the nail art pen to draw the green leaf patterns on selected nails.
- Add additional details with the brush to enhance the leaf design.
- Finish with a top coat to seal the design and add a glossy finish.
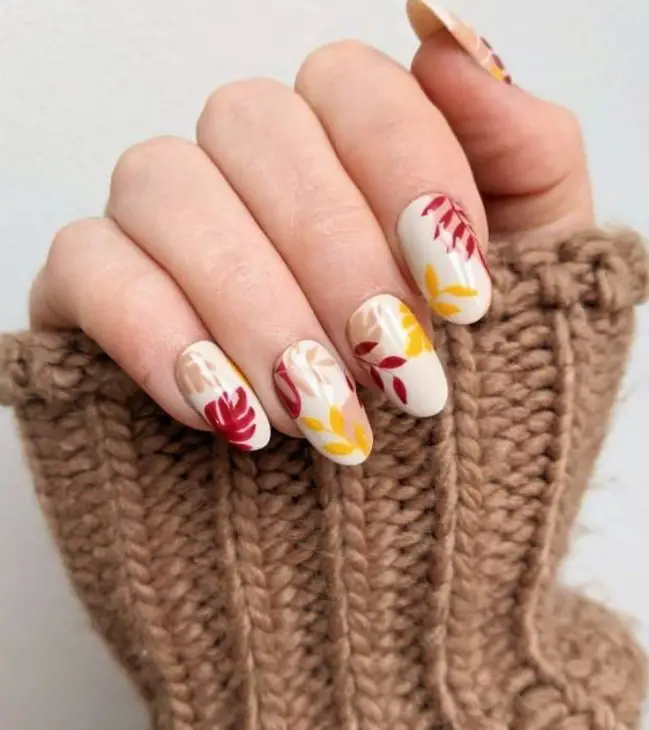
Autumn Leaves in Red, Yellow, and Beige
This vibrant design captures the essence of fall with its warm hues of red, yellow, and beige, arranged in delicate leaf patterns. The combination of these autumnal colors creates a cozy, inviting look that is perfect for the season. The matte finish adds a modern twist, making this manicure both trendy and timeless.
Consumables:
- Base Coat: OPI Natural Nail Base Coat for a strong foundation.
- Beige Polish: Essie “Sand Tropez” for the neutral background.
- Red and Yellow Polishes: OPI “Big Apple Red” and “Need Sunglasses?” for the leaf designs.
- Nail Art Brush: Winstonia Detail Brush for precise leaf patterns.
- Matte Top Coat: Essie Matte About You for a contemporary matte finish.
DIY Instructions:
- Start with a base coat to protect your natural nails.
- Apply the beige polish as the base color and let it dry thoroughly.
- Use the nail art brush to paint the red and yellow leaves, varying the sizes for a more natural look.
- Finish with a matte top coat to give the design a soft, modern finish.
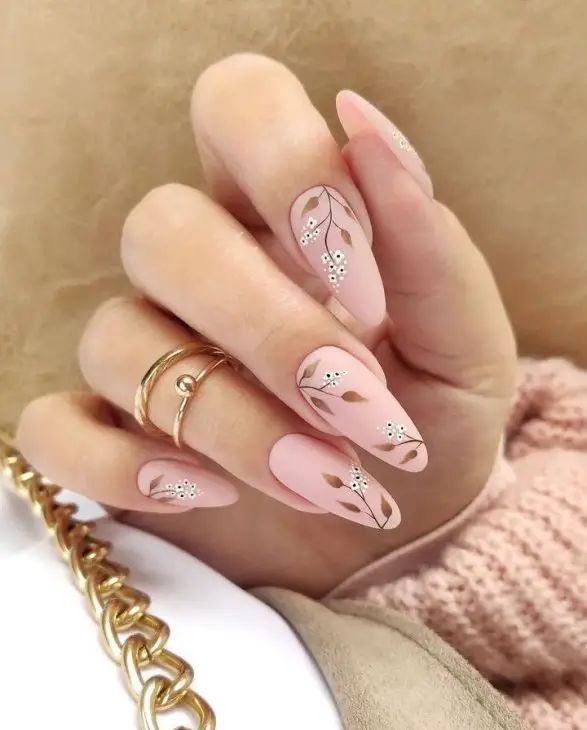
Soft Pink Florals with Delicate White Accents
This romantic design features soft pink nails adorned with delicate white floral accents. The simplicity of the flowers against the muted pink background creates a subtle yet elegant look, perfect for a fall beach wedding or a casual day out. The matte finish adds a contemporary touch, making this manicure both stylish and sophisticated.
Consumables:
- Base Coat: Orly Bonder Base Coat for lasting adhesion.
- Soft Pink Polish: OPI “Bubble Bath” for the soft, blush pink base.
- White Nail Art Pen: Sally Hansen I Love Nail Art Pen in White for the floral details.
- Matte Top Coat: Zoya Matte Velvet Top Coat for a modern matte finish.
DIY Instructions:
- Apply the base coat to ensure a smooth base and prevent chipping.
- Paint the nails with the soft pink polish, allowing each coat to dry.
- Use the white nail art pen to draw delicate floral patterns on each nail.
- Seal the design with a matte top coat for a sleek, modern look.
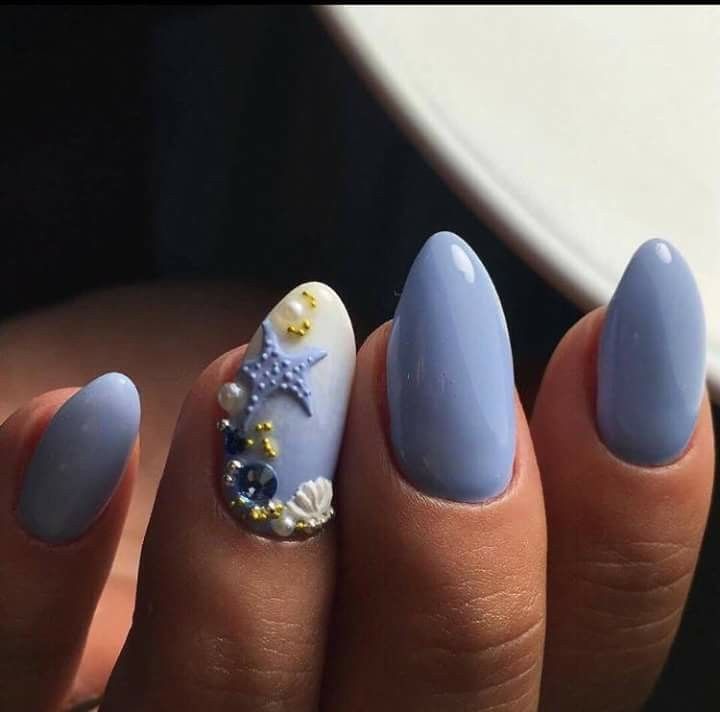
Fall Beach Nails: Coastal Elegance in Soft Blue
This stunning design captures the essence of the beach with a soft, pastel blue base that instantly reminds you of the serene ocean. The accent nail, adorned with 3D embellishments such as a starfish, tiny seashells, and delicate pearls, adds a playful yet sophisticated touch. The combination of these elements makes it perfect for a fall beach wedding or a simple getaway.
Consumables:
-
- Nail polish in pastel blue (e.g., OPI “It’s a Boy!”)
- 3D nail art embellishments (starfish, seashells, pearls)
- Clear top coat for sealing
- Nail glue for attaching embellishments
- DIY Instructions:
- Apply two coats of pastel blue polish on all nails and let them dry.
- On the accent nail, carefully apply nail glue and place the starfish, seashells, and pearls.
- Seal the design with a clear top coat to ensure longevity.
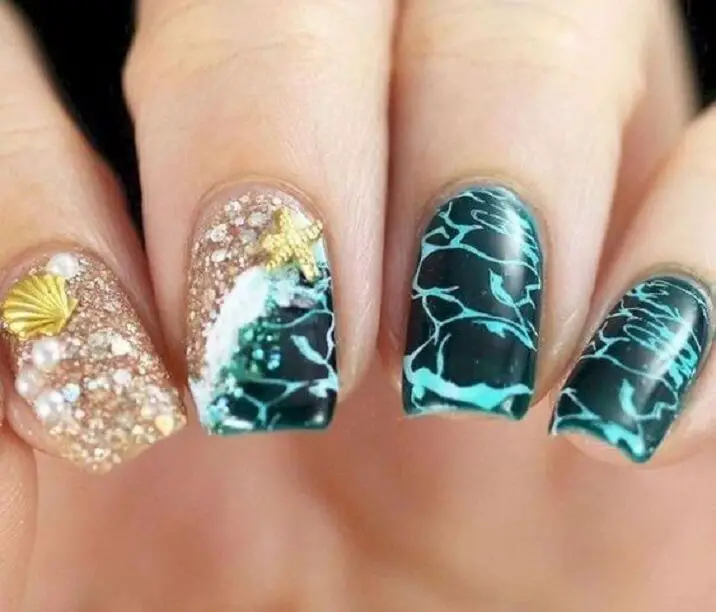
Fall Beach Nails: Ocean Waves and Sand
This nail design beautifully contrasts the deep blue ocean with the shimmering golden sands. The intricate wave patterns on the nails capture the motion of the sea, while the glittery golden accent nails represent the sandy shores, adorned with tiny seashells and starfish, adding a unique touch.
Consumables:
-
- Dark blue nail polish (e.g., Essie “Aruba Blue”)
- Gold glitter polish (e.g., Zoya “Solange”)
- Nail stickers or stamping plates with wave patterns
- Small 3D nail embellishments (seashells, starfish)
- Clear top coat
- DIY Instructions:
- Apply two coats of dark blue polish on some nails and gold glitter on others.
- Use a stamping plate or nail stickers to create wave patterns on the blue nails.
- Attach the small seashell and starfish embellishments to the glitter nails with nail glue.
- Seal everything with a clear top coat.
Fall Beach Nails: Luxe Navy and Gold
This luxurious nail art features a deep navy base with elegant golden waves and flecks that resemble a starry night sky reflecting on the ocean. The combination of navy and gold gives a regal, sophisticated vibe, perfect for a fall beach vacation or a formal beach event.
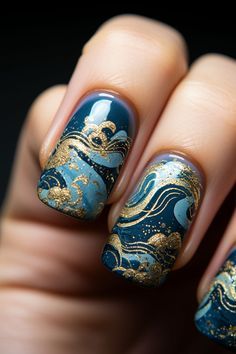
Consumables:
-
- Navy blue nail polish (e.g., Chanel “Bleu Trompeur”)
- Gold foil or metallic polish (e.g., Essie “Good as Gold”)
- Nail art brush for creating wave patterns
- Clear top coat
- DIY Instructions:
- Apply two coats of navy blue polish and let them dry completely.
- Using a thin nail art brush, create gentle wave patterns with the gold foil or polish.
- Add small gold flecks to resemble stars or sand.
- Finish with a clear top coat for a glossy finish.
Pastel Swirls of Sand and Sea
This playful design features swirls of pastel blue and pink, mimicking the soft waves of the sea and the warmth of the sandy beach. The simplicity and elegance of this design make it ideal for a casual beach day during the fall.
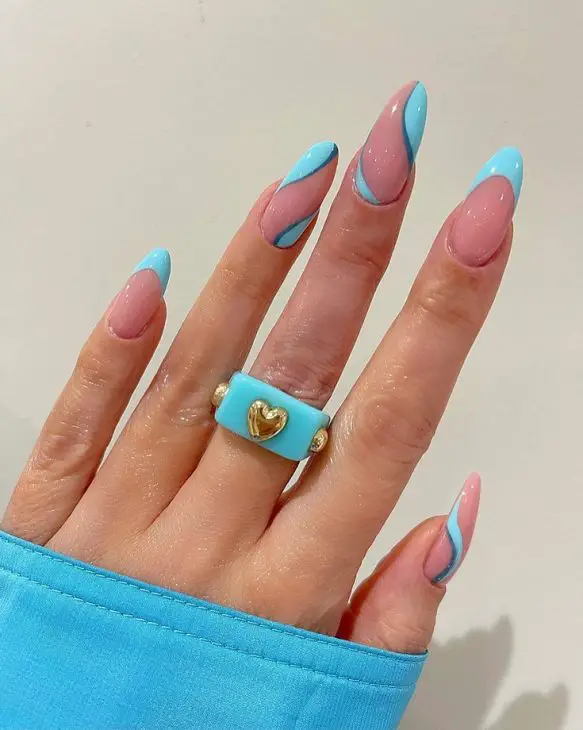
Consumables:
-
- Pastel blue nail polish (e.g., Sally Hansen “Breezy Blue”)
- Pastel pink nail polish (e.g., OPI “Mod About You”)
- Nail art brush or dotting tool for swirling
- Clear top coat
- DIY Instructions:
- Apply one coat of pastel blue polish as the base.
- Using a nail art brush, add swirls of pastel pink while the blue polish is still wet to create a marbled effect.
- Seal with a clear top coat to blend the colors and add shine.
Tropical Paradise in Green and White
This nail design brings a piece of tropical paradise to the fall season with its elegant green palm leaves over a creamy white base. The minimalist design is perfect for those looking to bring a subtle touch of the beach to their fall nail art.
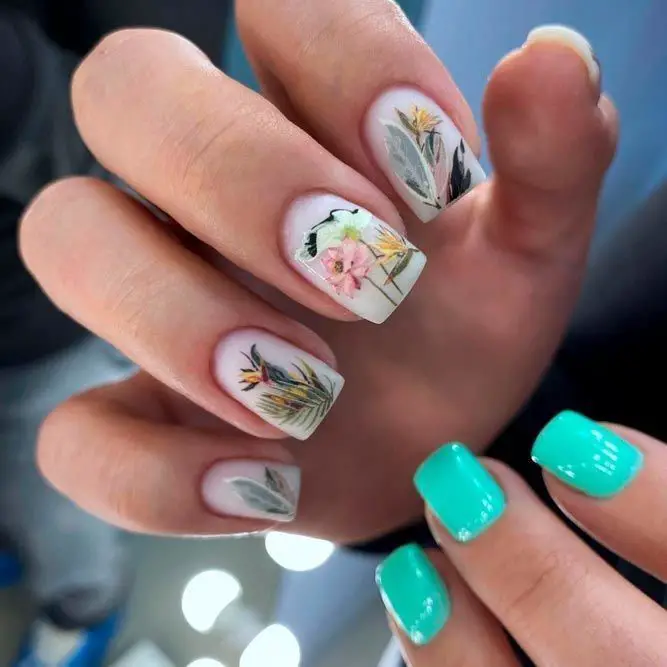
- Consumables:
- White nail polish (e.g., Essie “Blanc”)
- Green nail polish for the palm leaves (e.g., Zoya “Tilda”)
- Fine nail art brush for leaf detailing
- Clear top coat
- DIY Instructions:
- Apply two coats of white polish as the base and let it dry.
- Using a fine nail art brush, paint delicate green palm leaves on a few accent nails.
- Finish with a clear top coat to protect the design and add a glossy finish.
Save Pin
