20 Ideas Fall Nails Square: Your Ultimate Guide to Stunning Designs
Fall is here, and it’s the perfect time to refresh your nail game with some fabulous square nail designs. Whether you prefer short, medium, or long nails, square shapes are versatile and stylish, offering endless possibilities for creativity. In this article, we will explore a variety of fall nail ideas using square shapes, each uniquely suited for the season. Let’s dive into these stunning designs and see how you can recreate them at home.
Dark Gradient Square Nails
When it comes to fall nails, nothing beats the elegance of dark gradient square nails. This design features a smooth transition from a deep black to a light gray, creating a mysterious and sophisticated look. The matte finish adds an extra layer of chicness, making it perfect for any fall occasion.
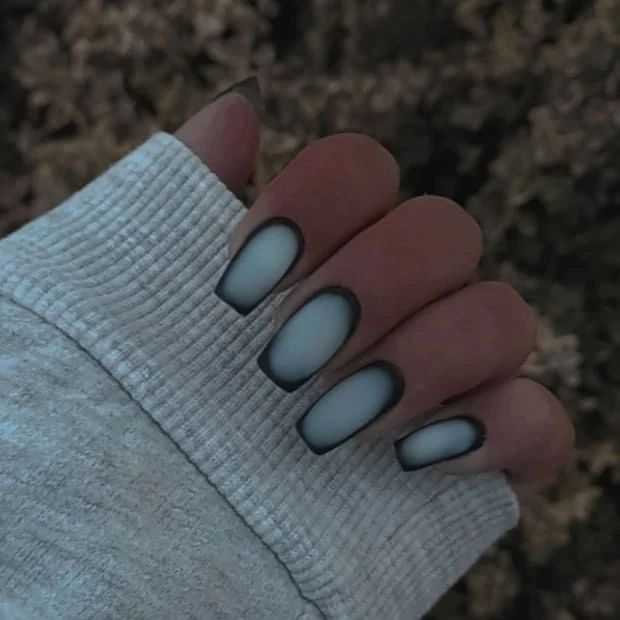
Consumables:
-
- Black nail polish (e.g., OPI Black Onyx)
- Light gray nail polish (e.g., Essie Master Plan)
- Matte top coat (e.g., Sally Hansen Big Matte Top Coat)
- Gradient sponge
- Nail polish remover and cotton pads
- DIY Instructions:
- Start with a clean base and apply a base coat to protect your nails.
- Paint your nails with the light gray polish and let it dry.
- Use the gradient sponge to dab black polish at the tips, blending it with the gray for a smooth gradient.
- Apply the matte top coat for a velvety finish.
- Clean up the edges with nail polish remover and cotton pads.
Minimalist Stripe Design
For a more subtle yet stylish fall nail look, try the minimalist stripe design. This nude base with thin, elegant black stripes gives a refined and polished appearance. It’s a great choice for those who prefer a more understated look but still want their nails to make a statement.
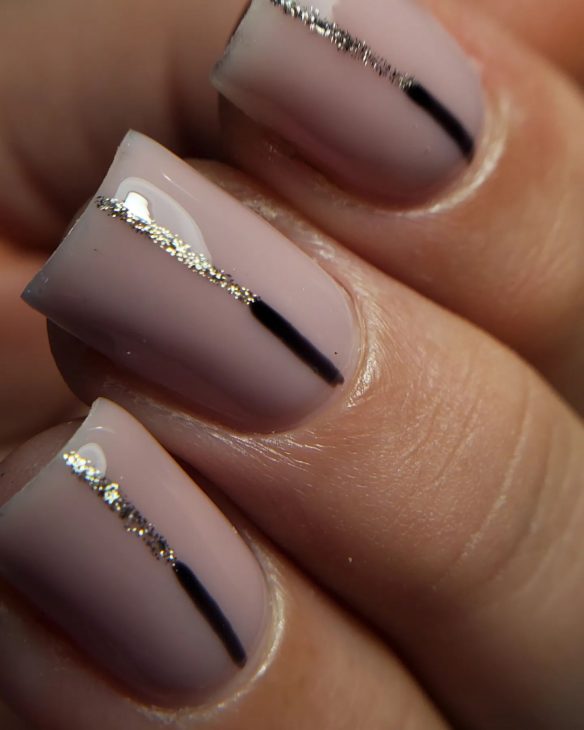
Consumables:
-
- Nude nail polish (e.g., OPI Samoan Sand)
- Black nail art pen or striping brush (e.g., Sally Hansen I Heart Nail Art Pen in Black)
- Top coat (e.g., Seche Vite Dry Fast Top Coat)
- DIY Instructions:
- Apply a base coat to your nails and let it dry.
- Paint your nails with the nude polish and allow it to dry completely.
- Use the nail art pen or striping brush to draw thin black lines down the center of each nail.
- Seal the design with a top coat for a glossy finish.
Classic French Manicure with a Twist
The classic French manicure never goes out of style, and this fall, give it a twist with square nails. The crisp white tips contrast beautifully with the natural pink base, offering a timeless and elegant look suitable for any occasion.
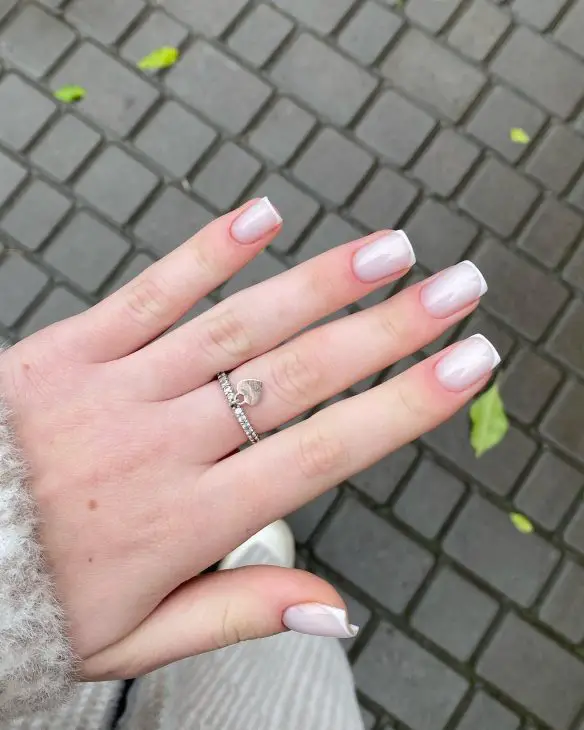
Consumables:
-
- Pink sheer nail polish (e.g., Essie Mademoiselle)
- White nail polish (e.g., OPI Alpine Snow)
- French manicure guides
- Top coat (e.g., Sally Hansen Insta-Dri)
- DIY Instructions:
- Apply a base coat to your nails.
- Paint your nails with the pink sheer polish and let it dry.
- Place the French manicure guides at the tips and paint the exposed tips white.
- Once dry, remove the guides and apply a top coat to seal the look.
Bright Orange Pop
Bright orange nails are perfect for adding a pop of color to your fall wardrobe. This design features a vibrant orange base with a playful polka dot accent nail, bringing fun and energy to your manicure.
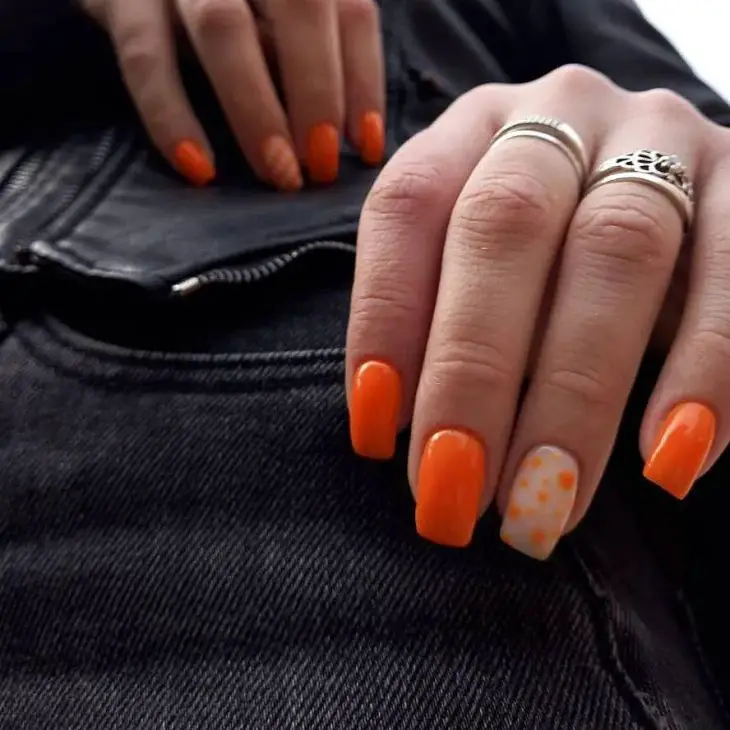
Consumables:
-
- Bright orange nail polish (e.g., Essie Meet Me at Sunset)
- White nail polish (e.g., OPI Alpine Snow)
- Dotting tool or bobby pin
- Top coat (e.g., Essie Good to Go)
- DIY Instructions:
- Apply a base coat to protect your nails.
- Paint all your nails with the bright orange polish and let it dry.
- On the accent nail, use the dotting tool to create white polka dots.
- Finish with a top coat to seal the design and add shine.
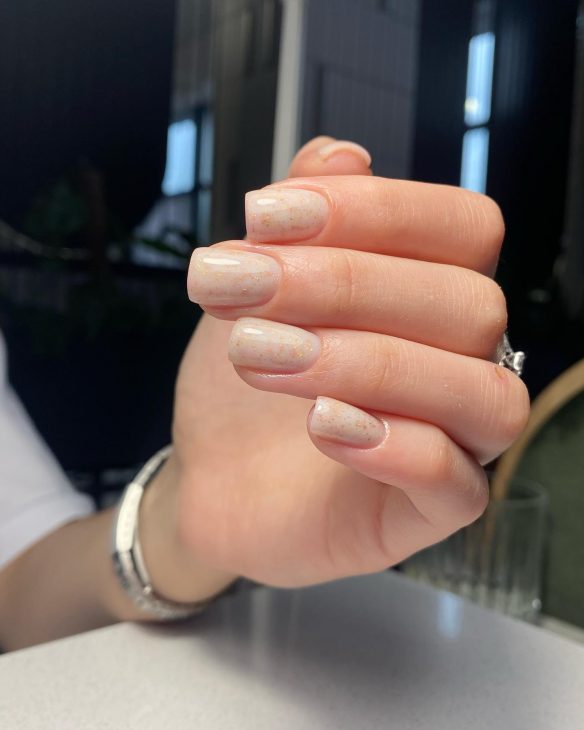
Subtle Glitter Touch
If you prefer a more natural look with a hint of sparkle, the subtle glitter design is perfect for you. This design features a neutral base with delicate gold glitter, adding a touch of glam without being too overpowering.
Consumables:
-
- Nude nail polish (e.g., Zoya Avery)
- Gold glitter nail polish (e.g., China Glaze Golden Enchantment)
- Top coat (e.g., Essie Gel Setter)
- DIY Instructions:
- Apply a base coat to your nails.
- Paint your nails with the nude polish and let it dry.
- Apply the gold glitter polish at the tips or as an accent on each nail.
- Seal the design with a top coat for added durability.
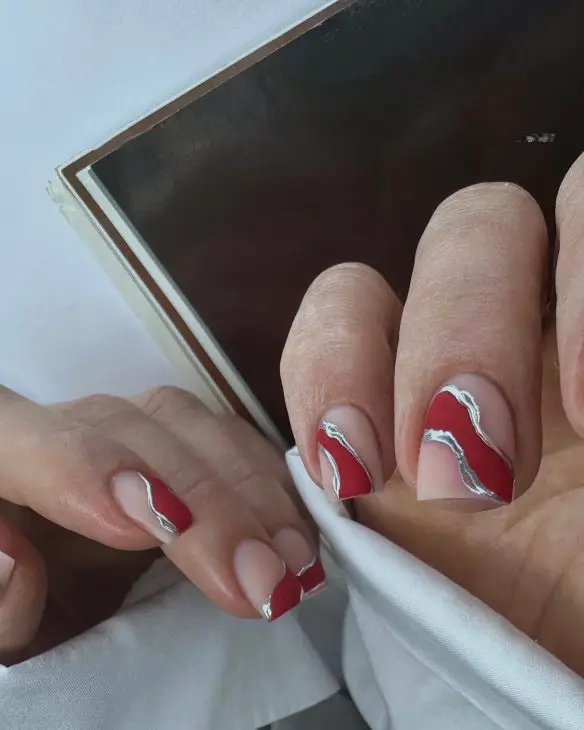
Red and Silver Waves
Red and silver waves bring a sophisticated yet bold look to your fall nails. This design features deep red and metallic silver waves on a nude base, creating a striking contrast that is perfect for both casual and formal occasions. The combination of matte and metallic finishes adds an extra layer of complexity and visual interest.
Consumables:
-
- Nude base coat (e.g., Essie Ballet Slippers)
- Deep red nail polish (e.g., OPI Big Apple Red)
- Silver metallic nail polish (e.g., Sally Hansen Miracle Gel in Stilettos & Studs)
- Fine detail brush
- Top coat (e.g., Seche Vite Dry Fast Top Coat)
- DIY Instructions:
- Start with a nude base coat and let it dry completely.
- Using a fine detail brush, paint wavy lines with the deep red polish.
- Outline the red waves with the silver metallic polish for a sharp contrast.
- Seal the design with a top coat to ensure durability and shine.
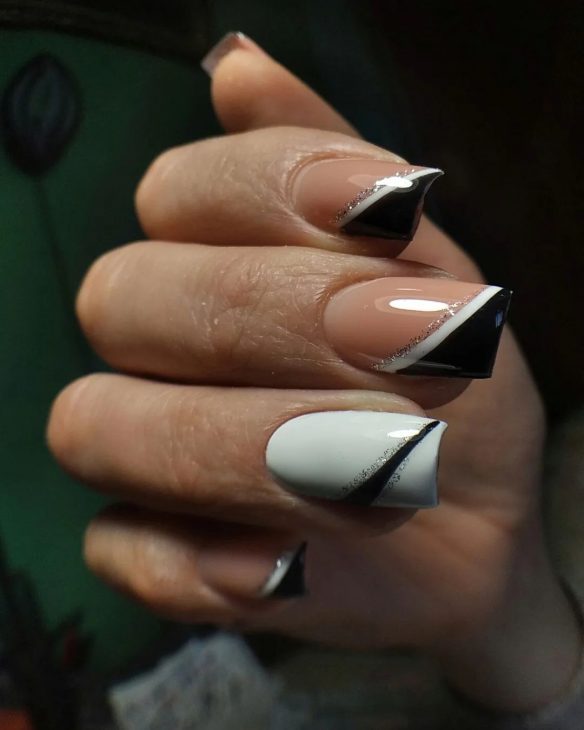
Black and White Geometric Design
This black and white geometric design is a perfect example of how contrasting colors can create a stunning nail art. The sharp angles and lines give a modern and edgy look, while the use of a glossy finish makes it sleek and polished.
Consumables:
-
- Nude base coat (e.g., Essie Ballet Slippers)
- Black nail polish (e.g., OPI Black Onyx)
- White nail polish (e.g., OPI Alpine Snow)
- Fine detail brush or nail art tape
- Top coat (e.g., Essie Gel Setter Top Coat)
- DIY Instructions:
- Apply the nude base coat and let it dry.
- Use the nail art tape or fine detail brush to create geometric shapes with black and white polish.
- Ensure each layer dries completely before adding another color.
- Finish with a top coat to protect the design and add shine.
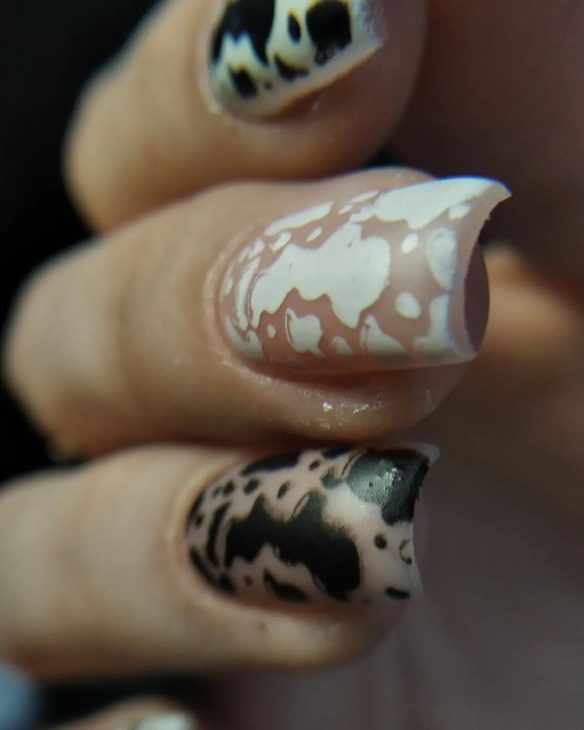
Leopard Print Nails
Leopard print nails bring a wild and trendy vibe to your fall look. This design combines neutral and black shades to create a realistic leopard pattern, making your nails stand out with a fierce and fashionable touch.
Consumables:
-
- Nude base coat (e.g., Zoya Avery)
- Black nail polish (e.g., China Glaze Liquid Leather)
- Light brown nail polish (e.g., Essie Mink Muffs)
- Dotting tool
- Top coat (e.g., Sally Hansen Insta-Dri)
- DIY Instructions:
- Start with a nude base coat and let it dry.
- Use the light brown polish to create random spots on each nail.
- Outline the brown spots with black polish using a dotting tool to mimic the leopard print.
- Seal the design with a top coat to keep it from chipping.
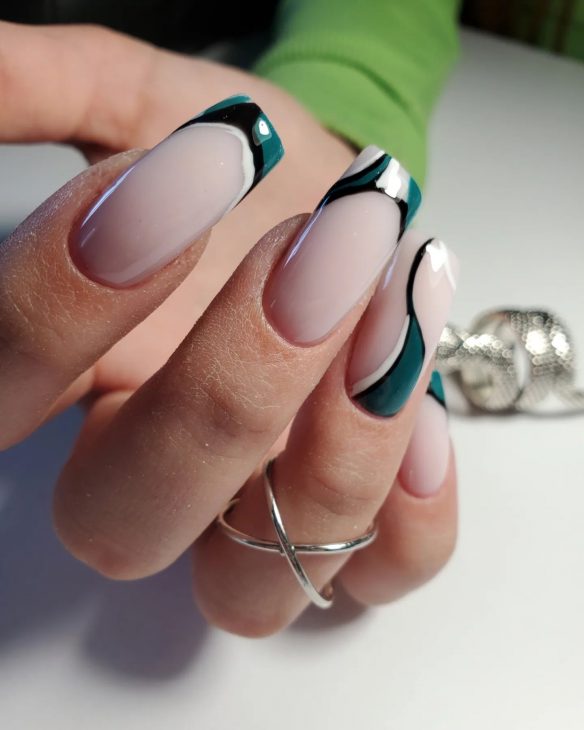
Abstract Green and Black Swirls
Abstract green and black swirls on a nude base create a unique and artistic design that is perfect for fall. The combination of soft and bold colors, along with the fluid, organic shapes, adds a touch of elegance and creativity to your nails.
Consumables:
-
- Nude base coat (e.g., Essie Ballet Slippers)
- Black nail polish (e.g., OPI Black Onyx)
- Dark green nail polish (e.g., Essie Off Tropic)
- Fine detail brush
- Top coat (e.g., Seche Vite Dry Fast Top Coat)
- DIY Instructions:
- Apply a nude base coat and allow it to dry.
- Using a fine detail brush, create abstract swirls with the dark green polish.
- Outline the green swirls with black polish for added contrast.
- Finish with a top coat to seal the design and add a glossy finish.
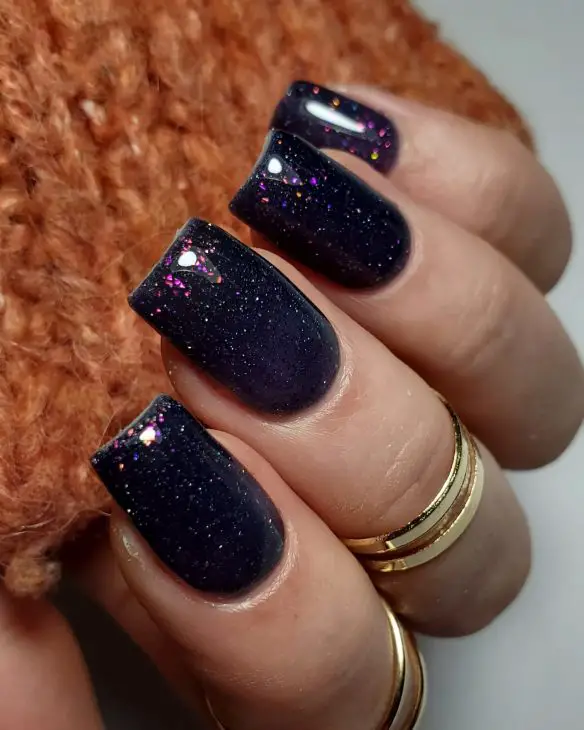
Glittery Night Sky
For those who love a bit of sparkle, the glittery night sky design is perfect. This design features a deep, dark base with shimmering glitter that mimics the look of a starry night sky, adding a touch of magic to your fall nails.
Consumables:
-
- Dark blue or black base coat (e.g., Essie Midnight Cami)
- Holographic glitter polish (e.g., China Glaze Fairy Dust)
- Top coat (e.g., Sally Hansen Miracle Gel Top Coat)
- DIY Instructions:
- Start with a dark blue or black base coat and let it dry.
- Apply the holographic glitter polish over the dark base.
- Add a second layer of glitter for extra sparkle if desired.
- Seal the design with a top coat to ensure the glitter stays in place and adds shine.
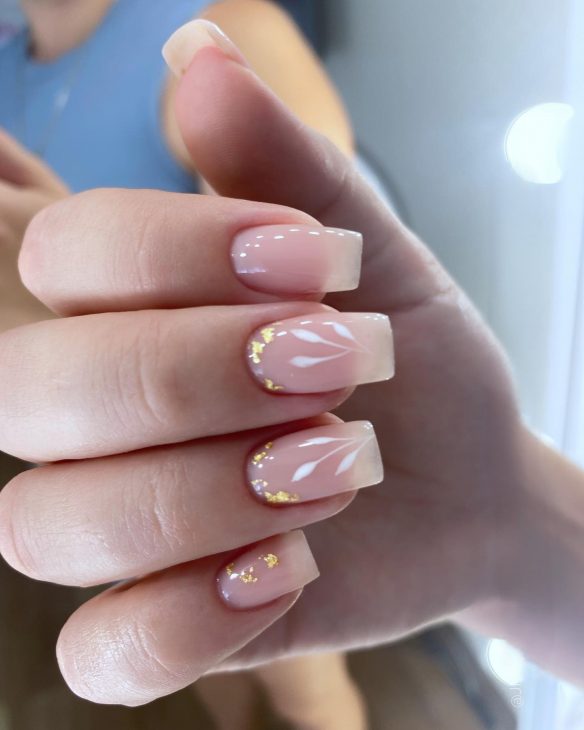
Delicate Leaf Design with Gold Accents
This beautiful fall nail design features delicate white leaf patterns on a soft pink base, accented with gold flakes. The combination of soft and metallic elements creates an elegant and sophisticated look perfect for any occasion.
Consumables:
-
- Soft pink nail polish (e.g., Essie Mademoiselle)
- White nail art polish (e.g., Sally Hansen Nail Art Pen in White)
- Gold leaf flakes (e.g., Born Pretty Gold Foil Flakes)
- Top coat (e.g., Seche Vite Dry Fast Top Coat)
- DIY Instructions:
- Apply a base coat to protect your nails.
- Paint your nails with the soft pink polish and let it dry.
- Using a fine detail brush, draw delicate leaf patterns with the white nail art polish.
- Apply gold leaf flakes in desired areas using a toothpick or tweezers.
- Seal the design with a top coat to protect the art and add shine.
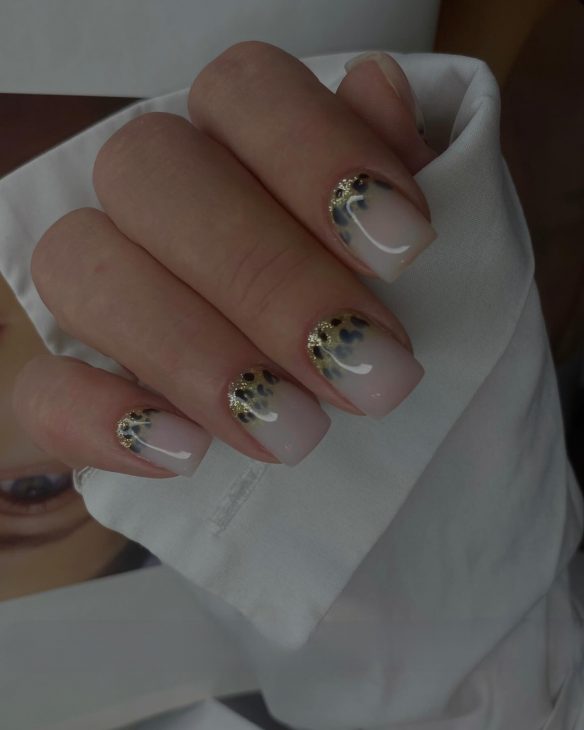
Elegant Gold Foil Accents
This elegant nail design incorporates subtle gold foil accents on a neutral beige base. The gold foil adds a touch of glamour and sophistication, making this design perfect for any fall event.
Consumables:
-
- Beige nail polish (e.g., OPI Samoan Sand)
- Gold foil flakes (e.g., Born Pretty Gold Foil Flakes)
- Top coat (e.g., Essie Gel Setter Top Coat)
- DIY Instructions:
- Apply a base coat to your nails.
- Paint your nails with the beige polish and let it dry.
- Apply gold foil flakes on the accent nails using a toothpick or tweezers.
- Seal the design with a top coat for a long-lasting finish.
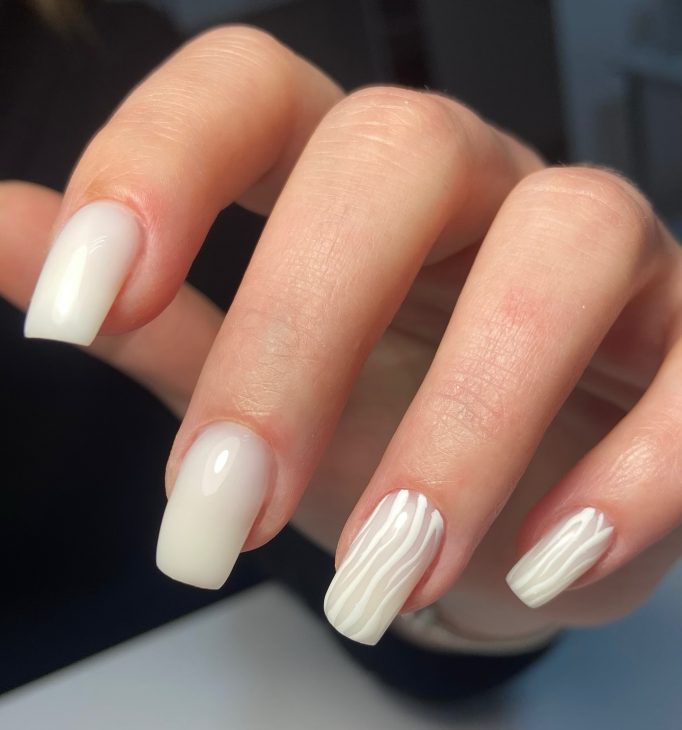
Pure White Elegance
Pure white nails exude elegance and simplicity, perfect for those who prefer a clean and classic look. This design features an all-white base with a subtle glossy finish, making it suitable for any occasion.
Consumables:
-
- White nail polish (e.g., OPI Alpine Snow)
- Top coat (e.g., Seche Vite Dry Fast Top Coat)
- DIY Instructions:
- Apply a base coat to your nails.
- Paint your nails with the white polish, applying two coats for full opacity.
- Finish with a top coat to add a glossy shine and protect the polish.
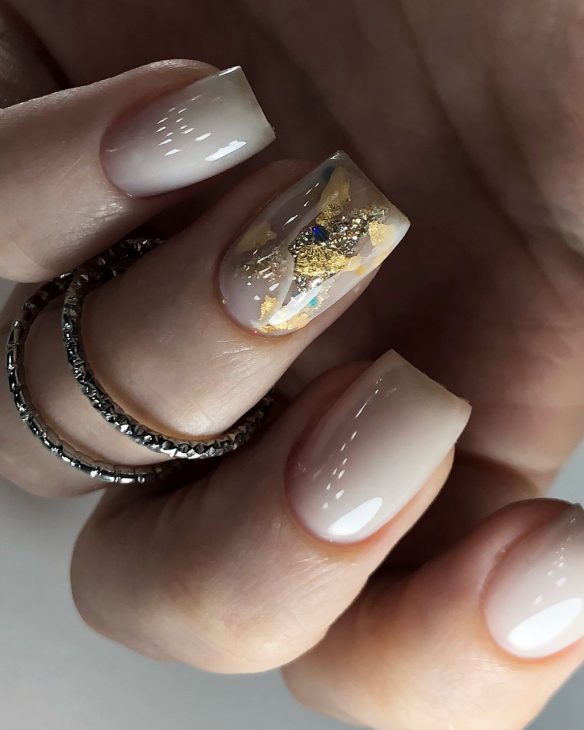
Gold Leopard Accents
This striking design features gold leopard print accents on a soft pink base, combining elegance with a wild touch. The use of gold and black against the pink background creates a visually stunning contrast perfect for fall.
Consumables:
-
- Soft pink nail polish (e.g., Essie Ballet Slippers)
- Gold and black nail art polish (e.g., Sally Hansen I Heart Nail Art Pen in Black and Gold)
- Top coat (e.g., Essie Gel Setter Top Coat)
- DIY Instructions:
- Apply a base coat to your nails.
- Paint your nails with the soft pink polish and let it dry.
- Create leopard print accents using gold and black nail art polish.
- Seal the design with a top coat to ensure durability and shine.
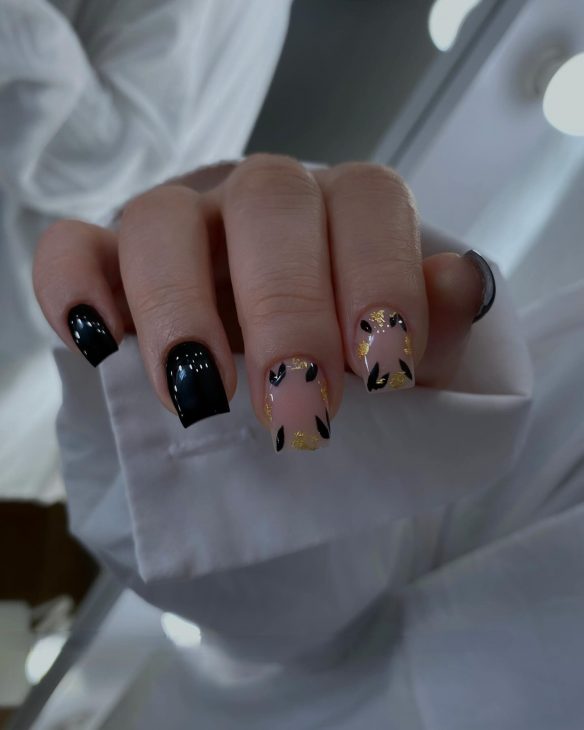
Black and Gold Leaves
This chic design features black and gold leaves on a nude base, creating a sophisticated and elegant look. The combination of black and gold against the nude background adds a touch of glamour and sophistication, perfect for fall.
Consumables:
-
- Nude nail polish (e.g., Essie Ballet Slippers)
- Black and gold nail art polish (e.g., Sally Hansen I Heart Nail Art Pen in Black and Gold)
- Top coat (e.g., Seche Vite Dry Fast Top Coat)
- DIY Instructions:
- Apply a base coat to your nails.
- Paint your nails with the nude polish and let it dry.
- Create leaf patterns using black and gold nail art polish.
- Seal the design with a top coat to protect the art and add shine.
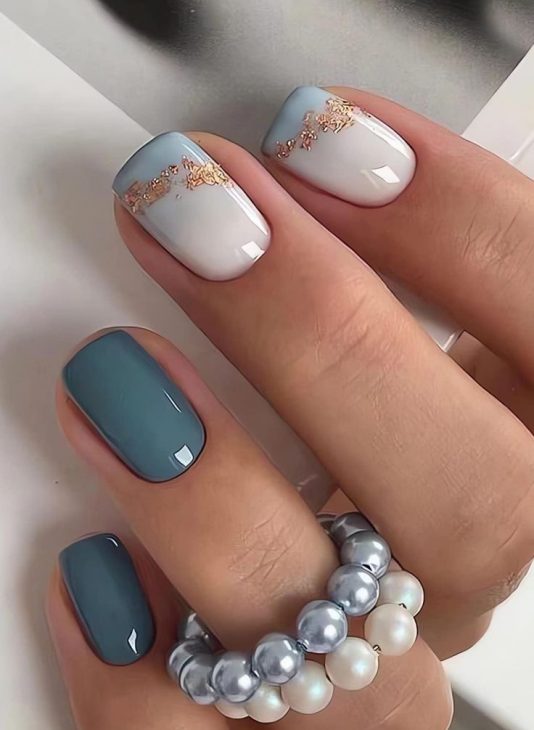
Blue and Gold Accents
This elegant design features a beautiful combination of blue and white nails with gold accents. The soft gradient from blue to white is perfectly complemented by the gold flakes, adding a touch of luxury to the overall look. This design is perfect for those who want to embrace the fall season with a subtle yet sophisticated style.
Consumables:
-
- Blue nail polish (e.g., OPI Rich Girls & Po-Boys)
- White nail polish (e.g., Essie Blanc)
- Gold flakes (e.g., Born Pretty Gold Foil Flakes)
- Gradient sponge
- Top coat (e.g., Seche Vite Dry Fast Top Coat)
- DIY Instructions:
- Apply a base coat to protect your nails.
- Use a gradient sponge to create a smooth transition from blue to white.
- Apply gold flakes on the gradient nails for added elegance.
- Seal the design with a top coat to ensure durability and shine.
Burgundy and Nude French Tips
This chic design features a modern twist on the classic French manicure, with a rich burgundy color paired with a nude base. The sharp lines and glossy finish make this design a standout choice for fall.
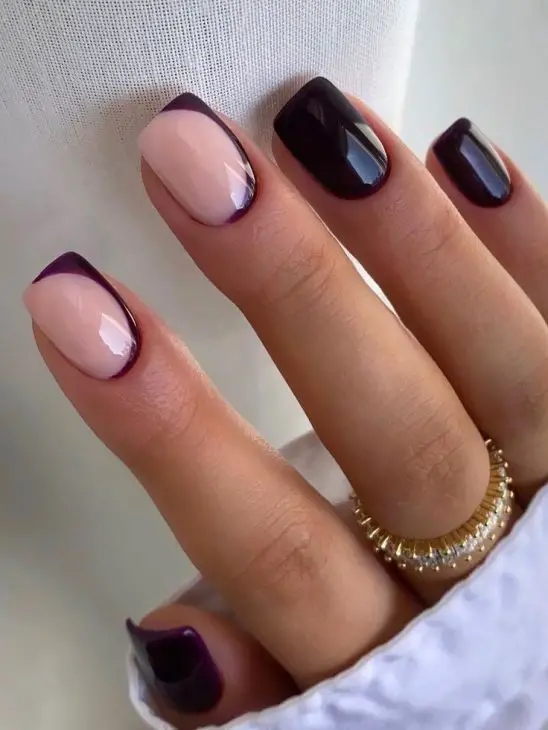
Consumables:
-
- Nude nail polish (e.g., Essie Ballet Slippers)
- Burgundy nail polish (e.g., OPI Malaga Wine)
- French manicure guides
- Top coat (e.g., Essie Gel Setter Top Coat)
- DIY Instructions:
- Apply a base coat to your nails.
- Paint your nails with the nude polish and let it dry.
- Place the French manicure guides at the tips and paint the tips burgundy.
- Once dry, remove the guides and apply a top coat to seal the look.
Olive Green with Zebra Accent
This trendy design combines a solid olive green color with a striking zebra print accent nail. The mix of solid color and animal print makes this a bold and fashionable choice for fall.
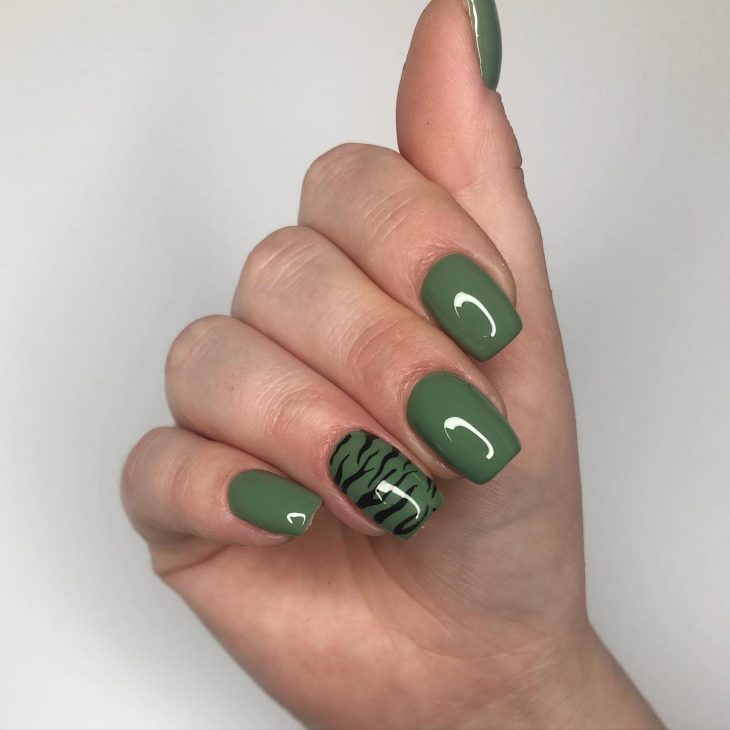
Consumables:
-
- Olive green nail polish (e.g., Essie Expressie Precious Cargo-Go!)
- Black nail polish (e.g., OPI Black Onyx)
- White nail polish (e.g., Essie Blanc)
- Fine detail brush
- Top coat (e.g., Seche Vite Dry Fast Top Coat)
- DIY Instructions:
- Apply a base coat to protect your nails.
- Paint your nails with the olive green polish and let it dry.
- On the accent nail, use a fine detail brush to create zebra stripes with black and white polish.
- Seal the design with a top coat to protect the art and add shine.
White Nails with Floral Accents
This delicate design features white nails with hand-painted floral accents in soft yellow and green hues. The intricate floral details add a touch of femininity and elegance, making it a perfect choice for a subtle fall look.
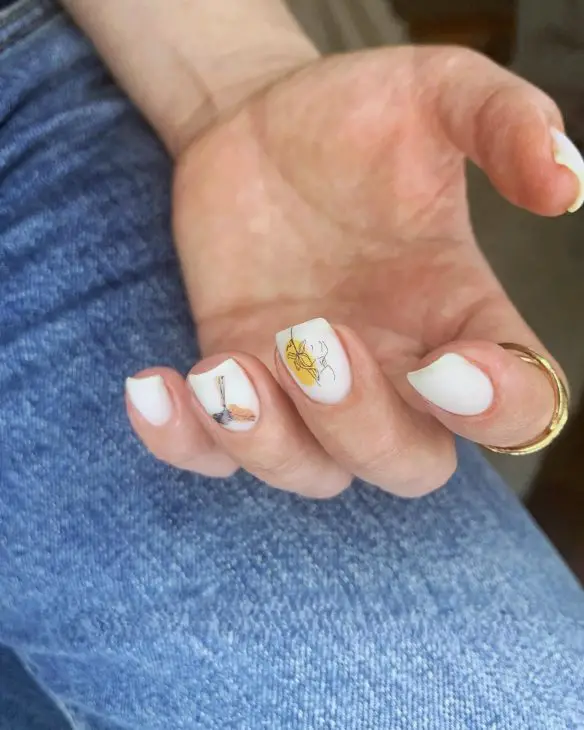
Consumables:
-
- White nail polish (e.g., OPI Alpine Snow)
- Yellow and green nail art polish (e.g., Sally Hansen Nail Art Pens in Yellow and Green)
- Fine detail brush
- Top coat (e.g., Essie Gel Setter Top Coat)
- DIY Instructions:
- Apply a base coat to your nails.
- Paint your nails with the white polish and let it dry.
- Use a fine detail brush to paint delicate floral designs on the accent nails with yellow and green polish.
- Seal the design with a top coat to ensure it lasts.
Orange and White Abstract Swirls
This bold and playful design features abstract orange and white swirls on a nude base. The vibrant orange contrasts beautifully with the clean white lines, creating a dynamic and eye-catching look.
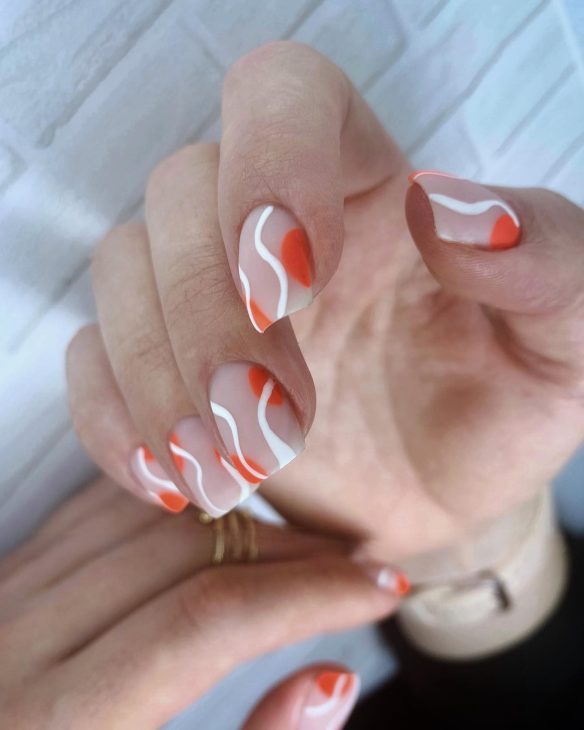
Consumables:
-
- Nude nail polish (e.g., Essie Ballet Slippers)
- Orange nail polish (e.g., OPI A Good Man-darin is Hard to Find)
- White nail polish (e.g., Essie Blanc)
- Fine detail brush
- Top coat (e.g., Seche Vite Dry Fast Top Coat)
- DIY Instructions:
- Apply a base coat to protect your nails.
- Paint your nails with the nude polish and let it dry.
- Use a fine detail brush to create abstract swirls with the orange and white polish.
- Seal the design with a top coat to protect the art and add shine.
Save Pin
