
As the leaves begin to change and the air turns crisp, it’s the perfect time to update your nail game with some gorgeous fall-inspired designs. This season, floral nail art isn’t just for spring—it’s making a big splash this autumn with rich colors, intricate patterns, and chic details.
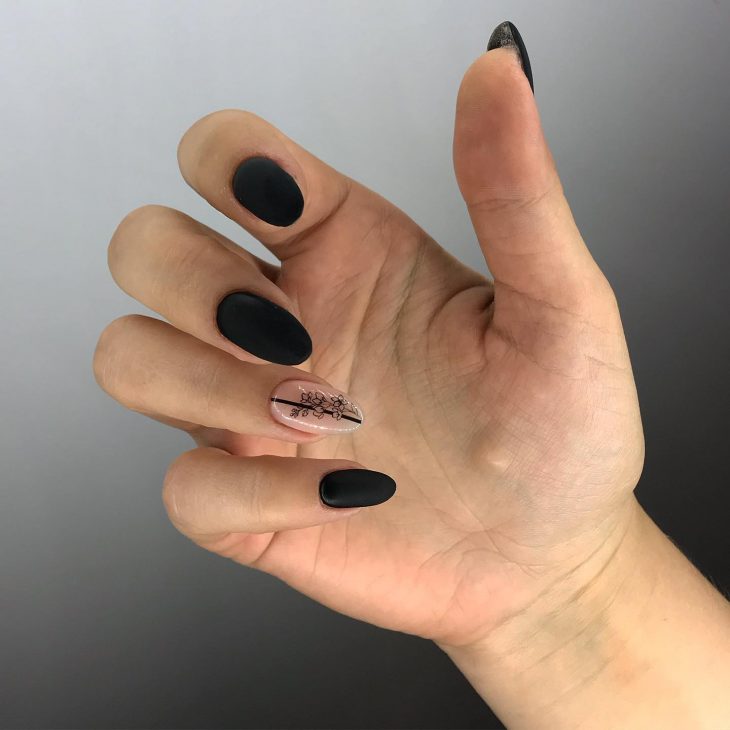
Chic Matte Black with Delicate Floral Accent
This nail design embodies the perfect balance between edgy and delicate. The matte black finish on the majority of the nails offers a bold, sophisticated look that is timeless and versatile. The standout feature here is the accent nail, which boasts a sheer nude base with a delicate black floral design. This contrast not only softens the overall appearance but also adds a touch of elegance and femininity to the bold black. The floral detail is intricately lined, making it the focal point of the manicure, ideal for those who love a minimalist yet impactful design.
Consumables List
- Matte Black Gel Polish – Brand Recommendation: OPI GelColor in ‘Black Onyx’
- Sheer Nude Gel Polish – Brand Recommendation: Essie Gel Couture in ‘Matter of Fiction’
- Black Nail Art Pen – Brand Recommendation: Sally Hansen I Heart Nail Art Pen in Black
- Matte Top Coat – Brand Recommendation: Essie Matte About You
- Fine Detail Brush – Use for precise application of the floral design
DIY Instructions
- Prep Your Nails: Start by applying a base coat to protect your nails.
- Apply Matte Black Polish: On four of your nails, apply two coats of matte black gel polish, curing each coat under a UV lamp.
- Sheer Nude Base: On the accent nail, apply two coats of sheer nude gel polish, curing after each layer.
- Create the Floral Design: Using the black nail art pen or a fine detail brush dipped in black gel polish, draw the floral design on the accent nail. Cure under a UV lamp.
- Finish with a Top Coat: Seal your design with a matte top coat on all nails and cure for a durable, long-lasting finish.
Elegant French Tip with Blue Floral Accent
This design is a modern twist on the classic French manicure, featuring a clean, white tip paired with a nude base. What sets this look apart is the singular blue floral accent on the ring finger. The soft blue hue of the flower is complemented by subtle geometric lines, adding a contemporary flair to the timeless French tip. This design is perfect for someone looking to add a touch of creativity to a traditional look while keeping it elegant and understated.

Consumables List
- White Gel Polish – Brand Recommendation: CND Shellac in ‘Cream Puff’
- Nude Gel Polish – Brand Recommendation: OPI GelColor in ‘Samoan Sand’
- Blue Nail Art Paint – Brand Recommendation: Nail Perfect Nail Art Paint in Blue
- Fine Line Nail Art Brush – For detailed line work
- Top Coat – Brand Recommendation: CND Shellac Top Coat
DIY Instructions
- Start with the Base: Apply two coats of nude gel polish to all nails, curing each coat under a UV lamp.
- Create the French Tip: Using white gel polish, carefully paint the tips of each nail. Cure under a UV lamp.
- Add the Floral Accent: On the ring finger, use the fine line brush to create the blue floral design. Add geometric lines for a modern twist. Cure once done.
- Seal the Design: Apply a top coat over all nails and cure under a UV lamp for a shiny, durable finish.
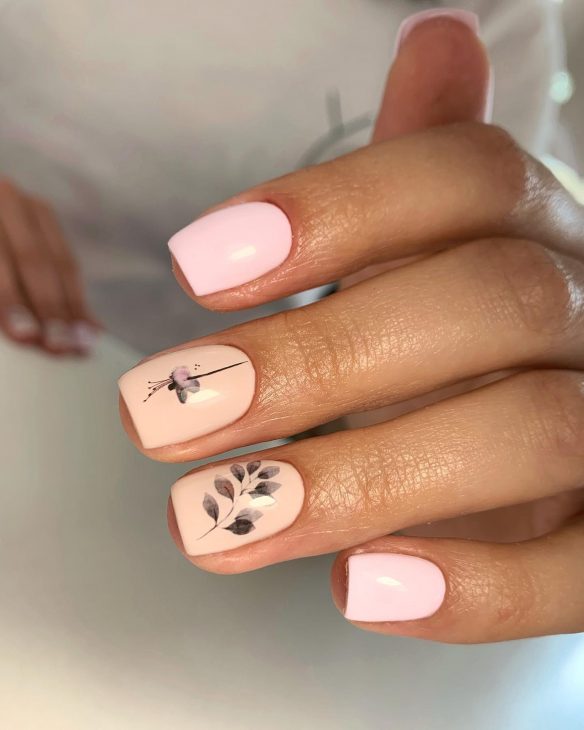
Soft Pink Nails with Artistic Floral Details
This design combines soft, muted pinks with delicate floral accents, creating a look that is both romantic and sophisticated. The use of soft pink as the base color makes it perfect for fall, while the floral details add a subtle artistic touch. The floral designs are strategically placed on the middle and ring fingers, drawing attention without overwhelming the simplicity of the manicure. This design is ideal for those who appreciate understated elegance with a hint of creativity.
Consumables List
- Soft Pink Gel Polish – Brand Recommendation: OPI GelColor in ‘Bubble Bath’
- Nude Gel Polish – Brand Recommendation: Essie Gel Couture in ‘Matter of Fiction’
- Floral Nail Stickers or Decals – For easy application
- Top Coat – Brand Recommendation: OPI Top Coat
DIY Instructions
- Apply the Base: Start by applying two coats of soft pink gel polish to all nails, curing each coat under a UV lamp.
- Add the Floral Details: Use floral nail stickers or decals on the middle and ring fingers. Ensure they are placed accurately for a balanced look.
- Seal the Look: Finish with a layer of top coat on all nails, curing under a UV lamp to ensure longevity.
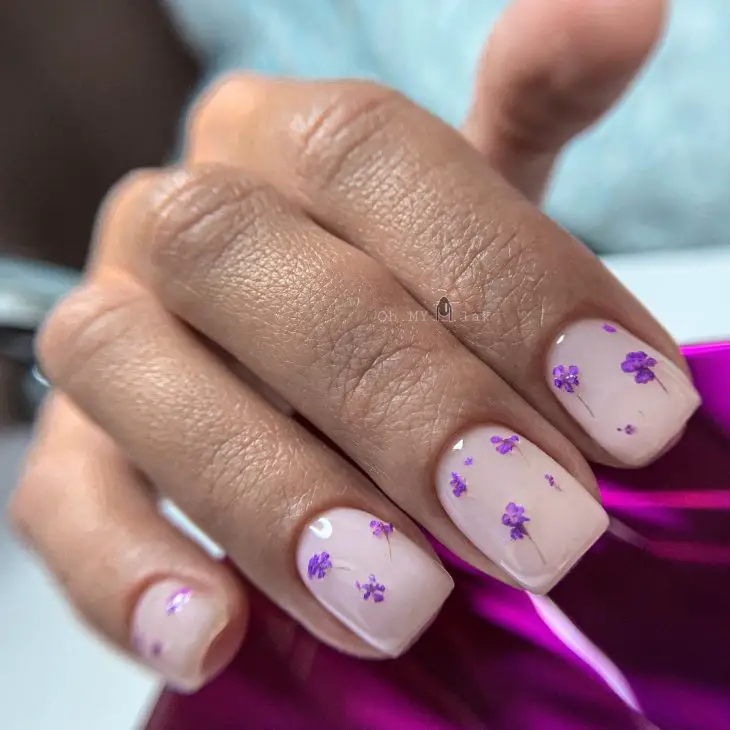
Delicate Lavender Flowers on Nude Base
This nail design is the epitome of subtle elegance, featuring tiny lavender flowers on a nude base. The nude polish provides a soft, clean canvas that allows the small, detailed flowers to stand out beautifully. This design is perfect for those who want to keep their nails simple yet stylish, making it a great choice for both everyday wear and special occasions. The small size of the flowers adds a delicate, feminine touch that is both charming and trendy for fall.
Consumables List
- Nude Gel Polish – Brand Recommendation: Zoya Naked Manicure Base
- Lavender Nail Art Paint – Brand Recommendation: Nail Perfect Nail Art Paint in Lavender
- Fine Detail Brush – For precise flower application
- Top Coat – Brand Recommendation: Seche Vite Dry Fast Top Coat
DIY Instructions
- Prep and Paint: Begin by applying two coats of nude gel polish, curing each coat under a UV lamp.
- Create the Lavender Flowers: Using a fine detail brush, paint small lavender flowers on the nails, focusing on one or two fingers for a minimalist look. Cure under a UV lamp.
- Top Coat Application: Apply a top coat to all nails and cure under a UV lamp to seal in the design and add shine.
Modern White with Autumnal Floral Accents
This nail art design offers a fresh take on fall flowers, combining a crisp white base with subtle, autumnal floral accents. The white polish provides a clean and modern look, while the small orange and red floral details add warmth and a seasonal touch. This manicure is perfect for those who love a minimalist style but still want to embrace the fall season with a nod to nature. The contrast between the bright white and the warm florals is striking and elegant.

Consumables List
- White Gel Polish – Brand Recommendation: Essie Gel Couture in ‘Pre-Show Jitters’
- Orange and Red Nail Art Paint – Brand Recommendation: Nail Perfect Nail Art Paint in Orange and Red
- Fine Detail Brush – For floral design application
- Top Coat – Brand Recommendation: Gelish Top It Off
DIY Instructions
- Apply the White Base: Start by applying two coats of white gel polish to all nails, curing each coat under a UV lamp.
- Add the Floral Accents: Using a fine detail brush, paint small orange and red flowers on one or two nails. Cure under a UV lamp after the design is complete.
- Finish with a Top Coat: Seal the design with a top coat, curing under a UV lamp to ensure a glossy, long-lasting finish.
Lush Greenery with Delicate Blossoms
This nail design captures the essence of a flourishing garden in autumn. The earthy base color serves as a perfect backdrop for the intricate green leaves and delicate white blossoms. The combination of vibrant green foliage and small, white flowers creates a beautiful contrast that is both natural and refined. This design is ideal for those who want to bring the tranquility and beauty of nature to their nails, making it a perfect choice for fall.
Consumables List
- Earthy Nude Gel Polish – Brand Recommendation: OPI GelColor in ‘Coconuts Over OPI’
- Green Nail Art Paint – Brand Recommendation: Nail Perfect Nail Art Paint in Green
- White Nail Art Paint – Brand Recommendation: Nail Perfect Nail Art Paint in White
- Fine Detail Brush – For precise leaf and flower application
- Top Coat – Brand Recommendation: Seche Vite Dry Fast Top Coat
DIY Instructions
- Apply the Base Color: Begin by applying two coats of the earthy nude gel polish, curing each layer under a UV lamp.
- Create the Greenery: Using a fine detail brush, paint the green leaves on each nail, allowing them to curve naturally along the nail’s surface. Cure under a UV lamp.
- Add the Blossoms: Carefully paint the white blossoms over the greenery using a fine detail brush. Ensure the flowers are evenly spaced for a balanced look. Cure again.
- Seal the Design: Finish with a top coat to protect your design and add a subtle shine, curing under a UV lamp.
Autumn Vibes with Rustic Florals
This design brings together warm, rustic tones with detailed floral patterns, perfectly embodying the spirit of fall. The earthy browns and muted greens are complemented by soft orange flowers, creating a harmonious and cozy vibe. The use of multiple shades on different nails adds depth and variety, making this design both visually appealing and seasonally appropriate. It’s an ideal choice for those who love the warm, rich tones of autumn and want their nails to reflect the season’s natural beauty.
Consumables List
- Rustic Brown Gel Polish – Brand Recommendation: CND Vinylux in ‘Brick Knit’
- Green Gel Polish – Brand Recommendation: Essie Gel Couture in ‘Vested Interest’
- Orange Nail Art Paint – Brand Recommendation: Nail Perfect Nail Art Paint in Orange
- Top Coat – Brand Recommendation: Gelish Top It Off
DIY Instructions
- Apply the Base Colors: Begin by alternating between the rustic brown and green gel polishes on different nails, applying two coats of each and curing under a UV lamp.
- Add the Floral Patterns: Using orange nail art paint, create small floral designs on the nails. Include stems and leaves to complete the look, curing after each step.
- Finish with a Top Coat: Apply a top coat to all nails and cure under a UV lamp to ensure a durable and glossy finish.
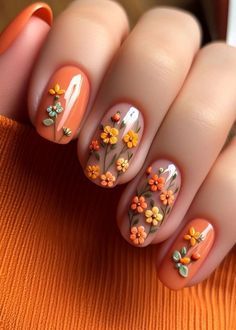
Vibrant Orange with 3D Floral Accents
This nail design is a burst of autumn energy, featuring a vibrant orange base with 3D floral accents. The bright orange color is bold and eye-catching, perfect for those who want their nails to stand out. The 3D flowers add a playful and tactile element to the design, making it not just visually stunning but also unique in texture. This design is ideal for someone who loves vibrant colors and innovative nail art techniques, bringing a fun and energetic vibe to their fall look.
Consumables List
- Vibrant Orange Gel Polish – Brand Recommendation: OPI GelColor in ‘A Good Man-Darin is Hard to Find’
- 3D Floral Nail Art Decorations – Available at most nail art supply stores
- Top Coat – Brand Recommendation: Seche Vite Dry Fast Top Coat
- Nail Glue – For applying 3D floral accents
DIY Instructions
- Apply the Orange Base: Start by applying two coats of the vibrant orange gel polish, curing each coat under a UV lamp.
- Apply 3D Floral Accents: Using nail glue, carefully place the 3D floral decorations on each nail, focusing on the middle and ring fingers for a balanced look. Allow the glue to dry thoroughly.
- Seal with a Top Coat: Apply a top coat over all nails to secure the 3D accents and give the nails a polished finish. Cure under a UV lamp.
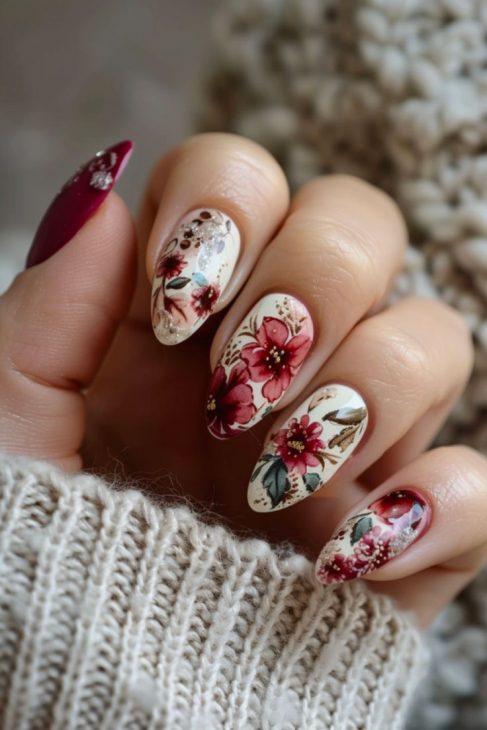
Rich Burgundy with Vintage Floral Motifs
This nail art design combines the rich, deep tones of burgundy with vintage-inspired floral motifs, creating a look that is both elegant and timeless. The use of burgundy as a base color exudes warmth and sophistication, while the detailed floral designs in contrasting colors add a touch of vintage charm. This design is perfect for those who love a classic, refined look with a hint of nostalgia, making it an ideal choice for fall events or everyday wear.
Consumables List
- Burgundy Gel Polish – Brand Recommendation: Essie Gel Couture in ‘Model Clicks’
- White Nail Art Paint – Brand Recommendation: Nail Perfect Nail Art Paint in White
- Red Nail Art Paint – Brand Recommendation: Nail Perfect Nail Art Paint in Red
- Top Coat – Brand Recommendation: Gelish Top It Off
DIY Instructions
- Apply the Burgundy Base: Apply two coats of burgundy gel polish to all nails, curing each coat under a UV lamp.
- Create the Vintage Florals: Using white and red nail art paint, create intricate floral motifs on each nail. Focus on layering and shading to give the flowers a vintage look. Cure after completing the design.
- Seal with a Top Coat: Apply a top coat to all nails, curing under a UV lamp to protect the design and add a glossy finish.
Delicate Pink with White Floral Tips
This nail design is a subtle and delicate option for fall, featuring a soft pink base with white floral accents at the tips. The use of pink gives the design a fresh and feminine feel, while the white floral details add a touch of elegance. This design is perfect for those who prefer a minimalist approach to nail art but still want something that feels special and refined. It’s an excellent choice for everyday wear or a more understated look for special occasions.
Consumables List
- Soft Pink Gel Polish – Brand Recommendation: OPI GelColor in ‘Let Me Bayou a Drink’
- White Nail Art Paint – Brand Recommendation: Nail Perfect Nail Art Paint in White
- Top Coat – Brand Recommendation: Seche Vite Dry Fast Top Coat
- Fine Detail Brush – For precise floral application
DIY Instructions
- Apply the Pink Base: Start by applying two coats of soft pink gel polish, curing each coat under a UV lamp.
- Create the Floral Tips: Using a fine detail brush, paint white floral designs at the tips of the nails. Keep the designs delicate and simple for a refined look. Cure under a UV lamp.
- Finish with a Top Coat: Apply a top coat to seal the design and add shine, curing under a UV lamp for a long-lasting finish.
Elegant Nude with Black Floral Accents
This nail design merges classic elegance with a modern twist, featuring a nude base and intricate black floral accents. The nude polish provides a neutral canvas that makes the black flowers stand out, creating a striking contrast. The use of black, with delicate detailing, adds a touch of sophistication and drama to the overall look. This design is perfect for those who appreciate a chic and understated style with a bit of flair.
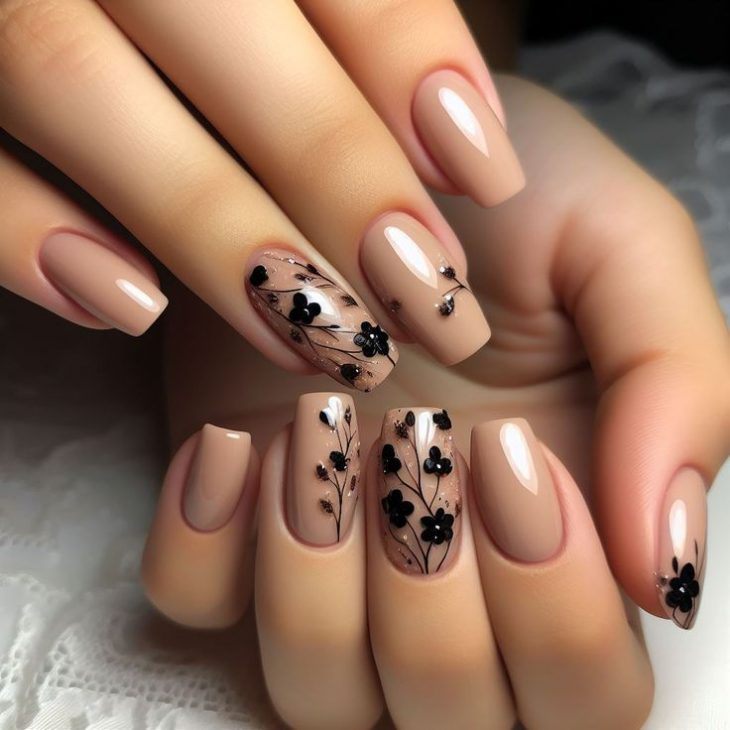
Consumables List
- Nude Gel Polish – Brand Recommendation: OPI GelColor in ‘Dulce de Leche’
- Black Nail Art Paint – Brand Recommendation: Nail Perfect Nail Art Paint in Black
- Top Coat – Brand Recommendation: Seche Vite Dry Fast Top Coat
- Fine Detail Brush – For precise floral application
DIY Instructions
- Apply the Nude Base: Start by applying two coats of nude gel polish, curing each coat under a UV lamp.
- Create the Black Floral Design: Using a fine detail brush, paint the black floral designs on the accent nails. Focus on creating delicate and intricate details. Cure under a UV lamp.
- Finish with a Top Coat: Apply a top coat to seal the design and add shine, curing under a UV lamp for a long-lasting finish.
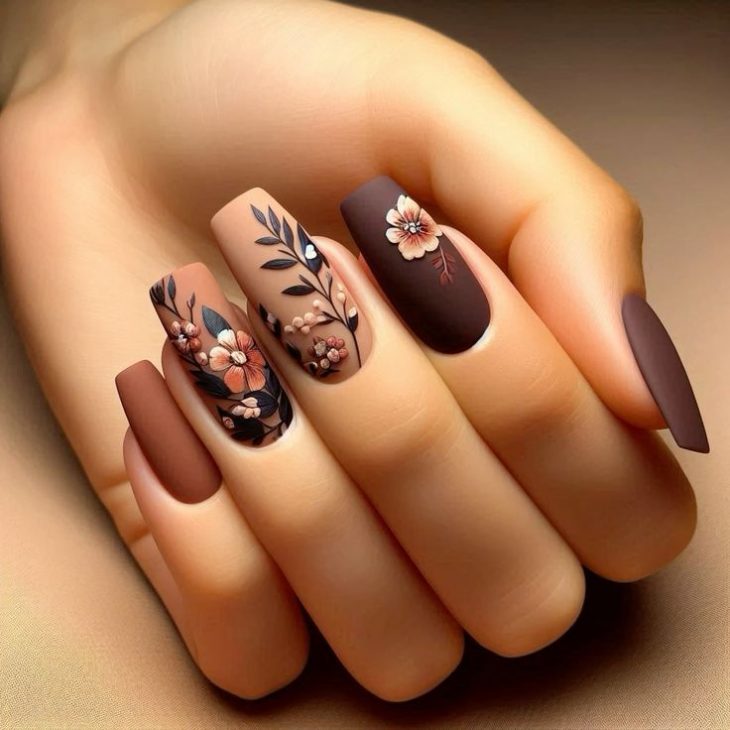
Matte Brown with Floral Accents
This design combines the richness of matte brown polish with delicate floral accents, creating a sophisticated and earthy look. The matte finish adds a modern and chic touch, while the floral accents on the ring fingers provide a subtle yet elegant contrast. The warm brown tones make this design ideal for fall, reflecting the colors of the season in a stylish and understated way.
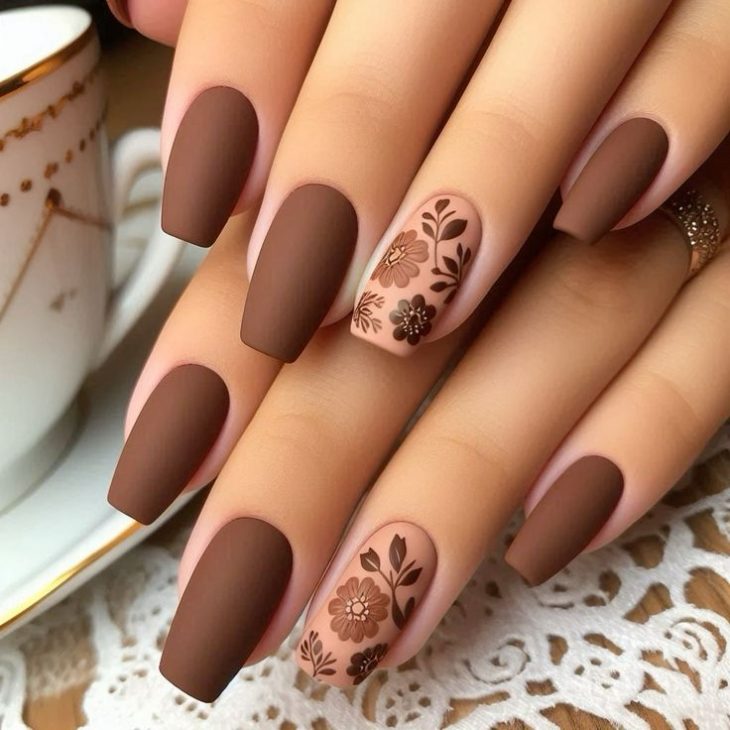
Consumables List
- Matte Brown Gel Polish – Brand Recommendation: OPI GelColor in ‘Chocolate Moose’
- Nude Gel Polish – Brand Recommendation: Essie Gel Couture in ‘Matter of Fiction’
- Brown Nail Art Paint – Brand Recommendation: Nail Perfect Nail Art Paint in Brown
- Matte Top Coat – Brand Recommendation: Essie Matte About You
DIY Instructions
- Apply the Matte Brown Base: Start by applying two coats of matte brown gel polish to most of the nails, curing each coat under a UV lamp.
- Accent with Floral Designs: On the ring fingers, apply the nude gel polish as a base and add the brown floral designs using a fine detail brush. Cure under a UV lamp.
- Seal with a Matte Top Coat: Finish with a matte top coat to all nails, ensuring a durable and matte finish, curing under a UV lamp.
Rustic Brown with 3D Floral Detailing
This nail design is a beautiful combination of rustic brown tones with 3D floral detailing, making it both unique and eye-catching. The matte finish on most of the nails provides a rich backdrop for the intricate floral designs, which include a mix of flat and raised elements. The 3D flowers add texture and depth to the design, making it perfect for someone who enjoys creative and tactile nail art.
Consumables List
- Matte Brown Gel Polish – Brand Recommendation: CND Vinylux in ‘Cap & Gown’
- 3D Floral Nail Art Decorations – Available at most nail art supply stores
- Top Coat – Brand Recommendation: Gelish Top It Off
- Nail Glue – For applying 3D floral accents
DIY Instructions
- Apply the Matte Brown Base: Begin by applying two coats of matte brown gel polish, curing each coat under a UV lamp.
- Apply 3D Floral Accents: Use nail glue to carefully place the 3D floral decorations on the accent nails, focusing on the middle and ring fingers for a balanced look. Allow the glue to dry thoroughly.
- Finish with a Top Coat: Apply a top coat over all nails to secure the 3D accents and give the nails a polished finish. Cure under a UV lamp.
Black and Pink Ombre with Cherry Blossom Design
This design beautifully transitions from black to soft pink in an ombre effect, complemented by delicate cherry blossom designs. The gradient effect provides a stunning backdrop for the cherry blossoms, which add a touch of femininity and elegance. The combination of dark and light shades creates a perfect balance, making this design suitable for both day and night looks.
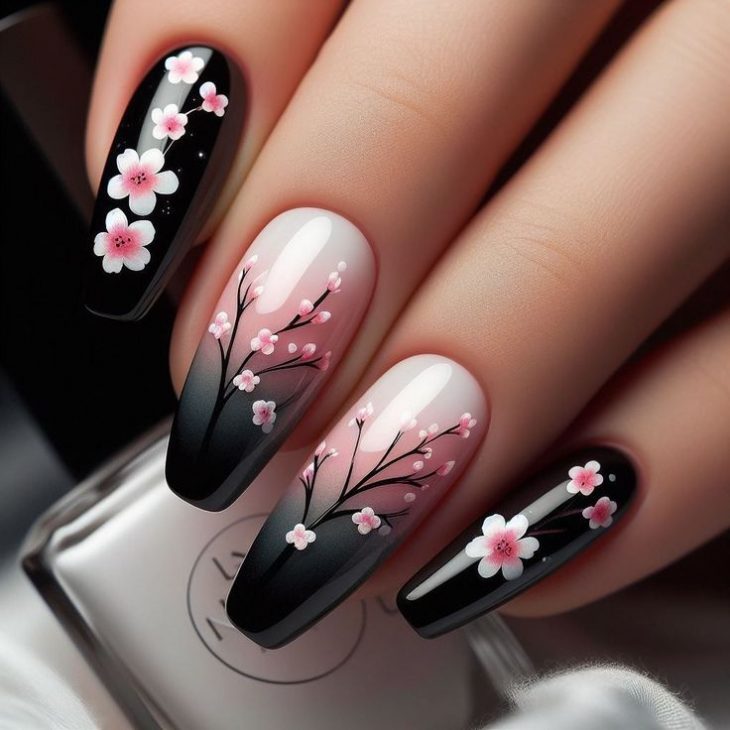
Consumables List
- Black Gel Polish – Brand Recommendation: OPI GelColor in ‘Black Onyx’
- Pink Gel Polish – Brand Recommendation: Essie Gel Couture in ‘Pinked to Perfection’
- White and Pink Nail Art Paints – Brand Recommendation: Nail Perfect Nail Art Paints in White and Pink
- Top Coat – Brand Recommendation: Seche Vite Dry Fast Top Coat
- Sponge – For creating the ombre effect
DIY Instructions
- Create the Ombre Base: Using a sponge, blend the black and pink gel polishes to create an ombre effect on each nail, curing each layer under a UV lamp.
- Paint the Cherry Blossoms: Use white and pink nail art paints to create delicate cherry blossom designs on the nails. Focus on symmetry and balance, curing the design under a UV lamp.
- Finish with a Top Coat: Apply a top coat to seal the design and enhance the gradient effect, curing under a UV lamp.
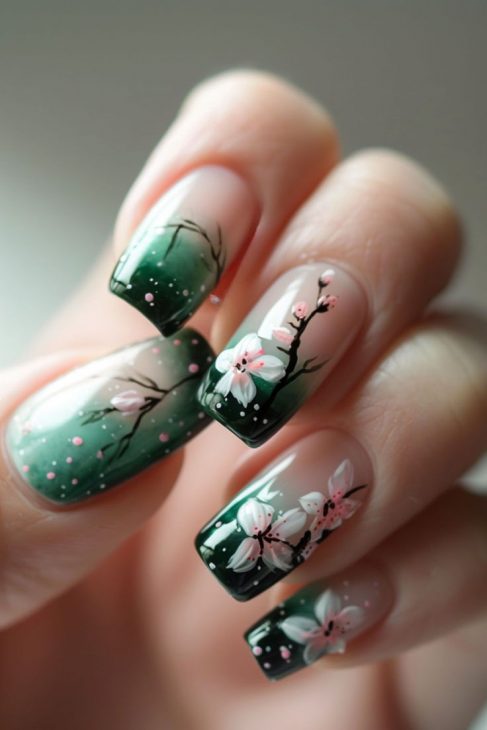
Green Ombre with Delicate Floral Details
This nail design features a soft green ombre effect with delicate floral details, creating a serene and natural look. The gradient from deep green to light gives the nails a sense of depth and dimension, while the floral accents add a touch of elegance. The design is perfect for those who love nature-inspired nails and want to carry a piece of the outdoors with them.
Consumables List
- Green Gel Polish – Brand Recommendation: Essie Gel Couture in ‘Sage You Love Me’
- White and Pink Nail Art Paints – Brand Recommendation: Nail Perfect Nail Art Paints in White and Pink
- Sponge – For creating the ombre effect
- Top Coat – Brand Recommendation: Seche Vite Dry Fast Top Coat
DIY Instructions
- Create the Green Ombre Base: Using a sponge, blend the green gel polish from dark to light on each nail, curing each layer under a UV lamp.
- Add the Floral Details: Use white and pink nail art paints to create delicate floral designs on the nails, focusing on balance and symmetry. Cure under a UV lamp.
- Seal with a Top Coat: Apply a top coat to all nails, curing under a UV lamp to protect the design and add shine.
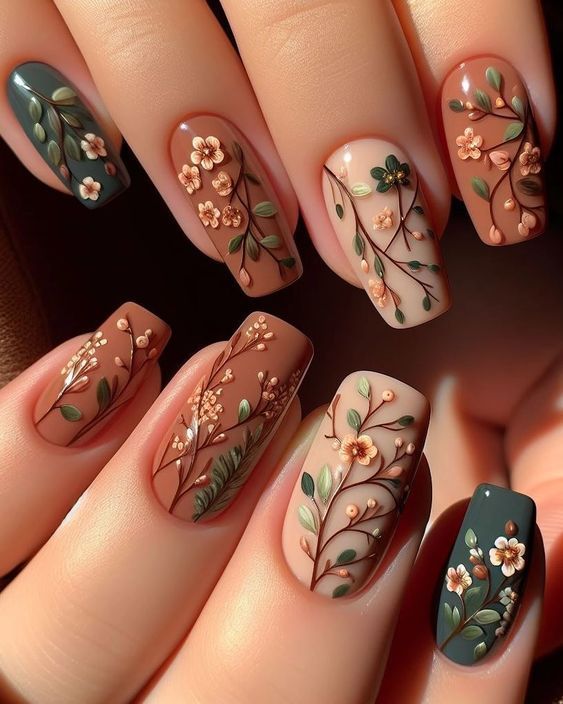
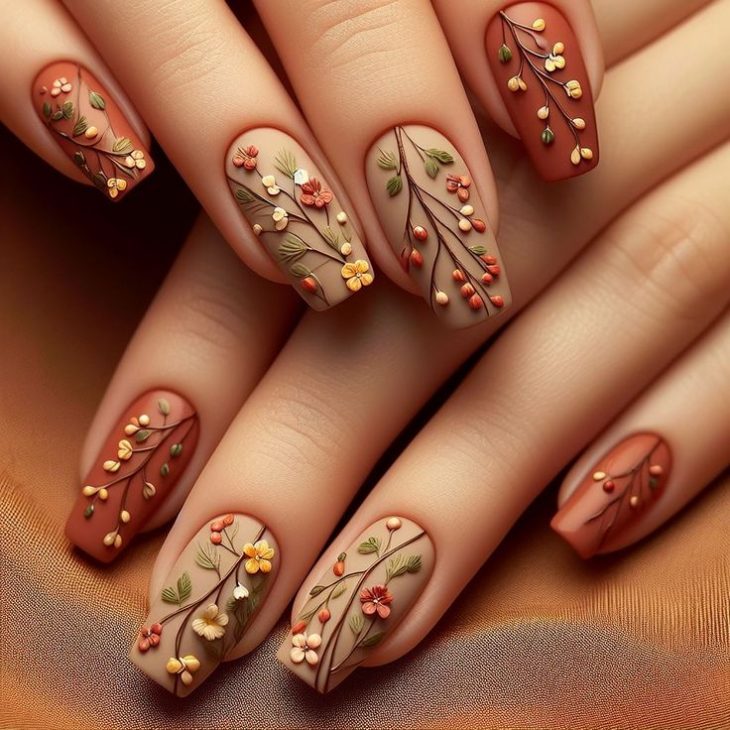
Autumnal Branches with 3D Floral Accents
This nail design captures the essence of fall with its earthy tones and intricate 3D floral accents. The use of warm browns and muted oranges as base colors perfectly complements the delicate branches and flowers that adorn each nail. The 3D floral accents add texture and depth, creating a visually stunning effect that is both sophisticated and festive. This design is ideal for those who want to embrace the autumn season with a touch of elegance and creativity.
Consumables List
- Earthy Brown Gel Polish – Brand Recommendation: OPI GelColor in ‘You Don’t Know Jacques!’
- Muted Orange Gel Polish – Brand Recommendation: Essie Gel Couture in ‘Rocky Rose’
- 3D Floral Nail Art Decorations – Available at most nail art supply stores
- Top Coat – Brand Recommendation: Seche Vite Dry Fast Top Coat
- Nail Glue – For applying 3D floral accents
DIY Instructions
- Apply the Base Colors: Start by applying the earthy brown and muted orange gel polishes to different nails, alternating between the two. Cure each coat under a UV lamp.
- Add the 3D Floral Accents: Use nail glue to carefully place the 3D floral decorations on the nails, following the flow of the branches painted in a contrasting color. Allow the glue to dry thoroughly.
- Finish with a Top Coat: Apply a top coat to seal the design and add a subtle shine, curing under a UV lamp for a durable finish.
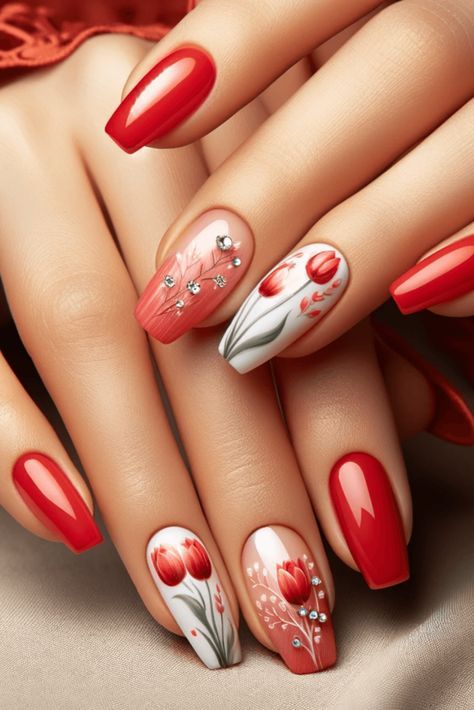
Bold Red with Tulip Accents
This nail design is a bold statement, featuring a vibrant red polish complemented by delicate tulip accents. The combination of bright red and soft white creates a striking contrast that is both eye-catching and elegant. The tulip designs, detailed with fine lines and subtle shading, add a touch of artistry and sophistication to the overall look. This design is perfect for those who want their nails to be the centerpiece of their fall outfit, exuding confidence and style.
Consumables List
- Bright Red Gel Polish – Brand Recommendation: OPI GelColor in ‘Big Apple Red’
- White Gel Polish – Brand Recommendation: Essie Gel Couture in ‘Snow White’
- Red and Green Nail Art Paints – Brand Recommendation: Nail Perfect Nail Art Paints in Red and Green
- Top Coat – Brand Recommendation: Seche Vite Dry Fast Top Coat
- Fine Detail Brush – For precise tulip application
DIY Instructions
- Apply the Red Base: Start by applying two coats of bright red gel polish to most of the nails, curing each coat under a UV lamp.
- Create the Tulip Design: On the accent nails, apply a base of white gel polish and then use red and green nail art paints to create detailed tulip designs. Cure under a UV lamp.
- Seal with a Top Coat: Finish with a top coat to protect the design and add a glossy finish, curing under a UV lamp.
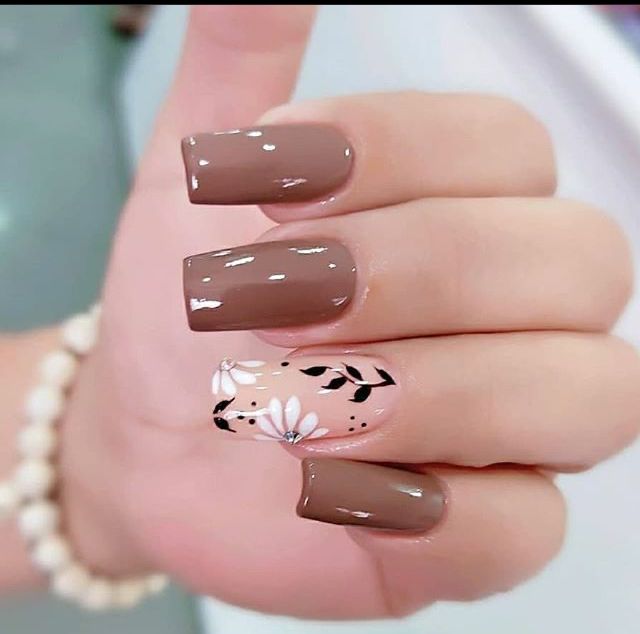
Chic Taupe with Floral Accent
This design features a chic taupe base color with a subtle yet elegant floral accent on the ring finger. The taupe shade is modern and versatile, making it a perfect backdrop for the delicate white flowers and black leaves that are meticulously detailed on the accent nail. The simplicity of the design makes it a great choice for those who prefer a minimalist approach to nail art while still wanting a touch of creativity.
Consumables List
- Taupe Gel Polish – Brand Recommendation: OPI GelColor in ‘Taupe-less Beach’
- White Nail Art Paint – Brand Recommendation: Nail Perfect Nail Art Paint in White
- Black Nail Art Paint – Brand Recommendation: Nail Perfect Nail Art Paint in Black
- Top Coat – Brand Recommendation: Seche Vite Dry Fast Top Coat
- Fine Detail Brush – For precise floral application
DIY Instructions
- Apply the Taupe Base: Begin by applying two coats of taupe gel polish to all nails, curing each coat under a UV lamp.
- Add the Floral Accent: On the ring finger, use white and black nail art paints to create a delicate floral design, ensuring the elements are well-balanced and subtle. Cure under a UV lamp.
- Finish with a Top Coat: Seal the design with a top coat, curing under a UV lamp to enhance durability and add shine.
Sophisticated Black and White Floral
This design combines the classic elegance of black and white with intricate floral detailing, creating a sophisticated and timeless look. The matte black base provides a bold contrast to the white flowers, which are enhanced with gold accents for a luxurious touch. The addition of small pearl-like decorations adds depth and texture, making this design ideal for formal occasions or anyone who loves a refined and elegant style.
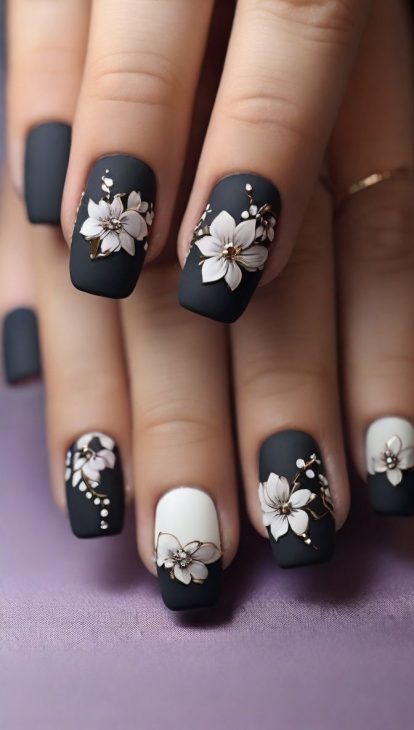
Consumables List
- Matte Black Gel Polish – Brand Recommendation: OPI GelColor in ‘Black Onyx’ with a matte top coat
- White Gel Polish – Brand Recommendation: Essie Gel Couture in ‘Blanc Slate’
- Gold Nail Art Paint – Brand Recommendation: Nail Perfect Nail Art Paint in Gold
- 3D Pearl Decorations – Available at most nail art supply stores
- Top Coat – Brand Recommendation: Seche Vite Dry Fast Top Coat
DIY Instructions
- Apply the Matte Black Base: Start by applying two coats of black gel polish, followed by a matte top coat, curing each layer under a UV lamp.
- Create the Floral Design: On the accent nails, apply white gel polish as a base and use gold nail art paint to outline the floral design. Add small 3D pearl decorations to enhance the look. Cure under a UV lamp.
- Seal with a Top Coat: Apply a top coat to seal the design and ensure the 3D elements stay in place, curing under a UV lamp.
Yellow Sunshine with Floral Tips
This vibrant design is all about embracing the sunshine with a bright yellow base and black floral accents. The floral details, located primarily at the tips, create a cheerful and lively look that’s perfect for those who love bold and playful nails. The combination of yellow and black is both striking and trendy, making this design a standout choice for fall.
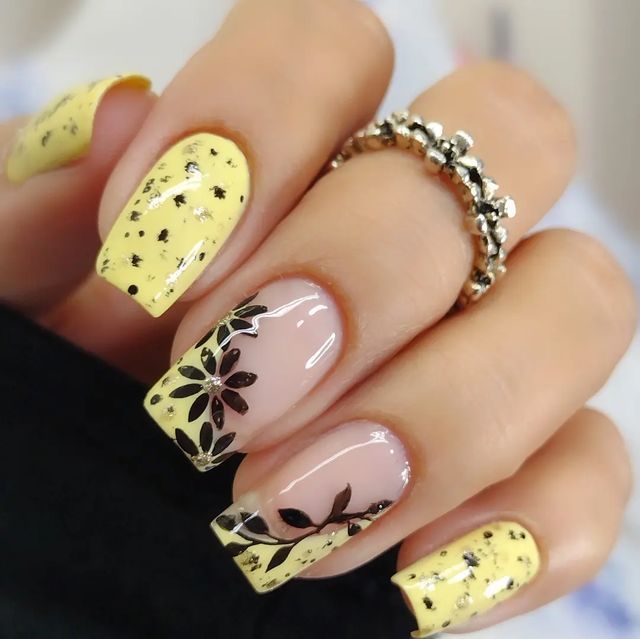
Consumables List
- Bright Yellow Gel Polish – Brand Recommendation: OPI GelColor in ‘Sun, Sea, and Sand in My Pants’
- Black Nail Art Paint – Brand Recommendation: Nail Perfect Nail Art Paint in Black
- Top Coat – Brand Recommendation: Seche Vite Dry Fast Top Coat
- Fine Detail Brush – For precise floral application
DIY Instructions
- Apply the Yellow Base: Begin by applying two coats of bright yellow gel polish to all nails, curing each coat under a UV lamp.
- Add the Floral Tips: Using black nail art paint, create floral designs at the tips of the nails. Ensure the designs are well-balanced and not too overpowering. Cure under a UV lamp.
- Finish with a Top Coat: Seal the design with a top coat, curing under a UV lamp to add shine and protect the design.
Save Pin