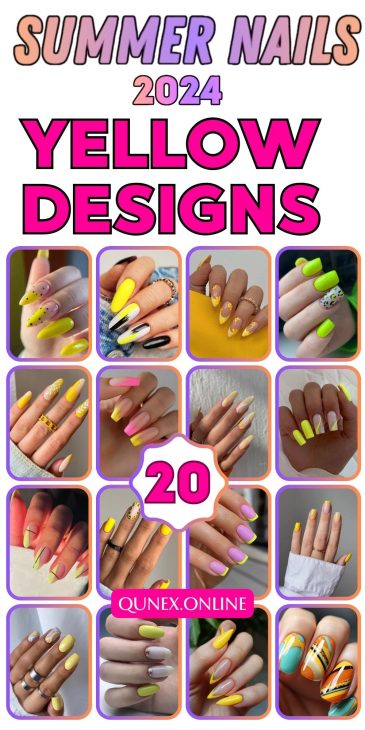
20 Trendy Summer Yellow Nail Designs for 2024: Inspiration for Every Nail Shape and Style
Summer is the perfect season to play with vibrant colors and unique nail designs. Yellow nails are making a significant comeback this year, offering a bright, cheerful look that’s perfect for the sunny weather. Whether you prefer a minimalist approach or love intricate designs, there’s a yellow nail idea for everyone. Let’s dive into some fabulous summer yellow nails inspo 2024 that will have you ready for the season.
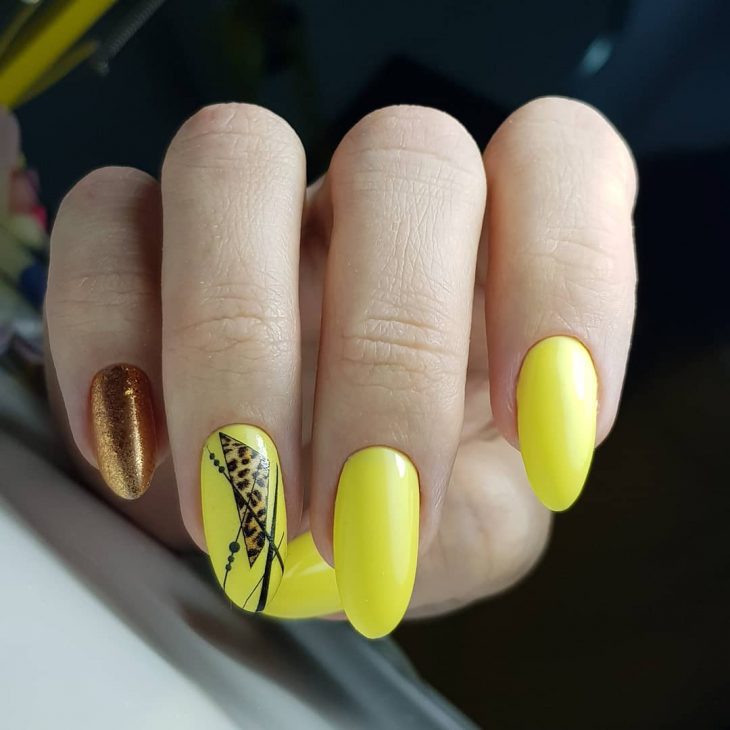
Sunshine and Leopard Accents
This design is a fantastic blend of bold yellow and animal print accents, creating a striking look that’s both playful and chic. The nails feature a bright yellow base, perfectly complemented by a leopard print accent nail and a shimmering gold pinky. This combination adds a touch of glamour while maintaining a fun, summer vibe. The almond shape further enhances the elegance of the design, making it suitable for both casual and formal occasions.
Consumables:
- Bright yellow nail polish (e.g., OPI’s “Sun, Sea, and Sand in My Pants”)
- Leopard print nail stickers or stamping kit
- Gold glitter nail polish (e.g., Essie’s “Golden Nuggets”)
- Almond-shaped nail tips or sculpting forms
- Top coat for a glossy finish (e.g., Seche Vite Dry Fast Top Coat)
DIY Instructions:
- Prep your nails by shaping them into an almond shape and applying a base coat.
- Apply two coats of the bright yellow polish to all nails except the accent nail.
- On the accent nail, use the leopard print stickers or stamping kit to create the animal print design.
- Apply the gold glitter polish to the pinky nail for a touch of sparkle.
- Finish with a top coat to seal the design and add shine.
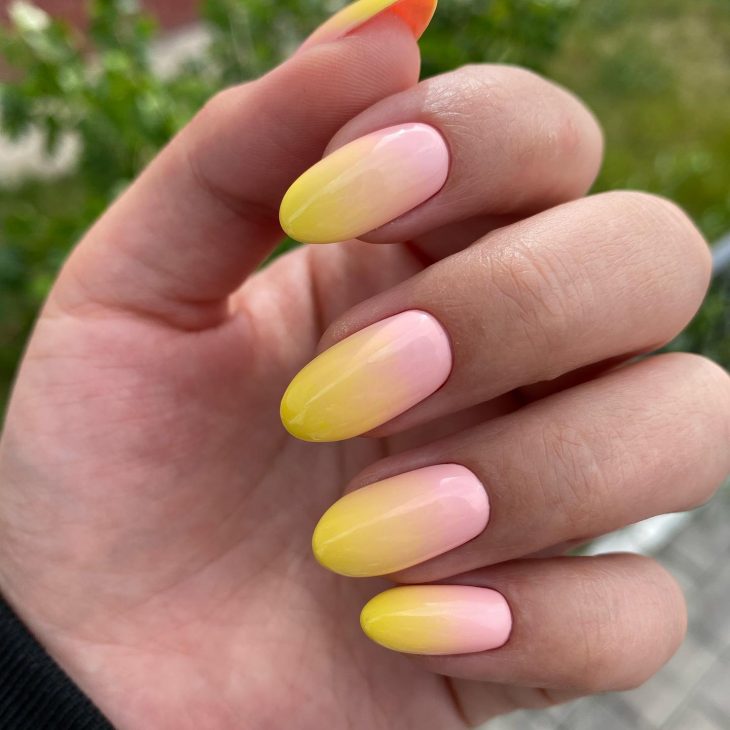
Ombre Elegance
Ombre nails are a timeless trend that never goes out of style. This beautiful yellow to pink ombre design is perfect for those who want a subtle yet eye-catching look. The gradient effect is flawlessly executed, creating a seamless transition between the colors. This design is ideal for both short and long nails and can be dressed up or down depending on the occasion.
Consumables:
- Yellow nail polish (e.g., Sally Hansen’s “Mellow Yellow”)
- Pink nail polish (e.g., OPI’s “Mod About You”)
- Makeup sponge for blending
- Ombre brush (optional)
- Top coat for durability and shine
DIY Instructions:
- Start by applying a base coat to protect your nails.
- Apply a light pink polish as the base color.
- On a makeup sponge, apply strips of yellow and pink polish side by side.
- Dab the sponge onto the nails to create the ombre effect, blending the colors seamlessly.
- Repeat the process until the desired opacity is achieved.
- Apply a top coat to smooth out the gradient and add shine.
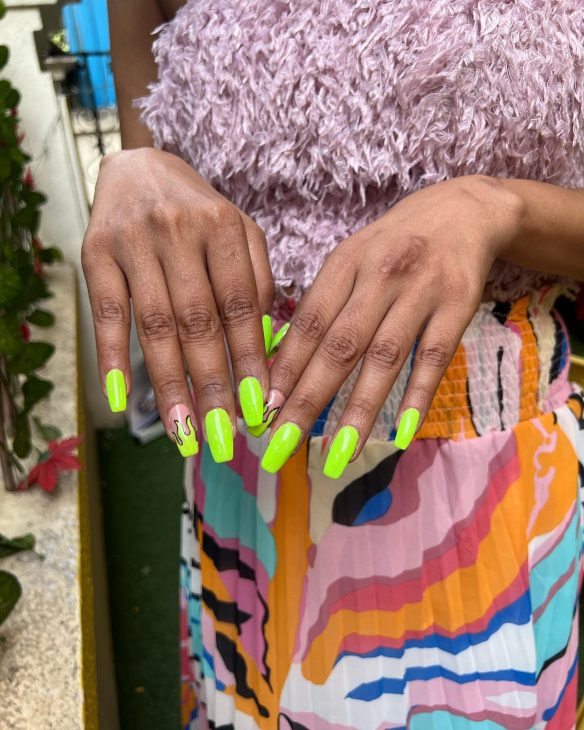
Neon Green with Art Accents
Neon nails are perfect for making a bold statement, and this neon green design is no exception. The vibrant hue is sure to turn heads, and the addition of abstract art accents on one nail adds a unique touch. This design is perfect for those who love to experiment with their nail art and aren’t afraid to stand out. The coffin shape further accentuates the boldness of this look.
Consumables:
- Neon green nail polish (e.g., China Glaze’s “Lime After Lime”)
- Nail art brushes for detailed work
- Black and white nail polish for the art accents
- Coffin-shaped nail tips or sculpting forms
- Top coat for a glossy finish
DIY Instructions:
- Shape your nails into a coffin shape and apply a base coat.
- Apply two coats of the neon green polish for full opacity.
- Using a fine nail art brush, create abstract designs on one accent nail with black and white polish.
- Allow the design to dry completely before applying a top coat to seal and protect your artwork.
Bold Leopard Print Accents
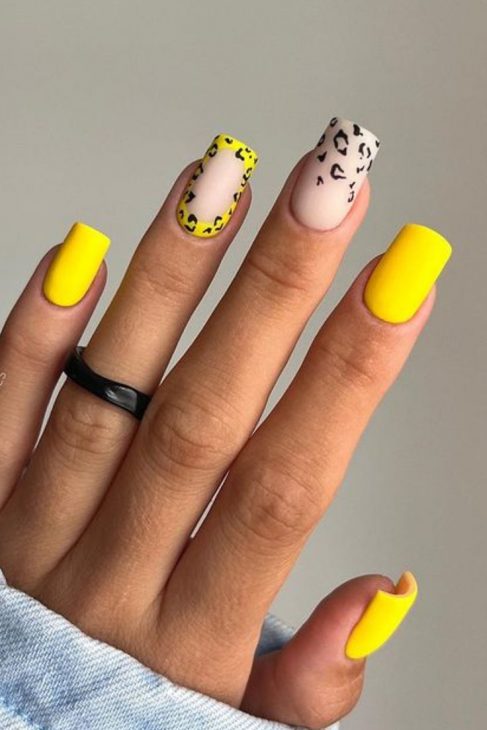
This design perfectly blends bold yellow with eye-catching leopard print accents, creating a look that is both fun and sophisticated. The nails feature a bright yellow base with two accent nails adorned with leopard spots in a chic and stylish manner. This design is ideal for those who love to make a statement with their nails while maintaining a touch of elegance. The square shape adds a modern twist, making it suitable for both casual and formal occasions.
Consumables:
- Bright yellow nail polish (e.g., OPI’s “Sun, Sea, and Sand in My Pants”)
- Leopard print nail stickers or stamping kit
- Square-shaped nail tips or sculpting forms
- Matte top coat for a smooth finish (e.g., Essie’s “Matte About You”)
DIY Instructions:
- Shape your nails into a square shape and apply a base coat.
- Apply two coats of the bright yellow polish to all nails.
- On the accent nails, use the leopard print stickers or stamping kit to create the design.
- Finish with a matte top coat to seal the design and give it a modern, matte finish.
Subtle Yellow Gradient with Gold Flakes
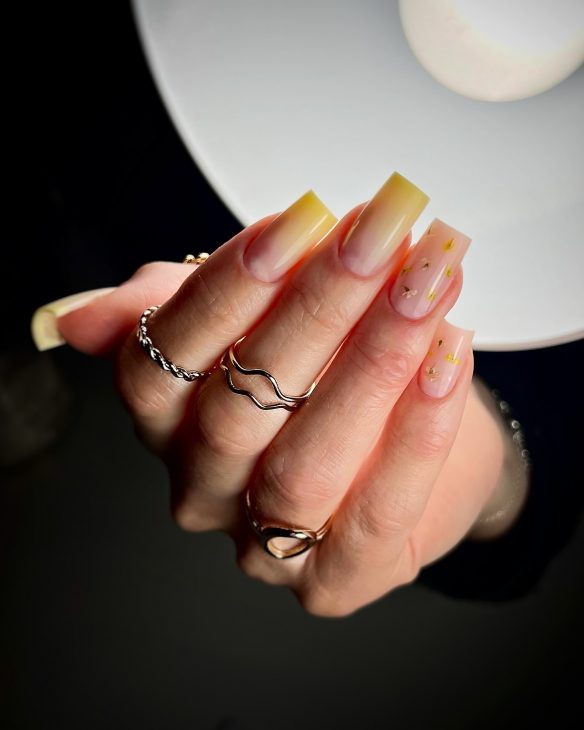
This design features a subtle yellow gradient with delicate gold flakes, offering a sophisticated and elegant look. The gradient effect transitions seamlessly from a soft yellow to a natural nail base, while the gold flakes add a touch of luxury and sparkle. This design is perfect for those who prefer a more understated look that still exudes elegance and charm.
Consumables:
- Yellow nail polish (e.g., Sally Hansen’s “Mellow Yellow”)
- Clear nail polish for blending
- Gold foil flakes
- Gradient sponge
- Coffin-shaped nail tips or sculpting forms
- Top coat for a glossy finish (e.g., Seche Vite Dry Fast Top Coat)
DIY Instructions:
- Start by applying a base coat to protect your nails.
- Apply the yellow polish to a gradient sponge and dab it onto the nails, blending upwards.
- Use clear polish to blend the gradient smoothly.
- Apply gold foil flakes to the tips while the polish is still tacky.
- Finish with a top coat to seal the design and add shine.
Vibrant Stained Glass Art
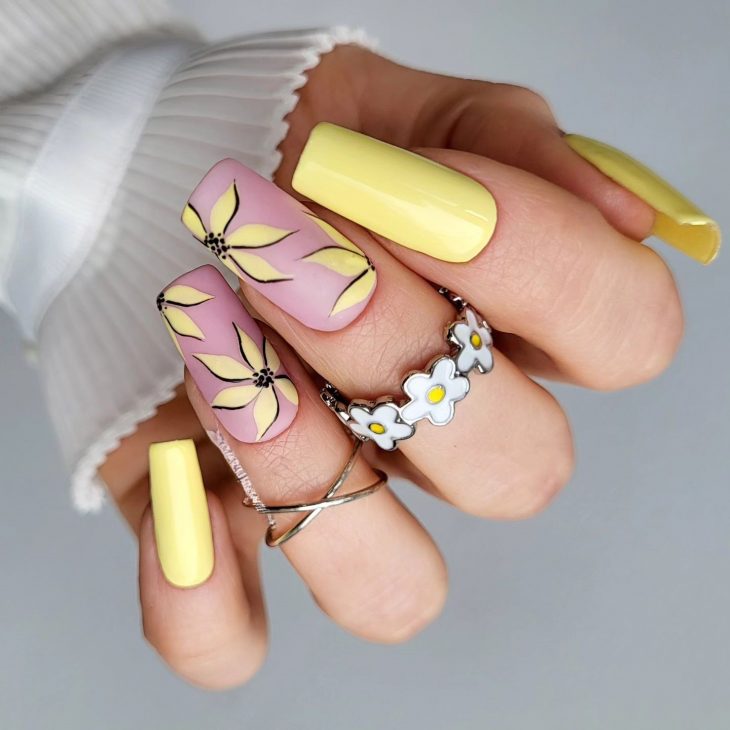
This vibrant design features a stained glass art pattern on a couple of accent nails, surrounded by a bright yellow base. The stained glass effect is created using various colors and outlined with black to mimic the look of actual stained glass. This design is perfect for those who love intricate and artistic nail art, bringing a pop of color and creativity to their summer look.
Consumables:
- Bright yellow nail polish (e.g., China Glaze’s “Lemon Fizz”)
- Multiple colored polishes for stained glass effect
- Fine nail art brushes for detailed work
- Black nail polish for outlining
- Top coat for durability and shine
DIY Instructions:
- Shape your nails and apply a base coat.
- Apply two coats of the bright yellow polish to all nails except the accent nails.
- On the accent nails, use fine brushes to create the stained glass design with various colors.
- Outline the design with black polish to enhance the stained glass effect.
- Finish with a top coat to protect the design and add shine.
Minimalist Yellow Tips with Stars
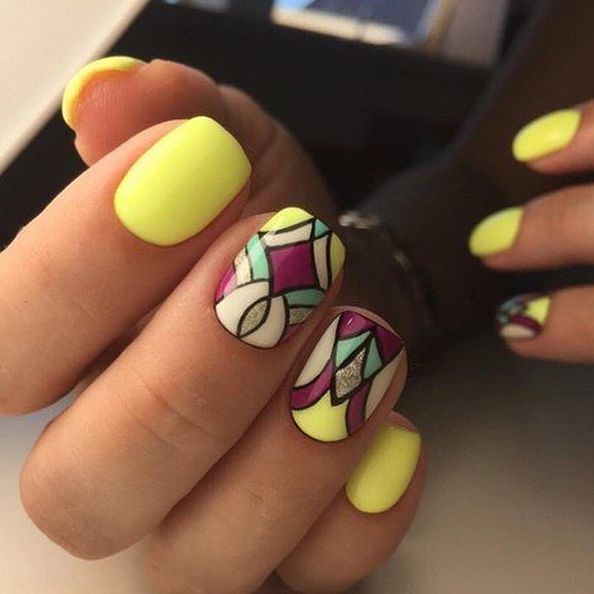
This minimalist design features soft yellow tips with tiny star accents, creating a simple yet charming look. The nails are kept natural with just the tips painted in a delicate yellow shade, and small gold stars are added for a touch of whimsy. This design is perfect for those who prefer a subtle and elegant manicure that still feels summery and fun.
Consumables:
- Soft yellow nail polish (e.g., Zoya’s “Bee”)
- Gold star nail stickers or glitter
- Nail art brush for precise application
- Top coat for a glossy finish (e.g., Seche Vite Dry Fast Top Coat)
DIY Instructions:
- Apply a base coat to your nails.
- Paint just the tips of your nails with the soft yellow polish, using a nail art brush for precision.
- Apply gold star stickers or glitter to the tips.
- Finish with a top coat to seal the design and add shine.
Neon French Tips with a Twist
This design features a unique twist on the classic French manicure with neon yellow tips paired with a soft lavender base. The bright yellow tips add a fun and modern touch to the traditional look, making it perfect for summer. The square shape enhances the sleekness of this design, making it both trendy and versatile for any occasion.
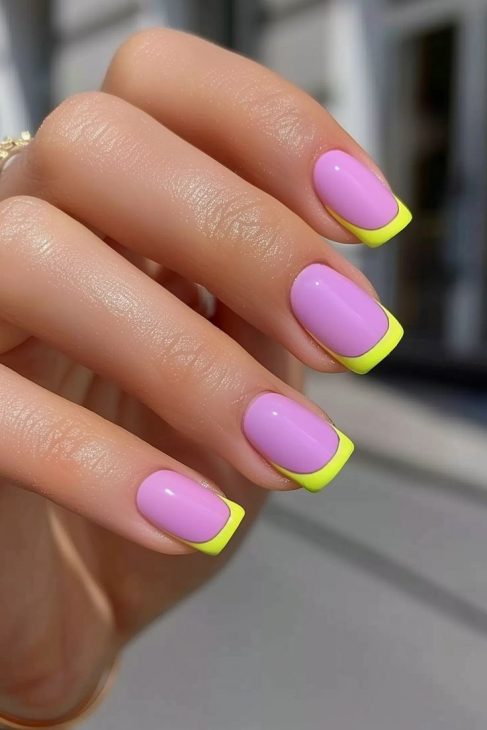
Consumables:
- Lavender nail polish (e.g., Essie’s “Lilacism”)
- Neon yellow nail polish (e.g., China Glaze’s “Yellow Polka Dot Bikini”)
- French tip guides for precision
- Square-shaped nail tips or sculpting forms
- Top coat for a glossy finish (e.g., Seche Vite Dry Fast Top Coat)
DIY Instructions:
- Start by applying a base coat to your nails.
- Apply two coats of the lavender polish and let it dry completely.
- Use French tip guides to paint the neon yellow tips with precision.
- Remove the guides and clean up any excess polish.
- Finish with a top coat to seal the design and add shine.
Golden Yellow with Glitter Accent
This elegant design combines solid yellow nails with a glittery accent on the ring finger. The bright yellow shade is perfect for summer, while the glitter accent adds a touch of glamour. The short, rounded shape makes this design practical for everyday wear while still being stylish and eye-catching.
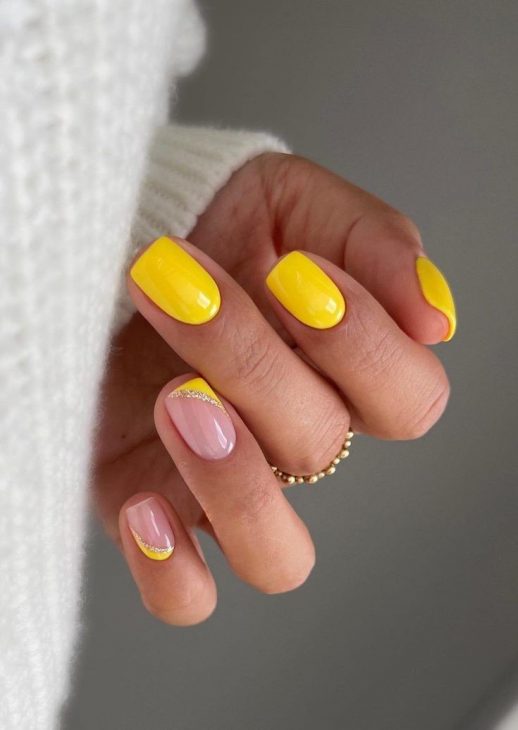
Consumables:
- Bright yellow nail polish (e.g., OPI’s “Sun, Sea, and Sand in My Pants”)
- Gold glitter nail polish (e.g., Essie’s “Golden Nuggets”)
- Short, rounded nail tips or sculpting forms
- Top coat for a glossy finish (e.g., Seche Vite Dry Fast Top Coat)
DIY Instructions:
- Shape your nails and apply a base coat.
- Apply two coats of the bright yellow polish to all nails except the ring finger.
- Apply the gold glitter polish to the ring finger.
- Finish with a top coat to seal the design and add shine.
Pink and Yellow Abstract Tips
This design features abstract pink and yellow tips on a natural nail base, creating a vibrant and artistic look. The pink and yellow strokes blend beautifully, making it a perfect choice for those who love bold and creative nail art. The coffin shape adds an extra edge to this modern design, making it ideal for summer parties and festivals.
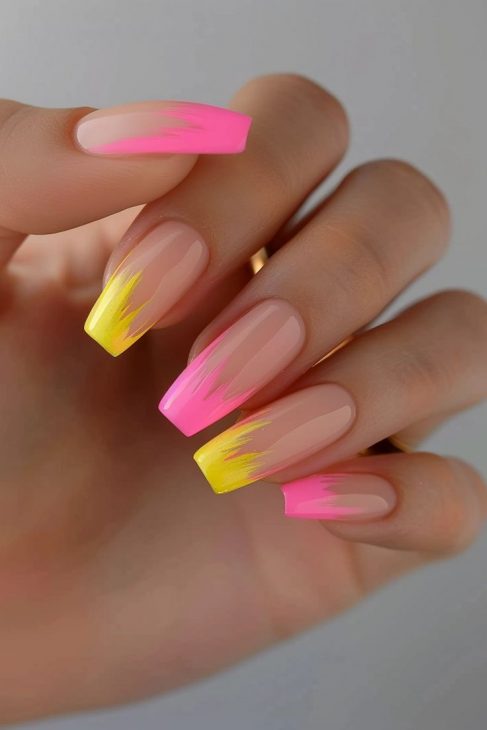
Consumables:
- Pink nail polish (e.g., OPI’s “Pink Flamenco”)
- Yellow nail polish (e.g., Sally Hansen’s “Mellow Yellow”)
- Fine nail art brushes for detailed work
- Coffin-shaped nail tips or sculpting forms
- Top coat for a glossy finish (e.g., Seche Vite Dry Fast Top Coat)
DIY Instructions:
- Shape your nails into a coffin shape and apply a base coat.
- Using a fine nail art brush, create abstract strokes with pink and yellow polish on the tips.
- Allow the design to dry completely before applying a top coat to seal and protect the artwork.
Yellow and Lavender Color Block
This design features a chic color block pattern with yellow and lavender sections separated by a fine black line. The combination of bright yellow and soft lavender creates a harmonious and stylish look that is perfect for summer. The almond shape adds elegance and sophistication to this modern design.
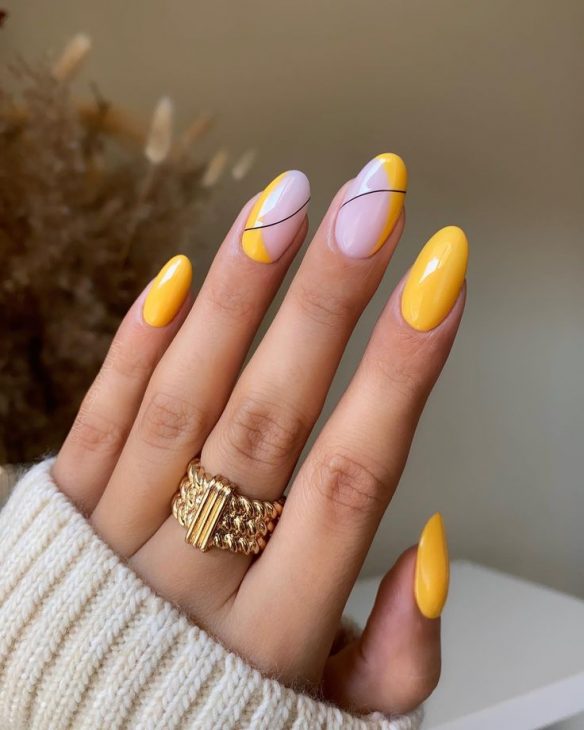
Consumables:
- Bright yellow nail polish (e.g., OPI’s “Sun, Sea, and Sand in My Pants”)
- Lavender nail polish (e.g., Essie’s “Lilacism”)
- Black nail polish for outlining
- Fine nail art brush for detailed work
- Almond-shaped nail tips or sculpting forms
- Top coat for a glossy finish (e.g., Seche Vite Dry Fast Top Coat)
DIY Instructions:
- Shape your nails into an almond shape and apply a base coat.
- Paint sections of the nail with bright yellow and lavender polish, leaving space between the colors.
- Use a fine nail art brush to outline the sections with black polish.
- Finish with a top coat to seal the design and add shine.
Grey and Yellow Elegance
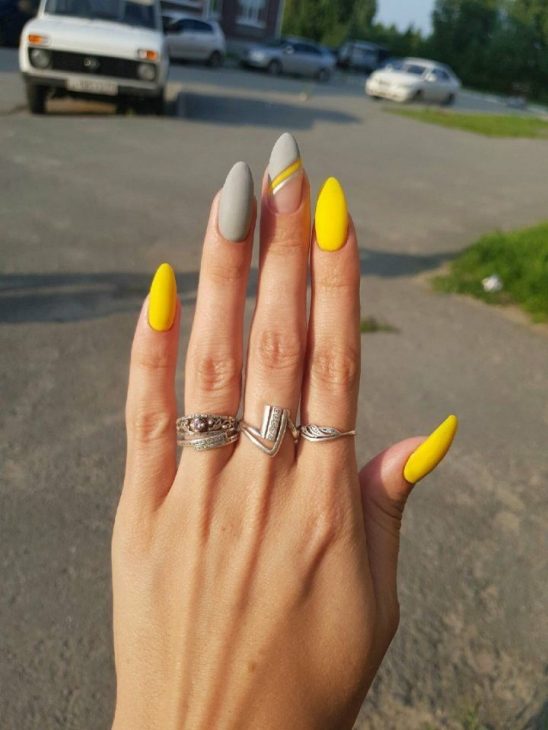
This design combines the elegance of matte grey with the vibrancy of yellow, creating a sophisticated yet playful look. The grey nails are accentuated with a touch of yellow and white stripes, while the solid yellow nails add a pop of color. The almond shape enhances the overall elegance of the design, making it suitable for both casual and formal occasions.
Consumables:
- Matte grey nail polish (e.g., OPI’s “I Can Never Hut Up”)
- Bright yellow nail polish (e.g., OPI’s “Sun, Sea, and Sand in My Pants”)
- White nail polish for stripes (e.g., Essie’s “Blanc”)
- Nail striping tape for precision
- Almond-shaped nail tips or sculpting forms
- Matte top coat for a smooth finish (e.g., Essie’s “Matte About You”)
DIY Instructions:
- Shape your nails into an almond shape and apply a base coat.
- Apply two coats of the matte grey polish to the designated nails.
- Use striping tape to create the white and yellow stripes on the grey nails.
- Apply two coats of the bright yellow polish to the remaining nails.
- Finish with a matte top coat to seal the design and add a smooth finish.
Yellow Wave Patterns
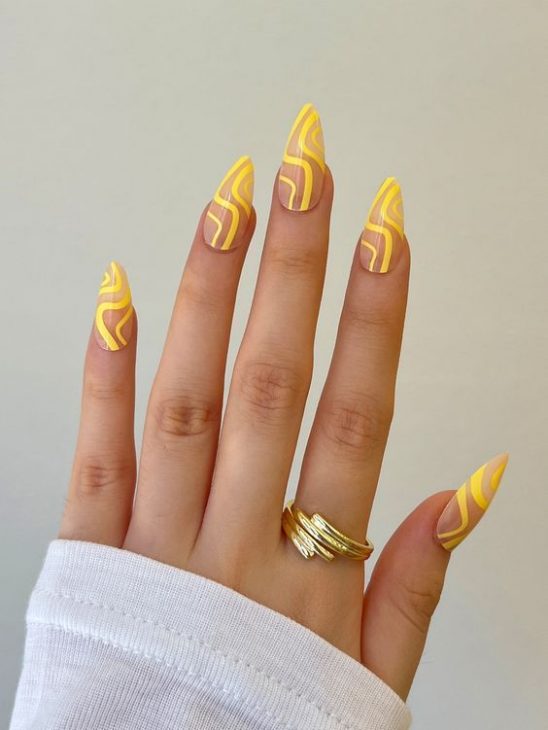
This design features vibrant yellow wave patterns on a nude base, creating a dynamic and artistic look. The waves add a playful touch, making this design perfect for summer. The stiletto shape enhances the boldness of the design, making it ideal for those who love to stand out with their nail art.
Consumables:
- Nude base nail polish (e.g., OPI’s “Bare My Soul”)
- Bright yellow nail polish (e.g., China Glaze’s “Happy Go Lucky”)
- Fine nail art brushes for detailed work
- Stiletto-shaped nail tips or sculpting forms
- Top coat for a glossy finish (e.g., Seche Vite Dry Fast Top Coat)
DIY Instructions:
- Shape your nails into a stiletto shape and apply a base coat.
- Apply two coats of the nude base polish.
- Using fine nail art brushes, create the yellow wave patterns on each nail.
- Finish with a top coat to seal the design and add shine.
Floral Yellow Tips
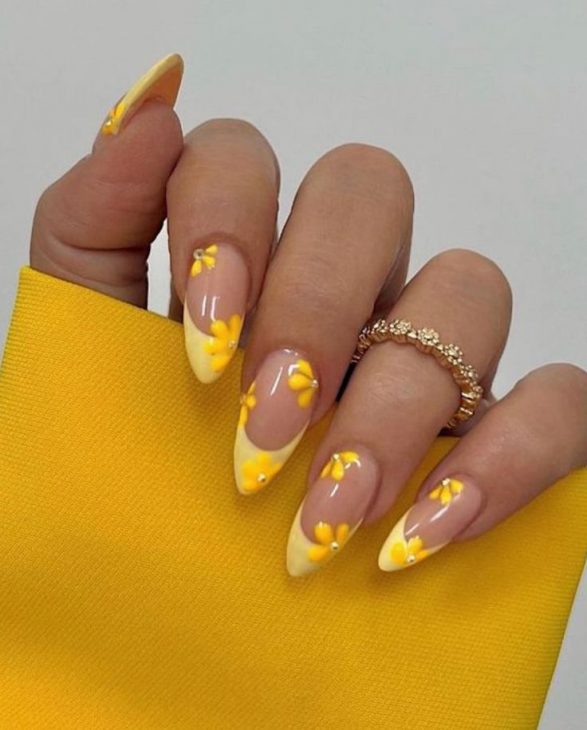
This design combines soft yellow tips with delicate floral accents, creating a charming and feminine look. The flowers add a touch of whimsy, making this design perfect for summer. The almond shape adds elegance, making it suitable for both everyday wear and special occasions.
Consumables:
- Nude base nail polish (e.g., Essie’s “Ballet Slippers”)
- Soft yellow nail polish for tips (e.g., Zoya’s “Bee”)
- Yellow and white nail polish for flowers
- Fine nail art brushes for detailed work
- Almond-shaped nail tips or sculpting forms
- Top coat for a glossy finish (e.g., Seche Vite Dry Fast Top Coat)
DIY Instructions:
- Shape your nails into an almond shape and apply a base coat.
- Apply two coats of the nude base polish.
- Paint the tips with the soft yellow polish.
- Use fine nail art brushes to create the floral accents on each nail.
- Finish with a top coat to seal the design and add shine.
Yellow and White Swirls
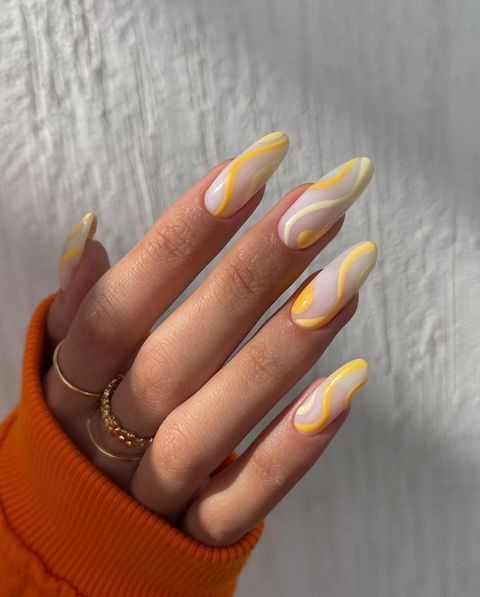
This design features elegant yellow and white swirls on a nude base, creating a sophisticated and artistic look. The swirls add a touch of creativity, making this design perfect for those who love unique and stylish nail art. The almond shape further enhances the elegance of the design, making it suitable for various occasions.
Consumables:
- Nude base nail polish (e.g., OPI’s “Samoan Sand”)
- Bright yellow nail polish (e.g., Sally Hansen’s “Mellow Yellow”)
- White nail polish (e.g., Essie’s “Blanc”)
- Fine nail art brushes for detailed work
- Almond-shaped nail tips or sculpting forms
- Top coat for a glossy finish (e.g., Seche Vite Dry Fast Top Coat)
DIY Instructions:
- Shape your nails into an almond shape and apply a base coat.
- Apply two coats of the nude base polish.
- Using fine nail art brushes, create the yellow and white swirl patterns on each nail.
- Finish with a top coat to seal the design and add shine.
Floral Yellow and White Design
This design features a stunning combination of yellow and white floral patterns on a nude base. The delicate white leaf and dot details add a touch of elegance and femininity, while the yellow brings a vibrant pop of color. The almond shape enhances the overall sophistication of this design, making it perfect for summer events or everyday wear.
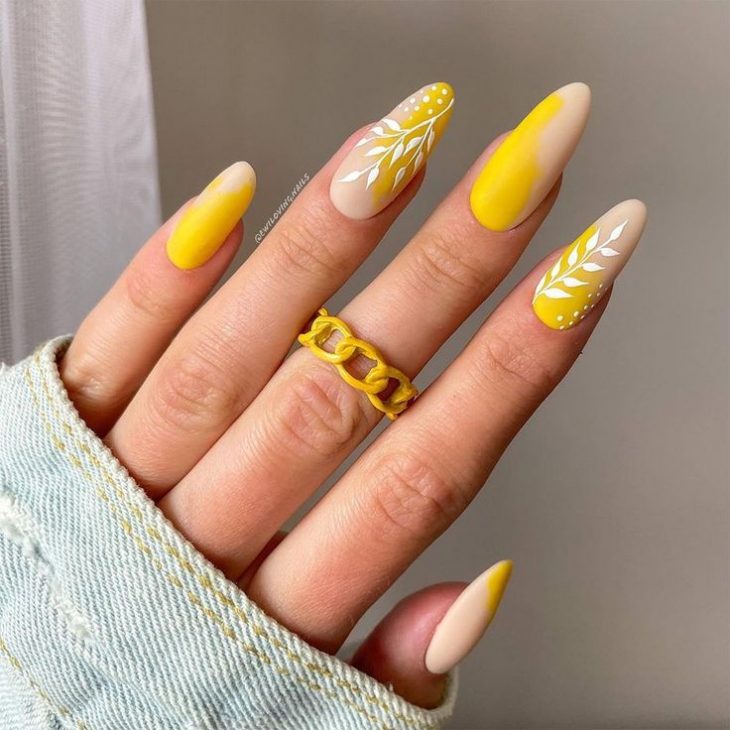
Consumables:
- Nude base nail polish (e.g., Essie’s “Ballet Slippers”)
- Bright yellow nail polish (e.g., Zoya’s “Bee”)
- White nail polish for details (e.g., OPI’s “Alpine Snow”)
- Fine nail art brushes for detailed work
- Almond-shaped nail tips or sculpting forms
- Matte top coat for a smooth finish (e.g., Essie’s “Matte About You”)
DIY Instructions:
- Shape your nails into an almond shape and apply a base coat.
- Apply two coats of the nude base polish.
- Use fine nail art brushes to create the yellow sections and white floral patterns.
- Finish with a matte top coat to seal the design and add a smooth finish.
Glittery Yellow and Nude Combo
This design combines the brightness of yellow with the subtle elegance of a nude base, accented with glitter for added glamour. The glittery detail at the base of the nude nails provides a sophisticated touch, while the solid yellow nails bring a cheerful summer vibe. The almond shape makes this design both stylish and practical for various occasions.
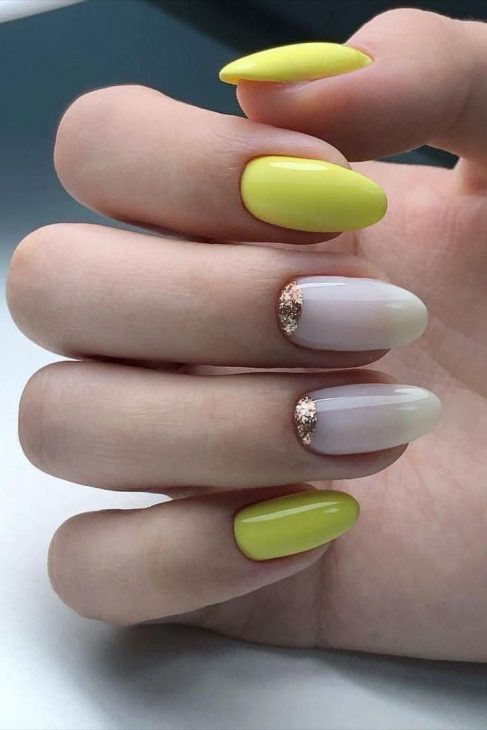
Consumables:
- Bright yellow nail polish (e.g., Sally Hansen’s “Mellow Yellow”)
- Nude base nail polish (e.g., OPI’s “Samoan Sand”)
- Gold glitter polish (e.g., Essie’s “Summit of Style”)
- Fine nail art brushes for detailed work
- Almond-shaped nail tips or sculpting forms
- Top coat for durability and shine (e.g., Seche Vite Dry Fast Top Coat)
DIY Instructions:
- Shape your nails into an almond shape and apply a base coat.
- Apply two coats of the yellow polish to the designated nails.
- Apply two coats of the nude polish to the remaining nails.
- Use a fine nail art brush to add glitter details to the base of the nude nails.
- Finish with a top coat to seal the design and add shine.
Daisy Delight Yellow Tips
This adorable design features bright yellow tips with delicate daisy accents, creating a fresh and cheerful look. The combination of yellow and white is perfect for summer, and the daisies add a whimsical touch. The almond shape further enhances the femininity and elegance of this design, making it ideal for any summer occasion.
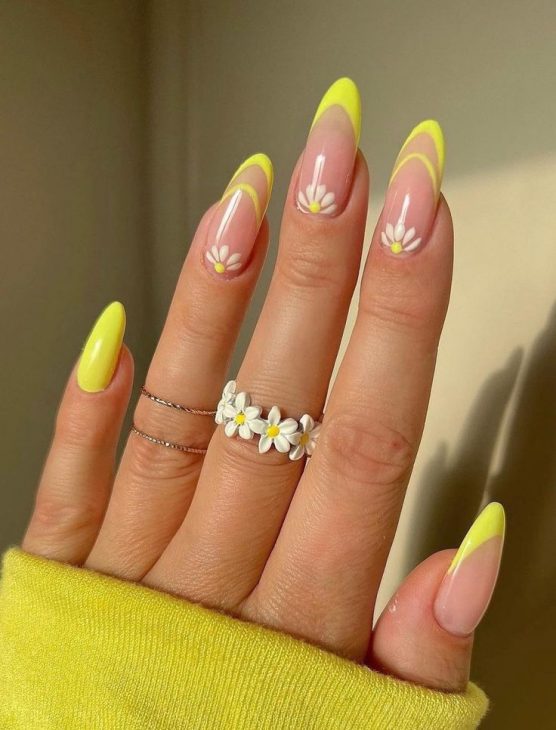
Consumables:
- Nude base nail polish (e.g., Essie’s “Ballet Slippers”)
- Bright yellow nail polish (e.g., China Glaze’s “Happy Go Lucky”)
- White and yellow polish for daisy details
- Fine nail art brushes for detailed work
- Almond-shaped nail tips or sculpting forms
- Top coat for a glossy finish (e.g., Seche Vite Dry Fast Top Coat)
DIY Instructions:
- Shape your nails into an almond shape and apply a base coat.
- Apply two coats of the nude base polish.
- Paint the tips with the bright yellow polish.
- Use fine nail art brushes to create the daisy accents on each nail.
- Finish with a top coat to seal the design and add shine.
Yellow Squiggle Art
This design features playful yellow squiggle patterns on a nude base, creating a modern and artistic look. The squiggles add a fun and dynamic touch, making this design perfect for summer. The square shape adds a contemporary edge to this creative design, making it suitable for both casual and formal settings.
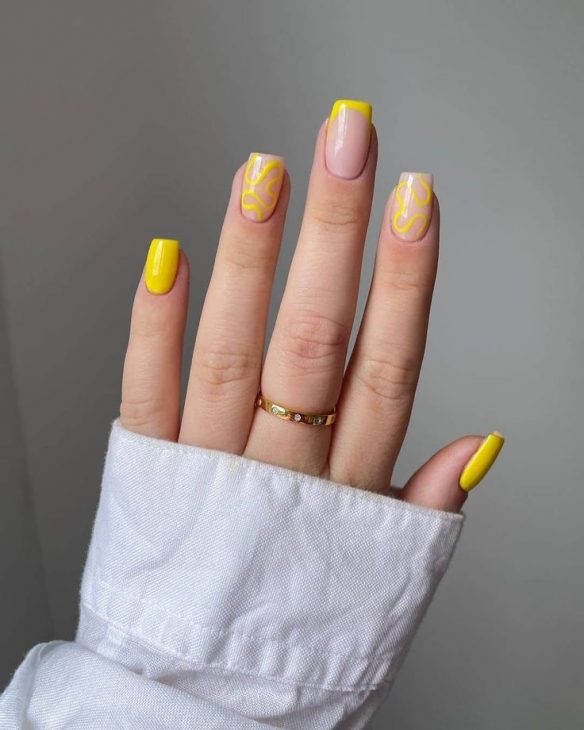
Consumables:
- Nude base nail polish (e.g., OPI’s “Bare My Soul”)
- Bright yellow nail polish (e.g., Essie’s “Hay There”)
- Fine nail art brushes for detailed work
- Square-shaped nail tips or sculpting forms
- Top coat for a glossy finish (e.g., Seche Vite Dry Fast Top Coat)
DIY Instructions:
- Shape your nails into a square shape and apply a base coat.
- Apply two coats of the nude base polish.
- Using fine nail art brushes, create the yellow squiggle patterns on each nail.
- Finish with a top coat to seal the design and add shine.
Sharp Yellow and Nude Combo
This striking design combines bright yellow with a nude base, creating a bold and modern look. The sharp, stiletto shape adds an edgy touch, while the yellow tips bring a vibrant pop of color that’s perfect for summer. The glossy finish enhances the overall sleekness of the design, making it ideal for those who love to make a statement with their nails.
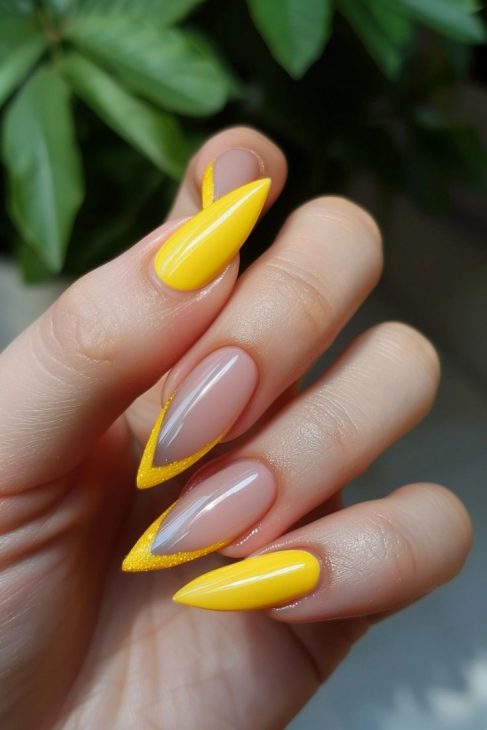
Consumables:
- Nude base nail polish (e.g., OPI’s “Samoan Sand”)
- Bright yellow nail polish (e.g., China Glaze’s “Happy Go Lucky”)
- Fine nail art brushes for precise application
- Stiletto-shaped nail tips or sculpting forms
- Top coat for a glossy finish (e.g., Seche Vite Dry Fast Top Coat)
DIY Instructions:
- Shape your nails into a stiletto shape and apply a base coat.
- Apply two coats of the nude base polish and let it dry completely.
- Using a fine nail art brush, paint the tips with the bright yellow polish, ensuring sharp and precise lines.
- Finish with a top coat to seal the design and add a glossy finish.
Save Pin
