
As the 4th of July approaches, it’s time to get your nails ready for the celebration with some festive and patriotic designs. Whether you prefer something simple and classy or want to go all out with acrylic and gel styles, we’ve got you covered. This guide features 21 stunning 4th of July nail designs that will help you show off your patriotic spirit in style. From cute and subtle fireworks designs to bold almond shapes and short nails, there’s something for everyone. Whether you’re a fan of dip powder, French tips, or gel nails, you’ll find plenty of inspiration here. So get ready to dazzle at your Independence Day celebrations with these classy and eye-catching nail designs that are sure to impress.
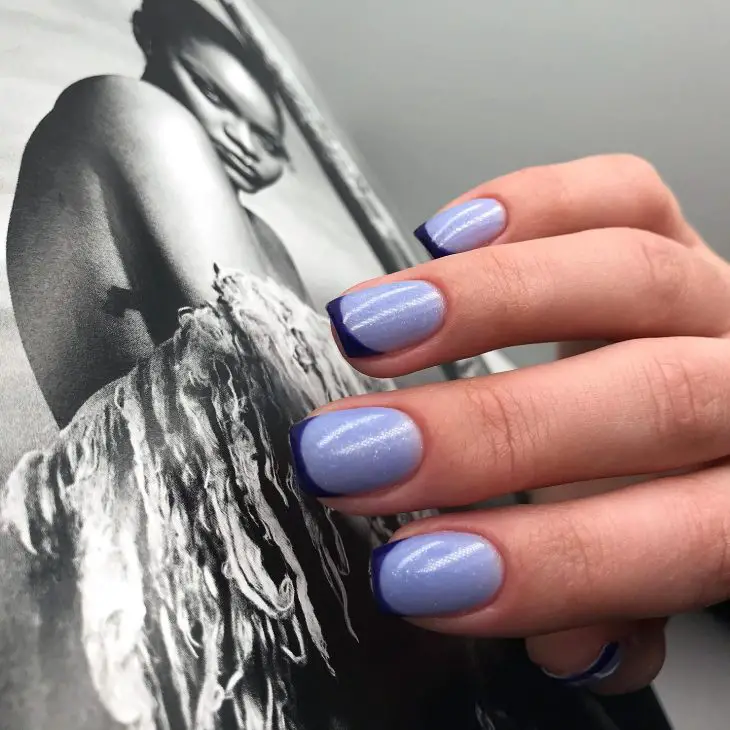
Cool Blue French Tip with a Twist
This chic take on the classic French tip nails adds a modern twist with a cool blue base and a deep blue tip. The subtle shimmer in the base color gives these nails a fresh, summery vibe that’s perfect for any occasion. As a professional manicurist, I appreciate the balance of elegance and playfulness in this design. It’s an excellent choice for those who want to stay on trend while maintaining a touch of sophistication.
Consumables
- Base coat: OPI Natural Nail Base Coat
- Blue shimmer polish: Essie “Bikini So Teeny”
- Deep blue polish for tips: OPI “Russian Navy”
- Top coat: Seche Vite Dry Fast Top Coat
- Nail guides or tape for creating the French tip
DIY Instructions
- Start with a clean, filed nail and apply a base coat.
- Paint the entire nail with the blue shimmer polish and let it dry completely.
- Use nail guides or tape to section off the tip of the nail.
- Apply the deep blue polish to the tip and carefully remove the guides before the polish dries.
- Finish with a top coat to seal in the design and add shine.
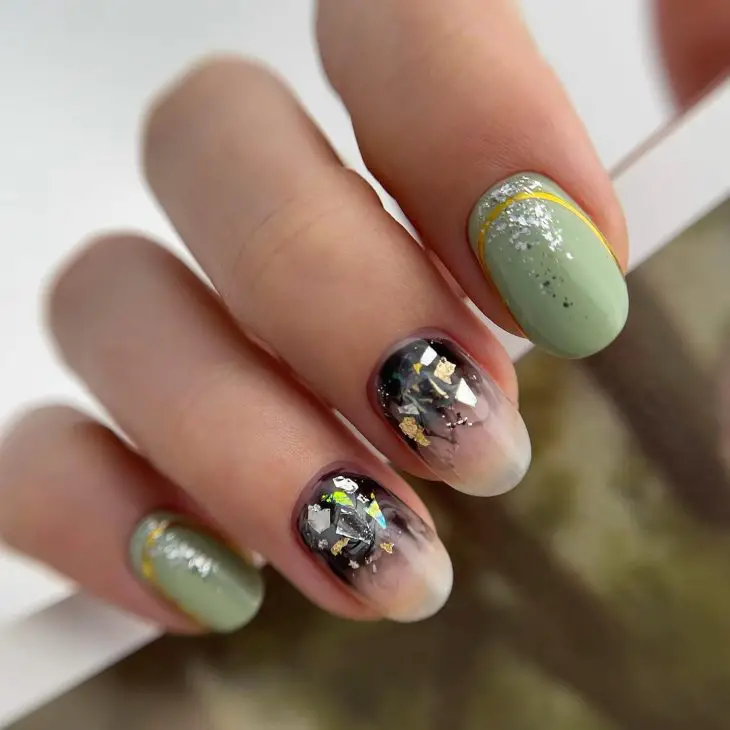
Green and Glitter Mixed Media
This design is a showstopper, combining matte olive green with shimmering glitter and intricate art designs. The contrast between the earthy green and the vibrant glitter makes this manicure a standout choice for summer. From a professional standpoint, the mix of textures and finishes creates a dynamic look that’s both trendy and unique.
Consumables
- Base coat: Sally Hansen Double Duty Base & Top Coat
- Olive green polish: Essie “Now and Zen”
- Glitter polish: China Glaze “Fairy Dust”
- Nail art stickers or foil: Holo Taco Nail Foils
- Top coat: Essie Gel Couture Top Coat
DIY Instructions
- Apply a base coat to clean, filed nails.
- Paint all nails with the olive green polish and let it dry.
- Select two accent nails for the glitter design.
- Apply the glitter polish to the accent nails, layering until you achieve the desired coverage.
- Use nail art stickers or foil on the accent nails for added dimension.
- Seal the design with a top coat for a long-lasting finish.
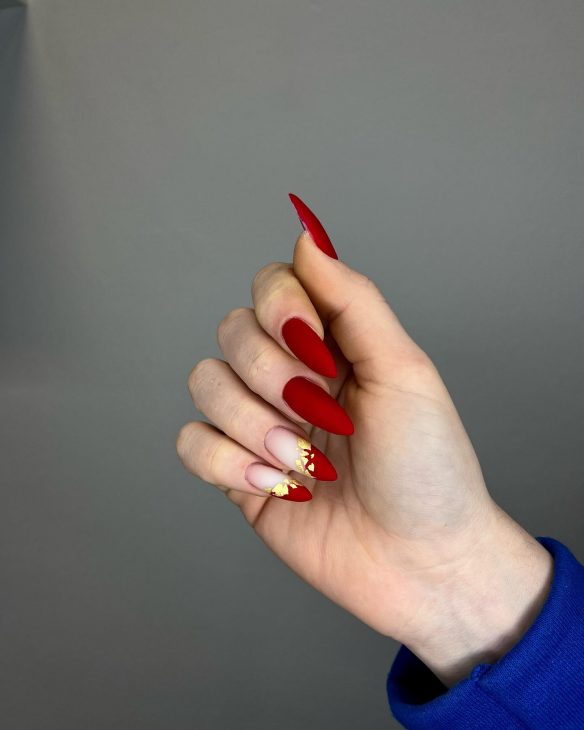
Classic Red Stiletto with Gold Accents
For those who love a bold, dramatic look, these classic red stiletto nails with gold accents are a must-try. The rich, matte red color is both timeless and striking, while the gold accents add a touch of luxury. This design is perfect for making a statement and exudes confidence and style.
Consumables
- Base coat: CND Stickey Base Coat
- Matte red polish: Zoya “Matte Velvet Red”
- Gold foil or glitter: Born Pretty Gold Nail Foil
- Top coat: CND Super Shiney Top Coat
DIY Instructions
- Begin with a base coat to protect your natural nails.
- Apply the matte red polish, ensuring full coverage and let it dry.
- Use gold foil or glitter to create accents on the desired nails.
- Apply a top coat to the nails with gold accents to secure the foil and add durability.
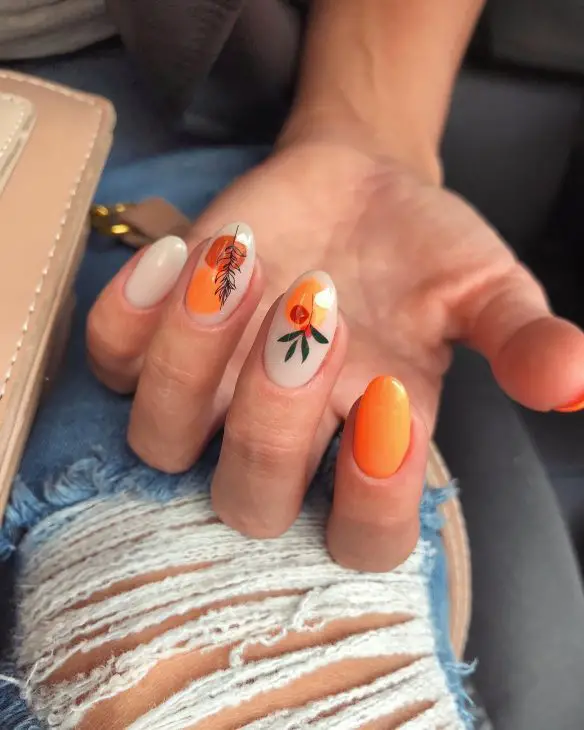
Vibrant Floral Art on Almond Nails
This vibrant floral art design on almond-shaped nails is a stunning choice for summer. The bright orange and white base colors create a perfect canvas for the intricate floral and leaf designs, adding a fresh and lively touch. The attention to detail in the floral accents showcases the artistry and creativity involved in this manicure. As a professional manicurist, I love how this design combines bold colors with delicate artwork to create a balanced and eye-catching look.
Consumables
- Base coat: Essie Here to Stay Base Coat
- Orange polish: OPI “No Tan Lines”
- White polish: Essie “Blanc”
- Nail art brushes for detailing
- Acrylic paints for the floral and leaf designs
- Top coat: Seche Vite Dry Fast Top Coat
DIY Instructions
- Apply a base coat to clean, filed nails.
- Paint the nails with orange and white polishes, alternating colors on each nail.
- Using fine nail art brushes and acrylic paints, create the floral and leaf designs on the accent nails.
- Allow the design to dry completely before applying a top coat to seal and protect the artwork.
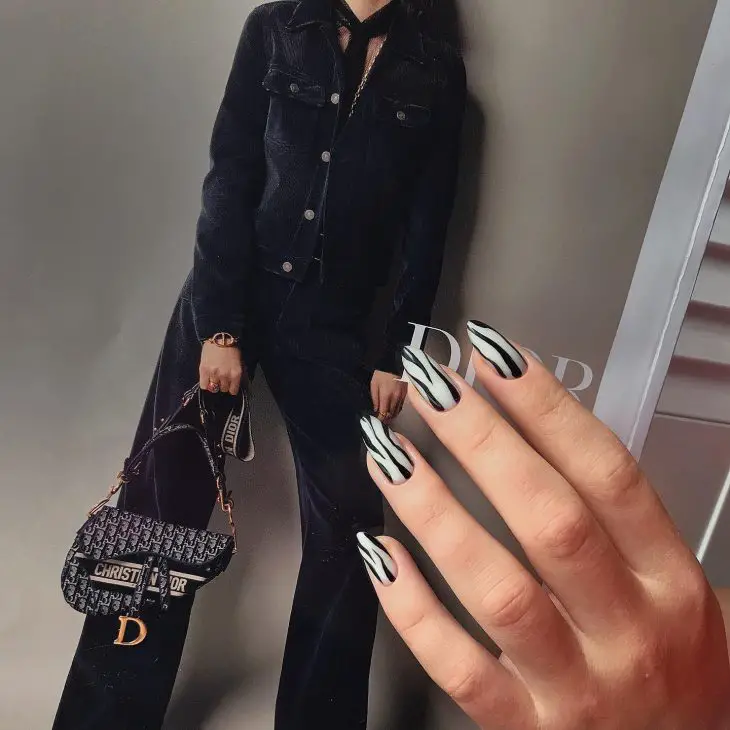
Chic Black and White Zebra Stripes
These black and white zebra stripe nails are the epitome of chic and trendy. The sleek, monochrome design is perfect for making a bold statement while remaining sophisticated. The clean lines and sharp contrast between the black and white polishes create a striking visual effect. As a professional, I appreciate the precision required to achieve such flawless stripes, making this design both daring and elegant.
Consumables
- Base coat: OPI Natural Nail Base Coat
- White polish: Essie “Blanc”
- Black polish: Sally Hansen “Black Out”
- Thin striping brush for detailed work
- Top coat: Essie Gel Couture Top Coat
DIY Instructions
- Start with a base coat to protect your natural nails.
- Apply two coats of white polish and let it dry completely.
- Use a thin striping brush dipped in black polish to create the zebra stripes, varying the thickness and direction for a natural look.
- Finish with a top coat to seal the design and add shine.
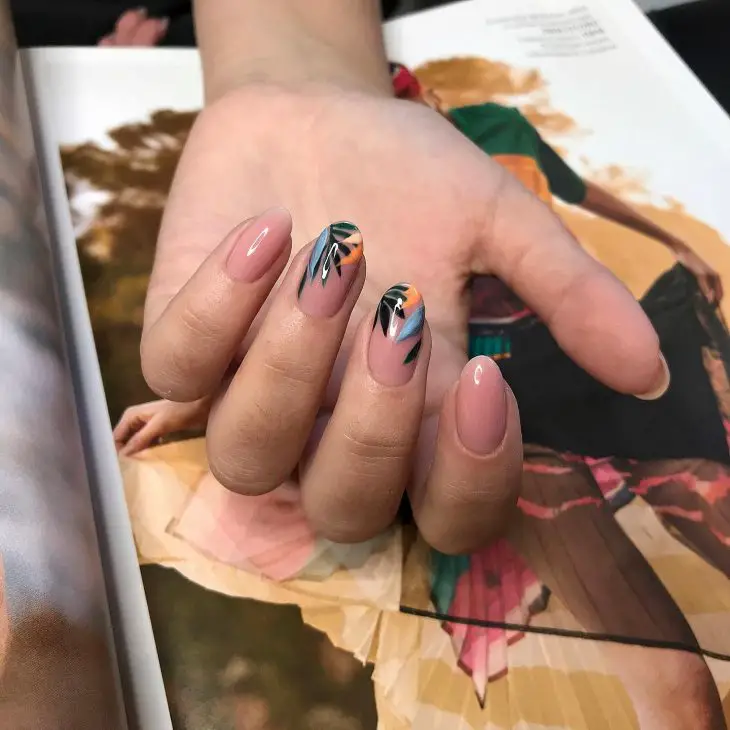
Tropical Leaf Accents on Nude Base
This tropical leaf design on a nude base is a beautiful blend of subtlety and vibrancy. The nude polish serves as a perfect backdrop, allowing the bold leaf patterns to take center stage. This design is ideal for those who want a touch of summer on their nails without overwhelming colors. From a professional perspective, the contrast between the soft nude and the vibrant leaf art is both stylish and elegant.
Consumables
- Base coat: Sally Hansen Double Duty Base & Top Coat
- Nude polish: OPI “Be There in a Prosecco”
- Acrylic paints or nail art pens for the leaf designs
- Fine nail art brushes for detailing
- Top coat: Essie Gel Couture Top Coat
DIY Instructions
- Apply a base coat to your nails.
- Paint all nails with the nude polish and allow it to dry.
- Using fine nail art brushes and acrylic paints or nail art pens, draw the tropical leaf patterns on accent nails.
- Seal the design with a top coat to ensure longevity and shine.
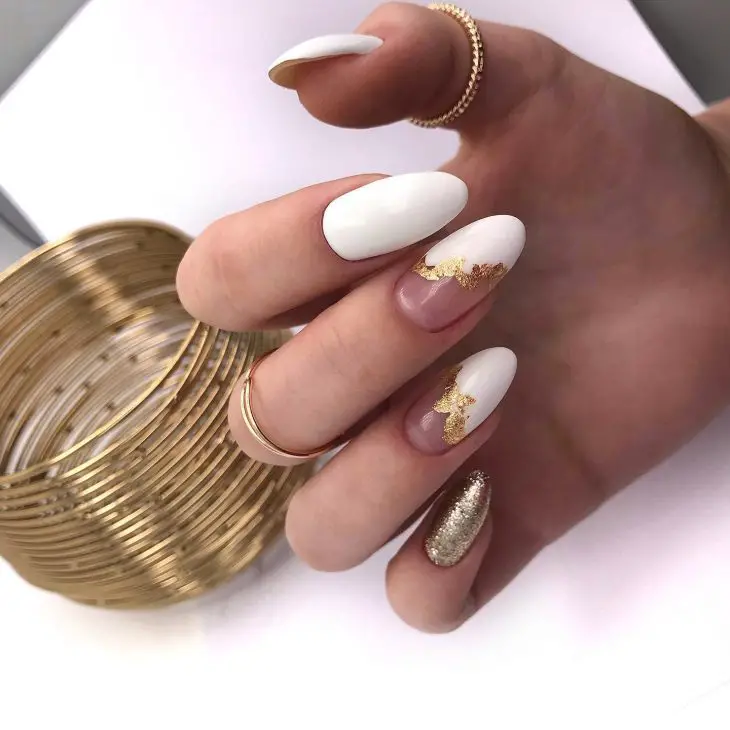
Elegant White and Gold with Glitter Accent
This elegant manicure features a sophisticated combination of white polish, gold leaf accents, and a glittery accent nail. The clean, white base is elevated by the luxurious gold leaf detailing, adding a touch of glamour and opulence. The glitter accent nail provides an extra layer of sparkle, making this design perfect for special occasions. As a professional, I love how this manicure combines simplicity and luxury for a truly classy look.
Consumables
- Base coat: CND Stickey Base Coat
- White polish: Essie “Blanc”
- Gold leaf foil: Born Pretty Gold Nail Foil
- Gold glitter polish: China Glaze “I’m Not Lion”
- Top coat: CND Super Shiney Top Coat
DIY Instructions
- Start with a base coat to protect your nails.
- Apply two coats of white polish and let them dry completely.
- Add gold leaf foil to the desired nails, pressing gently to adhere.
- Paint the accent nail with gold glitter polish for an extra sparkle.
- Seal the entire design with a top coat to ensure durability and shine.
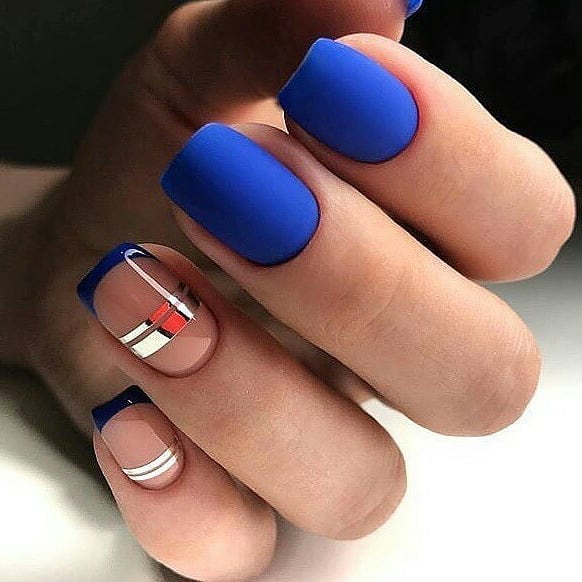
Bold Blue with Metallic Accents
This striking design features bold blue matte nails paired with metallic accents, creating a modern and edgy look. The blue matte polish offers a rich and sophisticated base, while the metallic stripes and red accent add a contemporary touch. This manicure is perfect for those who want to make a bold statement with their nails. As a professional, I appreciate the clean lines and the contrast between the matte and metallic finishes, which elevate the overall design.
Consumables
- Base coat: OPI Natural Nail Base Coat
- Matte blue polish: Sally Hansen “Matte Blue”
- Silver metallic striping tape: Kiss Nail Art Striping Tape
- Red nail polish: Essie “Geranium”
- Top coat: Seche Vite Dry Fast Top Coat
DIY Instructions
- Start with a base coat to protect your nails.
- Apply two coats of the matte blue polish and let them dry completely.
- Use silver striping tape to create the metallic accents on the ring finger.
- Add a small red stripe using a thin brush or striping tool.
- Finish with a top coat to seal the design and add durability.
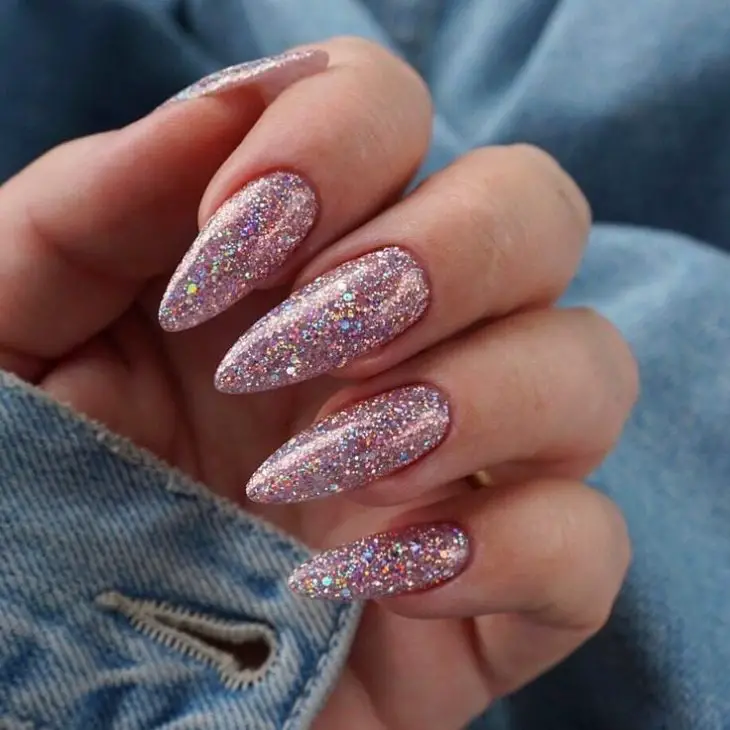
Glittering Rose Gold Sparkle
These glittering rose gold nails are the epitome of glamour and sophistication. The rose gold glitter polish provides a stunning, sparkling finish that is perfect for summer events and special occasions. This design is not only eye-catching but also versatile, complementing a wide range of outfits and styles. From a professional standpoint, the use of high-quality glitter polish ensures a smooth and long-lasting finish.
Consumables
- Base coat: Essie Here to Stay Base Coat
- Rose gold glitter polish: OPI “I Pull the Strings”
- Top coat: Essie Gel Couture Top Coat
DIY Instructions
- Apply a base coat to your nails.
- Paint all nails with the rose gold glitter polish, applying multiple coats until you achieve the desired opacity.
- Allow each coat to dry completely before applying the next.
- Finish with a top coat to add shine and protect the glitter.
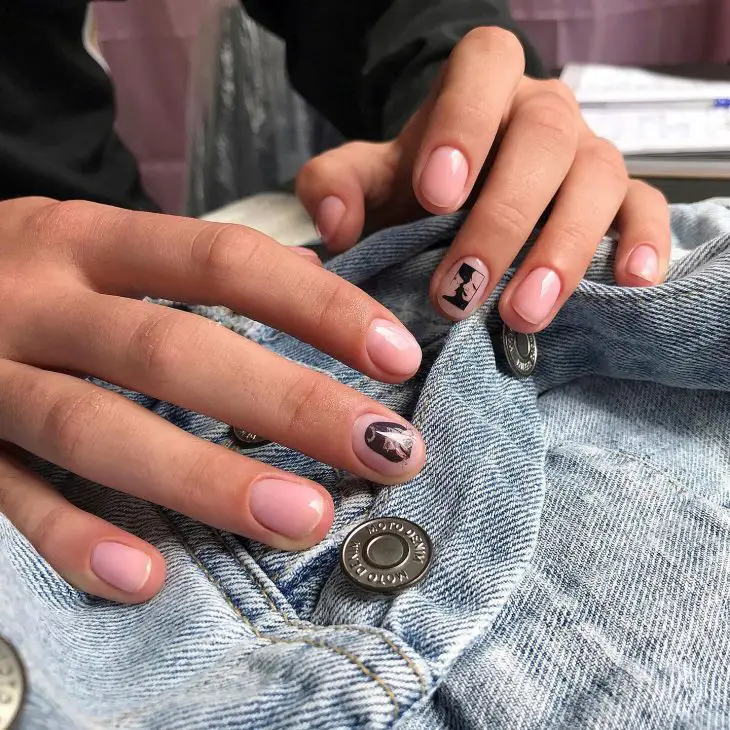
Subtle Nude with Artistic Accents
This subtle nude manicure with artistic accents is perfect for those who prefer a minimalist yet stylish look. The nude base color provides a clean and sophisticated canvas, while the artistic accents on the ring fingers add a touch of creativity and uniqueness. This design is ideal for everyday wear, offering a chic and polished appearance. As a professional, I appreciate the elegance and simplicity of this manicure, which can be easily customized with different accent designs.
Consumables
- Base coat: Sally Hansen Double Duty Base & Top Coat
- Nude polish: OPI “Dulce de Leche”
- Black polish for accents: Essie “Licorice”
- Nail art brushes or stamps for the accent designs
- Top coat: Essie Gel Couture Top Coat
DIY Instructions
- Apply a base coat to your nails.
- Paint all nails with the nude polish and allow them to dry.
- Use black polish and nail art brushes or stamps to create the artistic accents on the ring fingers.
- Seal the design with a top coat for a glossy finish and added protection.
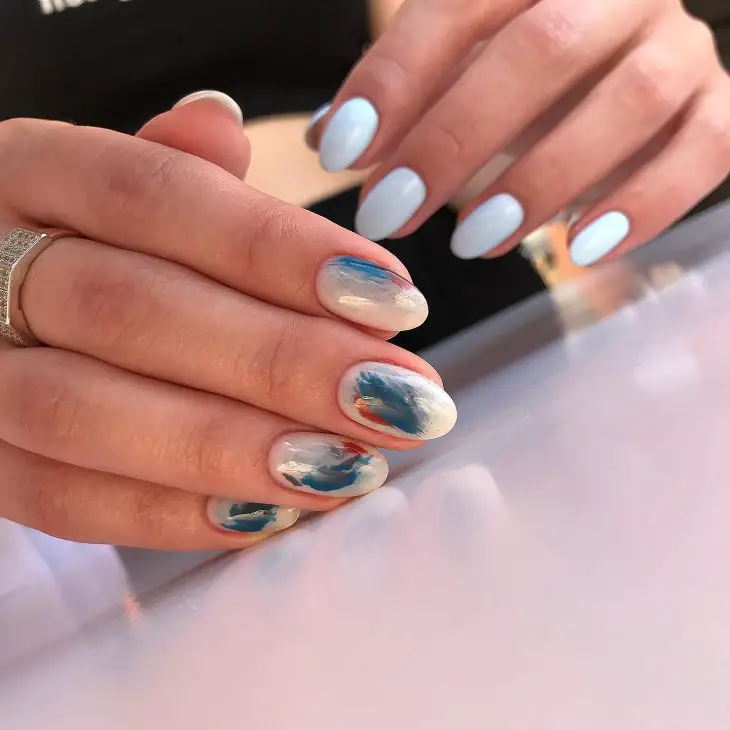
Dreamy Pastel with Abstract Art
This dreamy pastel manicure with abstract art is a perfect blend of soft colors and creative design. The pastel blue base is calming and stylish, while the abstract art on the accent nails adds a unique and artistic flair. This design is great for those who want a subtle yet interesting manicure for the summer. As a professional, I love how the abstract art adds depth and dimension to the pastel base, creating a modern and trendy look.
Consumables
- Base coat: OPI Natural Nail Base Coat
- Pastel blue polish: Essie “Bikini So Teeny”
- Acrylic paints or nail polishes for abstract art: Various colors
- Nail art brushes for detailing
- Top coat: Seche Vite Dry Fast Top Coat
DIY Instructions
- Apply a base coat to your nails.
- Paint all nails with the pastel blue polish and allow them to dry.
- Use nail art brushes and acrylic paints or polishes to create the abstract designs on the accent nails.
- Let the designs dry completely before applying a top coat to seal and protect the art.
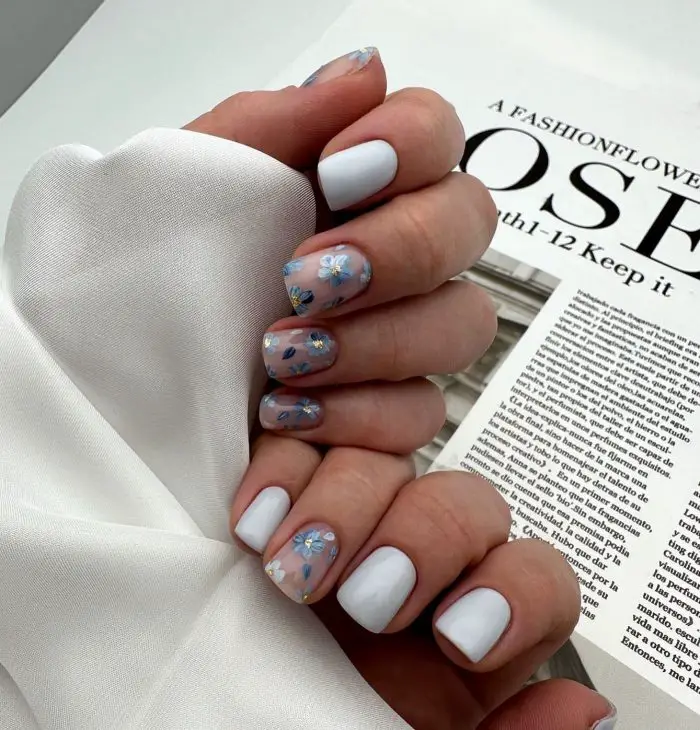
Delicate Floral Design on White Base
This delicate floral design on a white base is a perfect blend of elegance and femininity. The combination of white nails with floral accents on a sheer nude base creates a fresh and sophisticated look. The small blue and white flowers add a touch of whimsy and charm, making this design ideal for both casual and formal occasions. From a professional standpoint, the contrast between the solid white and the intricate floral patterns highlights the beauty and versatility of this manicure.
Consumables
- Base coat: Essie Here to Stay Base Coat
- White polish: OPI “Alpine Snow”
- Sheer nude polish: Essie “Ballet Slippers”
- Floral nail stickers or decals
- Top coat: Seche Vite Dry Fast Top Coat
DIY Instructions
- Apply a base coat to protect your natural nails.
- Paint most of your nails with the white polish, leaving a few for the sheer nude base.
- Apply the sheer nude polish to the remaining nails and let it dry.
- Add floral nail stickers or decals to the sheer nude nails, arranging them to your preference.
- Finish with a top coat to seal the design and ensure longevity.
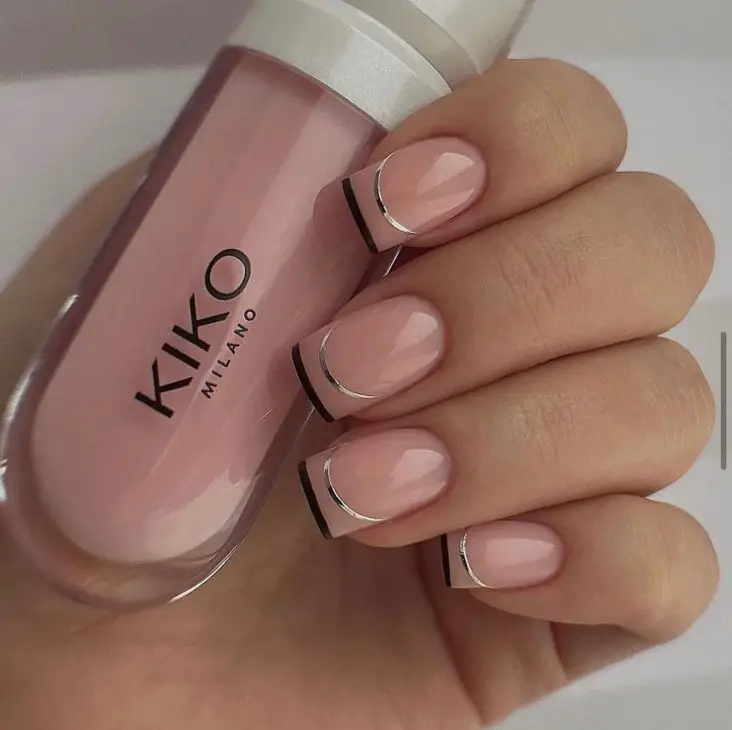
Modern Black and Silver French Tip
This modern twist on the classic French tip features a nude base with sleek black tips and a silver accent line. The minimalist design is both chic and contemporary, making it a perfect choice for those who love understated elegance. The addition of the silver line adds a touch of sophistication and luxury to the overall look. As a professional, I appreciate the precision and clean lines of this design, which elevate the traditional French manicure to a new level.
Consumables
- Base coat: OPI Natural Nail Base Coat
- Nude polish: KIKO Milano “Perfect Gel Nude”
- Black polish: Essie “Licorice”
- Silver striping tape: Kiss Nail Art Striping Tape
- Top coat: Essie Gel Couture Top Coat
DIY Instructions
- Start with a base coat to protect your nails.
- Apply two coats of the nude polish and let them dry completely.
- Use black polish to create the French tips, ensuring even and clean lines.
- Add a silver striping tape just below the black tips for a modern accent.
- Seal the design with a top coat to ensure a smooth and durable finish.
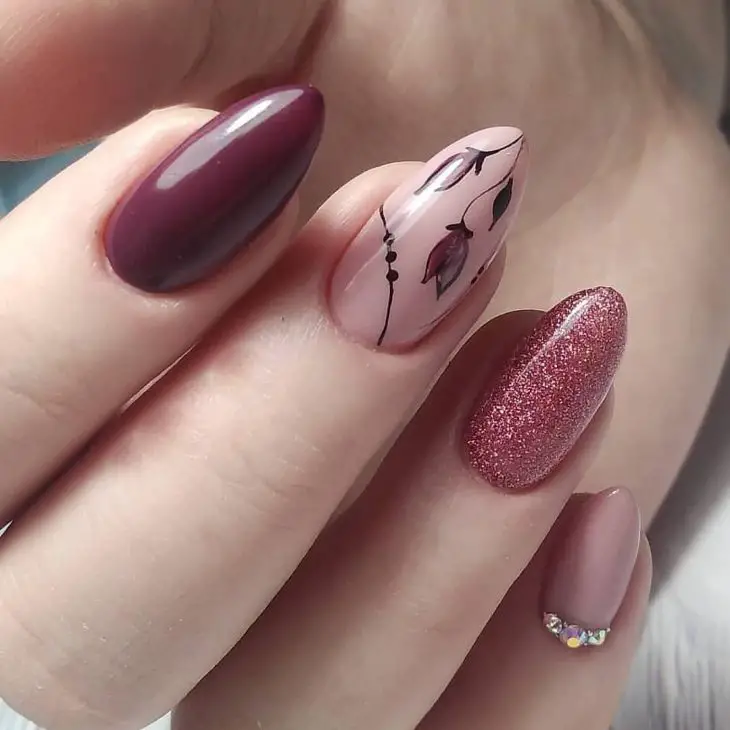
Elegant Burgundy and Pink with Glitter Accents
This elegant manicure combines rich burgundy and soft pink polishes with glitter and floral accents, creating a sophisticated and luxurious look. The deep burgundy provides a striking contrast to the soft pink, while the glitter accent adds a touch of sparkle and glamour. The delicate floral design on the pink base enhances the overall elegance, making this manicure perfect for special occasions. From a professional perspective, the combination of colors and textures in this design is both trendy and timeless.
Consumables
- Base coat: Sally Hansen Double Duty Base & Top Coat
- Burgundy polish: OPI “Malaga Wine”
- Pink polish: Essie “Fiji”
- Pink glitter polish: China Glaze “Pink Champagne”
- Nail art brushes for floral design
- Top coat: Seche Vite Dry Fast Top Coat
DIY Instructions
- Apply a base coat to your nails.
- Paint the nails with burgundy and pink polishes, alternating colors as desired.
- Apply the pink glitter polish to one of the pink nails for an accent.
- Use nail art brushes to create the floral design on one of the pink nails.
- Finish with a top coat to seal the design and add shine.
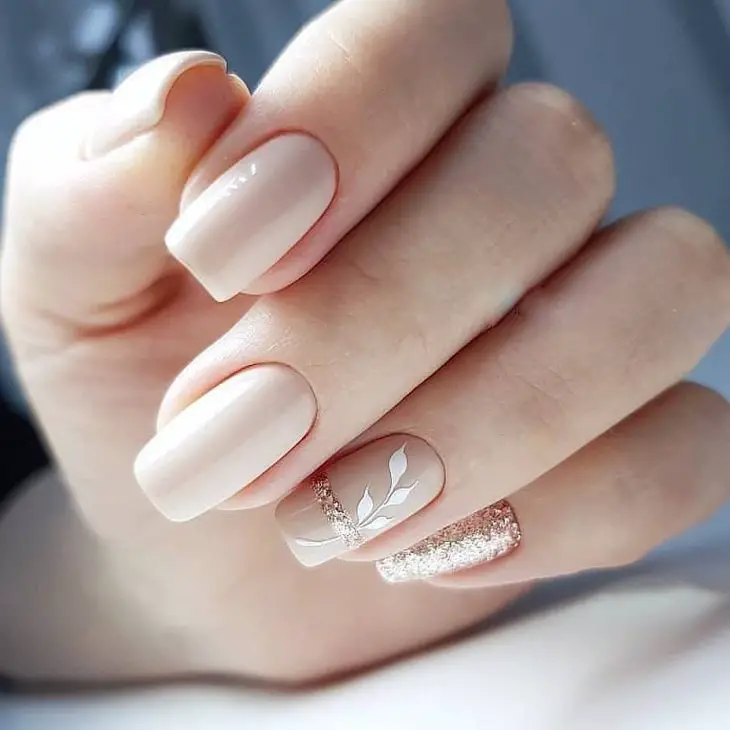
Soft Nude with Gold and White Accents
This soft nude manicure with gold and white accents is the epitome of subtle elegance. The nude polish serves as a versatile base, while the gold glitter and white detailing add a touch of sophistication and luxury. This design is perfect for those who prefer a minimalist yet chic look. As a professional, I love how the delicate accents complement the nude base, creating a timeless and refined manicure.
Consumables
- Base coat: CND Stickey Base Coat
- Nude polish: Essie “Sand Tropez”
- Gold glitter polish: OPI “Glitzerland”
- White polish for detailing: Essie “Blanc”
- Nail art brushes for detailing
- Top coat: CND Super Shiney Top Coat
DIY Instructions
- Start with a base coat to protect your nails.
- Apply two coats of the nude polish and let them dry completely.
- Use the gold glitter polish on one nail for an accent.
- Add white detailing to the nude nails using nail art brushes.
- Seal the entire design with a top coat to ensure durability and shine.
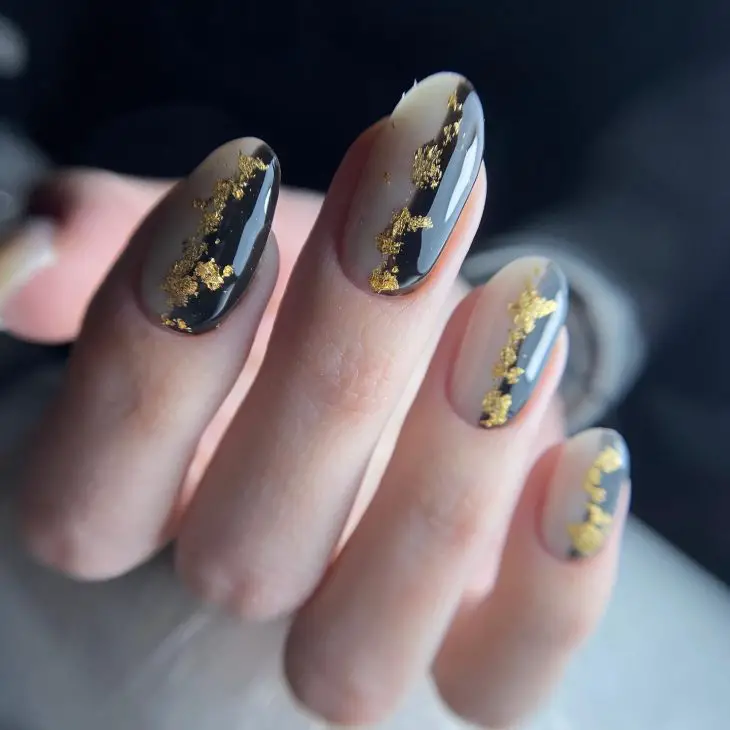
Elegant Gold Foil on Black and Nude
This elegant design combines the dramatic effect of black and nude polishes with luxurious gold foil accents. The seamless blend of black polish and nude base with irregular gold foil detailing creates a sophisticated and high-fashion look. This manicure is perfect for evening events or any occasion where you want to make a statement. As a professional, I appreciate the meticulous application of gold foil, which adds a touch of opulence and refinement to the overall design.
Consumables
- Base coat: Essie Here to Stay Base Coat
- Nude polish: OPI “Bubble Bath”
- Black polish: Essie “Licorice”
- Gold foil: Born Pretty Gold Nail Foil
- Top coat: Seche Vite Dry Fast Top Coat
DIY Instructions
- Apply a base coat to protect your natural nails.
- Paint a gradient of black and nude polish, blending them seamlessly.
- While the polish is still tacky, carefully place pieces of gold foil on the nails.
- Press the foil gently to ensure it adheres well.
- Finish with a top coat to seal the design and add shine.
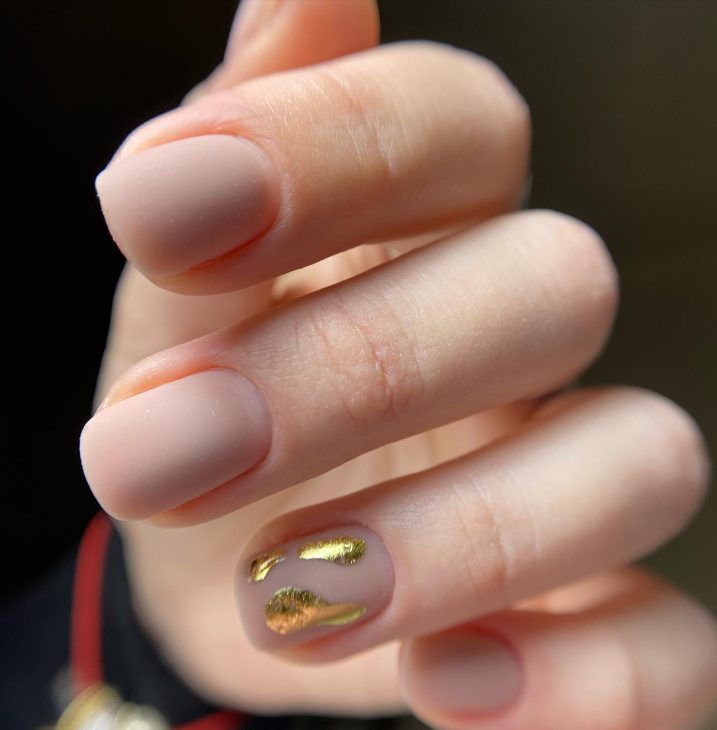
Minimalist Nude with Gold Accents
This minimalist nude manicure with subtle gold accents is perfect for those who appreciate understated elegance. The matte nude base is chic and versatile, while the gold foil accents on the ring finger add a hint of luxury. This design is ideal for everyday wear, providing a polished look that complements any outfit. From a professional perspective, the simplicity of this design highlights the beauty of the nude polish and the allure of gold accents.
Consumables
- Base coat: OPI Natural Nail Base Coat
- Matte nude polish: Sally Hansen “Matte Nude”
- Gold foil: Born Pretty Gold Nail Foil
- Top coat: Essie Matte About You Top Coat
DIY Instructions
- Start with a base coat to protect your nails.
- Apply two coats of the matte nude polish and let them dry completely.
- Place small pieces of gold foil on the ring finger, pressing gently to adhere.
- Finish with a matte top coat to seal the design and maintain the matte finish.
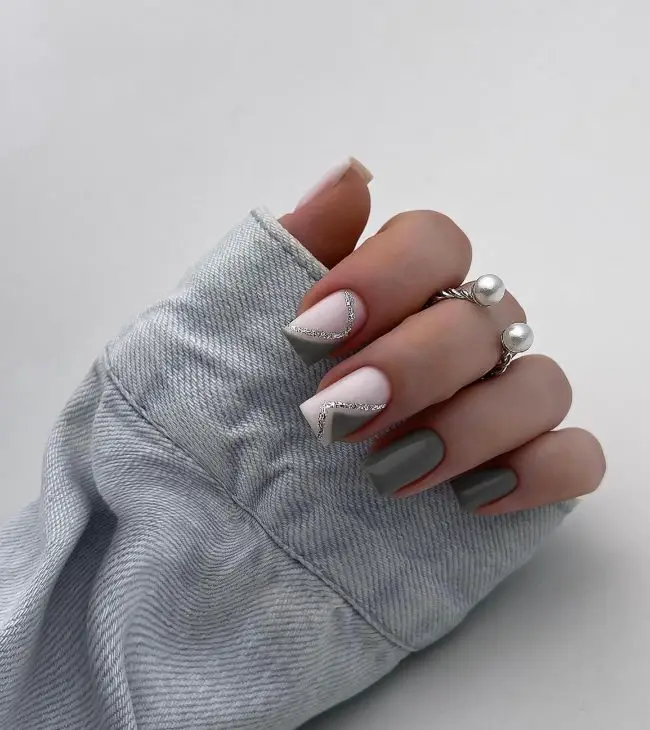
Geometric Gray and White with Silver Accents
This geometric design features a combination of gray and white polishes with silver glitter accents, creating a modern and trendy look. The clean lines and sharp angles of the geometric shapes make this manicure stand out, while the silver glitter adds a touch of sparkle. This design is perfect for those who want a contemporary and stylish manicure. As a professional, I admire the precision and creativity involved in achieving such clean geometric patterns.
Consumables
- Base coat: CND Stickey Base Coat
- Gray polish: OPI “Cement the Deal”
- White polish: Essie “Blanc”
- Silver glitter polish: China Glaze “Fairy Dust”
- Nail striping tape for clean lines
- Top coat: Seche Vite Dry Fast Top Coat
DIY Instructions
- Apply a base coat to your nails.
- Paint alternating nails with gray and white polishes and let them dry.
- Use nail striping tape to create geometric patterns and paint over with the opposite color.
- Add silver glitter accents to enhance the design.
- Finish with a top coat to seal the design and add shine.
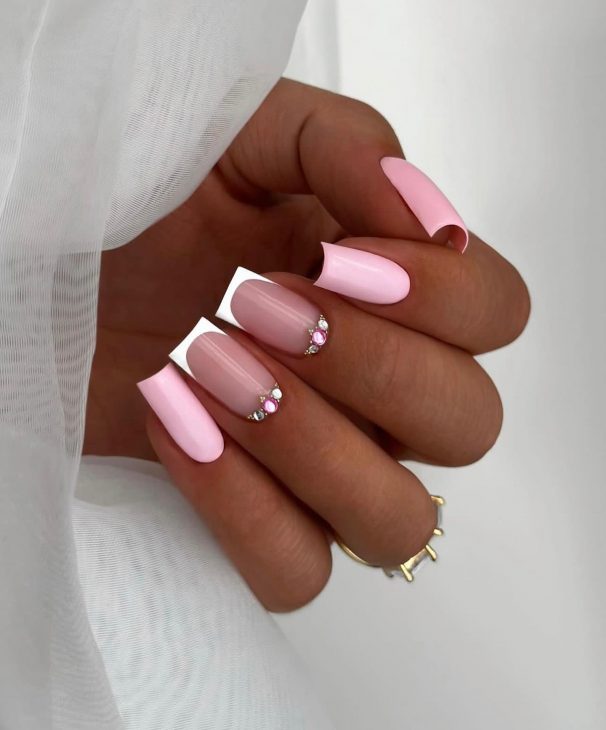
Romantic Pink with Rhinestone Accents
This romantic pink manicure features soft pink polish with elegant rhinestone accents. The combination of solid pink nails and a clear base with pink tips creates a delicate and feminine look, while the rhinestones add a touch of glamour. This design is perfect for special occasions or when you want to add a bit of sparkle to your everyday style. As a professional, I love how the rhinestones elevate the simplicity of the pink polish, making the design both chic and eye-catching.
Consumables
- Base coat: Essie Here to Stay Base Coat
- Pink polish: OPI “Mod About You”
- Clear polish for base: Essie “Mademoiselle”
- Rhinestones: Swarovski Nail Crystals
- Nail glue for rhinestones
- Top coat: Seche Vite Dry Fast Top Coat
DIY Instructions
- Apply a base coat to your nails.
- Paint alternating nails with the pink polish and clear polish with pink tips.
- Use nail glue to apply rhinestones to the accent nails.
- Finish with a top coat to seal the design and secure the rhinestones.
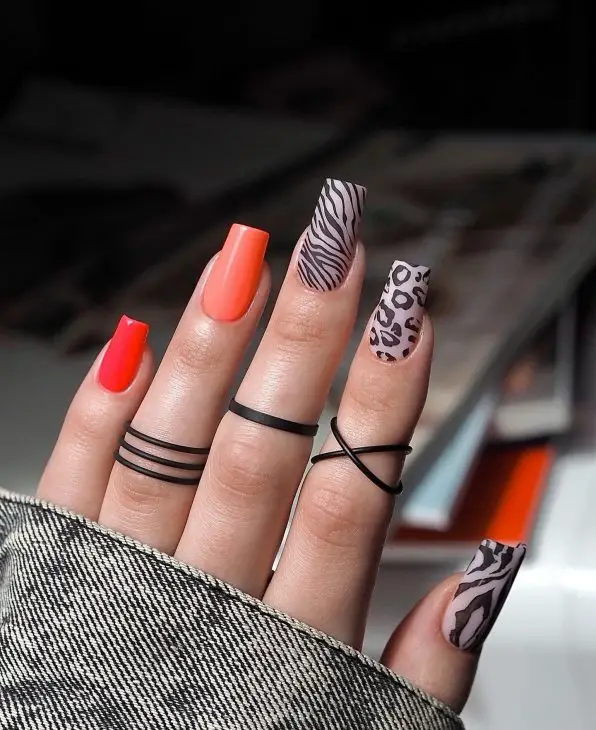
Bold Neon and Animal Print Mix
This bold manicure features a striking mix of neon orange and intricate animal prints, creating a dynamic and eye-catching design. The combination of vibrant neon and the classic zebra and leopard patterns adds a modern twist to a timeless look. This manicure is perfect for those who want to stand out and make a statement with their nails. As a professional, I love how the contrasting elements come together to create a cohesive and trendy look.
Consumables
- Base coat: Essie Here to Stay Base Coat
- Neon orange polish: China Glaze “Orange Knockout”
- Nude polish: OPI “Be There in a Prosecco”
- Black polish: Sally Hansen “Black Out”
- Nail art brushes for detailing
- Matte top coat: Essie Matte About You Top Coat
DIY Instructions
- Apply a base coat to protect your natural nails.
- Paint alternating nails with the neon orange and nude polishes.
- Use a thin nail art brush and black polish to create the zebra and leopard prints on the nude nails.
- Finish with a matte top coat to seal the design and add a modern finish.
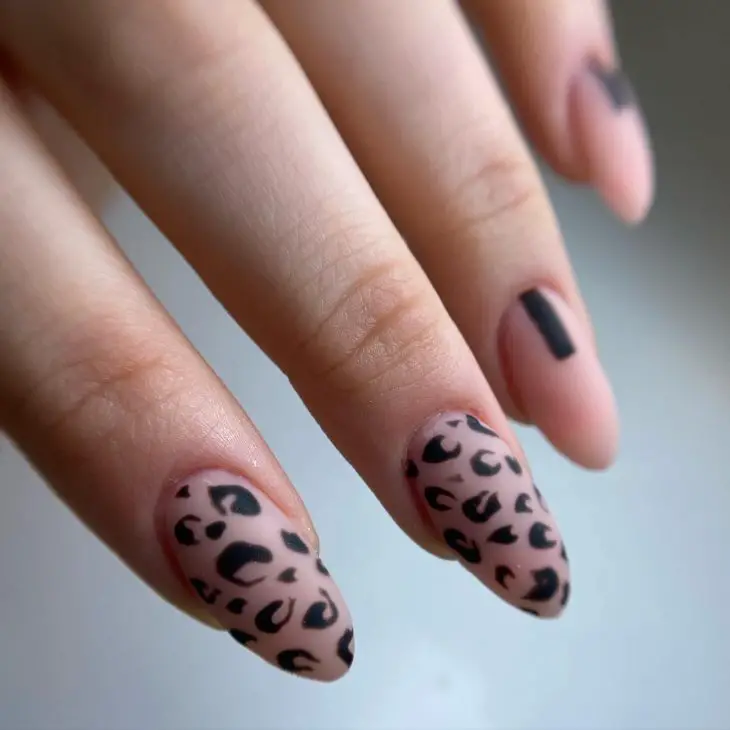
Matte Nude with Leopard Accents
This chic manicure combines a matte nude base with bold leopard print accents, creating a stylish and sophisticated look. The matte finish adds a touch of elegance, while the leopard print provides a playful and trendy element. This design is versatile and can be worn for both casual and formal occasions. From a professional perspective, the balance between the subtle nude and the striking leopard print makes this manicure both fashionable and timeless.
Consumables
- Base coat: OPI Natural Nail Base Coat
- Matte nude polish: Zoya “Satin Top Coat” over Essie “Sand Tropez”
- Black polish: Essie “Licorice”
- Nail art brushes for detailing
- Top coat: Essie Matte About You Top Coat
DIY Instructions
- Start with a base coat to protect your nails.
- Apply two coats of the nude polish and let them dry completely.
- Use nail art brushes and black polish to create the leopard print on the accent nails.
- Finish with a matte top coat to seal the design and maintain the matte finish.
Save Pin