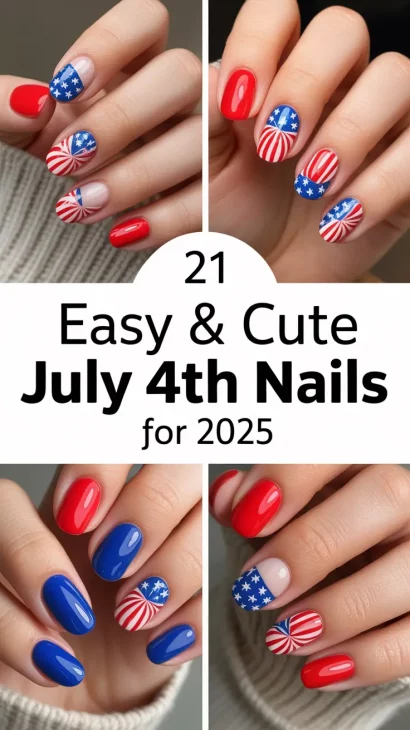
How about putting on a patriotic manicure for the holiday to reveal your style and cheer? Need nails for a party or just looking smart? These cute and simple July 4th manicures for 2025 are the way to go. The variety of looks includes easy and creative ones for fingers, toes and everything in between. Let’s dive into the top nail designs that will make your Fourth of July unforgettable — one cute, colorful nail at a time!
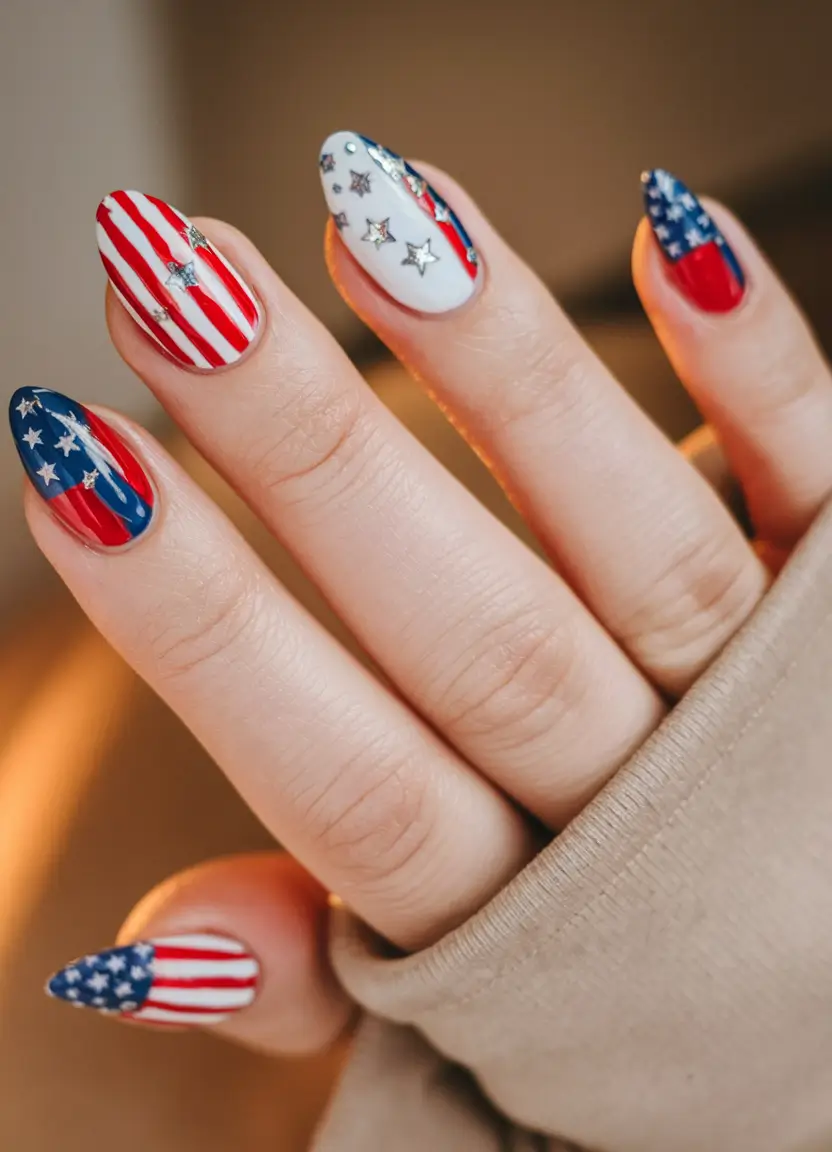
Simple Star Accent for Bold Patriotism
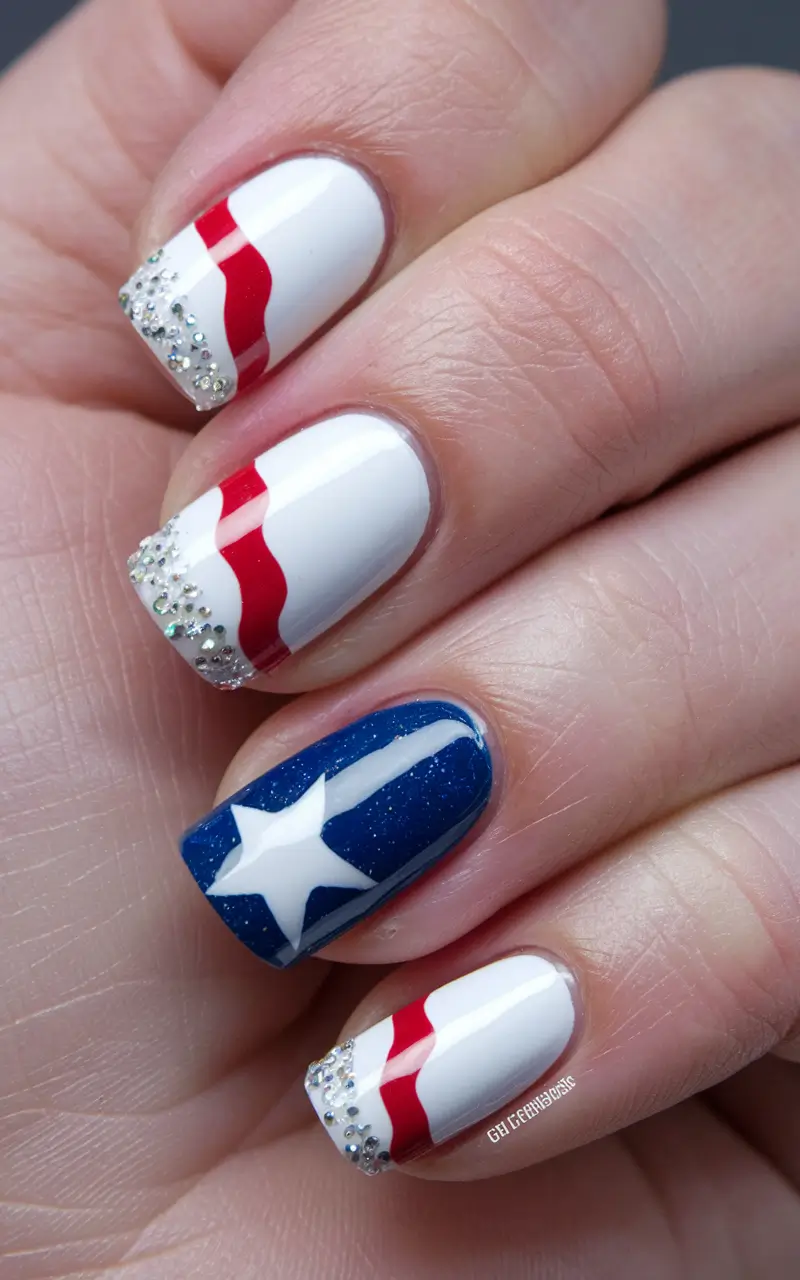
I really love how striking the bold red star looks against the crisp white background in this easy, cute 4th of July nails design. The nails are the perfect shade and bring out the design and the glittery silver highlights make everything sparkle, resulting in a playful and attractive manicure. This idea is great for anyone wanting cute and effective 4th of July nails that are simple to create.
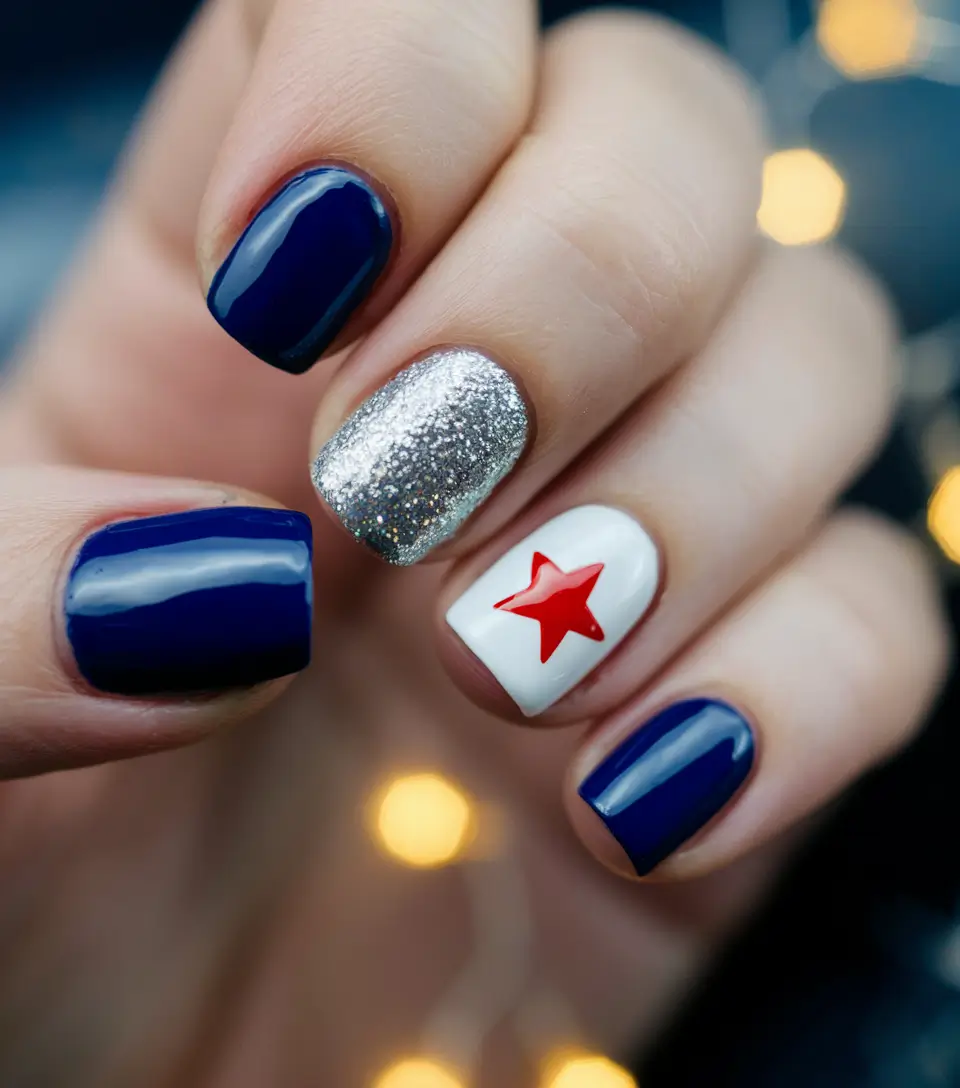
Go for Director’s Cut as the central star, Essie’s “Blanc” as the white base and Sally Hansen’s “Disco Ball” as the silver glitter. A top coat is important for locking in the design and maintaining the shine for a long time.
For first-time nail art, try using a stencil or a star-shaped sticker for a properly formed pattern. You can easily use this style for 4th of July nails for short nails because it requires very little space and isn’t complex.
This look gives me a traditional Americana feeling, except with some modern elements added. It always puts a smile on my face when I look at my nails; it’s definitely my favorite easy-to-make 4th of july nails.
Red Fireworks Burst with a Modern Twist
Talk about a burst of color! The paint used for this manicure is red, on which appear small bursts of blue, red and silver, celebrating the spirit of Independence Day. For those who like adorable and simple 4th of July manicures, sparkles will make them happy.
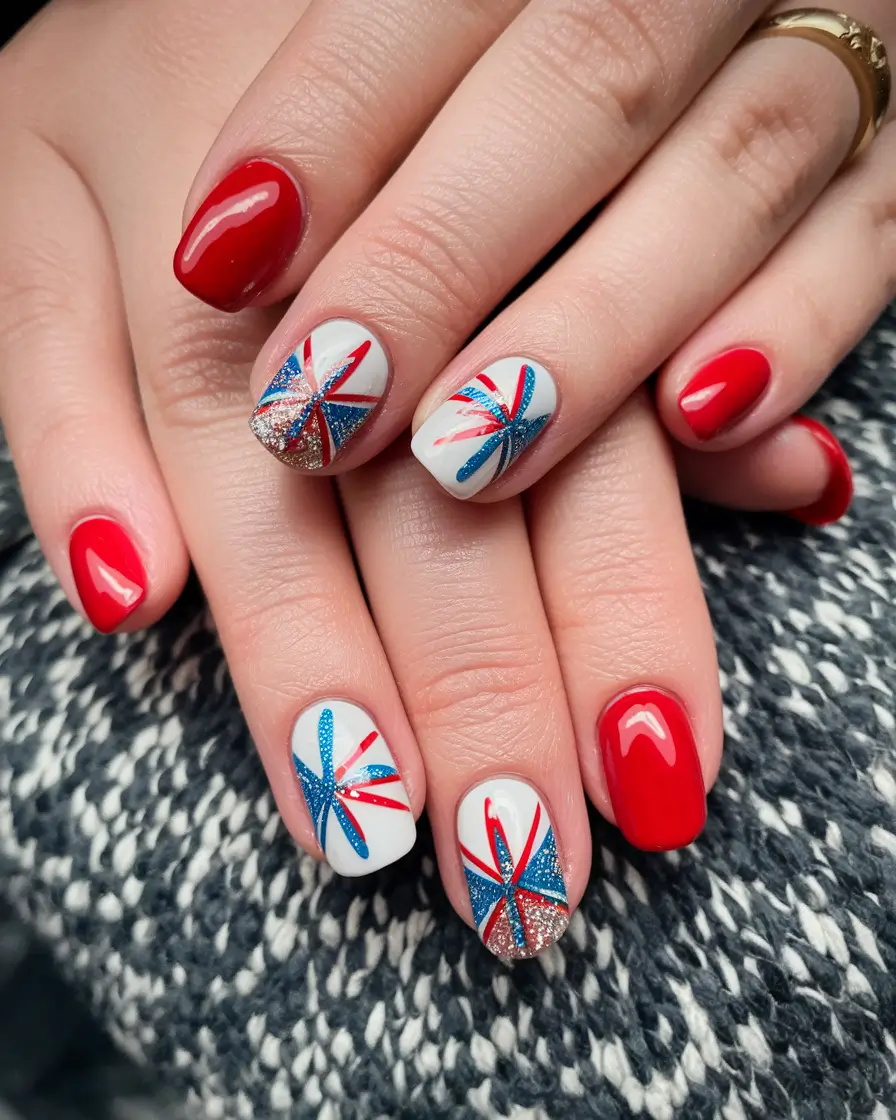
I often use a small fine brush and bright colors such as OPI’s “Alpine Snow,” Essie’s “Butler Please,” and China Glaze’s “Ruby Pumps,” to make nail art patterns that shine like stars. A glitter accent polish adds that extra wow factor.
Make a smooth red or white foundation and then make thin lines overlapping in all directions with a brush. If you put glitter on the painting, it will make the burst effect look even stronger and brighter.
It always makes me imagine sitting under a sky full of sparklers. I really like it because it captures the simple fun that we feel during the holiday.
Shimmering Waves with a Pop of Stars
This look modernizes the usual 4th of July nails style by adding blue nails with brushed white waves and bright red stars. The silver glitter accent nail gives off a wonderful shine whenever it catches light. This is a great style for people who want festive but still modern 4th of July nail art.
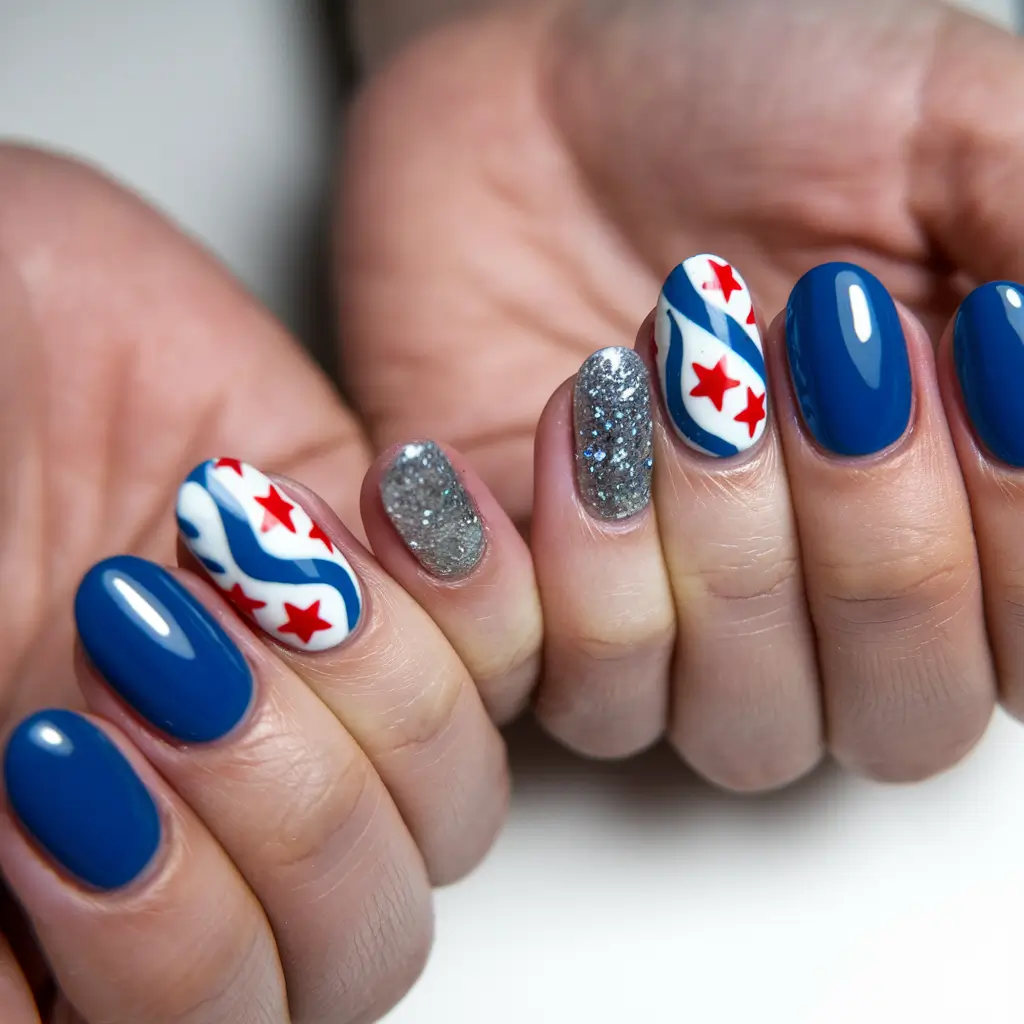
With this style, I suggest using colors from Essie, OPI and China Glaze, for example, “Blanc,” “My Private Jet,” and “Hey Sailor.” A thin brush or a striping brush is useful for adding wavy lines in your nail art.
Apply blue as a base and next use the brush to draw white waves across your nails. Stick or paint on little red stars and finish it up by adding some sparkling nail polish on one finger for glamour.
Looking at it almost brings the feeling of being at the beach for a holiday sunset picnic. These are a lovely diy 4th of July nails that represent the season’s theme.
Polka Dot Parade for a Playful Celebration
They show a lot of fun and you can see little red, white and blue dots all over a clean base. A vintage nail design like this is super-cute, simple to make for the 4th of July and will stay festive while it’s short-lived. It works well for people wanting a fun and joyful feel at the celebration.
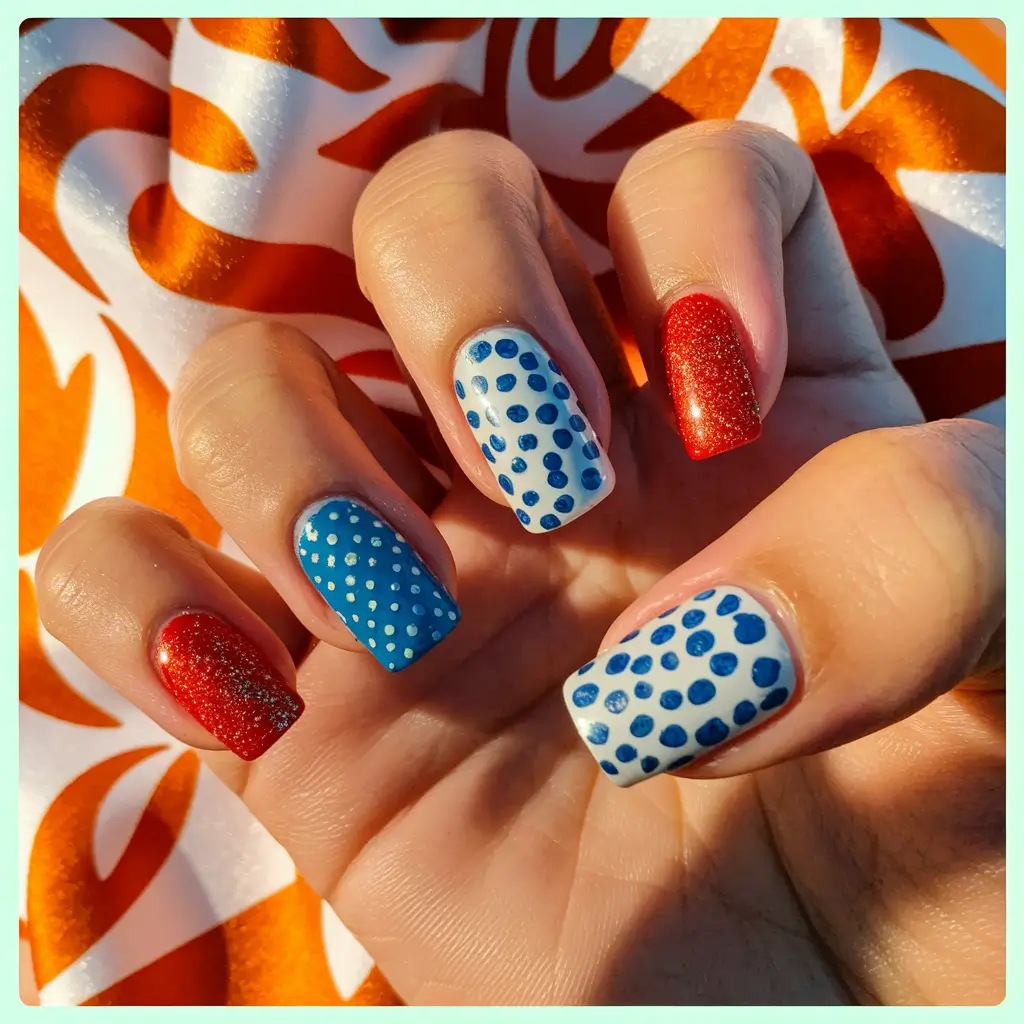
I’d select OPI’s “Red Hot Rio,” Essie’s “Bobbing for Baubles,” and use a dotting tool to decorate the nails. You might want to play with the dot sizes and you can include some glitter for more sparkle.
Apply a basic coat of nail paint on all nails, white or blue depending on what is chosen and ensure it dries completely. With the dotting tool, start placing polka dots of increasing and decreasing sizes in different and interesting colors. Finish with a top coat to protect the design.
I like that this style makes me look like I’m following trends while still having a 50s rockabilly twist. These designs are ideal for teenagers who want fun, unique and cute 4th of july nails.
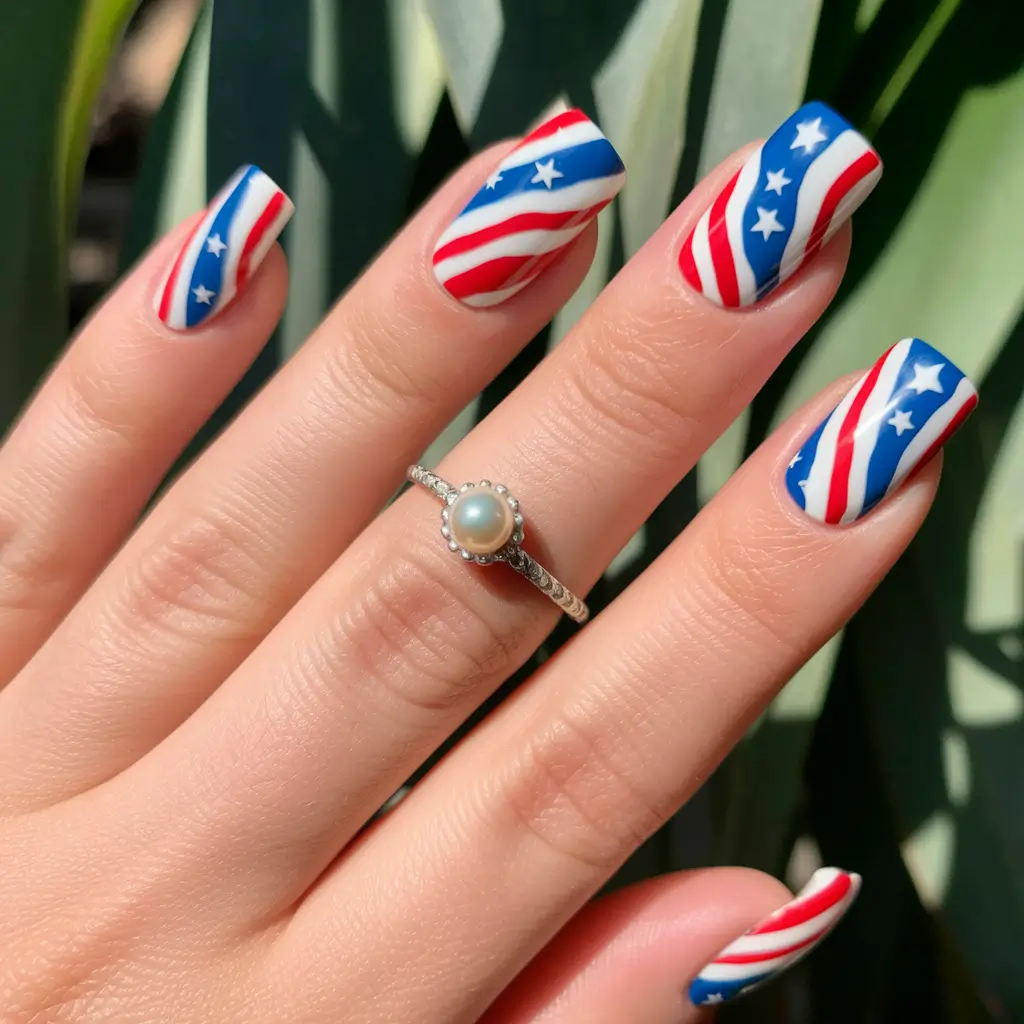
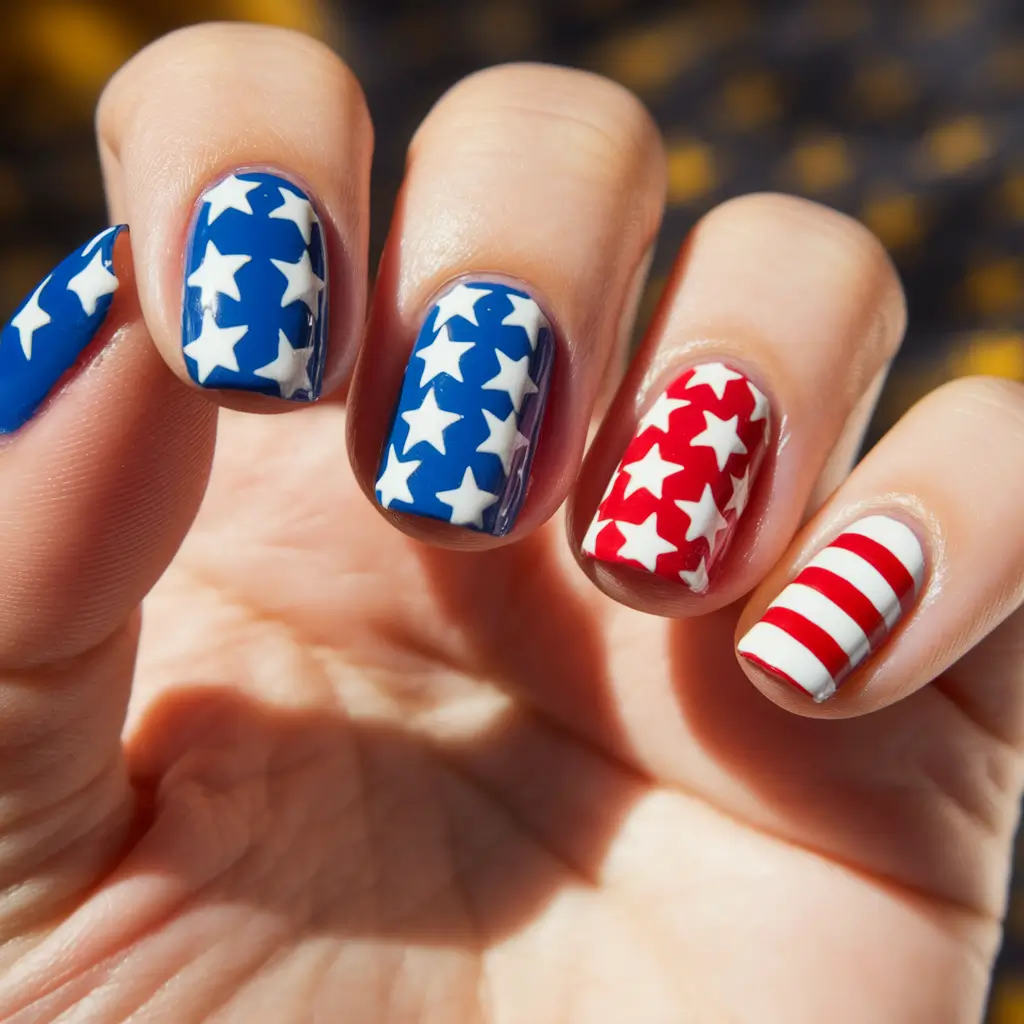
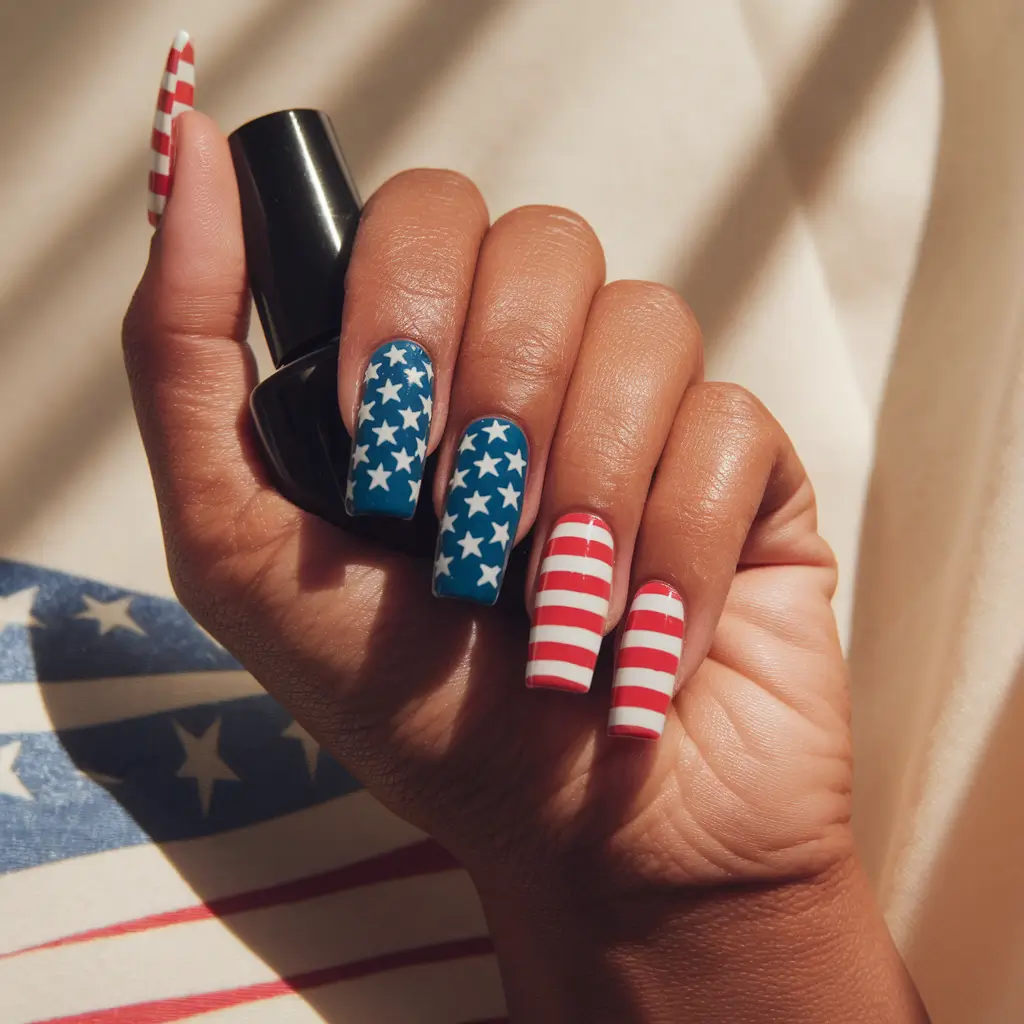
Stripes and Stars for Classic American Pride
If you love timeless designs, this one’s for you. To make cute and easy 4th of July nails, this manicure puts red, white, blue strips and accent stars, making the design easily spotted. This style works great for parties in the backyard, parades and watching fireworks.
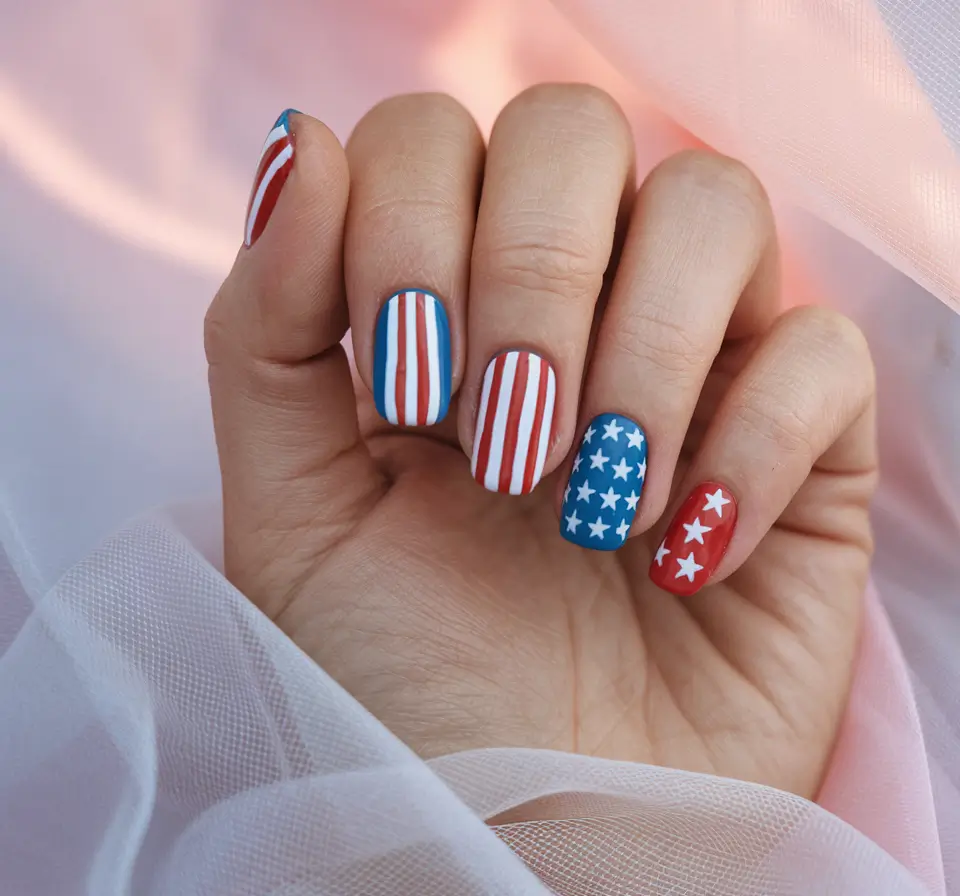
I’d suggest a striping brush for the lines and another brush or stickers, for the stars. This kind of design matches perfectly with reds such as OPI’s “Big Apple Red” and blues like Essie’s “Aruba Blue.”
Put on a base color of red, white or blue on all your nails to make them special. Following that, pick the striping brush and paint on stripes or small stars above the base color. Seal with a high-shine top coat.
This design brings back memories of classic Americana celebrations. It allows you to show love for your country in a simple, classy and adorable way.
Stars and Blue Sparkle Ombre
For a celebration in summer, the blue sparkle ombre is the perfect design to try. The light transition from natural nail bed to blue glitter tips is both easy on the eye and very noticeable. With its bright white stars on red and blue, the accent nail is the nail to wear for a patriotic and complete set of cute July 4th nails.
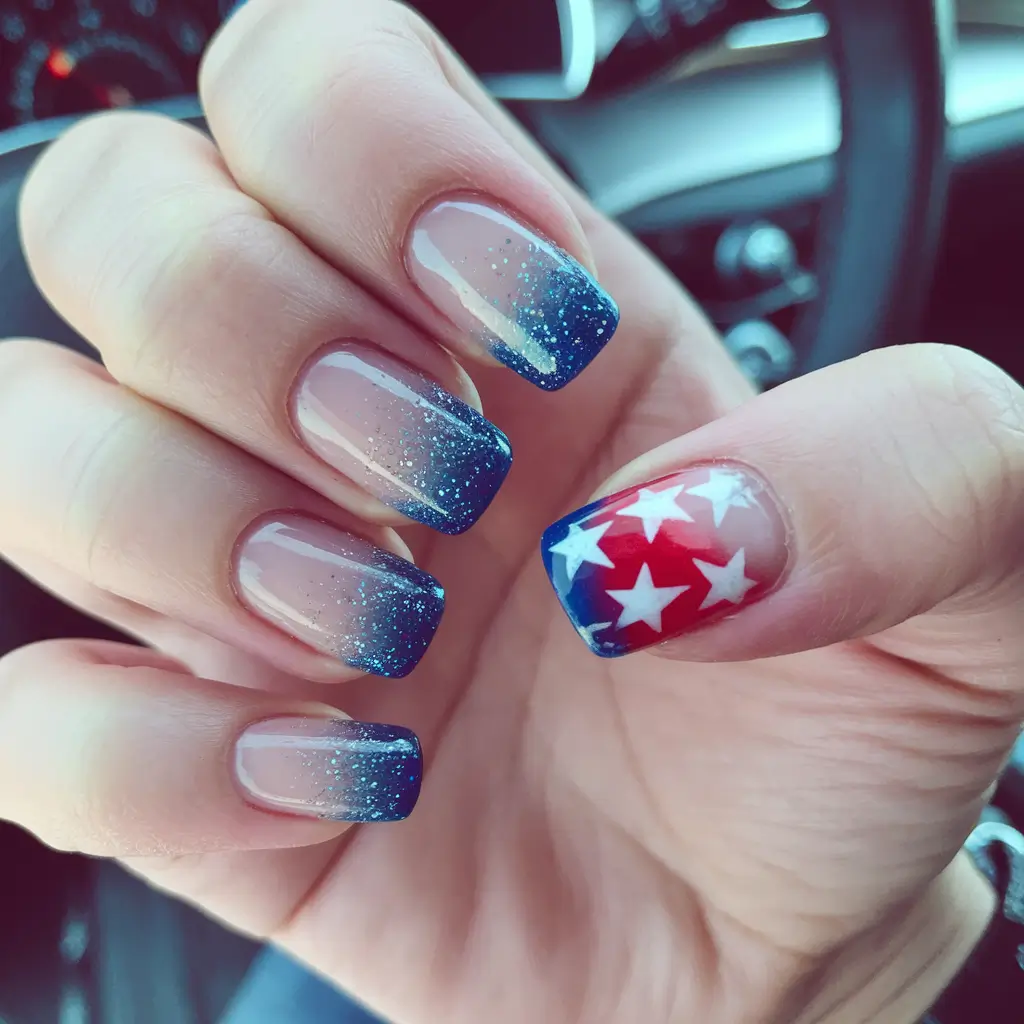
For avoid dreaded chipping, my suggestion is to first add a clear base coat by OPI or Essie for your nail as a base. For the ombre effect, blend a fine blue glitter polish (try China Glaze’s “Dorothy Who?”) with a sponge applicator. The glittering nail can be created by sticking on some white star decals or by painting a clean white line with a nail art brush.
Whenever I want that beautiful gradient effect, I apply color step by step with every layer set to dry completely between coats. A thin nail art brush allows me to be precise when drawing the white stars on the red accent nail part. Don’t let the design fool you, even someone new to manicures can make adorable and simple 4th of July nails.
I like this design because it mixes simple summer nails with some glittery drama which would look great both at a backyard party and during a fireworks display.
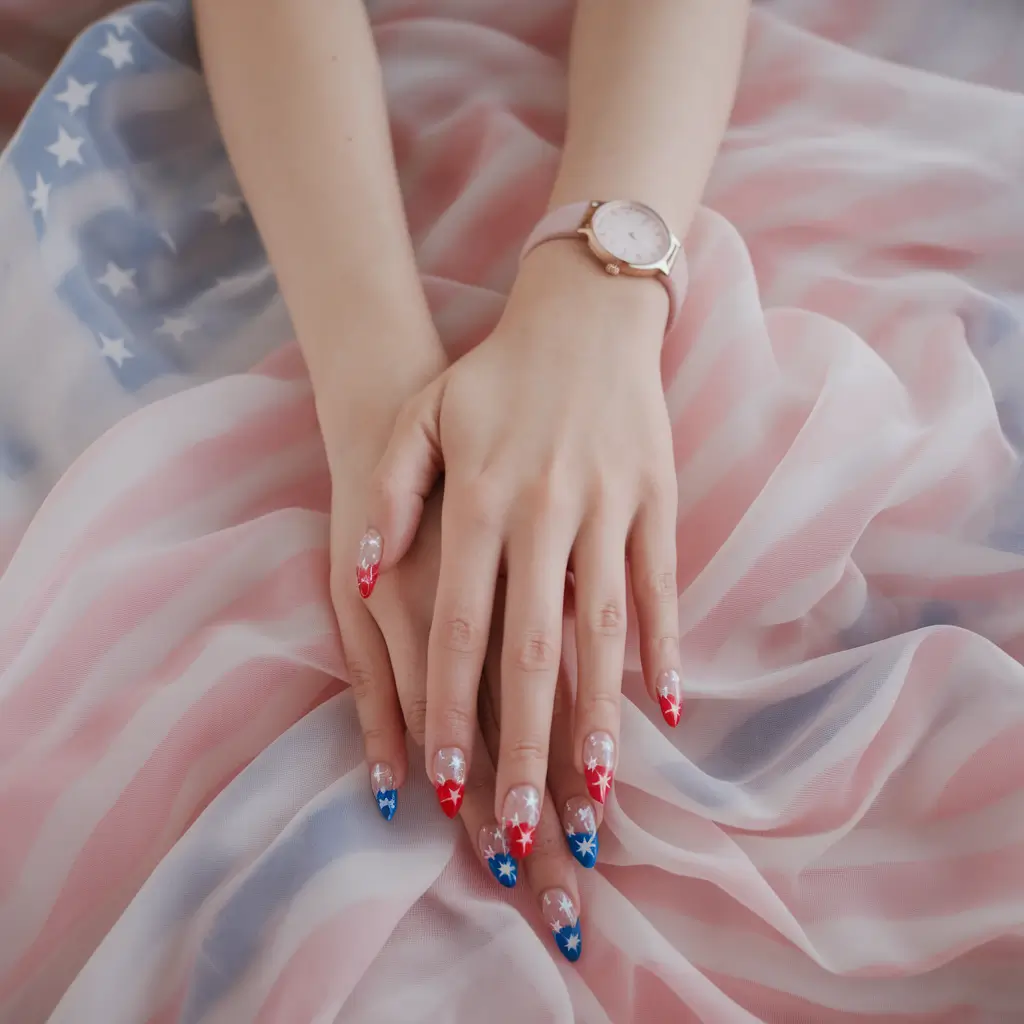
Red Starry Almond Nails
These nails highlight bold and fun changes from usual red, amazing for almond nails on 4th of July celebrations. A foundation of clear polish is layered with red nail art which blends into the natural nail; the design includes little white stars for a starry look.
I think people should always begin with a high-quality base coat. You can use Sally Hansen’s Hard As Nails to toughen up and shield your natural nails. To get the red fade, I think a classic red from Essie, applied with a sponge, would work well. You can get the white stars with a thin detailed brush and white polish or you could use nail art stickers for the same effect.
Apply a clear base before using a makeup sponge to gently add small amounts of red polish in a gradual way from the nail tip to the base. After, use a star sticker or dip a dotting tool into white polish to add small stars. Finish the stencil by applying a sealant top coat to it.
Fireworks nails are special — they mix having fun with sophistication and you can wear them all summer without a second thought.
Red, White, and Blue Glitter Stripes
It brings a bright touch to patriotism by uniting red and white stripes, rhinestones and a statement nail with a large white star. It’s a favorite for people who love 4th of July nails and want something attention-getting.
I suggest you go with acrylic paint for a design like this one because it lasts and is strong enough. When I do sculpting, I prefer Gelish or Young Nails acrylic systems. To put the red and white stripes on, use either tape or a very thin paint brush. Rhinestones shine up your nails and give them a sparkle and I recommend using Swarovski or high-quality rhinestones with nail glue.
I first add on the acrylic base, making me nails an almond or coffin shape. After I have filed the nails, I carefully paint the red and white stripes, then put rhinestones on the tips of the white stripes for a glamorous finish. Having a white star with blue nail polish on your ring finger blends them all together and gives your manicure center stage at the party.
The style is strong and fits well with 4th of july rings on coffin or almond nails. It’s so beautiful and the rhinestones bring a sense of luxury.
Stripes, Dots, and Stars Mix
If you enjoy having different patterns, the design features stripes, polka dots and stars, all in the classic red, white and blue. Different patterns on the nails make them a fun choice for cute July 4th nails for teenagers looking for something that stands out.
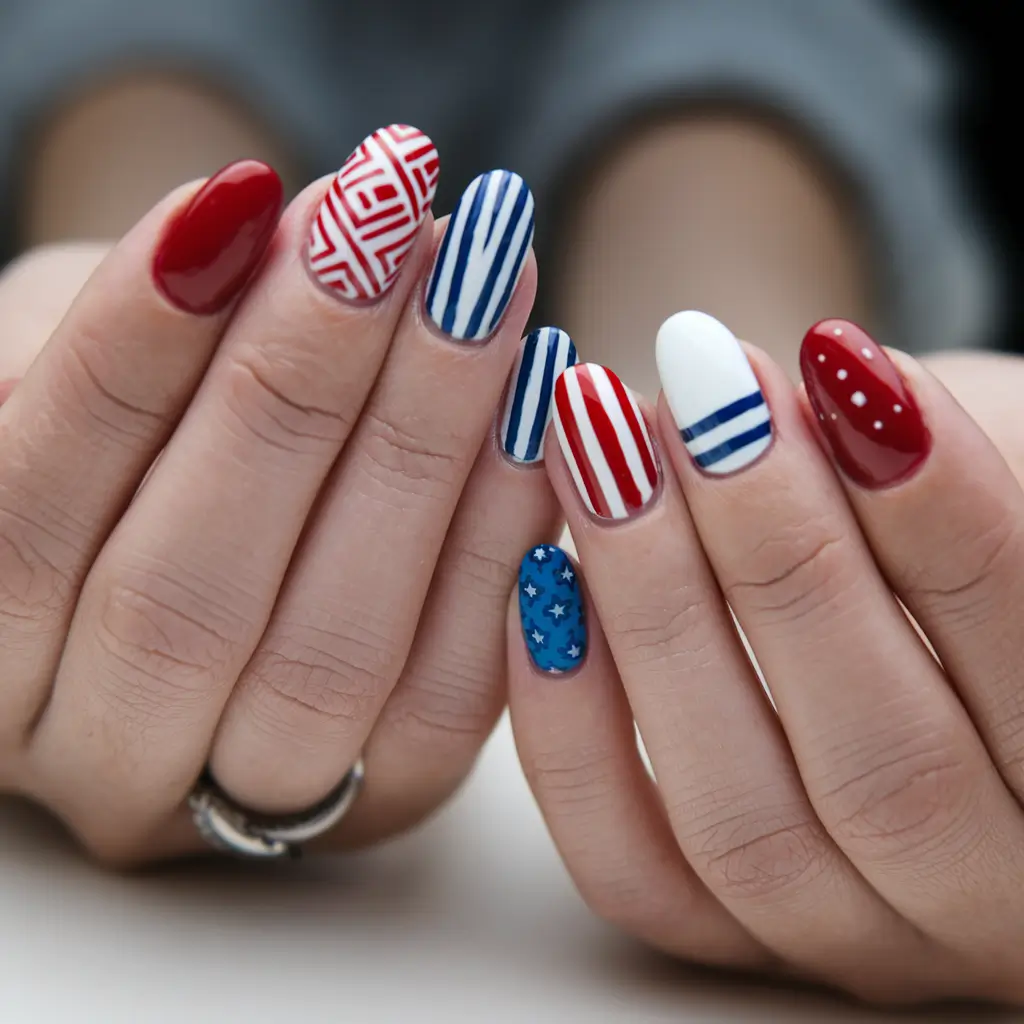
I suggest using a set of small detailed brushes and dotting pens while doing this art style. The company’s “Big Apple Red,” “Alpine Snow,” and “Russian Navy” give you bold and traditional colors for the base. For straight lines, apply striping tape and for even dots, pick dotting tools.
I begin by brushing on the main shade onto each toenail. I use tape for straight lines, a brush for designing patterns and dots are applied with special tools. It gives plenty of room to try new ideas and looks great on nails of any size.
The design stands out because it expresses the holiday without making everything the same. The details on every nail make them stand out as meaningful and interesting at any July 4 holiday event.
Pink and Blue Stars Combo
For those who want a gentle patriotic look, this design uses pink, blue and white and adds playful stars. The look is both fun and sweet on your fourth of July manicure.
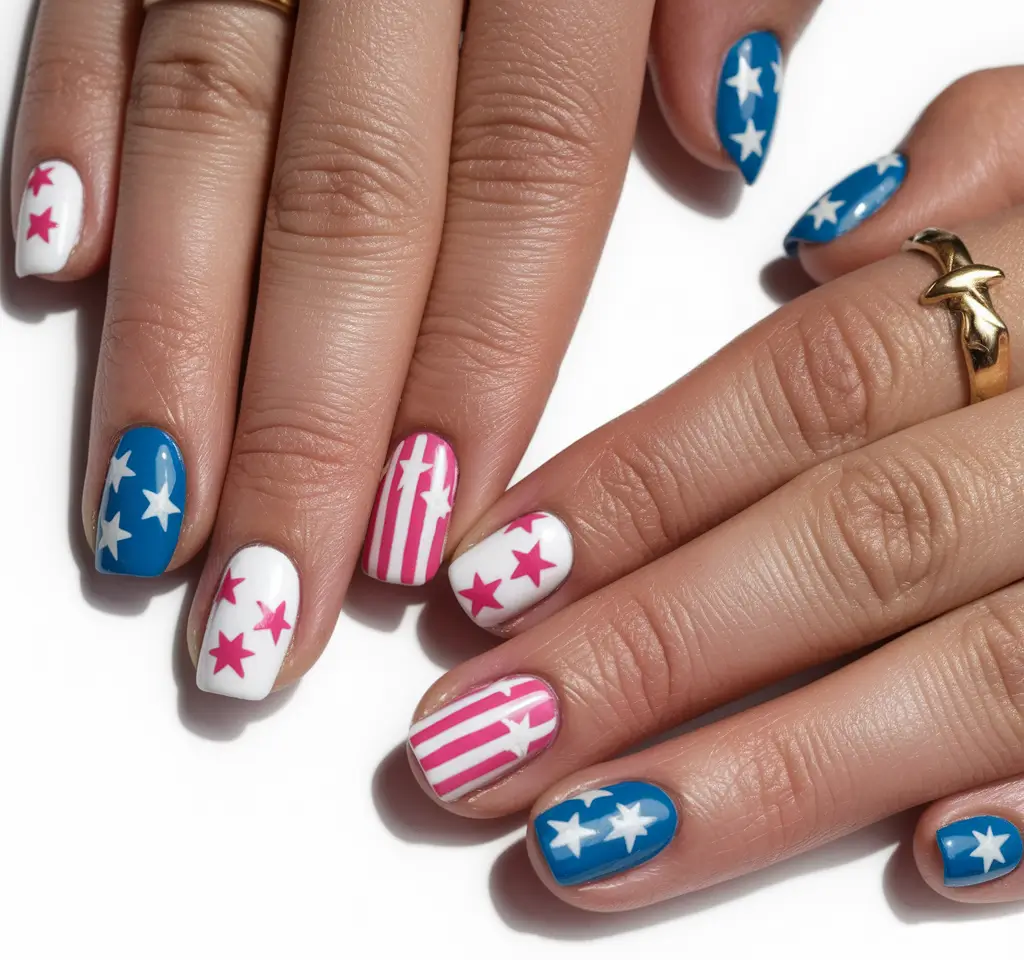
Essie’s “Bikini So Teeny” and OPI’s “Mod About You” are good suggestions for the pink and blue bases. I would use a small brush or star stencils on the stars.
Creating this look at home is a joy. I first put on a clear base coat and then apply pink on some nails and blue on the other nails. When the background is dry, I either put star stickers on or paint stars using a detail brush. Tempered glass gives a silky finish and protects the design.
This design works well for people who like things to be both discrete and enjoyable. Young dancers can wear headbands easily and they put a cuteness factor into any outfit for summer.
Glittering Star Accent with Bold Blue Base
Combining deep blue, crisp white and sparkling silver gives an attractive design that represents easy cute 4th of july nails. The main color is blue, covering most of your nails and the red star on the white one is the highlight, representing the holiday. Silver nail polish on your fingertips pulls the whole design together and gives that special glitter and shine that helps your 4th of july nails look even better.
I love to use polishes like OPI’s “Russian Navy” for that deep blue, coupled with Essie’s “Blanc” for the white base, and topped with Sally Hansen’s “Strobe Light” for that sparkling accent. A thin detail brush and a red polish with high pigment will give you a lovely red star.
When I do it at home, I always begin by applying a good base coat to look after my nails. The following step is to use two coats of the deep blue shade over most of my nails. I paint the accent nail with a pure white shade of polish. When the white polish has dried, I draw a red star with a small brush. To do a glitter nail, I put the silver polish over a base coat so the shine is extra. As the final step, I apply a smooth top coat over the whole painting.
To me, this approach is cheerful and not too complicated and it’s perfect for those wanting a flashy but nevertheless achievable look at home. The design makes everyone compliment you and I adore how it looks with a denim jacket for a genuine country 4th of july nails look.
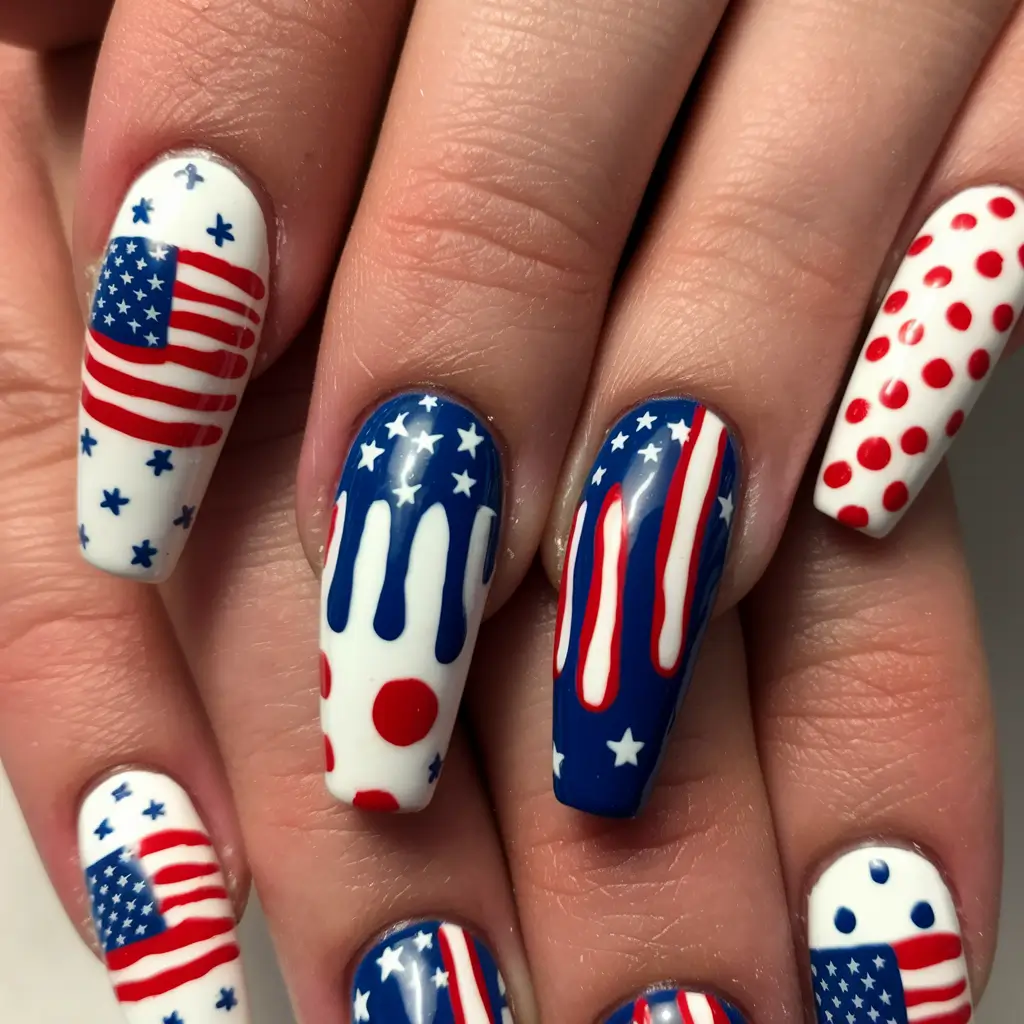
Red, White & Blue Fireworks Party
The design really expresses the party mood—think of cute nails to celebrate July 4th. The motif of fireworks is seen on every nail and each features a mix of vibrant blue, red and white streaks. Wearing nails with silver glitter on them gives a lively, sparkling effect that matches the spirit of a 4th of July holiday.
To get this look, I use a combination of bright polishes like OPI’s “Red Hot Rio” and “Alpine Snow,” plus a blue from Essie’s “Butler Please.” For the silver glitter accent, I prefer Sally Hansen’s “Disco Ball” for that festival sparkle.
When making this manicure myself, the first step is to cover all nails with a white foundation. After that, I paint the firework bursts with red and blue using a fine nail art brush and put silver glitter dots around each burst for more life in the design. A steady hand is key, but that’s half the fun of cute diy 4th of july nails! A top coat seals everything in place.
It always gives a smile when I see the fireworks in this design; the combination is lively, simple and suitable for any festival. Barbecues, parades and every other kind of celebration is a great time to choose glitter eyeshadow.
Patriotic Swirls with Silver Accents
The 4th of July nails have a bold swirl using red, white and blue and small amounts of silver glitter to catch the light. Combining wavy lines and star motifs makes the design fun and festive for a long holiday. The style is stylish and sporty which makes it fit for different types of occasions.
I usually reach for Zoya’s “Sailor” for the deep blue and “Livingston” for the vibrant red. For the white base, OPI’s “Alpine Snow” is a reliable choice, and the silver glitter can come from Essie’s “Set in Stones” for that extra sparkle.
I paint my nails a clean white color at home as the starting point. Next, I let myself paint swirls of red and blue with a paint brush, sometimes making them combine in a few spots. I use a fine brush to tap sparkly silver glitter on top of parts of the design. A glossy top coat locks in the look.
I think these nails are a total showstopper. It is easy to make these, they can be used in many ways and they’re great for summer events. The swirls in the design feel like colorful parade floats and sparklers in the dark.
Colorful Confetti Vibes
This is a fun approach to cute simple nails for the 4th of July. They have a polka dot confetti look and the different red, white and blue spots give a fresh, up-to-date feel. All of the nails come together, with their own dots and tiny shimmers, to really show off the design.
For polishes, I love using China Glaze’s “Hey Sailor” for the red, Essie’s “Bikini So Teeny” for the blue, and OPI’s “Alpine Snow” for the white base. I use a small dotting tool to paint lots of confetti-shaped dots of different sizes.
I apply a white base to every nail at home. With the dotting tool, I place various-sized dots of red and blue and occasionally cover up some areas of both colors to get a layered appearance. This design is enjoyable to do and you don’t need to be perfect—just keep your hand and mind creative. A top coat makes sure the dots stay put.
I find it especially nice that this design can be worn by teenagers or people older than teens. It can easily go with different colors and adding sparkles for decoration is really simple as well.
Striped Flag Vibes
This is the design for those wanting cute and simple 4th of july manicures with an American touch. Switching between red and white stripes and including blue stars helps make this design clear, memorable and full of patriotism. It stands out, catches attention and is certain to get noticed at any gathering.
My go-to for this design is OPI’s “Big Apple Red” and “Alpine Snow,” with Essie’s “Butler Please” for that bold blue. I use a small striping brush to make the lines and a dotting tool for the stars, so everything looks neat.
Simply, I use a striping brush to make perfect stripes on each nail. I then place the blue stars precisely by using a dotting tool. When your top coat protects it, your nails look shiny and are secured.
These nails have always been one of my favorites, since they look simple yet they catch the eye. These nails are so much fun and cute and they look great with a sundress or jeans shorts.
Shiny Red Chevron Tips with Silver Stars
Adding these nails makes 4th of July fun by giving French tips strong red chevrons traced with faint blue and white lines. The nail beds are decorated with a little silver star at the top to represent Christmas. The overall design feels modern yet perfectly patriotic.
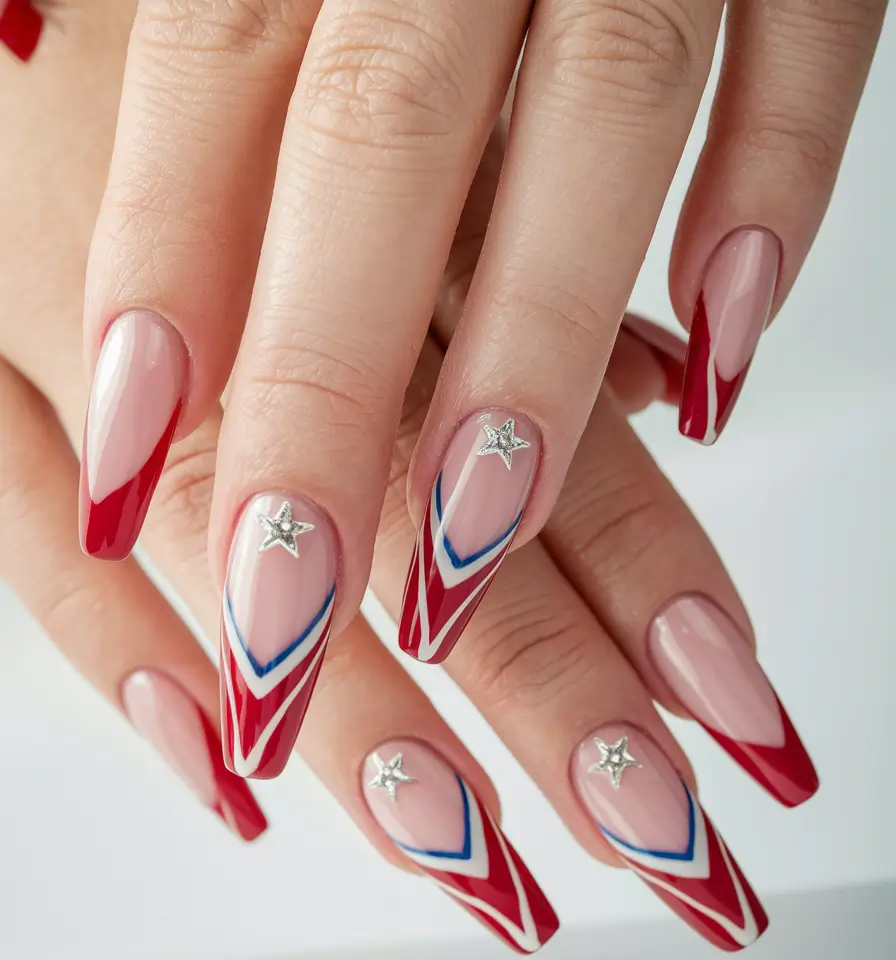
For this style, use OPI’s “Big Apple Red” polish and use a thin striping brush for adding the stripes. Silver stars are available from good nail art stores as well as Amazon.
The first step to this cute diy 4th of july nails style is shaping your nails like an almond or coffin. Pain the nails with their basic color, then, use your marker to draw the rounded red points. Let them dry and next add the white and blue decorative lines. Polish your finished base with a glossy top coat and stick the silver stars on with nail glue or a drop of top coat.
I absolutely like how this design manages to be elegant and festive at the same time. It has simple elegance with a bit of eye-catching style which is perfect for anyone hoping to look nice on Independence Day.
Patriotic French Tips with Stars and Stripes
A touch of creativity on a French manicure is an adorable idea for 4th of July. The French tips form stars in navy blue which gives the design a good touch for any 4th of july style, suitable for all teens. Because the look is so simple, it feels both neat and well-finished.
I think Essie’s “Ballet Slippers” is a good one for the base color and I recommend using “Aruba Blue” for the tips. To get accurate star shapes, use a fine nail art brush and striping brushes are important for the red stripes.
For these 4th of july french tip nails, you will need a steady hand. Put on a base coat, then carefully paint the blue on the front and add some star stickers. Painting small white stars onto thick red and white stripes creates a great-looking flag accent.
Because it’s bright and lively, the design is best for an informal holiday picnic or BBQ with friends. They are the kind of simple cute nails you’ll want to show off throughout the summer.
Playful Pastel American Flags
The idea is to have fun, with pastel blue tips and dozens of tiny white stars scattered throughout and a cute American flag on one nail. You can customize it for lovely 4th of July nail or toe nails or keep it cute and simple. Because the cake is oval, it stays soft and pretty for a casual gathering.
Choose a nice soft blue color for your base nails such as Sally Hansen’s “Breezy Blue,” and use a white stamping polish to add the stars. Red striping brush and a fine detail brush are used to make the accent nail.
Paint all your nails with the first color and use a dotting tool or a stamping plate to put on the stars. Place the star accents and then draw a vertical line down the middle with a small nail sticker or brush.
I often reach for it since it is charming and reminds me of holidays, so it matches with many outfits for a casual, fun summer look.
Layered Stars on a Soft Pink Base
To have a girly and fun look for Independence Day, this shirt presents delicate red, white and blue stars on a sheer pink background. Stars have different sizes which creates a bold look great for polished nails on the 4th of July.
What I suggest for this color scheme is starting with a sheer pink nail color such as OPI’s “Bubble Bath.” You could create stars by stickers or by using a stamping plate and white, red and blue polish.
1. Put on a sheer pink foundation, let it settle for a while and then dry it completely. After that, use a thin brush or cover your nails with stickers to add the stars anywhere you wish. Seal with a high-shine top coat.
If you hope for a dinner party with a modest touch of celebration, this is a good design to consider, whether for a summer brunch or fireworks.
Stars and Stripes Elegance
On this 4th of july mani, red and white stripes are applied next to one another and solid blue nails are covered in white stars. The layout looks new and simple, giving a relaxed version of a patriotic holiday theme.
The colors Essie offer are ideal for these polishes: choose “Blanc” and “Really Red” for the stripes and go with “Midnight Cami” for the base. It is easy to make tiny, even white stars on your nails with the help of a dotting tool or star stickers.
Use a striping brush to paint the sections and paint the stars either with a nail art brush or by stamping. Seal with a top coat for a smooth finish.
It’s a style I like because it looks trendy and trendy with a bold freedom declaration.
Matte Americana Vibes
One of the best ways to show patriotism is with fully matte nails in red and white stripes and blue nails with white stars. This look is just right for country-themed 4th of july nails and is a hit on Instagram!
A matte top coat and three lively polishes in the colors red, white and blue are needed to do this look. Brands like OPI or Essie offer great, long-lasting options.
Apply some red, white and blue to the base of the cake in the pattern you plan. Next, take a small brush to put stripes and stars on just the accent nails. End the look by applying a matte top coat.
I would pick this design for a fireworks rooftop event — it stands out, shows how much you care about the holiday and all in a cool way.
Save Pin