Fall Tree Nail Art Ideas for 2024: Embrace Autumn with Simple and Festive Designs
When the leaves begin to change and the air turns crisp, it’s the perfect time to reflect that autumnal beauty on your nails. Fall tree nail art is a wonderful way to capture the essence of the season. From the vibrant hues of fall foliage to the intricate details of bare branches, these designs are both stunning and versatile. Let’s dive into some beautiful fall tree nail art ideas, each accompanied by a detailed description and tutorial.
Golden Autumn Branches
Embrace the rich colors of fall with this golden autumn branches design. The nails are painted with a gradient of warm yellows and oranges, blending seamlessly to create a sunset-like background. Over this, delicate black branches stretch across the nails, giving the design a striking yet elegant look.
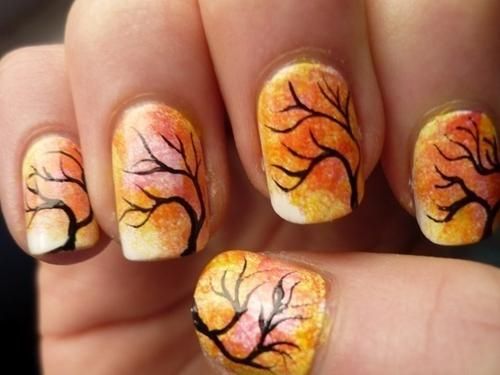
Materials:
- Base coat
- Yellow nail polish (e.g., OPI’s “Sun, Sea, and Sand in My Pants”)
- Orange nail polish (e.g., Essie’s “Playing Koi”)
- Black nail polish for the branches (e.g., China Glaze’s “Liquid Leather”)
- Thin nail art brush
- Top coat
Steps:
- Apply a base coat to protect your nails.
- Create a gradient effect with yellow and orange polish using a makeup sponge.
- Once dry, use a thin brush to paint black branches across each nail.
- Seal the design with a top coat for a glossy finish.
Turquoise Fall Trees
A unique twist on fall tree nail art, this design features a turquoise background with autumn trees adorned in orange and yellow leaves. The contrast between the cool base color and the warm leaf tones creates a visually appealing effect.
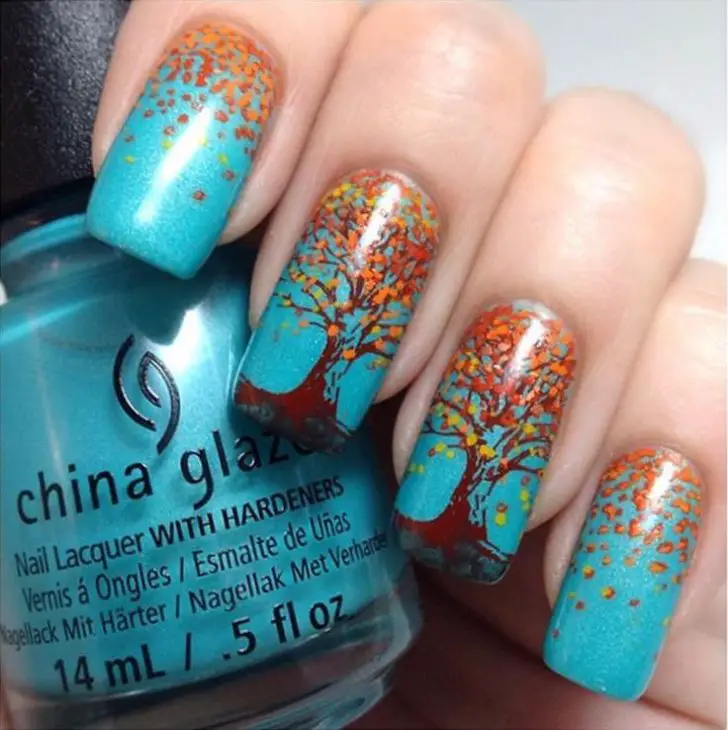
Materials:
- Base coat
- Turquoise nail polish (e.g., China Glaze’s “Too Yacht to Handle”)
- Yellow and orange nail polish for the leaves
- Brown nail polish for the tree trunks
- Thin nail art brush or dotting tool
- Top coat
Steps:
- Apply a base coat.
- Paint your nails with turquoise polish.
- Use a thin brush or dotting tool to add tree trunks in brown.
- Create small dots or leaf shapes in yellow and orange to represent the foliage.
- Finish with a top coat to protect your design.
Misty Forest
Capture the mystique of a foggy fall morning with this misty forest nail art. The gradient background ranges from a soft gray to a deep charcoal, with bare branches and tiny red leaves adding a touch of color.
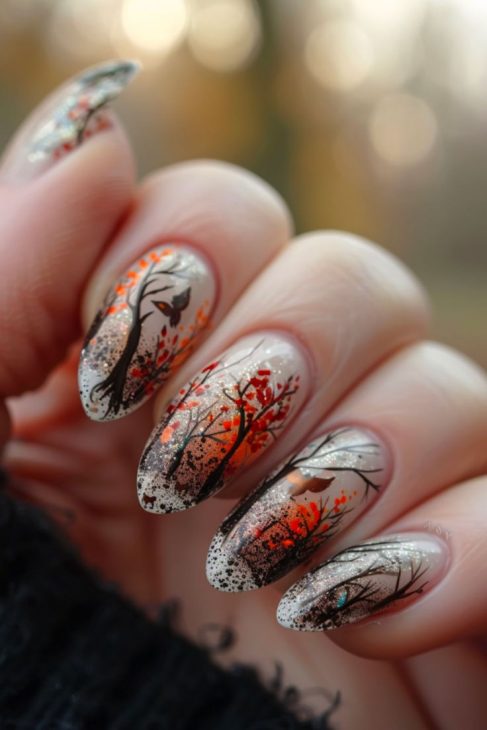
Materials:
- Base coat
- Light gray nail polish (e.g., OPI’s “I Can Never Hut Up”)
- Charcoal nail polish (e.g., Essie’s “Now and Zen”)
- Black nail polish for branches
- Red nail polish for leaves
- Thin nail art brush
- Top coat
Steps:
- Start with a base coat.
- Create a gradient with light gray and charcoal polishes.
- Paint thin black branches across the nails.
- Add small red leaves using a fine brush.
- Apply a top coat to lock in the design.
Glittering Fall Trees
For those who love a bit of sparkle, this glittering fall tree design is perfect. The nails are coated in a clear or nude base with glittery orange tips. Over the glitter, black branches extend, creating a stunning contrast.

Materials:
- Base coat
- Nude or clear nail polish
- Orange glitter nail polish (e.g., Sally Hansen’s “Big Glitter Top Coat”)
- Black nail polish for branches
- Thin nail art brush
- Top coat
Steps:
- Apply a base coat.
- Paint your nails with a nude or clear polish.
- Apply the orange glitter polish to the tips.
- Once dry, paint black branches extending from the cuticle towards the tips.
- Finish with a top coat to add shine and durability.
Subtle Fall Accent
This design is perfect for those who prefer a more subtle fall look. One or two accent nails feature a delicate tree with multicolored leaves, while the rest of the nails are painted in a complementary shade of brown.
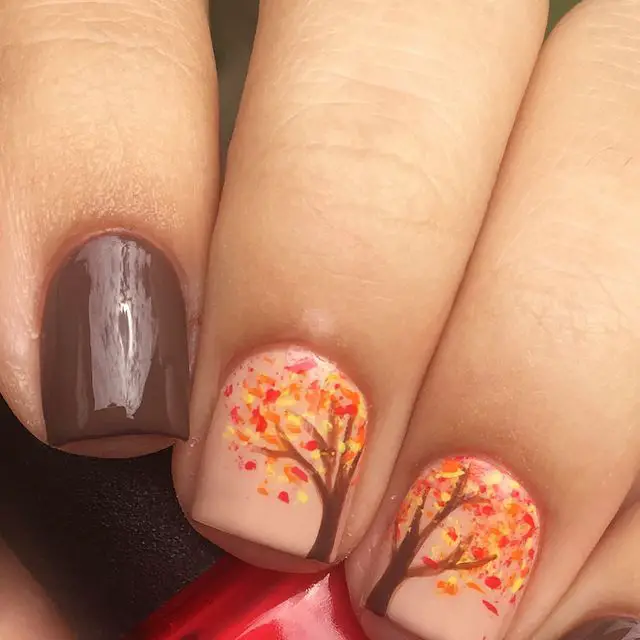
Materials:
- Base coat
- Brown nail polish (e.g., Essie’s “Chinchilly”)
- Multicolored polish for leaves
- Brown nail polish for the tree trunk
- Thin nail art brush
- Top coat
Steps:
- Start with a base coat.
- Paint most of your nails in brown.
- On the accent nails, use a thin brush to create tree trunks and branches in brown.
- Add multicolored leaves using tiny dots or leaf shapes.
- Seal the design with a top coat.
Matte Black with Fall Leaves
This elegant design combines matte black nails with a vivid fall leaf accent. The contrast between the rich black and the bright leaf colors creates a striking and sophisticated look perfect for autumn.
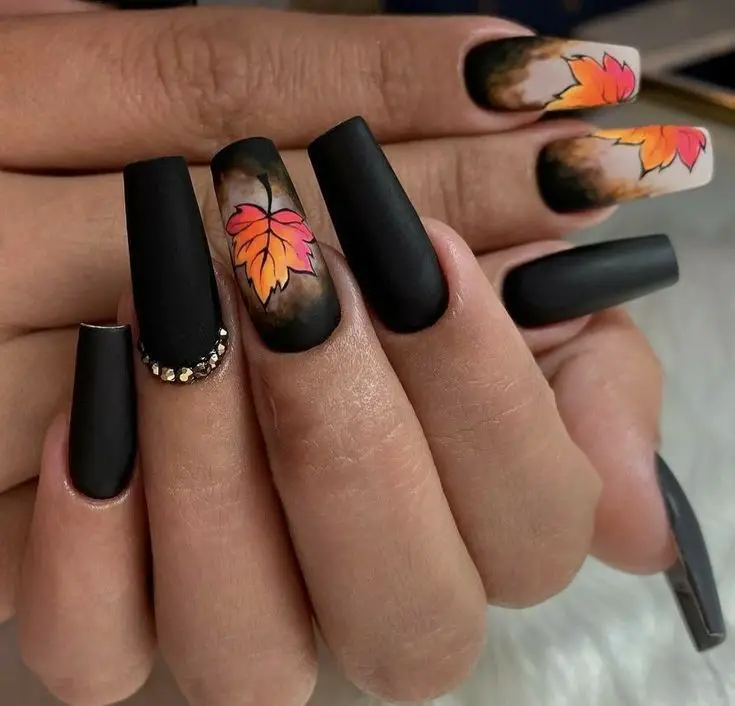
Materials:
- Base coat
- Matte black nail polish (e.g., OPI’s “Black Onyx” with a matte top coat)
- Orange, yellow, and red nail polish for the leaf (e.g., OPI’s “A Good Man-darin is Hard to Find,” Essie’s “Hay There,” and Essie’s “Forever Yummy”)
- Thin nail art brush
- Rhinestones for decoration
- Top coat
Steps:
- Apply a base coat.
- Paint all nails with the matte black polish.
- Use a thin brush to paint a fall leaf in orange, yellow, and red on the accent nails.
- Add rhinestones at the base of one nail for extra glamour.
- Finish with a top coat to seal the design.
Autumn Sunset Silhouette
This design captures the beauty of an autumn sunset with silhouette trees. The warm gradient background transitions from orange to red, evoking the colors of a sunset, while the black tree silhouettes add depth and contrast.
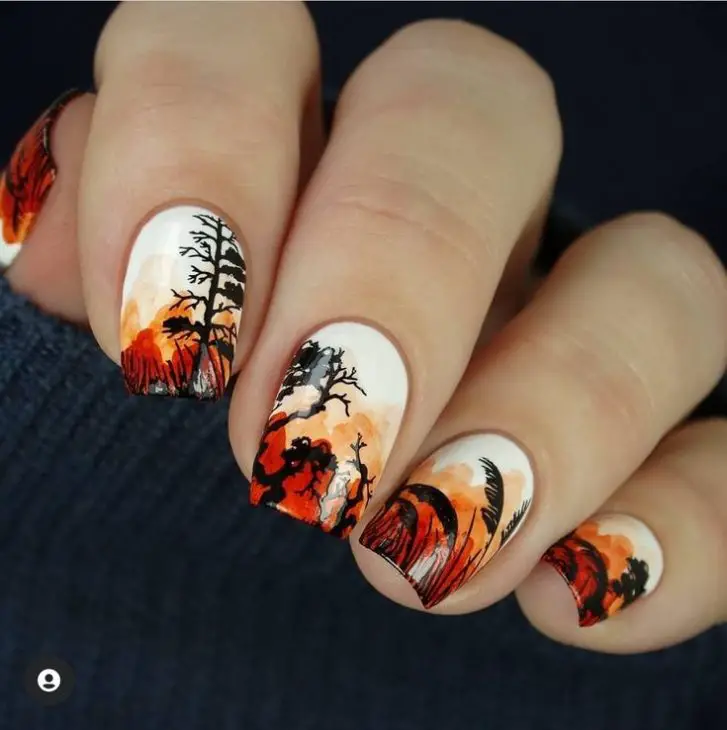
Materials:
- Base coat
- White nail polish (e.g., Essie’s “Blanc”)
- Orange and red nail polish for the gradient (e.g., Essie’s “Meet Me at Sunset” and “Playing Koi”)
- Black nail polish for the tree silhouettes
- Thin nail art brush
- Top coat
Steps:
- Start with a base coat.
- Paint your nails white to make the gradient colors pop.
- Create a gradient effect with orange and red polishes using a makeup sponge.
- Once dry, paint black tree silhouettes using a thin brush.
- Seal the design with a top coat.
Vibrant Fall Trees
Bright and cheerful, this design features vibrant fall trees against a white background. The colorful leaves and detailed tree trunks bring a lively touch to the nails.
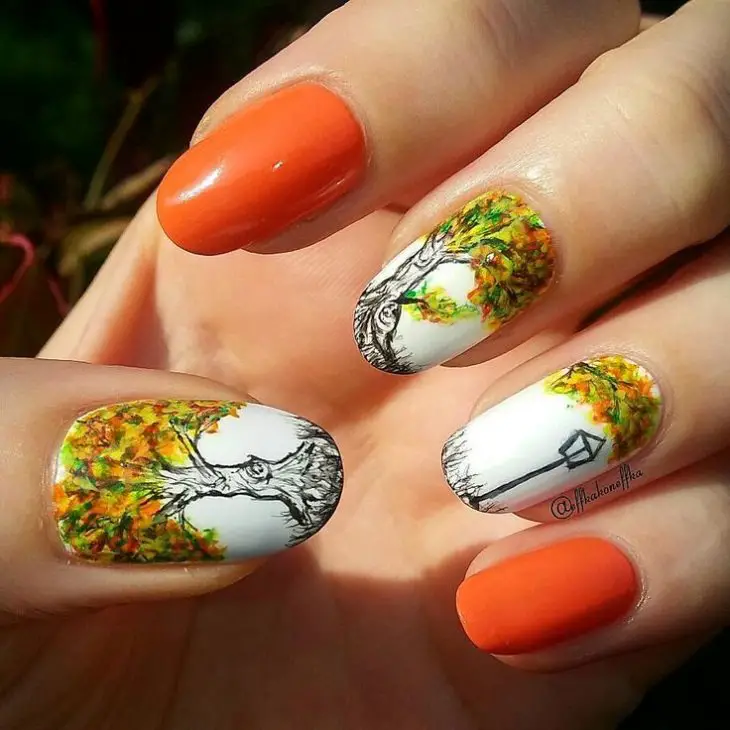
Materials:
- Base coat
- White nail polish (e.g., Essie’s “Blanc”)
- Green, yellow, orange, and brown nail polish for the leaves and tree trunks (e.g., OPI’s “Did It On ‘Em,” Essie’s “Hay There,” OPI’s “A Good Man-darin is Hard to Find,” and Essie’s “Chinchilly”)
- Thin nail art brush
- Top coat
Steps:
- Apply a base coat.
- Paint your nails with white polish.
- Use a thin brush to paint tree trunks in brown.
- Add colorful leaves using tiny dots or leaf shapes in green, yellow, and orange.
- Finish with a top coat to protect the design.
Glitter Fall Trees
For a sparkling take on fall tree nail art, this design features glittery nails with simple black tree silhouettes. The glitter adds a festive touch, making it perfect for fall celebrations.
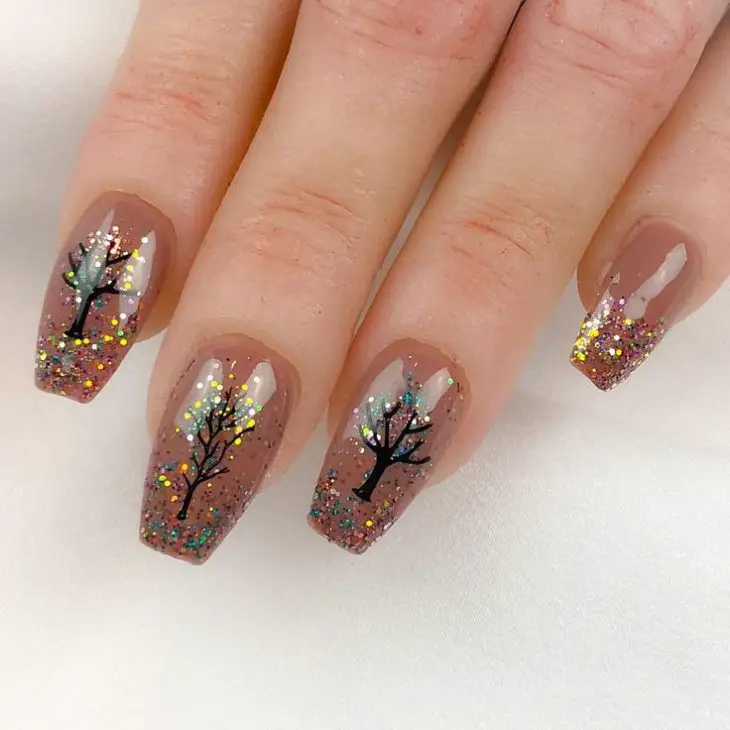
Materials:
- Base coat
- Nude or light brown nail polish (e.g., Essie’s “Topless & Barefoot”)
- Multicolored glitter polish (e.g., China Glaze’s “Fairy Dust”)
- Black nail polish for tree silhouettes
- Thin nail art brush
- Top coat
Steps:
- Start with a base coat.
- Paint your nails with nude or light brown polish.
- Apply a layer of multicolored glitter polish.
- Once dry, paint black tree silhouettes using a thin brush.
- Seal the design with a top coat.
Fall Leaf Accent
This design features a simple yet elegant fall leaf accent on a mix of nude and dark brown nails. The delicate leaf design stands out beautifully against the neutral background.
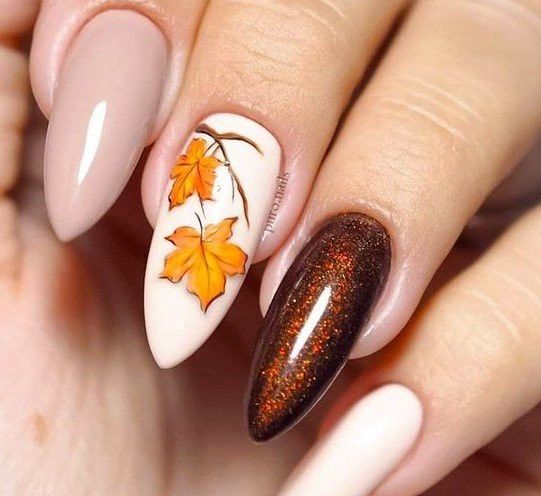
Materials:
- Base coat
- Nude nail polish (e.g., Essie’s “Mademoiselle”)
- Dark brown nail polish (e.g., OPI’s “You Don’t Know Jacques!”)
- Orange nail polish for the leaf (e.g., Essie’s “Meet Me at Sunset”)
- Thin nail art brush
- Top coat
Steps:
- Apply a base coat.
- Paint some nails nude and others dark brown.
- Use a thin brush to paint a delicate orange leaf on the nude nails.
- Finish with a top coat to protect the design.
Autumn Leaves on Long Nails
This vibrant design features a mix of bright orange, olive green, and delicate line art depicting fall leaves on a nude base. The combination of solid colors and intricate leaf details make this design both eye-catching and sophisticated.
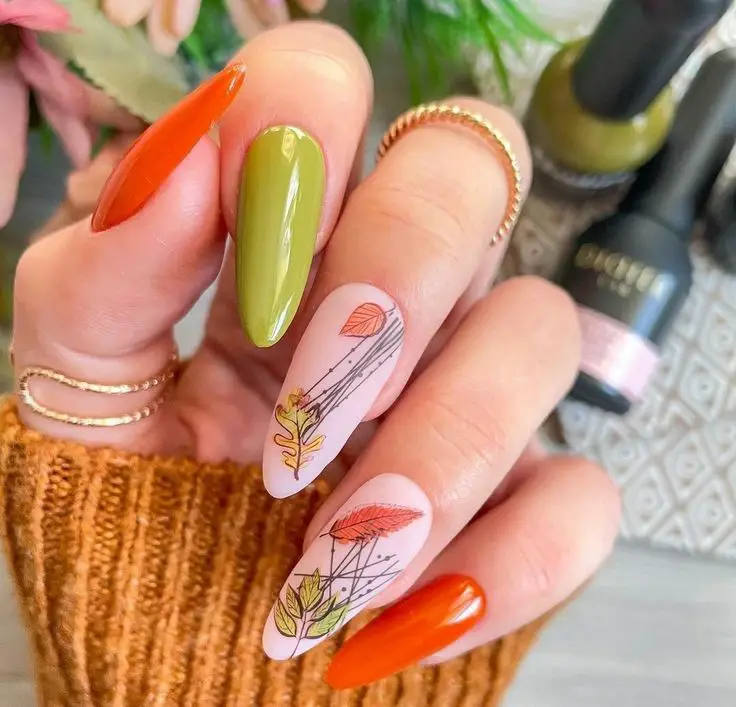
Materials:
- Base coat
- Orange nail polish (e.g., OPI’s “A Good Man-darin is Hard to Find”)
- Olive green nail polish (e.g., Essie’s “Exposed”)
- Nude nail polish for the base (e.g., Essie’s “Topless & Barefoot”)
- Thin nail art brush
- Top coat
Steps:
- Start with a base coat.
- Paint one nail orange, one olive green, and the others nude.
- Use a thin brush to create delicate leaf line art on the nude nails.
- Finish with a top coat to seal the design.
Fiery Fall Leaves
Capturing the fiery essence of fall, this design showcases bold red and orange nails with intricate leaf patterns on a white base. The vibrant colors and detailed artwork bring the warmth of autumn to your fingertips.
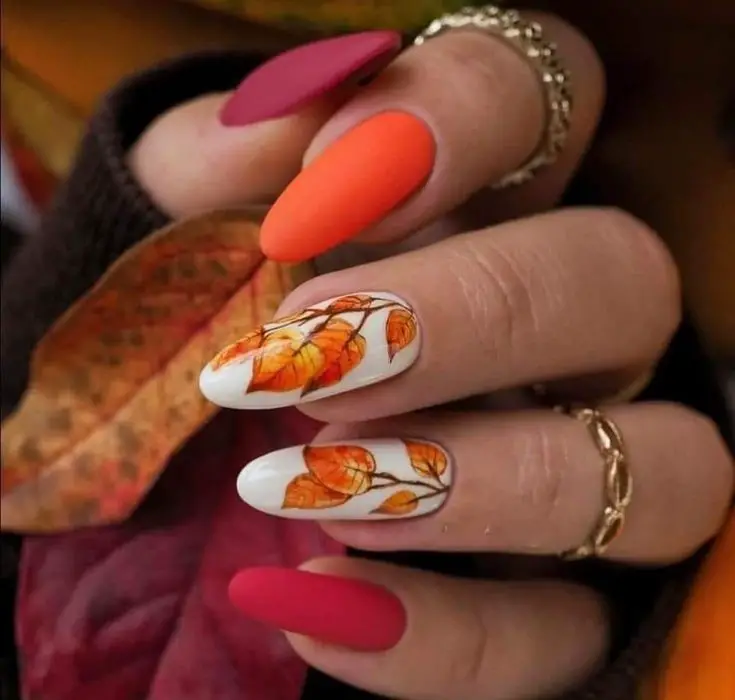
Materials:
- Base coat
- Red nail polish (e.g., Essie’s “Russian Roulette”)
- Orange nail polish (e.g., OPI’s “Cajun Shrimp”)
- White nail polish for the base (e.g., Essie’s “Blanc”)
- Thin nail art brush
- Top coat
Steps:
- Apply a base coat.
- Paint a couple of nails red, a couple orange, and the rest white.
- Use a thin brush to paint detailed leaves in red and orange on the white nails.
- Seal the design with a top coat.
Earthy Tones and Leaves
This design combines earthy tones with minimalist leaf art. The matte finish in green and orange gives a natural, sophisticated look, while the simple leaf designs add a touch of elegance.
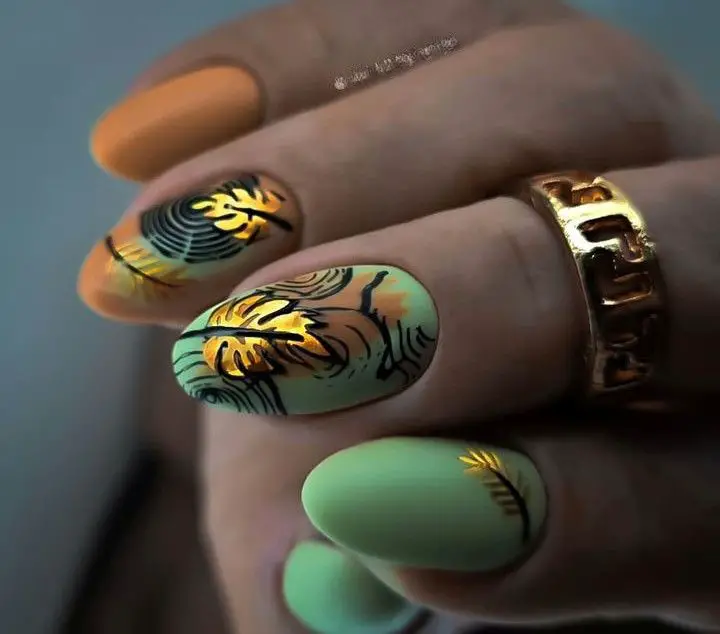
Materials:
- Base coat
- Matte green nail polish (e.g., Essie’s “Mojito Madness”)
- Matte orange nail polish (e.g., OPI’s “It’s a Piazza Cake”)
- Nude nail polish for the base (e.g., Essie’s “Spin the Bottle”)
- Thin nail art brush
- Top coat
Steps:
- Apply a base coat.
- Paint your nails with green, orange, and nude polish in a pattern.
- Use a thin brush to draw minimalist leaves on the nude nails.
- Finish with a matte top coat.
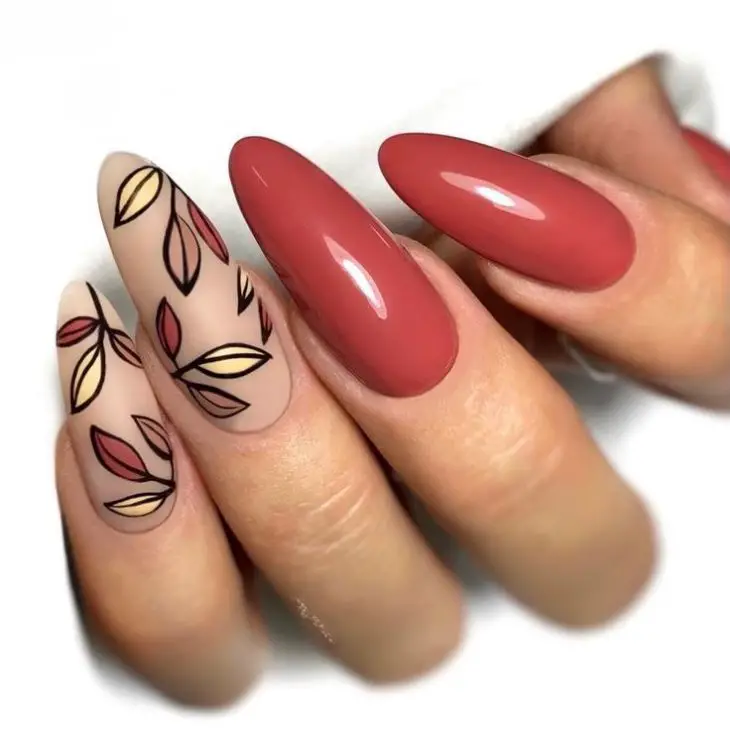
Autumn Leaf Patterns
This elegant design features a mix of deep red and neutral nude nails with outlined leaf patterns. The design is simple yet chic, perfect for those who love understated elegance.
Materials:
- Base coat
- Deep red nail polish (e.g., Essie’s “Bahama Mama”)
- Nude nail polish for the base (e.g., Essie’s “Bare With Me”)
- Thin nail art brush
- Top coat
Steps:
- Start with a base coat.
- Paint some nails deep red and others nude.
- Use a thin brush to outline leaves on the nude nails.
- Seal the design with a top coat.
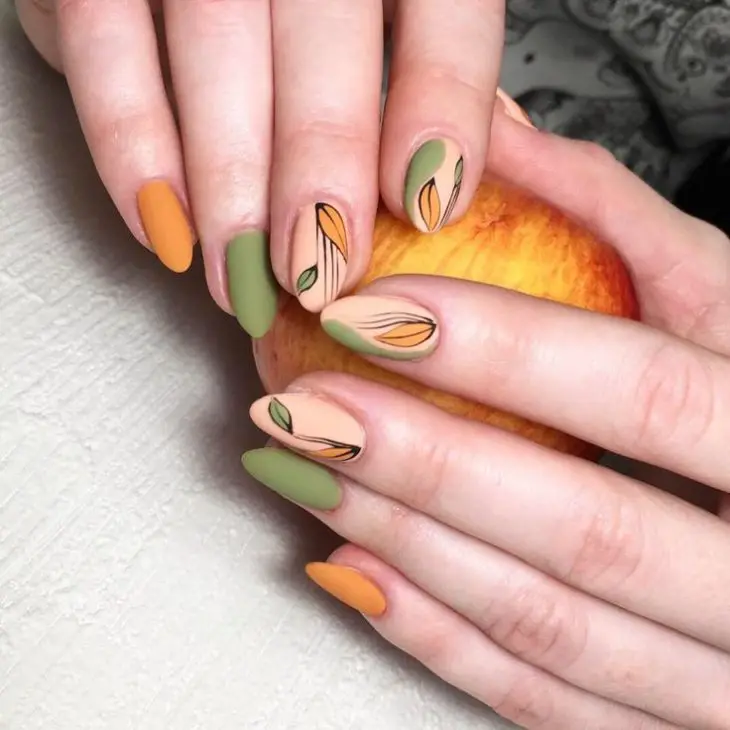
Gold Leaf Accents
A luxurious take on fall nail art, this design incorporates gold leaf accents on a matte background of green and orange. The combination of metallic and matte finishes creates a stunning contrast.
Materials:
- Base coat
- Matte green nail polish (e.g., Essie’s “Fashion Playground”)
- Matte orange nail polish (e.g., OPI’s “It’s a Piazza Cake”)
- Gold nail polish or gold leaf accents
- Thin nail art brush
- Top coat
Steps:
- Apply a base coat.
- Paint your nails with green and orange polish.
- Use a thin brush to apply gold leaf accents to the nails.
- Finish with a matte top coat.
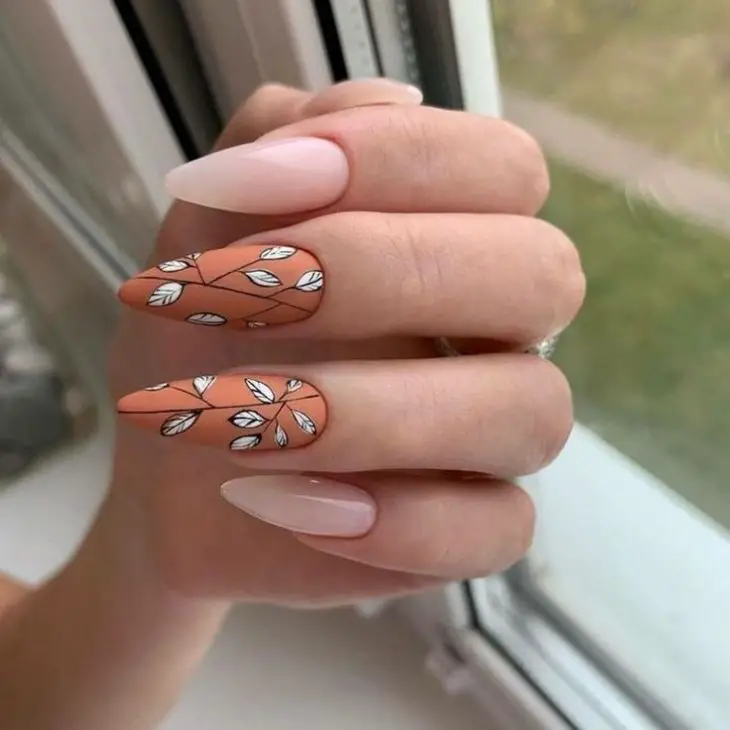
Elegant Autumn Branches
This elegant design features soft pink and nude shades with detailed white leaf patterns on an orange base. The combination of subtle colors and delicate artwork makes this design perfect for those who love understated elegance.
Materials:
- Base coat
- Nude nail polish (e.g., Essie’s “Topless & Barefoot”)
- Soft pink nail polish (e.g., OPI’s “Bubble Bath”)
- Orange nail polish for the base (e.g., Essie’s “Playing Koi”)
- White nail polish for the leaf details (e.g., OPI’s “Alpine Snow”)
- Thin nail art brush
- Top coat
Steps:
- Start with a base coat.
- Paint some nails nude, some soft pink, and others orange.
- Use a thin brush to create white leaf patterns on the orange nails.
- Finish with a top coat to seal the design.
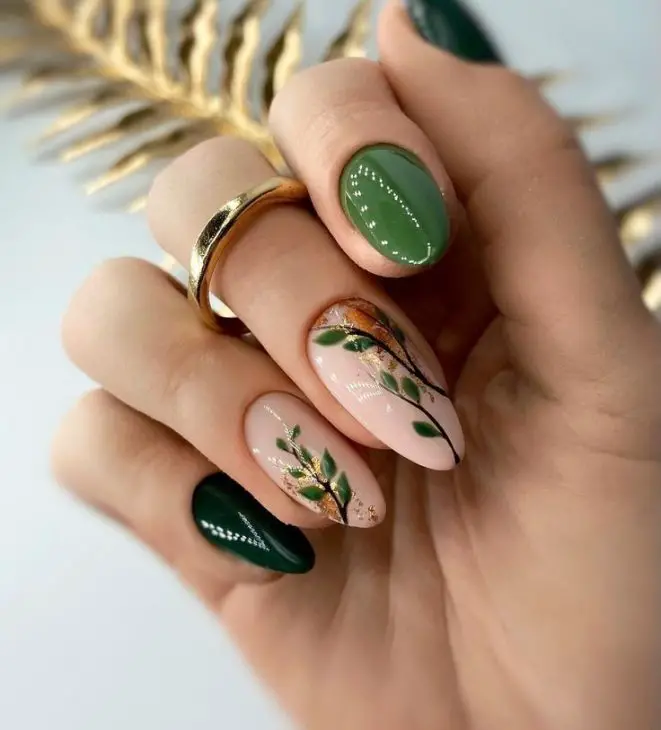
Green and Gold Fall Foliage
This luxurious design incorporates green nails with gold accents and detailed leaf artwork on a nude base. The combination of matte and glossy finishes adds depth and sophistication to the look.
Materials:
- Base coat
- Green nail polish (e.g., Essie’s “Off Tropic”)
- Nude nail polish for the base (e.g., Essie’s “Mademoiselle”)
- Gold nail polish for the accents (e.g., OPI’s “Gold Key to the Kingdom”)
- Thin nail art brush
- Top coat
Steps:
- Apply a base coat.
- Paint some nails green and others nude.
- Use a thin brush to add gold leaf accents on the nude nails.
- Finish with a top coat to protect the design.
Vibrant Autumn Leaves
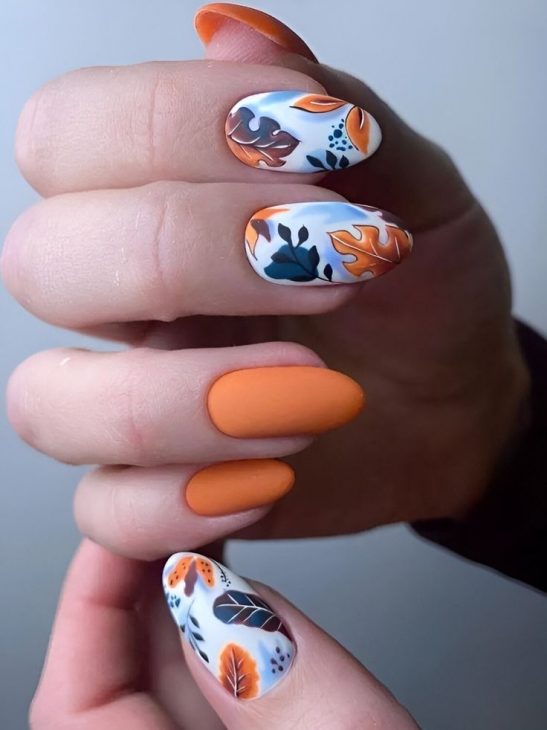
This bold design features bright orange nails with detailed leaf patterns in shades of blue, brown, and orange. The combination of vibrant colors and intricate details brings a playful yet stylish touch to your nails.
Materials:
- Base coat
- Orange nail polish (e.g., OPI’s “A Good Man-darin is Hard to Find”)
- White nail polish for the base (e.g., Essie’s “Blanc”)
- Blue, brown, and orange nail polishes for the leaf details
- Thin nail art brush
- Top coat
Steps:
- Start with a base coat.
- Paint some nails orange and others white.
- Use a thin brush to paint leaf patterns in blue, brown, and orange on the white nails.
- Seal the design with a top coat.
Subtle Autumn Elegance
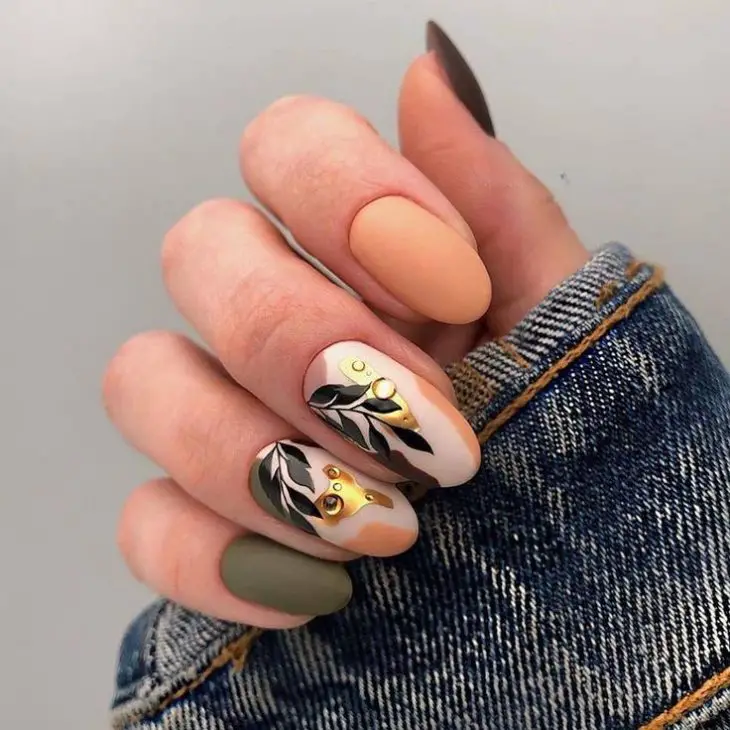
This design features a mix of matte and glossy finishes in earthy tones, accented with gold leaf details. The understated colors and elegant accents make this design perfect for a sophisticated fall look.
Materials:
- Base coat
- Matte green nail polish (e.g., Essie’s “Mojito Madness”)
- Matte orange nail polish (e.g., OPI’s “It’s a Piazza Cake”)
- Nude nail polish for the base (e.g., Essie’s “Spin the Bottle”)
- Gold nail polish or gold leaf accents
- Thin nail art brush
- Top coat
Steps:
- Apply a base coat.
- Paint your nails with a mix of green, orange, and nude polish.
- Use a thin brush to add gold leaf accents to the nude nails.
- Finish with a matte top coat.
Earthy Fall Leaves
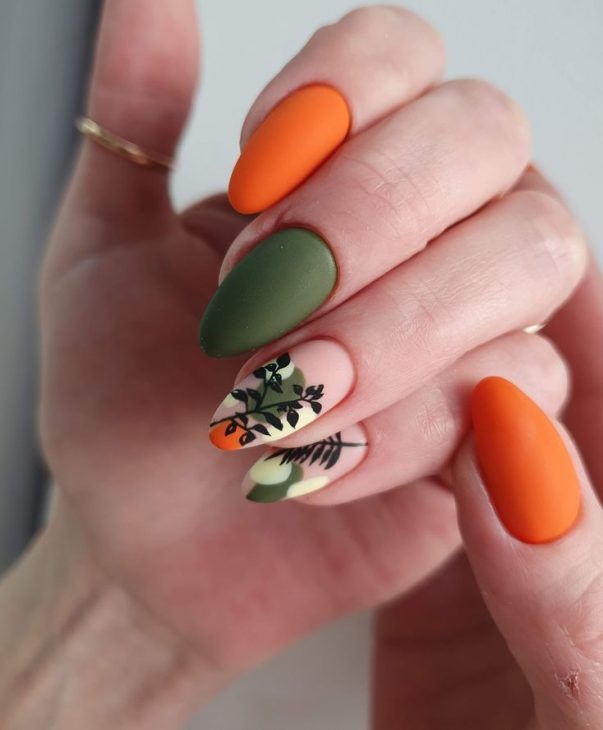
This design combines deep green and orange nails with detailed black leaf artwork on a nude base. The contrast between the bold colors and intricate details makes this design a standout.
Materials:
- Base coat
- Deep green nail polish (e.g., Essie’s “Going Incognito”)
- Orange nail polish (e.g., OPI’s “Cajun Shrimp”)
- Nude nail polish for the base (e.g., Essie’s “Spin the Bottle”)
- Black nail polish for the leaf details
- Thin nail art brush
- Top coat
Steps:
- Apply a base coat.
- Paint some nails green, some orange, and others nude.
- Use a thin brush to paint detailed black leaves on the nude nails.
- Finish with a top coat to protect the design.
Save Pin

