Embracing the Elegance of Fall Oval Nails in 2024
As the crisp air of fall settles in, our style shifts to match the season’s warm and earthy tones. Nail designs are no exception, and fall 2024 is all about embracing the timeless elegance of oval nails. Whether you’re drawn to deep hues, intricate patterns, or minimalist designs, there’s an oval nail style for everyone this season. Let’s dive into some inspiring looks that will have you reaching for your nail polish!
Subtle Sparkle: The Magic of Minimalism
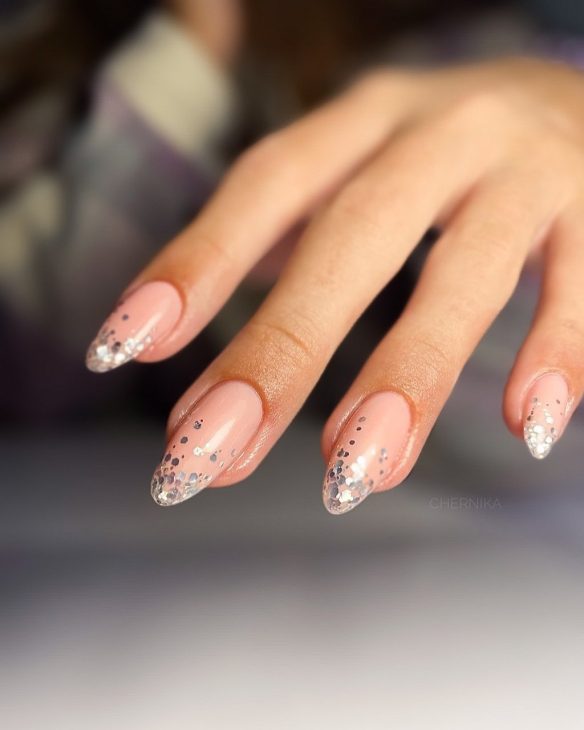
When it comes to understated elegance, this design takes the crown. A soft nude base color paired with a delicate sprinkle of silver glitter at the tips creates a look that’s both simple and sophisticated. The gentle oval shape adds to the design’s overall grace, making it perfect for both everyday wear and special occasions.
Consumables:
-
- Nude gel polish (e.g., Essie Gel Couture in Fairy Tailor)
- Silver glitter polish (OPI in Champagne for Breakfast)
- Top coat (Seche Vite Dry Fast Top Coat)
- UV/LED Lamp for curing
- DIY Instructions:
- Start by shaping your nails into a soft oval. Apply a base coat to protect your nails.
- Apply two coats of the nude gel polish, curing each layer under the UV/LED lamp.
- Using a fine brush, apply the silver glitter polish to the tips, creating a gradient effect.
- Seal with a top coat and cure for a long-lasting finish.
Fall Florals: An Artistic Statement
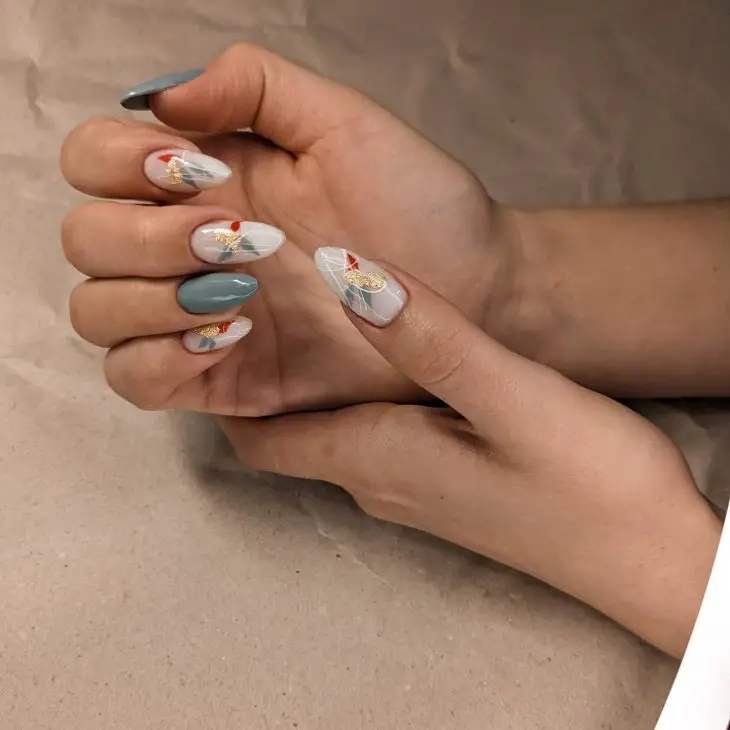
Florals aren’t just for spring. This intricate design blends autumnal shades of gray and gold with delicate floral accents, making it a standout look for fall. The oval shape gives the design a soft, feminine edge, while the color palette keeps it grounded in the season.
Consumables:
-
- Gray gel polish (Essie in Petal Pushers)
- Gold foil accents (Foil It in Golden Hour)
- Fine detailing brush
- UV/LED Lamp for curing
- DIY Instructions:
- Shape your nails into an oval and apply a base coat.
- Apply two coats of gray polish, curing each layer under the lamp.
- Using a fine brush, paint delicate floral patterns with white polish. Add gold foil accents for a touch of luxury.
- Finish with a top coat to protect your design and cure under the lamp.
Wild at Heart: Animal Print with a Twist
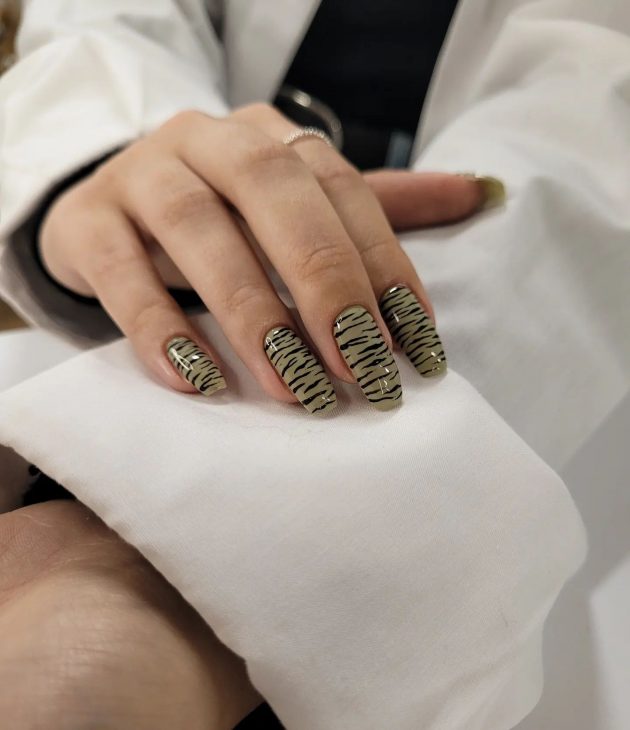
For those who like to walk on the wild side, this zebra-inspired design is a must-try. The neutral base color paired with black stripes creates a look that’s bold yet wearable. The oval shape softens the design, making it chic and trendy for fall 2024.
Consumables:
-
- Beige gel polish (OPI in Coconuts Over OPI)
- Black nail art polish (Sally Hansen Nail Art Pen in Black)
- Top coat (Sally Hansen Insta-Dri Top Coat)
- UV/LED Lamp for curing
- DIY Instructions:
- Shape your nails into an oval and apply a base coat.
- Apply two coats of beige polish, curing each under the lamp.
- Use the nail art pen to draw zebra stripes across the nails. Vary the thickness and direction of the stripes for a more natural look.
- Seal the design with a top coat and cure.
Minimalist Chic: Less is More
Sometimes, simplicity makes the most significant statement. This design features a muted gray base with minimal black and gold accents. The clean lines and neutral colors make it a versatile option for fall, effortlessly complementing any outfit.
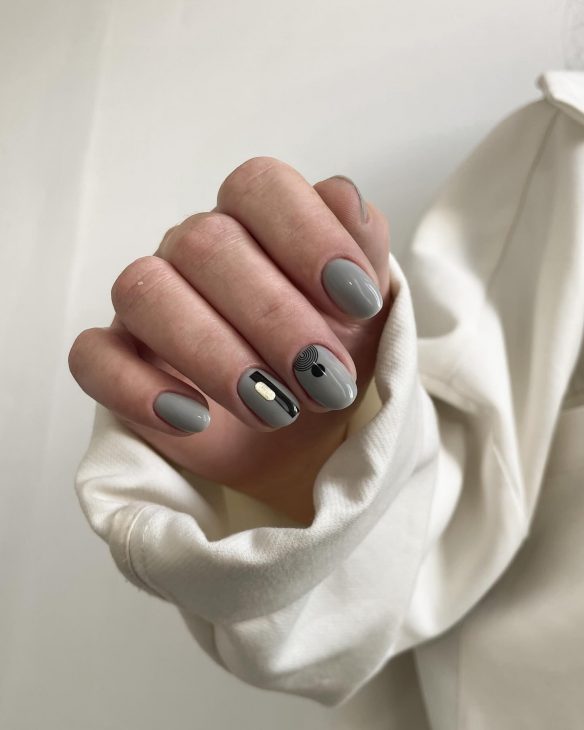
Consumables:
-
- Gray gel polish (Essie in Chinchilly)
- Black and gold nail art polish (Sally Hansen Nail Art Pens)
- Top coat (Glisten & Glow Top Coat)
- UV/LED Lamp for curing
- DIY Instructions:
- Shape your nails into an oval and apply a base coat.
- Apply two coats of gray polish, curing under the lamp.
- Use nail art pens to create simple, minimalistic designs like dots or lines.
- Finish with a top coat and cure.
Abstract Waves: The Art of Movement
This design is all about flow and movement, with abstract wavy lines dancing across a pale pink base. The combination of white and silver lines adds depth and dimension, making the nails look almost like a piece of modern art.
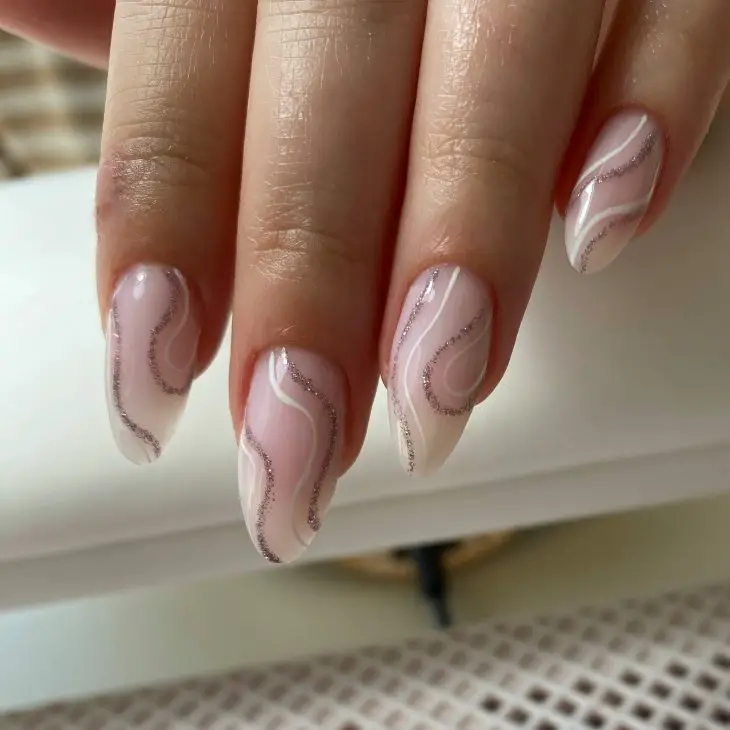
Consumables:
-
- Pale pink gel polish (Essie in Ballet Slippers)
- White and silver nail art polish (Born Pretty Nail Art Brushes)
- Fine detailing brush
- UV/LED Lamp for curing
- DIY Instructions:
- Shape your nails into an oval and apply a base coat.
- Apply two coats of pale pink polish, curing each under the lamp.
- Use a fine brush to draw wavy lines in white and silver. Start from one side of the nail and work your way across, varying the thickness of the lines.
- Seal the design with a top coat and cure.
Earthy Tones and Gold Accents: A Cozy Fall Vibe
This nail design embraces the natural beauty of fall with a combination of earthy tones and subtle gold accents. The matte finish on the beige and blue nails contrasts beautifully with the glossy white nails adorned with delicate gold leaf. The oval shape adds an elegant touch, making this design perfect for a cozy autumn day.
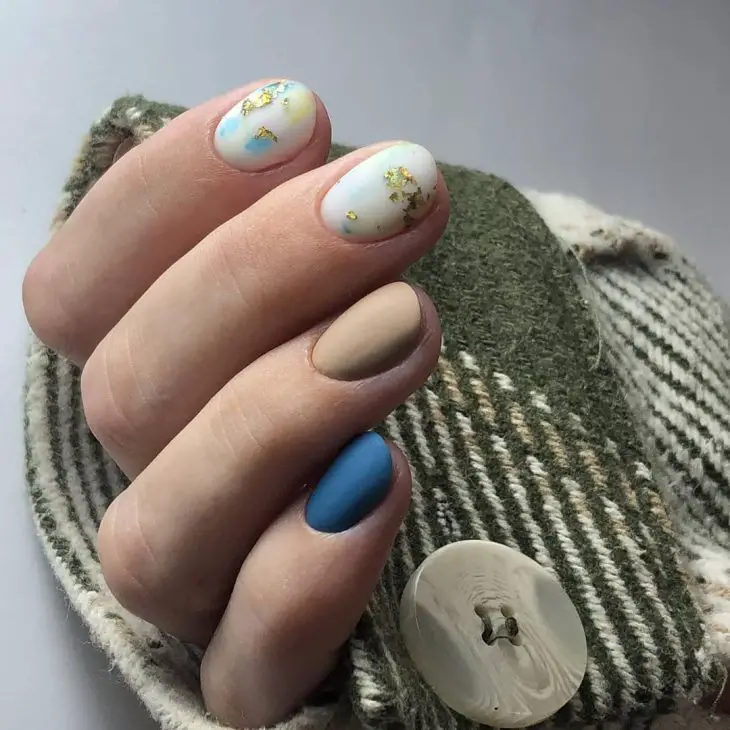
Consumables:
-
- Beige matte polish (OPI in Tiramisu for Two)
- Blue matte polish (Essie in Butler Please)
- White polish (Sally Hansen in White On)
- Gold leaf accents (Born Pretty Gold Foil)
- Matte top coat (Zoya Matte Velvet Top Coat)
- UV/LED Lamp for curing
- DIY Instructions:
- Begin by shaping your nails into a soft oval and apply a base coat.
- Apply two coats of beige and blue polish on alternating nails, curing each layer under the lamp.
- For the white nails, apply two coats of white polish, cure, and then carefully apply gold leaf accents using a fine brush or tweezers.
- Seal the design with a matte top coat, curing under the lamp for a long-lasting finish.
Sophisticated Neutrals: French Tips with a Modern Twist
This design is a modern take on the classic French manicure, featuring neutral brown tones and a sleek, oval shape. The mix of glossy and matte finishes adds depth and interest, while the clean lines of the tips create a sophisticated and trendy look perfect for fall.
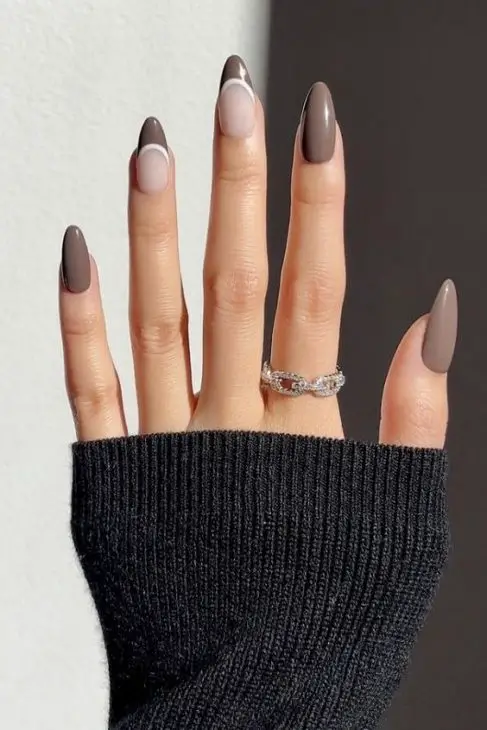
Consumables:
-
- Taupe polish (Essie in Chinchilly)
- Matte top coat (OPI Matte Top Coat)
- White nail art polish (Orly Instant Artist in Crisp White)
- Fine detailing brush
- UV/LED Lamp for curing
- DIY Instructions:
- Shape your nails into an oval and apply a base coat.
- Apply two coats of taupe polish, curing each under the lamp.
- Use a fine brush to create the white French tips, ensuring clean, sharp lines.
- Apply a matte top coat to the entire nail or just the tips for a mixed finish, then cure.
Marbled Masterpiece: Warm and Rich Autumn Tones
This marbled design captures the essence of fall with its rich, warm tones of brown, gold, and cream. The swirling patterns mimic the natural marbling found in stone, making each nail look like a unique work of art. The glossy finish enhances the depth of the design, while the oval shape adds a touch of softness.
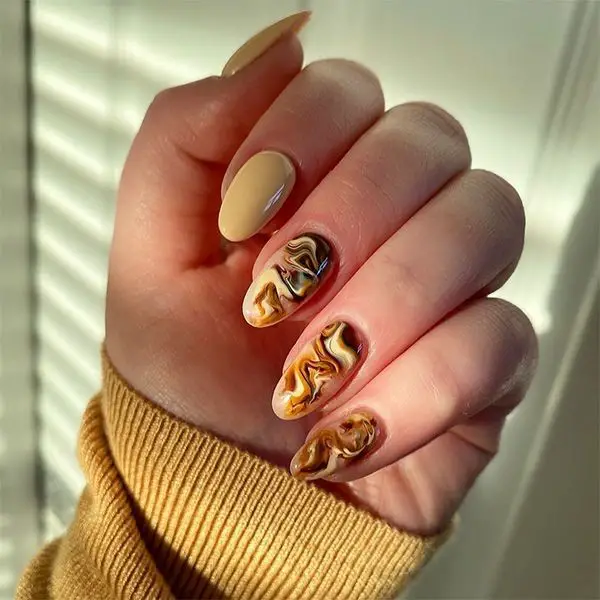
Consumables:
-
- Cream polish (OPI in Pale to the Chief)
- Brown polish (Essie in Playing Koi)
- Gold polish (Sally Hansen in Golden-I)
- Fine detailing brush or nail art pen
- UV/LED Lamp for curing
- DIY Instructions:
- Start by shaping your nails into an oval and applying a base coat.
- Apply two coats of cream polish on the base nails, curing each layer under the lamp.
- To create the marbled effect, use a fine brush to swirl brown and gold polishes on the accent nails, working quickly before the polish sets.
- Seal the design with a glossy top coat and cure under the lamp.
Geometric Elegance: The Power of Precision
This design showcases the beauty of simplicity with a nude base and sharp, geometric lines in black and gold. The combination of matte and glossy finishes adds an extra layer of sophistication, making this look both modern and elegant. The oval shape enhances the sleekness of the design, making it a perfect choice for the minimalist at heart.
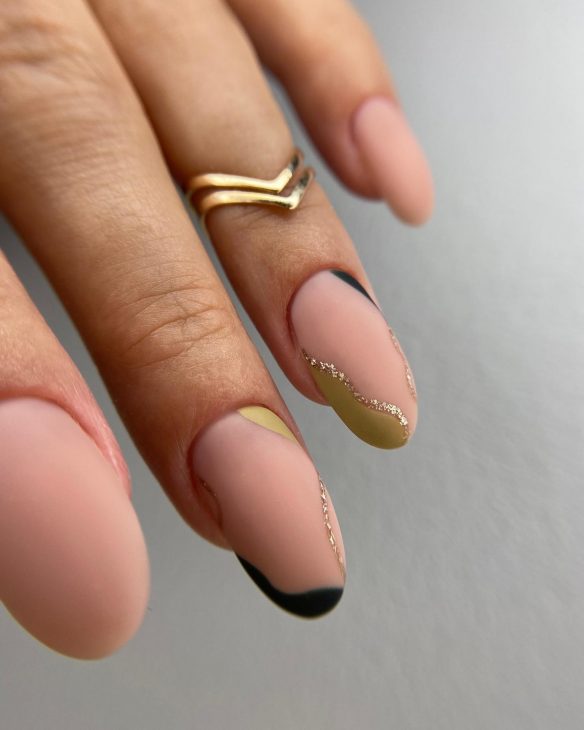
Consumables:
-
- Nude matte polish (Zoya in Avery)
- Black nail art polish (Sally Hansen Nail Art Pen in Black)
- Gold nail art polish (OPI Nail Lacquer in Glitzerland)
- Fine detailing brush
- Matte top coat (Essie Matte About You)
- UV/LED Lamp for curing
- DIY Instructions:
- Shape your nails into an oval and apply a base coat.
- Apply two coats of nude matte polish, curing each under the lamp.
- Use a fine brush to draw geometric lines and shapes in black and gold, focusing on precision.
- Seal the design with a matte top coat and cure for a long-lasting finish.
Elegant Lines: A Minimalist’s Dream
This design is all about clean lines and subtle elegance. A soft pink base is complemented by delicate black and silver lines, creating a design that’s both simple and striking. The oval shape gives the nails a feminine flair, making this a versatile look that can transition from day to night effortlessly.
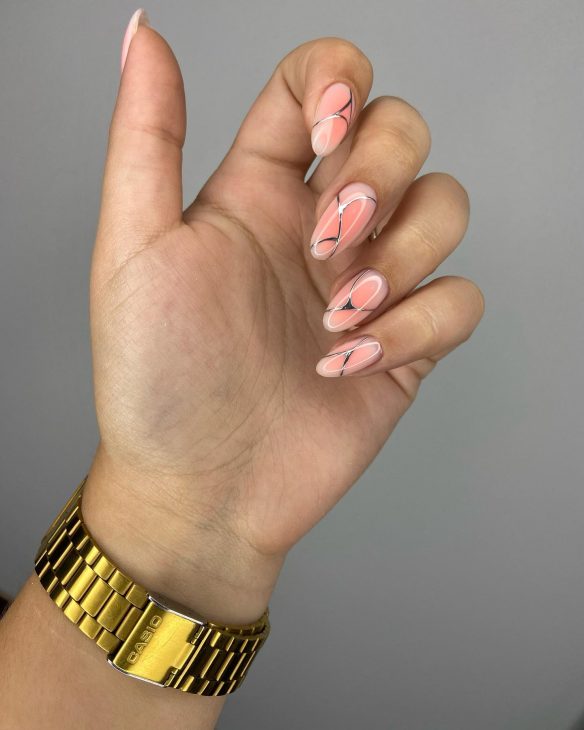
Consumables:
-
- Soft pink polish (OPI in Bubble Bath)
- Black and silver nail art polish (Orly Instant Artist in Jet Black and Platinum Silver)
- Fine detailing brush
- UV/LED Lamp for curing
- DIY Instructions:
- Begin by shaping your nails into an oval and applying a base coat.
- Apply two coats of soft pink polish, curing each under the lamp.
- Using a fine brush, create delicate lines in black and silver, focusing on symmetry and precision.
- Seal the design with a glossy top coat and cure under the lamp.
Elegant French Tips with a Touch of Gold
This design is a modern twist on the classic French manicure, featuring soft, milky pink nails with crisp white tips. The addition of delicate gold foil at the base of each nail adds a luxurious touch, elevating the overall look. The oval shape enhances the elegance of the design, making it a perfect choice for those who love a sophisticated yet trendy style.
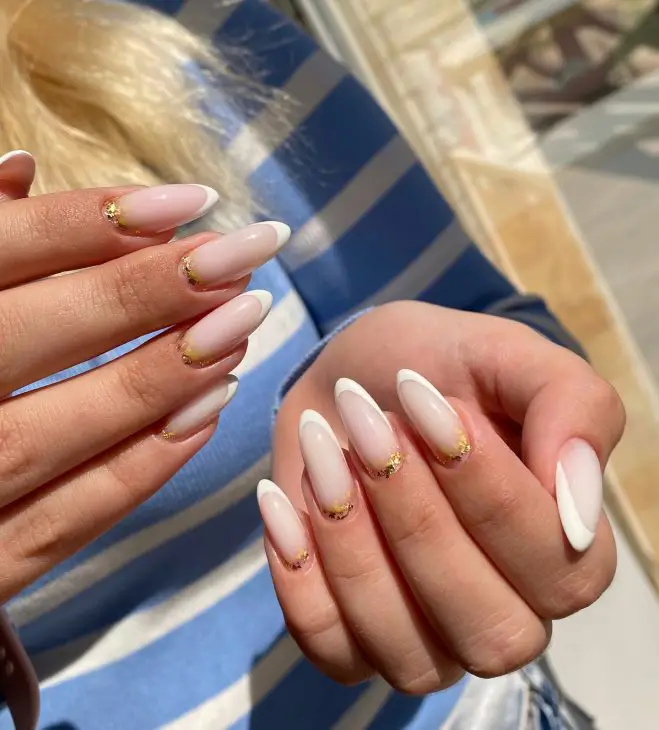
Consumables:
-
- Milky pink gel polish (OPI in Bubble Bath)
- White gel polish (Essie in Blanc)
- Gold foil accents (Born Pretty Gold Foil)
- Fine detailing brush
- UV/LED Lamp for curing
- DIY Instructions:
- Shape your nails into an oval and apply a base coat.
- Apply two coats of milky pink polish, curing each layer under the lamp.
- Carefully paint the white tips using a fine brush to create the French manicure look, then cure.
- Add the gold foil accents at the base of each nail and seal with a glossy top coat. Cure for a long-lasting finish.
Fresh and Fun: Green and Gray with Botanical Accents
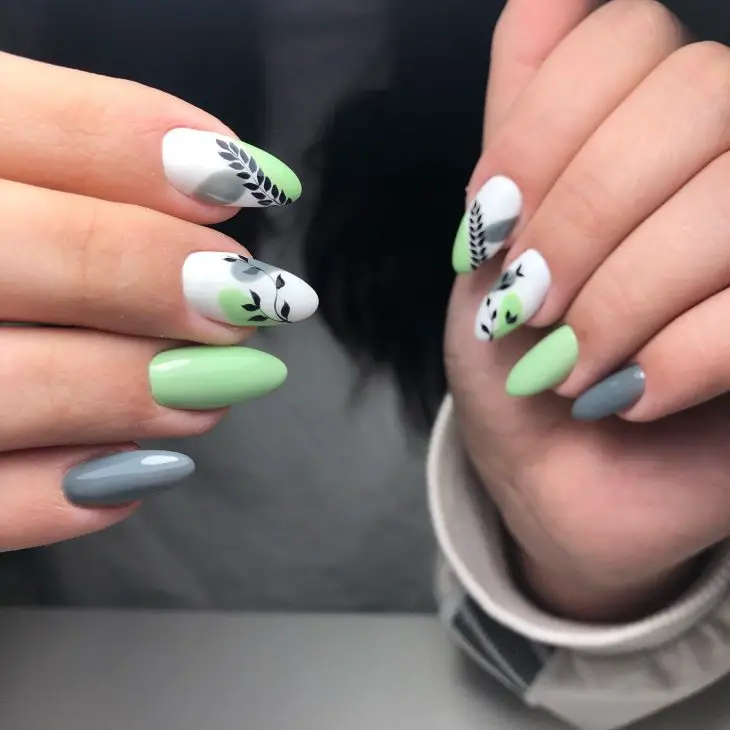
This playful design combines soft green and gray tones with bold black botanical accents. The mix of matte and glossy finishes creates depth, while the oval shape keeps the design feminine and chic. It’s a fresh, modern look that’s perfect for those who love a bit of nature-inspired flair in their manicure.
Consumables:
-
- Green gel polish (Essie in Mojito Madness)
- Gray gel polish (OPI in Suzi Takes the Wheel)
- Black nail art polish (Sally Hansen Nail Art Pen in Black)
- Matte top coat (Essie Matte About You)
- UV/LED Lamp for curing
- DIY Instructions:
- Shape your nails into an oval and apply a base coat.
- Apply two coats of green and gray polish on alternating nails, curing each under the lamp.
- Use a fine brush to create the botanical accents in black, then cure.
- Apply a matte top coat to finish the look, and cure again for a lasting effect.
Subtle Orange Accents: A Pop of Fall Color
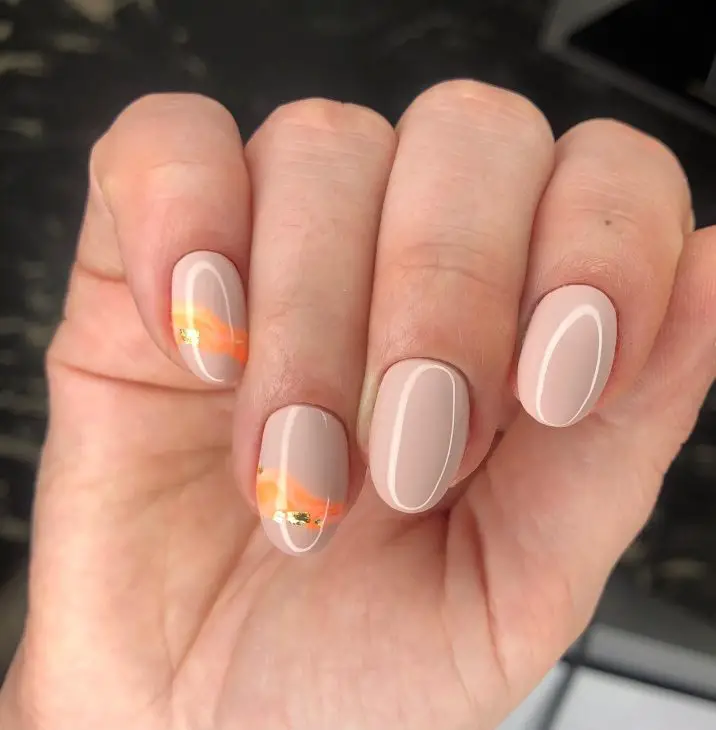
This design is perfect for those who prefer a more understated fall look. Nude nails are accented with soft orange waves and a hint of gold leaf, creating a subtle yet eye-catching design. The oval shape adds a touch of elegance, making this a great option for both everyday wear and special occasions.
Consumables:
-
- Nude gel polish (OPI in Samoan Sand)
- Orange nail art polish (Essie in Tart Deco)
- Gold leaf accents (Born Pretty Gold Foil)
- Fine detailing brush
- UV/LED Lamp for curing
- DIY Instructions:
- Begin by shaping your nails into an oval and applying a base coat.
- Apply two coats of nude polish, curing each layer under the lamp.
- Use a fine brush to paint soft orange waves on the accent nails, then cure.
- Add gold leaf accents for a touch of luxury, and finish with a glossy top coat. Cure for a long-lasting finish.
Earthy Green and Gold: A Nature-Inspired Design
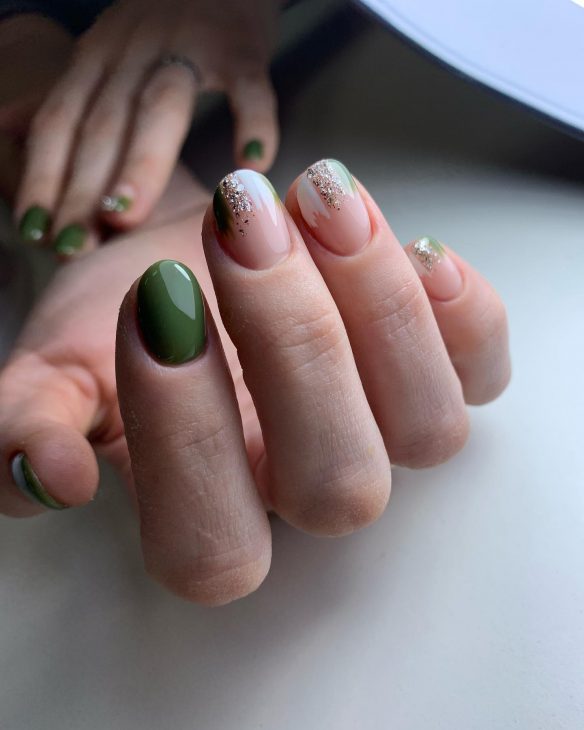
This design brings the beauty of nature to your nails with a mix of rich green, white, and nude tones. The green polish is complemented by subtle gold accents, creating a look that’s both earthy and elegant. The oval shape enhances the natural feel of the design, making it a great choice for fall.
Consumables:
-
- Green gel polish (Essie in Going Incognito)
- White gel polish (OPI in Alpine Snow)
- Nude gel polish (Zoya in Avery)
- Gold foil accents (Born Pretty Gold Foil)
- Fine detailing brush
- UV/LED Lamp for curing
- DIY Instructions:
- Shape your nails into an oval and apply a base coat.
- Apply two coats of green, white, and nude polish on alternating nails, curing each under the lamp.
- Add subtle gold accents on the white and nude nails using a fine brush, then cure.
- Seal the design with a glossy top coat and cure for a long-lasting finish.
Autumn Leaves: A Bold and Festive Look
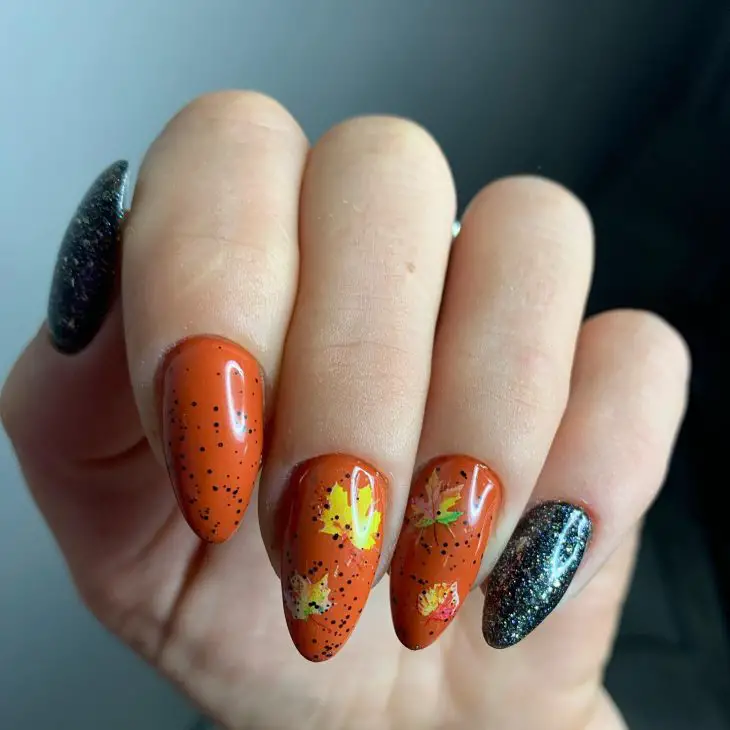
This vibrant design captures the essence of fall with its bold orange nails adorned with tiny black speckles and delicate leaf patterns. The black accent nails, coated in glitter, add a touch of drama, making this design perfect for those who want to make a statement. The oval shape adds a feminine touch, balancing the bold colors.
Consumables:
-
- Orange gel polish (OPI in A Good Man-darin is Hard to Find)
- Black glitter polish (China Glaze in Fairy Dust)
- Leaf nail decals or stickers (Born Pretty Autumn Leaf Stickers)
- Fine detailing brush
- UV/LED Lamp for curing
- DIY Instructions:
- Begin by shaping your nails into an oval and applying a base coat.
- Apply two coats of orange polish on most nails, and black glitter polish on the accent nails, curing each layer under the lamp.
- Add the leaf decals or paint them by hand using a fine brush, then cure.
- Finish with a glossy top coat to seal the design and cure for a long-lasting finish.
Fall Marble Elegance
These fall oval nails feature a rich marbled design that combines deep browns and burnt oranges, creating a striking and sophisticated look perfect for autumn. The marbled effect gives the nails a sense of movement, reminiscent of swirling leaves in the wind. The oval shape adds elegance and length to the fingers, making this manicure a chic choice for the season. The high-gloss finish enhances the depth of the colors, making the design stand out even more.
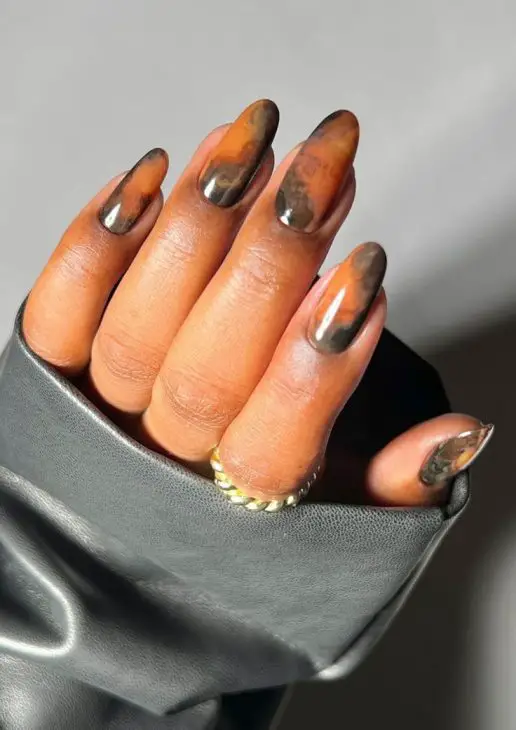
Consumables:
-
- Base Coat: OPI Natural Nail Base Coat
- Nail Polish: Essie in ‘Playing Koi’ for the burnt orange and OPI in ‘Lincoln Park After Dark’ for the deep brown
- Top Coat: Seche Vite Dry Fast Top Coat
- Nail Art Brush: Makartt Nail Art Brushes
- Marble Tool: Winstonia Marble Nail Art Tool
- DIY Instructions:
- Apply a base coat to protect your nails and ensure smooth application.
- Apply two coats of the burnt orange polish as your base color.
- Use a marble tool to swirl the deep brown polish into the wet orange base, creating a marbled effect.
- Finish with a glossy top coat to seal and protect your design.
Warm Autumn Marble
This manicure showcases fall oval nails with a warm and inviting color scheme of burnt orange and crisp white. The design features an elegant marbling effect on the white nails, with the burnt orange adding a pop of color to the rest. The oval shape gives a soft, feminine look, while the marbling provides a modern and trendy twist. This design is perfect for those who want to embrace the colors of fall in a subtle yet stylish way.
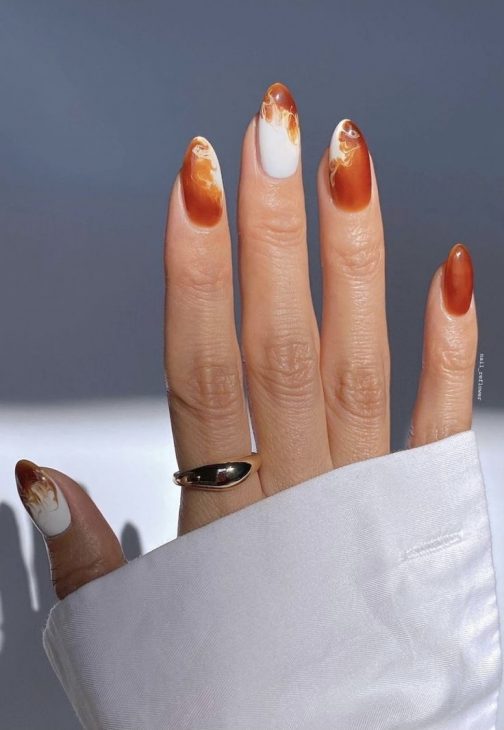
Consumables:
-
- Base Coat: Essie Grow Stronger Base Coat
- Nail Polish: OPI in ‘Cajun Shrimp’ for the burnt orange and Sally Hansen in ‘White On’ for the white
- Top Coat: Essie Gel Couture Top Coat
- Detail Brush: Pana Professional Nail Art Brushes
- Marble Tool: Winstonia Marble Nail Art Tool
- DIY Instructions:
- Start with a base coat to ensure the longevity of your manicure.
- Apply two coats of the burnt orange polish on three nails and white on two nails.
- Create the marbled effect by lightly swirling the burnt orange polish onto the white nails with a marble tool.
- Finish with a top coat to add a glossy finish and protect your design.
Bold Sunset Vibes
This vibrant and playful design is ideal for those who love to experiment with bold colors. The fall oval nails feature a striking combination of bright orange and an abstract sunset-inspired design on the accent nails. The use of sharp lines and vivid colors creates a dynamic look that is sure to turn heads. The oval shape not only elongates the nails but also balances the boldness of the colors with its soft curves.
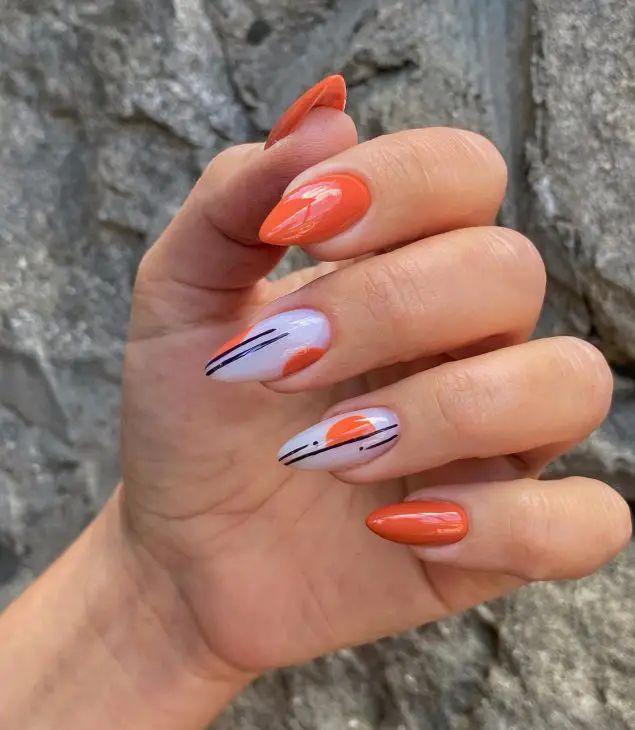
Consumables:
-
- Base Coat: Butter London Nail Foundation Priming Basecoat
- Nail Polish: China Glaze in ‘Orange You Hot?’ for the main color
- Detail Brushes: Kolinsky Sable Nail Art Brushes
- Top Coat: Orly Sec ‘n Dry Quick-Dry Topcoat
- Nail Art Stickers (for the sunset design)
- DIY Instructions:
- Start by applying a base coat to protect the nails.
- Apply two coats of the bright orange polish to all nails except the accent nails.
- On the accent nails, use detail brushes to create an abstract sunset design, using shades of orange, pink, and white.
- Finish with a quick-dry top coat to seal and protect the design.
Minimalist Fall Chic
These fall oval nails present a perfect blend of minimalism and seasonal warmth. The design features a neutral beige base with a delicate leaf accent on one nail and a marbled green and orange pattern on another. The use of different textures and subtle colors brings a fresh take on fall nail art. The oval shape adds a touch of elegance, making this manicure suitable for both casual and formal settings.
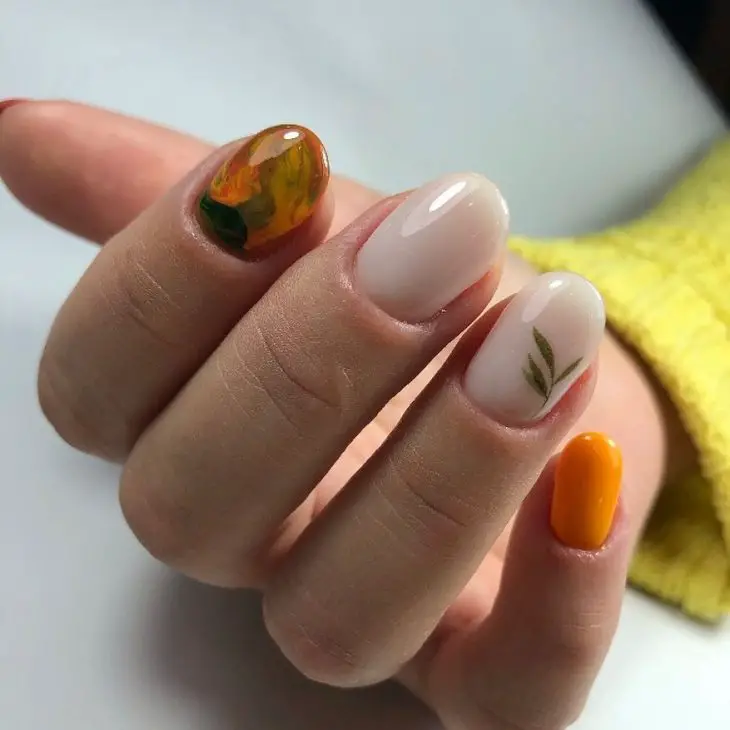
Consumables:
-
- Base Coat: Zoya Anchor Base Coat
- Nail Polish: OPI in ‘Be There in a Prosecco’ for the beige base, Essie in ‘Cargo Cameo’ for the green accent
- Top Coat: Sally Hansen Miracle Gel Top Coat
- Detail Brush: Beetles Nail Art Brushes Set
- Leaf Nail Stickers or Stamps
- DIY Instructions:
- Apply a base coat to prepare your nails.
- Paint all nails with the beige polish as your base color.
- Use a detail brush to add the green marbled pattern on one nail and apply a leaf sticker or stamp on another.
- Finish with a top coat to give your nails a glossy, long-lasting finish.
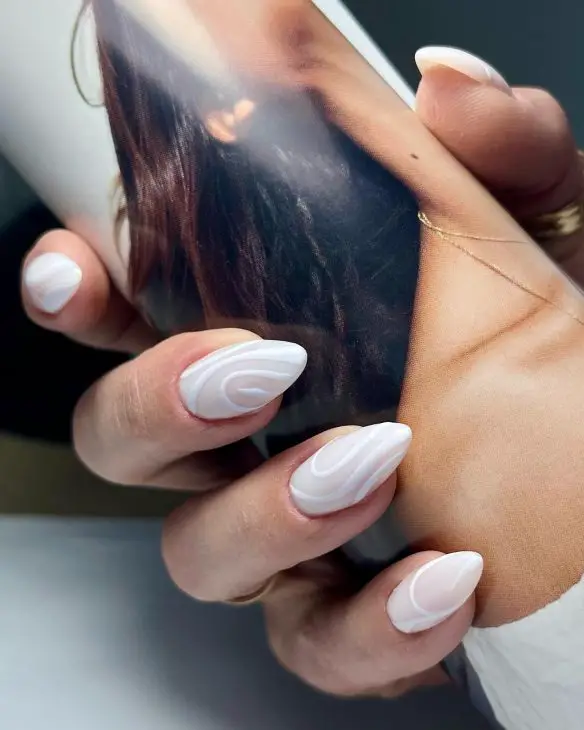
Swirling White Sophistication
This design takes fall oval nails to a new level of sophistication with its intricate white swirl patterns on a neutral base. The soft, swirling lines create a mesmerizing effect, while the clean white color adds a crisp contrast against the natural base. The oval shape enhances the delicate and feminine feel of this manicure, making it a great choice for those who love elegant and understated nail art.
Consumables:
-
- Base Coat: Essie Smooth-e Base Coat
- Nail Polish: OPI in ‘Bubble Bath’ for the neutral base
- White Nail Art Pen or Brush: Saviland Nail Art Brush Set
- Top Coat: OPI Infinite Shine Top Coat
- Detail Brushes: Winstonia Nail Art Brushes
- DIY Instructions:
- Apply a base coat to protect the nails and provide a smooth surface.
- Paint your nails with two coats of the neutral base polish.
- Use a white nail art pen or brush to create the swirl patterns on each nail.
- Seal your design with a top coat to add shine and protect the art.
Save Pin
