Fall Cat Eye Nails: Captivating Designs for the Season
As the leaves turn and the air grows crisp, it’s the perfect time to transition your nail game to something that mirrors the beauty of fall. One of the most enchanting trends this season is fall cat eye nails. Whether you love short nails, almond shapes, or vibrant colors, there’s a cat eye design to suit your style. Let’s dive into some stunning examples and how you can achieve these looks at home.
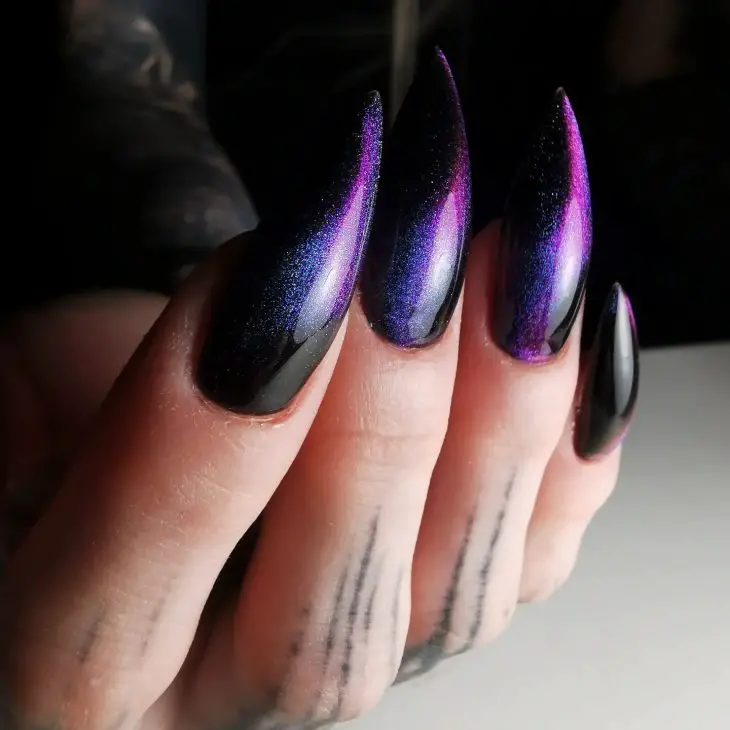
Mesmerizing Purple and Black Cat Eye
This stunning nail design features a mesmerizing blend of purple and black, creating a deep, mysterious effect perfect for the fall season. The elongated almond shape enhances the elegance of the fall cat eye nails, while the shimmering gradient from black to purple adds depth and sophistication. This look is ideal for those who love a dramatic and bold manicure.
Consumables
- Black gel polish (e.g., OPI GelColor in “Black Onyx”)
- Purple magnetic gel polish (e.g., Born Pretty Cat Eye Gel Polish in “Galaxy Purple”)
- UV/LED nail lamp
- Magnetic stick for cat eye effect
- Base coat and top coat (e.g., Gelish Foundation Base and Top It Off)
DIY Instructions
- Prep Your Nails: Start by shaping your nails into an almond shape and buffing the surface.
- Base Coat: Apply a base coat and cure it under the UV/LED lamp.
- Black Base: Apply two coats of black gel polish, curing each layer.
- Cat Eye Effect: Apply a layer of purple magnetic gel polish. Before curing, use the magnetic stick to create the cat eye effect. Cure under the lamp.
- Top Coat: Seal your design with a top coat and cure it. Wipe off any sticky residue with a cleanser.
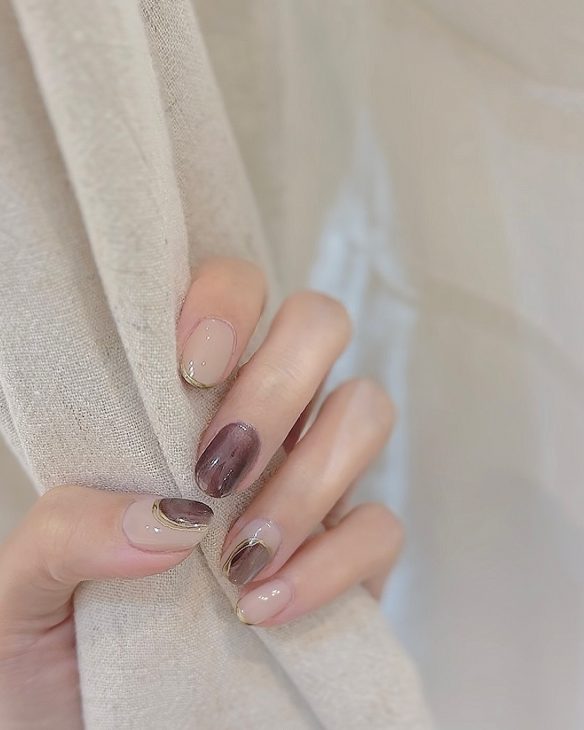
Subtle Brown and Nude Cat Eye
This elegant design combines subtle brown and nude shades, creating a chic and understated look that’s perfect for everyday wear. The delicate lines of the cat eye effect add just the right amount of intrigue to these fall cat eye nails. This design is particularly well-suited for shorter nails.
Consumables
- Nude gel polish (e.g., Essie Gel Couture in “Fairy Tailor”)
- Brown magnetic gel polish (e.g., Born Pretty Cat Eye Gel Polish in “Brown Sugar”)
- UV/LED nail lamp
- Magnetic stick for cat eye effect
- Base coat and top coat (e.g., Sally Hansen Miracle Gel Top Coat)
DIY Instructions
- Prep Your Nails: Shape your nails and buff the surface for better adhesion.
- Base Coat: Apply a base coat and cure it under the UV/LED lamp.
- Nude Base: Apply two coats of nude gel polish, curing each layer.
- Cat Eye Effect: Apply a layer of brown magnetic gel polish. Use the magnetic stick to create the desired effect before curing under the lamp.
- Top Coat: Finish with a top coat and cure it. Remove any tacky layer with a nail cleanser.
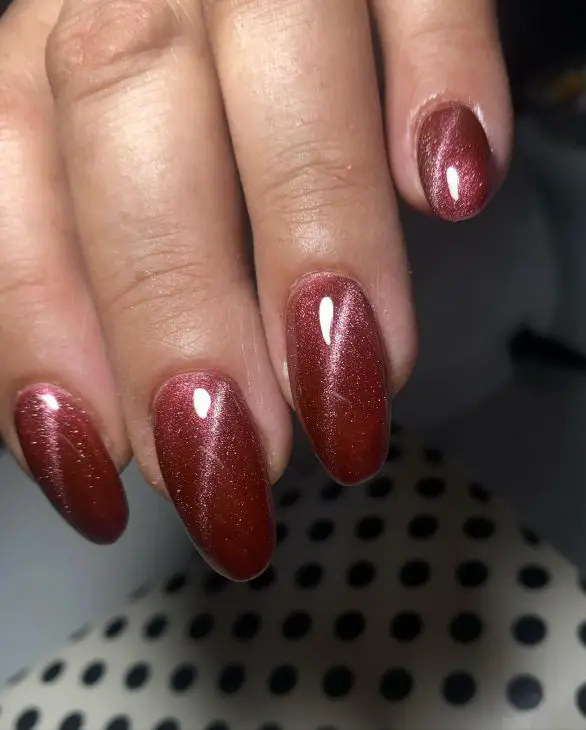
Radiant Red Cat Eye
These nails are a fiery tribute to fall with a radiant red cat eye effect. The oval shape adds a touch of softness to the bold color, making it perfect for anyone looking to make a statement. The depth of the red polish combined with the shimmering cat eye effect is truly captivating.
Consumables
- Red gel polish (e.g., Gelish in “Good Gossip”)
- Red magnetic gel polish (e.g., Born Pretty Cat Eye Gel Polish in “Ruby Red”)
- UV/LED nail lamp
- Magnetic stick for cat eye effect
- Base coat and top coat (e.g., CND Shellac Base Coat and Top Coat)
DIY Instructions
- Prep Your Nails: Shape your nails into an oval and buff the surface.
- Base Coat: Apply a base coat and cure it under the UV/LED lamp.
- Red Base: Apply two coats of red gel polish, curing each layer.
- Cat Eye Effect: Apply a layer of red magnetic gel polish. Create the cat eye effect with the magnetic stick before curing under the lamp.
- Top Coat: Seal your manicure with a top coat and cure it. Cleanse with a nail cleanser to finish.
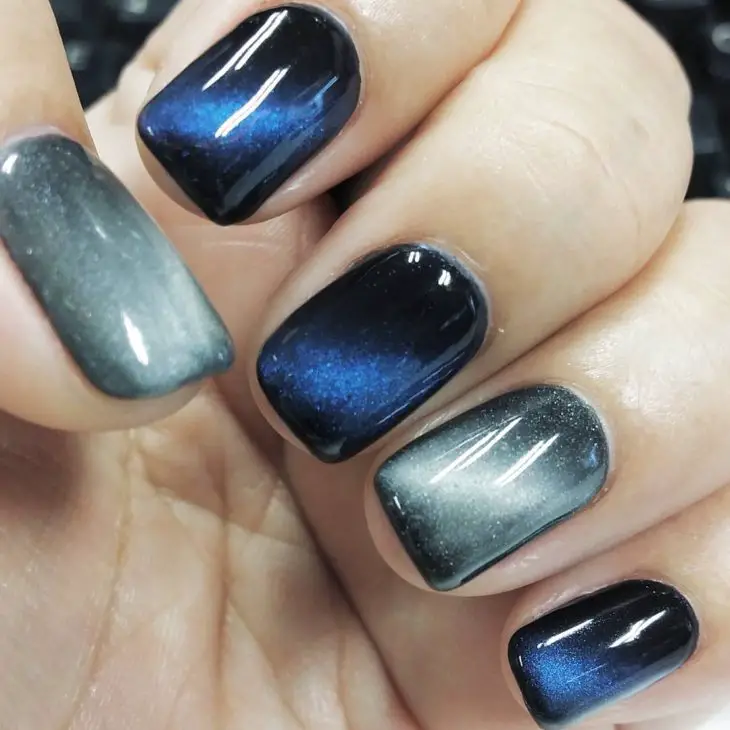
Mysterious Blue and Grey Cat Eye
This design blends mysterious blue and grey tones for a look that’s both modern and sophisticated. The square shape complements the clean lines of the cat eye effect, making it ideal for a sleek and polished appearance. These fall cat eye nails are perfect for a chic, urban look.
Consumables
- Grey gel polish (e.g., Essie Gel Couture in “Sew Me”)
- Blue magnetic gel polish (e.g., Born Pretty Cat Eye Gel Polish in “Midnight Blue”)
- UV/LED nail lamp
- Magnetic stick for cat eye effect
- Base coat and top coat (e.g., OPI GelColor Base and Top Coat)
DIY Instructions
- Prep Your Nails: Shape your nails into a square and buff the surface.
- Base Coat: Apply a base coat and cure it under the UV/LED lamp.
- Grey Base: Apply two coats of grey gel polish, curing each layer.
- Cat Eye Effect: Apply a layer of blue magnetic gel polish. Use the magnetic stick to achieve the desired effect before curing under the lamp.
- Top Coat: Finish with a top coat and cure it. Cleanse with a nail cleanser to remove any sticky residue.
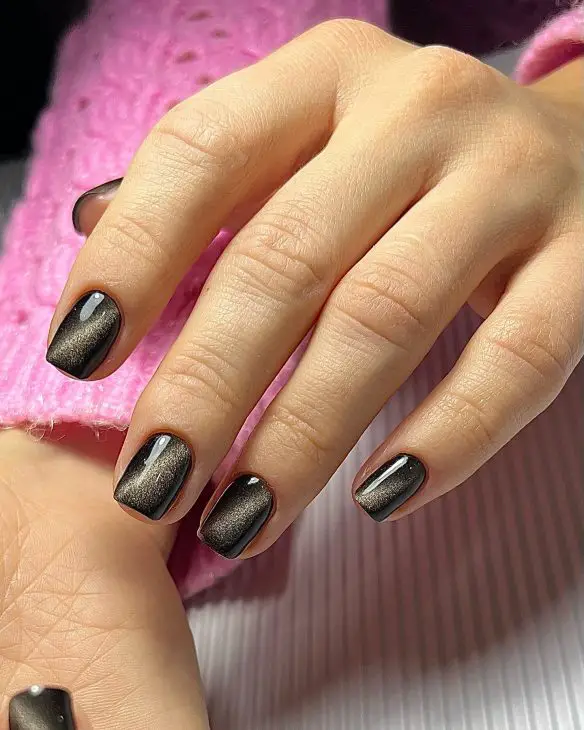
Elegant Black and Gold Cat Eye
These elegant black and gold cat eye nails exude luxury and sophistication. The square shape and dark color palette are perfect for fall, making these nails a standout accessory. The subtle shimmer of the gold cat eye effect adds a touch of glam without being overpowering.
Consumables
- Black gel polish (e.g., Gelish in “Black Shadow”)
- Gold magnetic gel polish (e.g., Born Pretty Cat Eye Gel Polish in “Golden Treasure”)
- UV/LED nail lamp
- Magnetic stick for cat eye effect
- Base coat and top coat (e.g., Gelish Foundation Base and Top It Off)
DIY Instructions
- Prep Your Nails: Shape your nails and buff the surface.
- Base Coat: Apply a base coat and cure it under the UV/LED lamp.
- Black Base: Apply two coats of black gel polish, curing each layer.
- Cat Eye Effect: Apply a layer of gold magnetic gel polish. Use the magnetic stick to create the effect before curing under the lamp.
- Top Coat: Seal with a top coat and cure it. Wipe off any sticky layer with a cleanser.
Unique Green and Black Cat Eye
This striking nail design features a bold green and black cat eye effect, making a statement with its unique rectangular shape. The green shimmer against the matte black base creates a modern, futuristic look perfect for fall. This design is ideal for those looking for something different yet elegant in their fall cat eye nails.

Consumables
- Black gel polish (e.g., OPI GelColor in “Black Onyx”)
- Green magnetic gel polish (e.g., Born Pretty Cat Eye Gel Polish in “Emerald Green”)
- UV/LED nail lamp
- Magnetic stick for cat eye effect
- Base coat and top coat (e.g., Gelish Foundation Base and Top It Off)
DIY Instructions
- Prep Your Nails: Shape your nails into a rectangular form and buff the surface.
- Base Coat: Apply a base coat and cure it under the UV/LED lamp.
- Black Base: Apply two coats of black gel polish, curing each layer.
- Cat Eye Effect: Apply a layer of green magnetic gel polish. Use the magnetic stick to create the cat eye effect before curing under the lamp.
- Top Coat: Seal your design with a top coat and cure it. Wipe off any sticky residue with a cleanser.
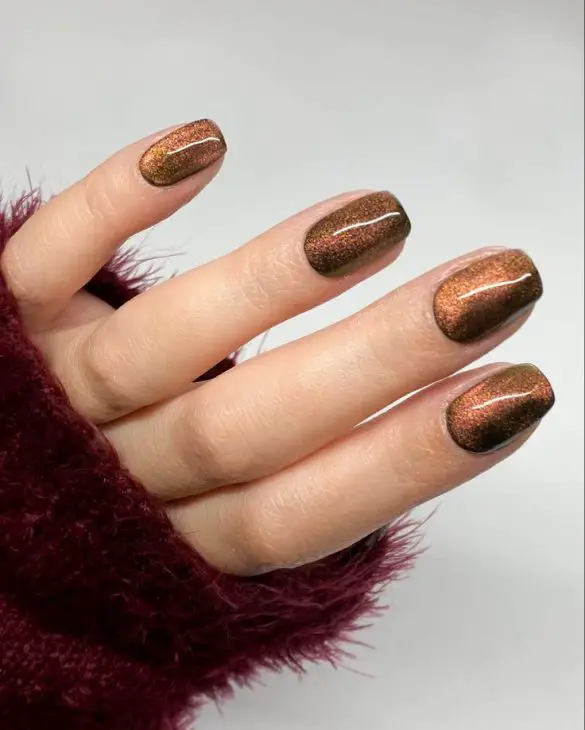
Elegant Bronze Cat Eye
These elegant nails showcase a beautiful bronze cat eye effect that captures the essence of autumn. The short, rounded shape makes them practical yet stylish, perfect for daily wear. The bronze shimmer provides a warm, inviting look that’s ideal for the season.
Consumables
- Bronze magnetic gel polish (e.g., Born Pretty Cat Eye Gel Polish in “Bronze Glow”)
- UV/LED nail lamp
- Magnetic stick for cat eye effect
- Base coat and top coat (e.g., Sally Hansen Miracle Gel Top Coat)
DIY Instructions
- Prep Your Nails: Shape your nails and buff the surface for better adhesion.
- Base Coat: Apply a base coat and cure it under the UV/LED lamp.
- Bronze Base: Apply two coats of bronze magnetic gel polish, curing each layer.
- Cat Eye Effect: Use the magnetic stick to create the desired effect before curing under the lamp.
- Top Coat: Finish with a top coat and cure it. Remove any tacky layer with a nail cleanser.
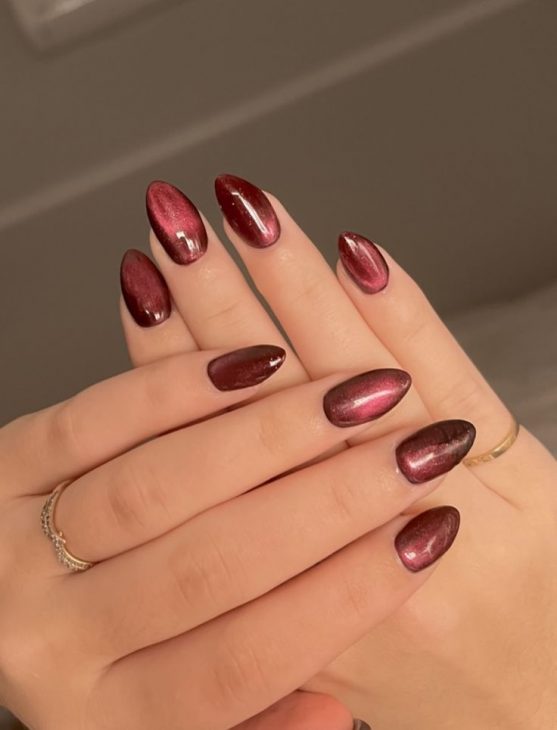
Deep Red Cat Eye
This deep red cat eye design is perfect for those who love a rich, luxurious look. The almond shape adds a touch of sophistication, while the deep red shimmer creates a captivating effect. These nails are ideal for adding a touch of glamour to your fall wardrobe.
Consumables
- Deep red magnetic gel polish (e.g., Born Pretty Cat Eye Gel Polish in “Crimson Glow”)
- UV/LED nail lamp
- Magnetic stick for cat eye effect
- Base coat and top coat (e.g., CND Shellac Base Coat and Top Coat)
DIY Instructions
- Prep Your Nails: Shape your nails into an almond shape and buff the surface.
- Base Coat: Apply a base coat and cure it under the UV/LED lamp.
- Red Base: Apply two coats of deep red magnetic gel polish, curing each layer.
- Cat Eye Effect: Use the magnetic stick to create the cat eye effect before curing under the lamp.
- Top Coat: Seal your manicure with a top coat and cure it. Cleanse with a nail cleanser to finish.
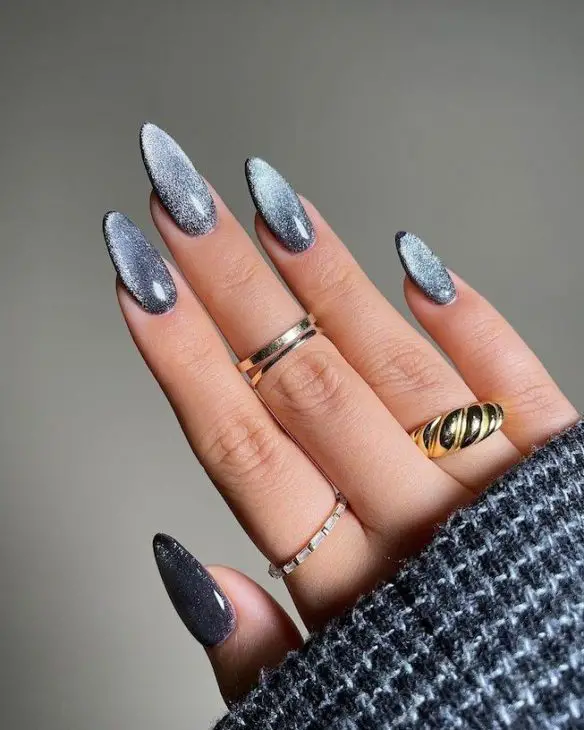
Silver and Black Gradient Cat Eye
This stunning design features a gradient cat eye effect transitioning from silver to black. The almond shape and shimmering gradient create a sophisticated and trendy look, perfect for the fall season. These fall cat eye nails are sure to turn heads.
Consumables
- Black gel polish (e.g., Gelish in “Black Shadow”)
- Silver magnetic gel polish (e.g., Born Pretty Cat Eye Gel Polish in “Silver Lining”)
- UV/LED nail lamp
- Magnetic stick for cat eye effect
- Base coat and top coat (e.g., Gelish Foundation Base and Top It Off)
DIY Instructions
- Prep Your Nails: Shape your nails into an almond shape and buff the surface.
- Base Coat: Apply a base coat and cure it under the UV/LED lamp.
- Black Base: Apply two coats of black gel polish, curing each layer.
- Cat Eye Effect: Apply a layer of silver magnetic gel polish. Use the magnetic stick to create the gradient cat eye effect before curing under the lamp.
- Top Coat: Seal with a top coat and cure it. Wipe off any sticky layer with a cleanser.
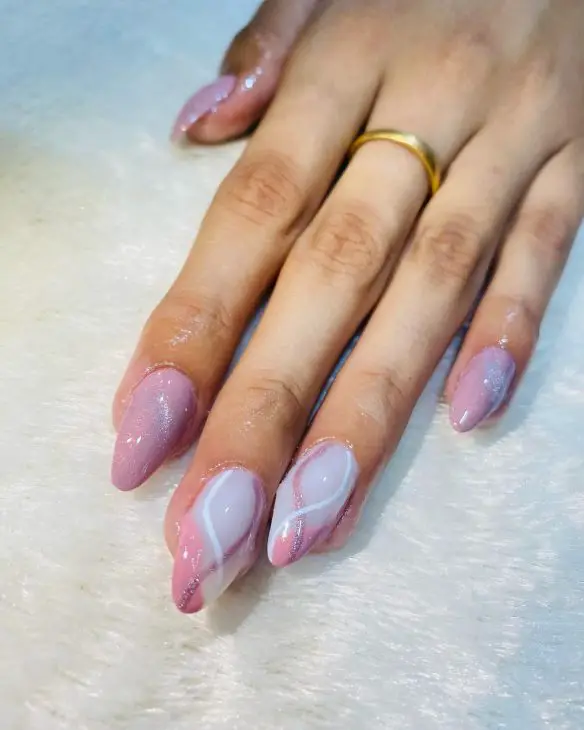
Pastel Pink Cat Eye
These pastel pink cat eye nails offer a softer take on the trend, combining the elegance of a cat eye effect with the femininity of pink. The almond shape adds a delicate touch, making this design perfect for those who prefer a more subtle look.
Consumables
- Pink magnetic gel polish (e.g., Born Pretty Cat Eye Gel Polish in “Pastel Pink”)
- UV/LED nail lamp
- Magnetic stick for cat eye effect
- Base coat and top coat (e.g., OPI GelColor Base and Top Coat)
DIY Instructions
- Prep Your Nails: Shape your nails into an almond shape and buff the surface.
- Base Coat: Apply a base coat and cure it under the UV/LED lamp.
- Pink Base: Apply two coats of pink magnetic gel polish, curing each layer.
- Cat Eye Effect: Use the magnetic stick to achieve the desired effect before curing under the lamp.
- Top Coat: Finish with a top coat and cure it. Cleanse with a nail cleanser to remove any sticky residue.
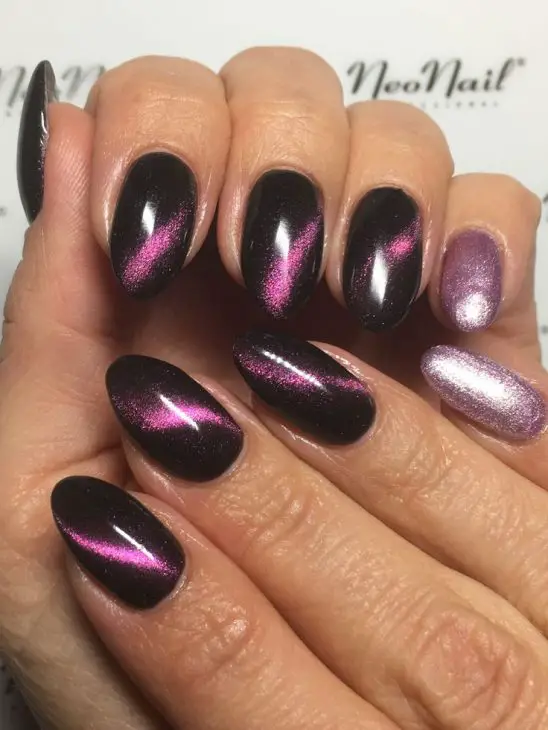
Radiant Pink and Black Cat Eye
This nail design showcases a captivating blend of pink and black, creating a striking contrast that’s perfect for fall. The almond shape enhances the elegance, while the cat eye effect in pink adds a touch of glamour. This look is ideal for those who want to stand out with a bold and chic manicure.
Consumables
- Black gel polish (e.g., OPI GelColor in “Black Onyx”)
- Pink magnetic gel polish (e.g., Born Pretty Cat Eye Gel Polish in “Rosy Pink”)
- UV/LED nail lamp
- Magnetic stick for cat eye effect
- Base coat and top coat (e.g., Gelish Foundation Base and Top It Off)
DIY Instructions
- Prep Your Nails: Shape your nails into an almond shape and buff the surface.
- Base Coat: Apply a base coat and cure it under the UV/LED lamp.
- Black Base: Apply two coats of black gel polish, curing each layer.
- Cat Eye Effect: Apply a layer of pink magnetic gel polish. Use the magnetic stick to create the cat eye effect before curing under the lamp.
- Top Coat: Seal your design with a top coat and cure it. Wipe off any sticky residue with a cleanser.
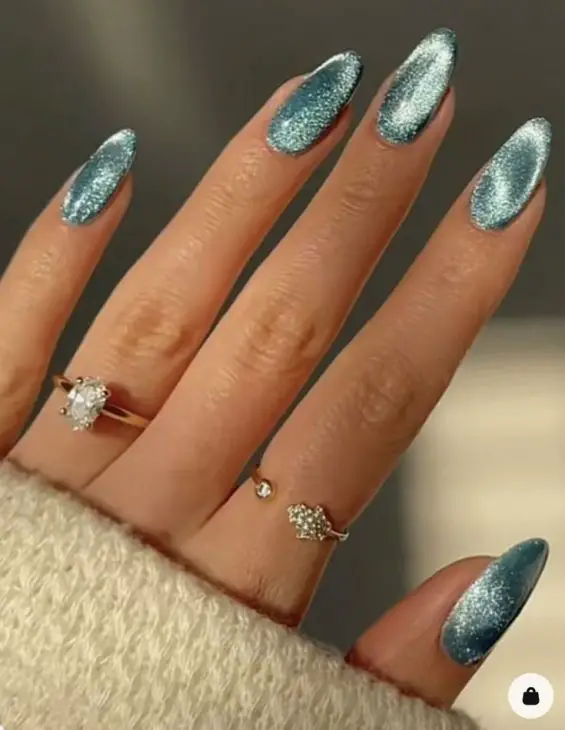
Shimmering Blue Cat Eye
These nails feature a beautiful shimmering blue cat eye effect, making them a perfect choice for fall. The almond shape adds sophistication, and the light blue color brings a refreshing touch to the fall palette. This design is ideal for those who prefer a cool, vibrant look.
Consumables
- Blue magnetic gel polish (e.g., Born Pretty Cat Eye Gel Polish in “Sky Blue”)
- UV/LED nail lamp
- Magnetic stick for cat eye effect
- Base coat and top coat (e.g., OPI GelColor Base and Top Coat)
DIY Instructions
- Prep Your Nails: Shape your nails into an almond shape and buff the surface.
- Base Coat: Apply a base coat and cure it under the UV/LED lamp.
- Blue Base: Apply two coats of blue magnetic gel polish, curing each layer.
- Cat Eye Effect: Use the magnetic stick to achieve the desired effect before curing under the lamp.
- Top Coat: Finish with a top coat and cure it. Cleanse with a nail cleanser to remove any sticky residue.
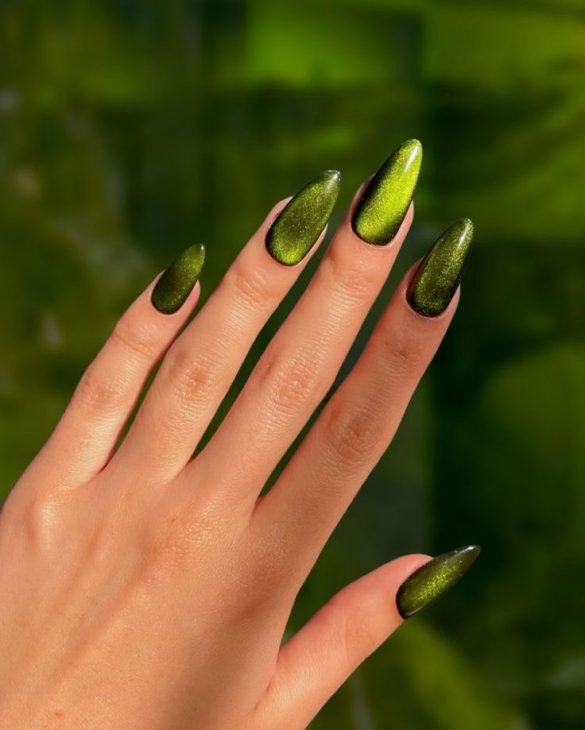
Vibrant Green Cat Eye
This vibrant green cat eye nail design is a showstopper. The rich green hue paired with the cat eye effect creates a dynamic look perfect for fall. The almond shape adds an element of elegance, making these nails ideal for both casual and formal settings.
Consumables
- Green magnetic gel polish (e.g., Born Pretty Cat Eye Gel Polish in “Emerald Green”)
- UV/LED nail lamp
- Magnetic stick for cat eye effect
- Base coat and top coat (e.g., Sally Hansen Miracle Gel Top Coat)
DIY Instructions
- Prep Your Nails: Shape your nails into an almond shape and buff the surface.
- Base Coat: Apply a base coat and cure it under the UV/LED lamp.
- Green Base: Apply two coats of green magnetic gel polish, curing each layer.
- Cat Eye Effect: Use the magnetic stick to create the effect before curing under the lamp.
- Top Coat: Seal with a top coat and cure it. Wipe off any sticky layer with a cleanser.
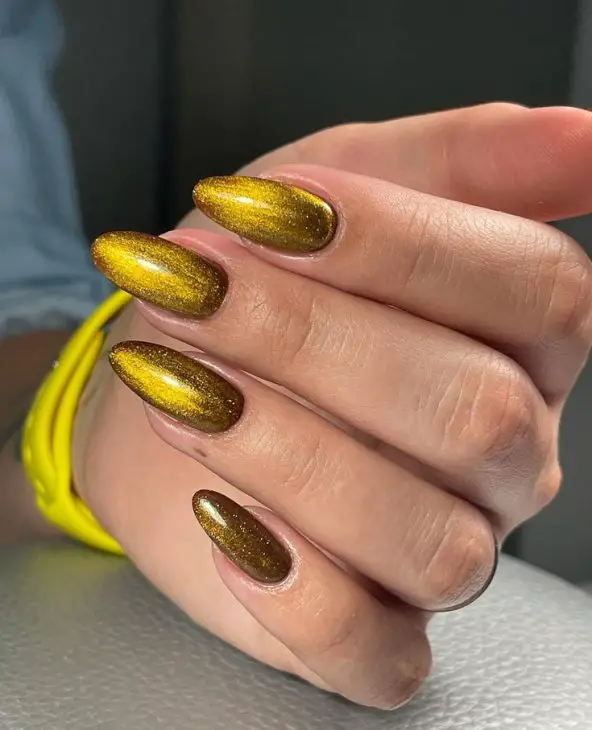
Golden Glow Cat Eye
These nails exude luxury with their golden cat eye effect. The warm gold shimmer against the almond shape creates a rich, sophisticated look. This design is perfect for fall and adds a touch of opulence to any outfit.
Consumables
- Gold magnetic gel polish (e.g., Born Pretty Cat Eye Gel Polish in “Golden Treasure”)
- UV/LED nail lamp
- Magnetic stick for cat eye effect
- Base coat and top coat (e.g., Gelish Foundation Base and Top It Off)
DIY Instructions
- Prep Your Nails: Shape your nails into an almond shape and buff the surface.
- Base Coat: Apply a base coat and cure it under the UV/LED lamp.
- Gold Base: Apply two coats of gold magnetic gel polish, curing each layer.
- Cat Eye Effect: Use the magnetic stick to create the cat eye effect before curing under the lamp.
- Top Coat: Finish with a top coat and cure it. Cleanse with a nail cleanser to remove any sticky residue.
Autumn Brown Cat Eye with Leaf Accent
This design combines a rich brown cat eye effect with a delicate leaf accent, perfect for embracing the fall season. The almond shape adds elegance, while the leaf detail provides a unique, seasonal touch. These nails are ideal for those who love incorporating thematic elements into their manicure.

Consumables
- Brown magnetic gel polish (e.g., Born Pretty Cat Eye Gel Polish in “Chestnut Brown”)
- Leaf nail stickers or decals
- UV/LED nail lamp
- Magnetic stick for cat eye effect
- Base coat and top coat (e.g., CND Shellac Base Coat and Top Coat)
DIY Instructions
- Prep Your Nails: Shape your nails into an almond shape and buff the surface.
- Base Coat: Apply a base coat and cure it under the UV/LED lamp.
- Brown Base: Apply two coats of brown magnetic gel polish, curing each layer.
- Cat Eye Effect: Use the magnetic stick to achieve the desired effect before curing under the lamp.
- Leaf Accent: Apply leaf stickers or decals to accent nails.
- Top Coat: Seal with a top coat and cure it. Wipe off any sticky layer with a cleanser.
Deep Red Cat Eye with Foil Accent
This nail design features a rich, deep red cat eye effect complemented by foil accents. The square shape adds a modern touch, while the foil details provide a luxurious feel. This design is perfect for those looking to make a bold statement with their fall cat eye nails.

Consumables
- Deep red magnetic gel polish (e.g., Born Pretty Cat Eye Gel Polish in “Crimson Glow”)
- Foil transfer gel and foil sheets (e.g., Makartt Foil Transfer Gel and Foil Set)
- UV/LED nail lamp
- Magnetic stick for cat eye effect
- Base coat and top coat (e.g., Gelish Foundation Base and Top It Off)
DIY Instructions
- Prep Your Nails: Shape your nails into a square form and buff the surface.
- Base Coat: Apply a base coat and cure it under the UV/LED lamp.
- Red Base: Apply two coats of deep red magnetic gel polish, curing each layer.
- Cat Eye Effect: Use the magnetic stick to create the cat eye effect before curing under the lamp.
- Foil Accent: Apply foil transfer gel to accent nails, cure, and press foil sheets onto the gel. Seal with top coat and cure again.
Oceanic Blue Cat Eye with Textured Accent
These nails showcase an oceanic blue cat eye effect with textured accents. The combination of smooth and textured finishes creates a unique and eye-catching design. The almond shape adds elegance, making these nails ideal for a sophisticated fall look.

Consumables
- Blue magnetic gel polish (e.g., Born Pretty Cat Eye Gel Polish in “Ocean Blue”)
- Textured gel polish (e.g., OPI GelColor in “Turn On The Northern Lights!”)
- UV/LED nail lamp
- Magnetic stick for cat eye effect
- Base coat and top coat (e.g., CND Shellac Base Coat and Top Coat)
DIY Instructions
- Prep Your Nails: Shape your nails into an almond shape and buff the surface.
- Base Coat: Apply a base coat and cure it under the UV/LED lamp.
- Blue Base: Apply two coats of blue magnetic gel polish, curing each layer.
- Cat Eye Effect: Use the magnetic stick to achieve the desired effect before curing under the lamp.
- Textured Accent: Apply textured gel polish to accent nails and cure. Finish with a top coat and cure again.
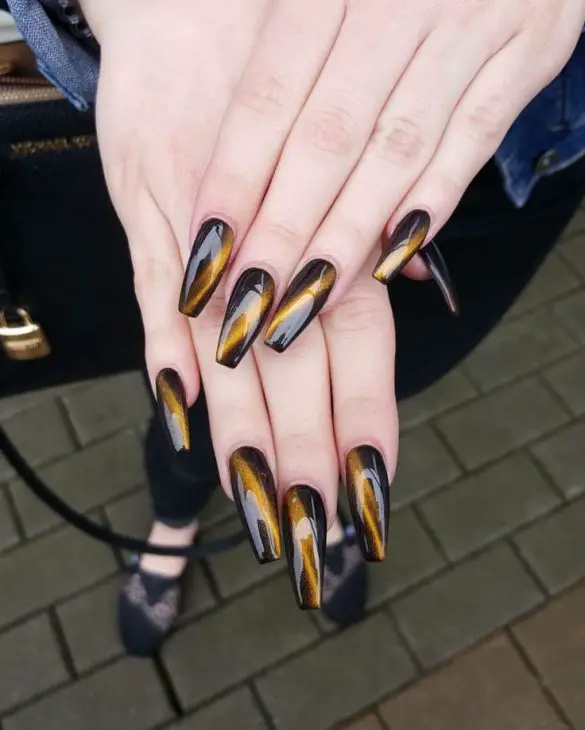
Golden Tiger Eye Cat Eye
This stunning design features a golden tiger eye cat eye effect, creating a striking and dynamic look. The long, almond shape enhances the elegance and drama of the design. These nails are perfect for those looking to add a touch of luxury to their fall manicure.
Consumables
- Black gel polish (e.g., Gelish in “Black Shadow”)
- Golden magnetic gel polish (e.g., Born Pretty Cat Eye Gel Polish in “Golden Tiger Eye”)
- UV/LED nail lamp
- Magnetic stick for cat eye effect
- Base coat and top coat (e.g., Gelish Foundation Base and Top It Off)
DIY Instructions
- Prep Your Nails: Shape your nails into an almond shape and buff the surface.
- Base Coat: Apply a base coat and cure it under the UV/LED lamp.
- Black Base: Apply two coats of black gel polish, curing each layer.
- Cat Eye Effect: Apply a layer of golden magnetic gel polish. Use the magnetic stick to create the tiger eye effect before curing under the lamp.
- Top Coat: Finish with a top coat and cure it. Cleanse with a nail cleanser to remove any sticky residue.
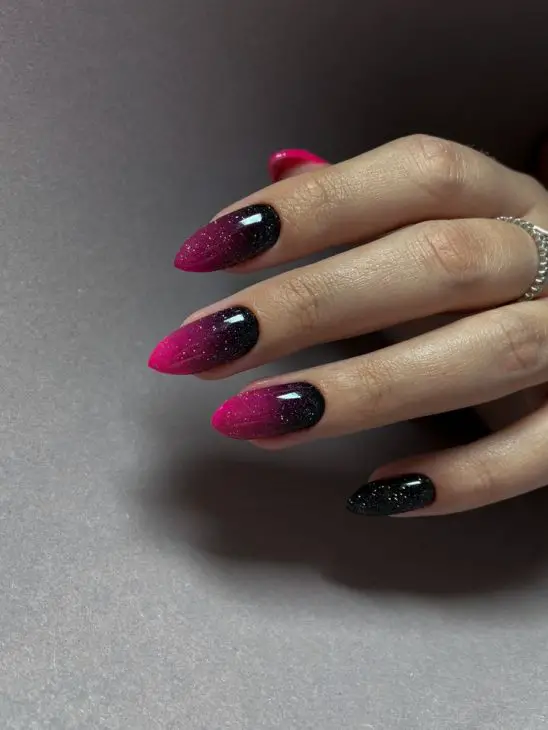
Gradient Pink and Black Cat Eye
This design features a gradient effect transitioning from pink to black, enhanced by the cat eye shimmer. The almond shape adds sophistication, while the gradient provides a modern twist on traditional cat eye nails. This look is perfect for those who want a chic and trendy fall manicure.
Consumables
- Black gel polish (e.g., OPI GelColor in “Black Onyx”)
- Pink magnetic gel polish (e.g., Born Pretty Cat Eye Gel Polish in “Rosy Pink”)
- UV/LED nail lamp
- Magnetic stick for cat eye effect
- Base coat and top coat (e.g., Sally Hansen Miracle Gel Top Coat)
DIY Instructions
- Prep Your Nails: Shape your nails into an almond shape and buff the surface.
- Base Coat: Apply a base coat and cure it under the UV/LED lamp.
- Gradient Base: Apply a gradient of pink to black gel polish, curing each layer.
- Cat Eye Effect: Use the magnetic stick to create the cat eye effect before curing under the lamp.
- Top Coat: Seal with a top coat and cure it. Wipe off any sticky layer with a cleanser.
Elegant Pink and Black Swirl Cat Eye
This elegant design combines pink and black with a swirl cat eye effect. The almond shape and the glittery pink accent nail add a touch of femininity and sophistication. This design is perfect for a glamorous and stylish fall look.

Consumables
- Black gel polish (e.g., Gelish in “Black Shadow”)
- Pink magnetic gel polish (e.g., Born Pretty Cat Eye Gel Polish in “Rosy Pink”)
- Glitter pink gel polish (e.g., Essie Gel Couture in “Glitz & Glam”)
- UV/LED nail lamp
- Magnetic stick for cat eye effect
- Base coat and top coat (e.g., CND Shellac Base Coat and Top Coat)
DIY Instructions
- Prep Your Nails: Shape your nails into an almond shape and buff the surface.
- Base Coat: Apply a base coat and cure it under the UV/LED lamp.
- Black and Pink Base: Apply a base of black gel polish, curing each layer. For the pink accent nails, apply pink gel polish and cure.
- Swirl Cat Eye Effect: Apply a layer of pink magnetic gel polish on black nails and create the swirl effect with a magnetic stick before curing under the lamp.
- Glitter Accent: Apply glitter pink gel polish to the accent nail and cure.
- Top Coat: Finish with a top coat and cure it. Cleanse with a nail cleanser to remove any sticky residue.
Save Pin
