When it comes to embracing the essence of fall, nail art offers a delightful way to showcase the beauty of the season. From warm hues to intricate floral designs, fall flowers nail art is all about celebrating the autumnal bloom. In this article, we’ll explore a variety of stunning nail art designs for fall flowers, each meticulously crafted to bring the season’s charm to your fingertips. Let’s dive into these enchanting designs that blend elegance with the vibrant colors of fall.
Vibrant Autumn Blossoms
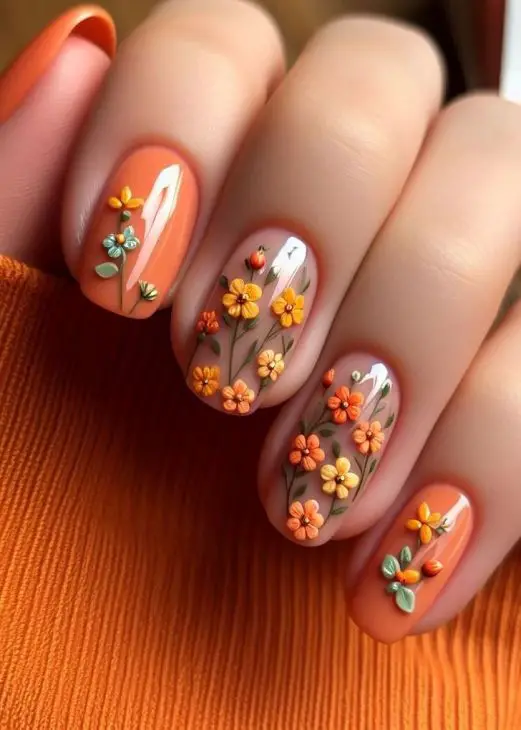
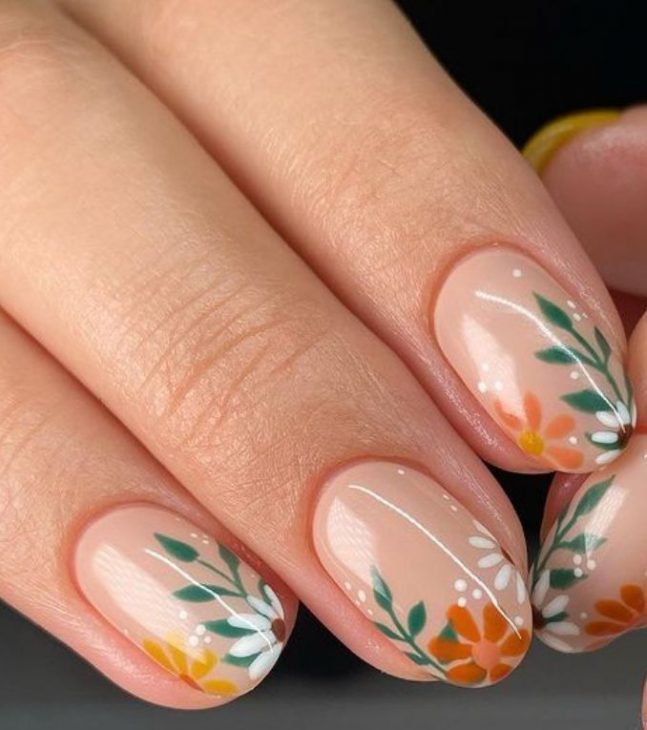
As a professional manicurist, I can attest that this design captures the vibrant essence of fall perfectly. The orange base serves as a rich canvas, allowing the intricate floral details to stand out. The mix of yellow, orange, and blue flowers creates a harmonious blend of warm and cool tones, embodying the transitional beauty of fall.
Consumables:
-
- Orange nail polish (e.g., OPI “A Good Man-darin is Hard to Find”)
- Yellow, orange, and blue flower decals
- Green leaf decals
- Top coat (e.g., Seche Vite Dry Fast Top Coat)
- DIY Instructions:
- Apply a base coat to protect your nails.
- Paint your nails with two coats of orange polish and let them dry completely.
- Carefully place the flower decals on the nails, arranging them to your liking.
- Add green leaf decals around the flowers to enhance the design.
- Seal the design with a top coat for a glossy finish.
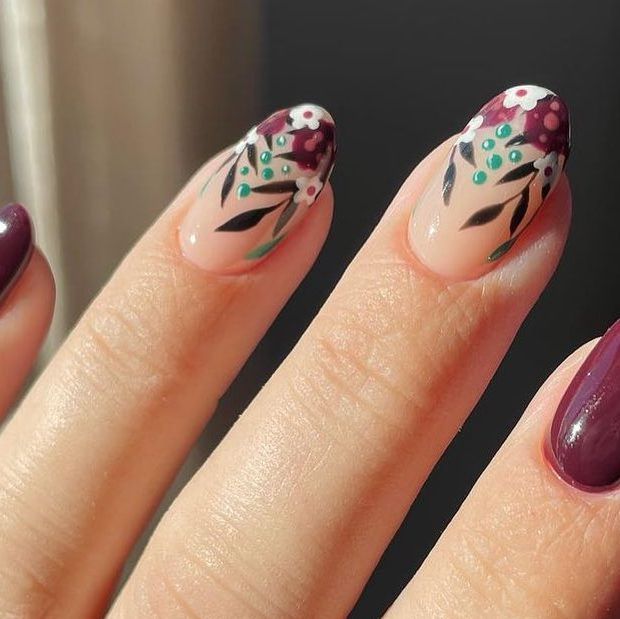
Elegant Maroon and Daisies
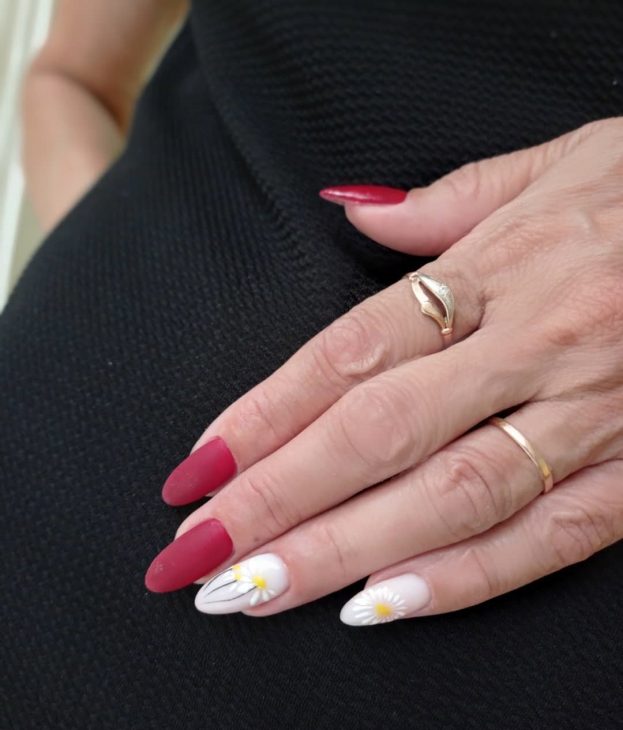
This design combines the deep, elegant maroon color with delicate daisy accents. The contrast between the bold maroon and the soft white daisies creates a stunning visual effect, perfect for fall nail art designs flowers. The matte finish adds an extra layer of sophistication to this look.
Consumables:
-
- Maroon nail polish (e.g., Essie “Angora Cardi”)
- White and yellow daisy decals
- Matte top coat (e.g., OPI Matte Top Coat)
- DIY Instructions:
- Start with a base coat to ensure nail protection.
- Apply two coats of maroon polish and allow them to dry.
- Place the daisy decals on the accent nails, pressing them gently to adhere.
- Finish with a matte top coat to achieve a velvety finish.
Golden Leaves and Black Elegance
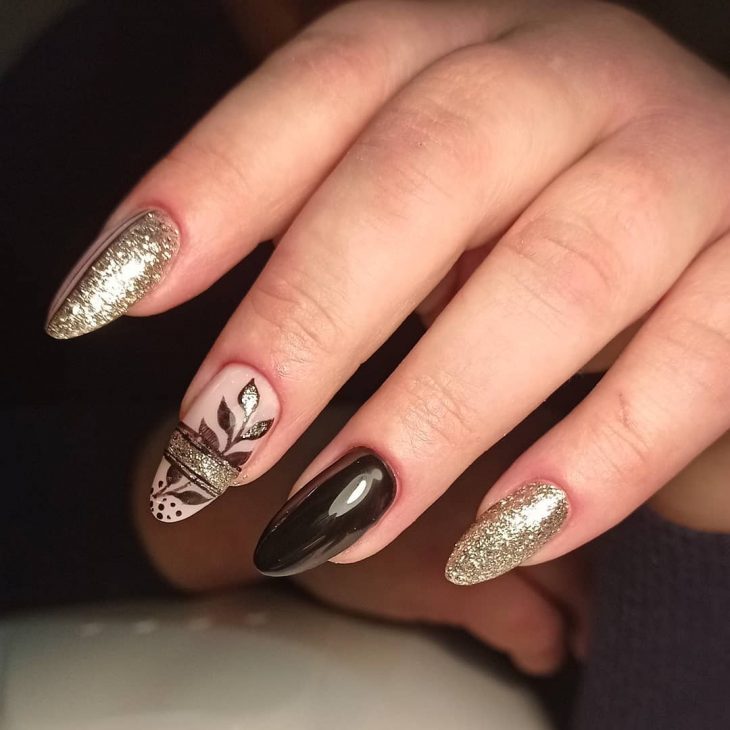
For those who prefer a touch of glam, this design incorporates golden leaves with a sleek black polish. The gold glitter adds a festive sparkle, making this design ideal for fall nail art designs flowers. The combination of black and gold is timeless and exudes sophistication.
Consumables:
-
- Black nail polish (e.g., Sally Hansen “Black Out”)
- Gold glitter polish (e.g., China Glaze “Golden Enchantment”)
- Leaf decals
- Top coat (e.g., Essie “Good to Go”)
- DIY Instructions:
- Apply a base coat to prep your nails.
- Paint your nails with two coats of black polish and let them dry.
- Add a layer of gold glitter polish on the ring finger.
- Apply the leaf decals on the middle and ring fingers.
- Seal the design with a top coat for lasting shine.
Whimsical Floral Accents
This design features a playful mix of green and gold with delicate floral accents. The subtle hints of fall flowers nail art bring a whimsical touch to the design, making it perfect for those who love a more understated look.
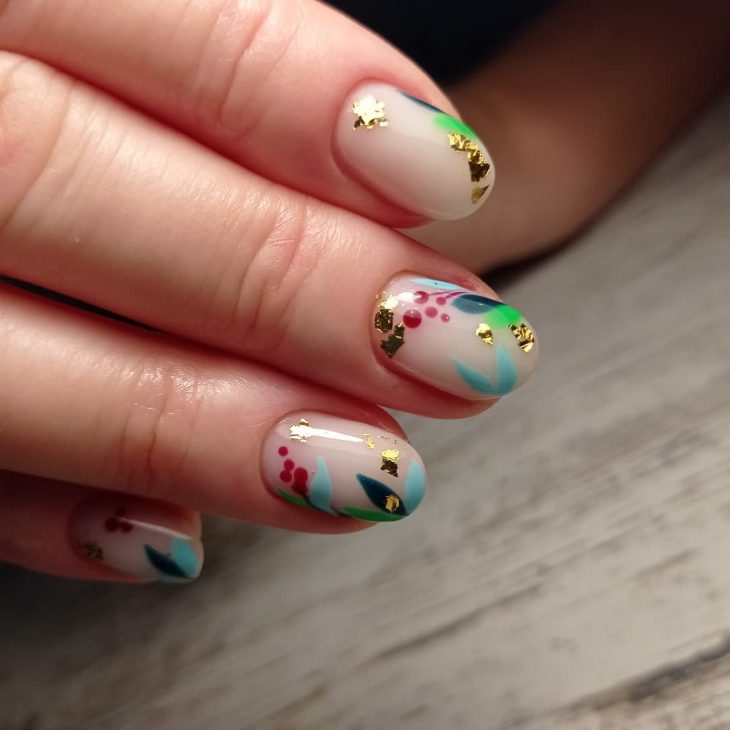
Consumables:
-
- Nude base polish (e.g., Zoya “Rue”)
- Green and gold foil accents
- Floral nail stickers
- Top coat (e.g., Orly “Glosser”)
- DIY Instructions:
- Begin with a base coat to protect your nails.
- Apply a nude base polish and let it dry.
- Add green and gold foil accents to each nail.
- Place the floral stickers strategically on the nails.
- Finish with a top coat to protect the design.
Fall Flowers Nail Art Design 5: Classic French with Floral Twist
This design elevates the classic French manicure with a floral twist. The soft pink base and white tips are complemented by intricate flower details, creating a sophisticated look that’s perfect for any occasion.
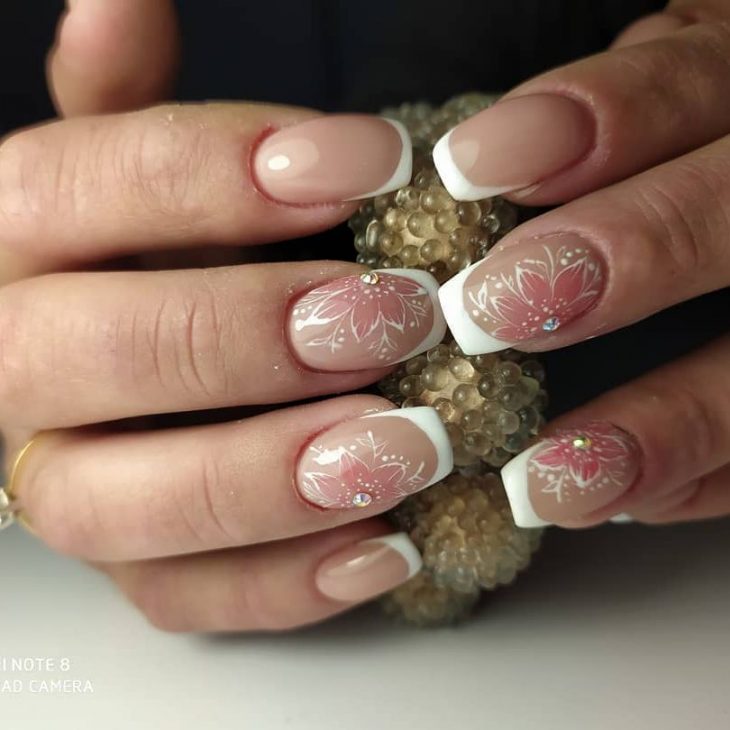
Consumables:
-
- Soft pink nail polish (e.g., OPI “Bubble Bath”)
- White polish for tips (e.g., Essie “Blanc”)
- Flower nail decals
- Top coat (e.g., CND “Vinylux Weekly Top Coat”)
- DIY Instructions:
- Apply a base coat to protect your nails.
- Paint your nails with the soft pink polish and let them dry.
- Create the French tips using white polish.
- Place the flower decals on the accent nails.
- Seal the design with a top coat for a glossy finish.
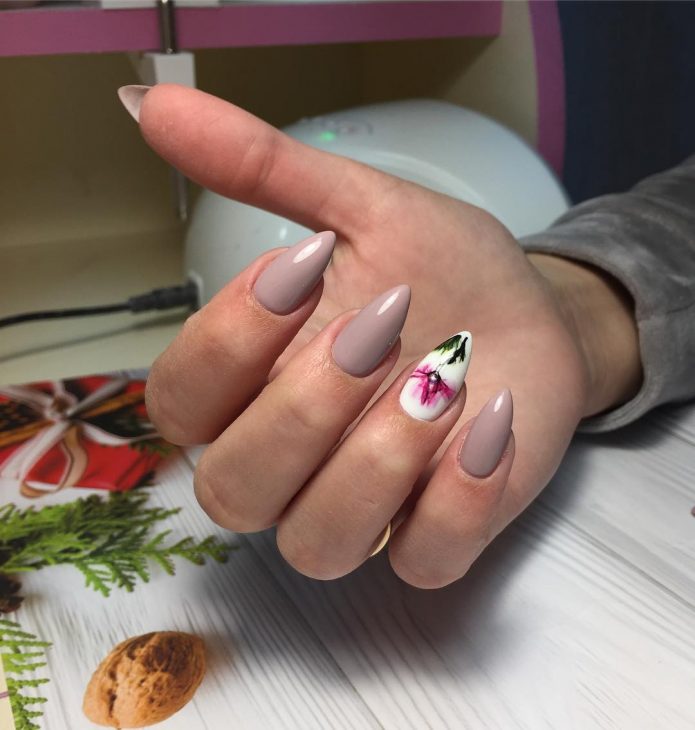
Maroon Elegance
As a professional manicurist, I can attest that this design captures the deep, rich hues of fall perfectly. The combination of maroon nails with delicate floral accents creates a striking contrast. The almond shape enhances the elegance of the design, making it a perfect choice for those who love sophisticated nail art.
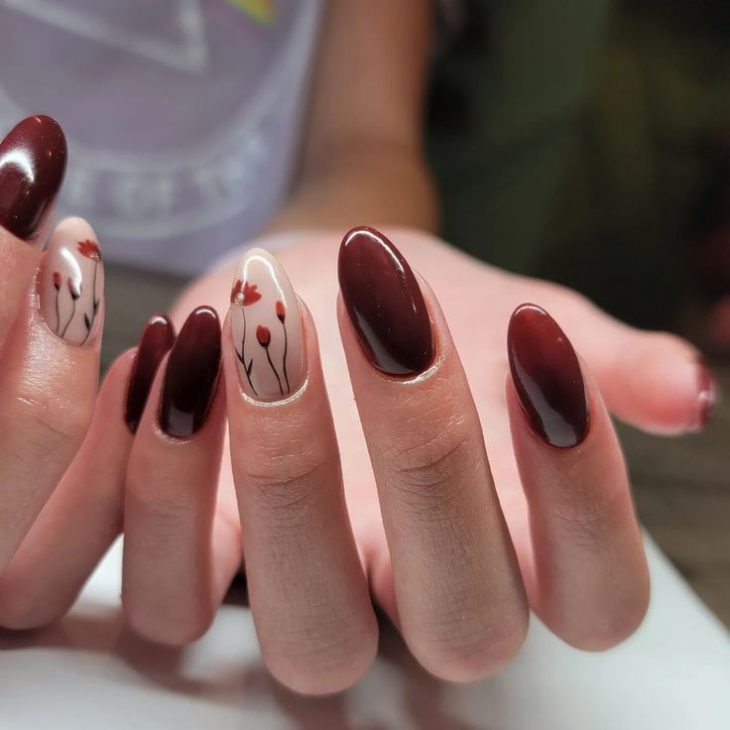
Consumables:
-
- Maroon nail polish (e.g., Essie “Maki Me Happy”)
- Nude base polish for accent nails (e.g., OPI “Be There in a Prosecco”)
- Black and red flower decals
- Top coat (e.g., Seche Vite Dry Fast Top Coat)
- DIY Instructions:
- Start with a base coat to protect your nails.
- Apply two coats of maroon polish to all nails except the ring fingers.
- On the ring fingers, apply two coats of nude polish.
- Once dry, place the flower decals on the accent nails.
- Finish with a top coat to seal the design and add shine.
Soft Pastel Florals
This design is perfect for those who prefer a softer look. The pale blue polish provides a serene background for the delicate floral details. The combination of purple and gold accents adds a touch of elegance to the overall design, making it ideal for fall nail art designs flowers.
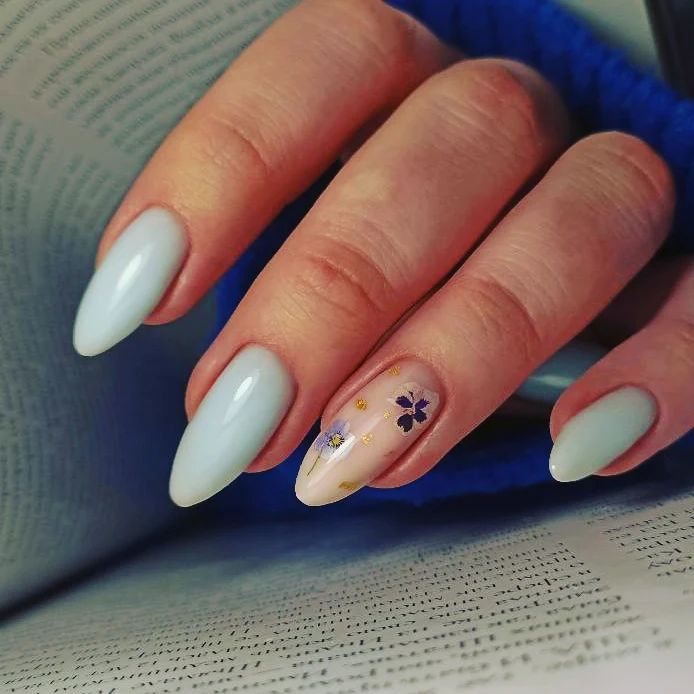
Consumables:
-
- Pale blue nail polish (e.g., Essie “Bikini So Teeny”)
- Clear polish for accent nails (e.g., Sally Hansen “Clear’d for Takeoff”)
- Purple and gold flower decals
- Top coat (e.g., Orly “Glosser”)
- DIY Instructions:
- Apply a base coat to prepare your nails.
- Paint all nails with two coats of pale blue polish, except for the ring fingers.
- On the ring fingers, apply a clear polish base.
- Place the flower decals on the clear nails, arranging them as desired.
- Seal the design with a top coat for a glossy finish.
Nude and Floral Fusion
This elegant design combines a nude base with intricate floral details, perfect for those who appreciate subtlety. The almond shape and delicate gold stripe accentuate the sophistication of the look, making it a go-to for fall nail art designs flowers.
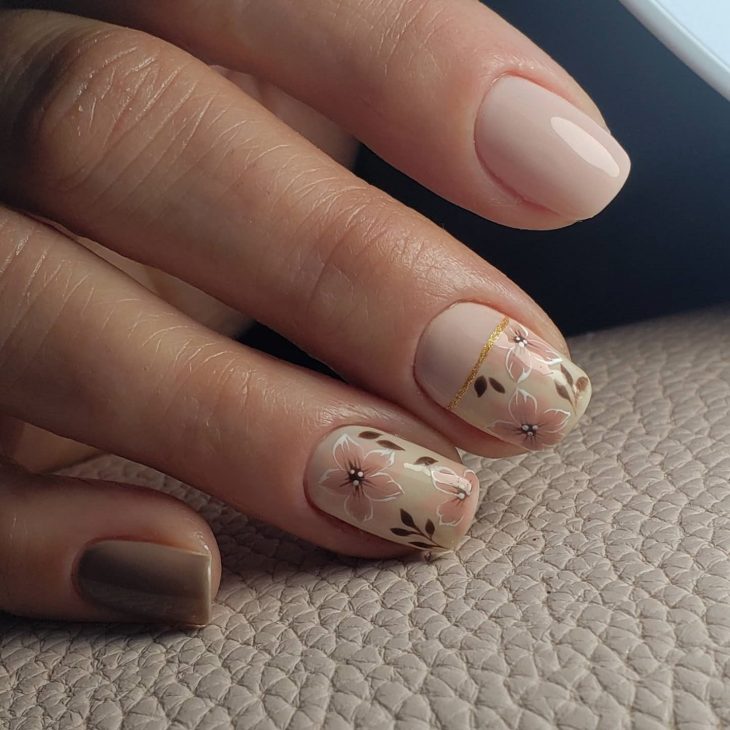
Consumables:
-
- Nude nail polish (e.g., OPI “Dulce de Leche”)
- White and pink flower decals
- Gold striping tape
- Top coat (e.g., CND “Vinylux Weekly Top Coat”)
- DIY Instructions:
- Begin with a base coat to protect your nails.
- Apply two coats of nude polish to all nails.
- Once dry, place the flower decals on the ring fingers.
- Add a gold stripe using striping tape on the accent nails.
- Finish with a top coat to secure the design.
Short and Sweet Florals
For those who prefer short nails, this design is both charming and practical. The soft pink base with white flower details creates a fresh, clean look. The touch of gold foil adds a bit of sparkle, perfect for nail art designs for fall flowers.
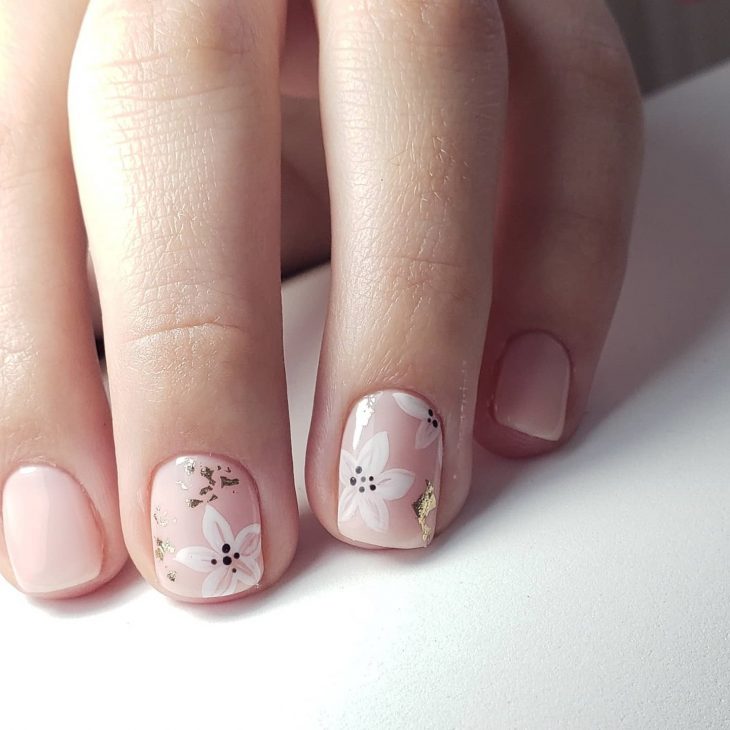
Consumables:
-
- Soft pink nail polish (e.g., Essie “Ballet Slippers”)
- White flower decals
- Gold foil accents
- Top coat (e.g., Zoya “Armor”)
- DIY Instructions:
- Apply a base coat to protect your nails.
- Paint your nails with two coats of soft pink polish and let them dry.
- Place the white flower decals on the nails, positioning them as desired.
- Add gold foil accents around the flowers.
- Seal the design with a top coat for a lasting finish.
Burgundy Blossoms
This design features a rich burgundy color with intricate floral accents. The deep hue is perfect for fall, and the detailed flowers add an elegant touch. The almond shape complements the overall look, making it ideal for those who love bold yet refined nail art.
Consumables:
-
- Burgundy nail polish (e.g., Zoya “Lael”)
- Nude base polish for accent nails (e.g., OPI “My Vampire is Buff”)
- Green, white, and burgundy flower decals
- Top coat (e.g., Essie “Good to Go”)
- DIY Instructions:
- Start with a base coat to protect your nails.
- Apply two coats of burgundy polish to all nails except the ring fingers.
- On the ring fingers, apply two coats of nude polish.
- Once dry, place the flower decals on the accent nails.
- Finish with a top coat to seal the design and add shine.
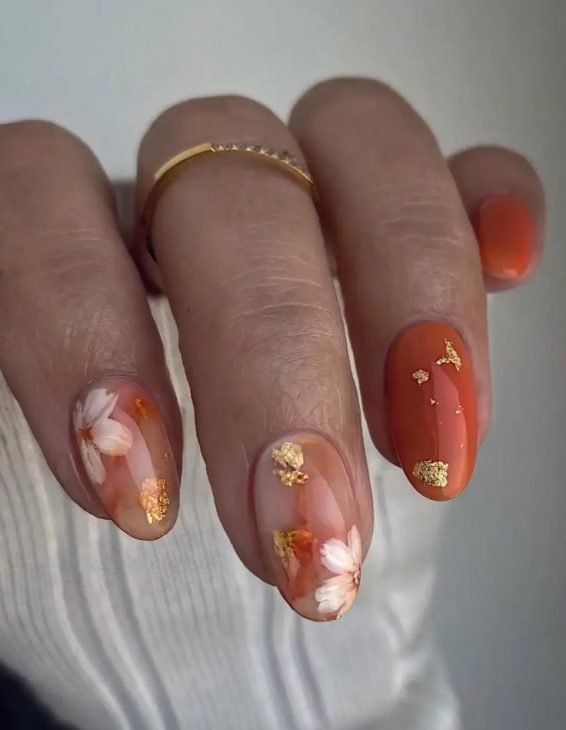
Orange Blossom Delight
This design beautifully combines the warmth of orange with delicate floral accents, perfect for fall flowers nail art. The addition of gold foil adds a touch of luxury, making it ideal for those who want a sophisticated yet vibrant look. The almond shape of the nails enhances the elegance of the design.
Consumables:
-
- Orange nail polish (e.g., Essie “Playing Koi”)
- Clear polish for accent nails (e.g., Sally Hansen “Clear’d for Takeoff”)
- White flower decals
- Gold foil accents
- Top coat (e.g., Seche Vite Dry Fast Top Coat)
- DIY Instructions:
- Begin with a base coat to protect your nails.
- Apply two coats of orange polish to all nails except the ring fingers.
- On the ring fingers, apply a clear polish base.
- Place the white flower decals on the clear nails and add gold foil accents around them.
- Finish with a top coat to seal the design and add shine.
Autumn Meadow
This design features a nude base with vibrant floral accents, creating a serene autumn meadow on your nails. The combination of green leaves and colorful flowers makes this a standout design for fall nail art designs flowers. The short, rounded shape keeps it practical and elegant.

Consumables:
-
- Nude nail polish (e.g., OPI “Be There in a Prosecco”)
- Green, yellow, and white flower decals
- Top coat (e.g., Orly “Glosser”)
- DIY Instructions:
- Apply a base coat to prepare your nails.
- Paint all nails with two coats of nude polish.
- Place the green, yellow, and white flower decals on the nails, arranging them to create a meadow-like effect.
- Seal the design with a top coat for a lasting finish.
Floral French Twist
This design takes the classic French manicure and adds a floral twist. The combination of white tips and intricate floral details creates a fresh and sophisticated look. The square shape of the nails complements the design, making it perfect for those who love classic yet creative nail art.
Consumables:
-
- Nude base polish (e.g., Essie “Ballet Slippers”)
- White polish for tips (e.g., Essie “Blanc”)
- Green, white, and pink flower decals
- Top coat (e.g., CND “Vinylux Weekly Top Coat”)
- DIY Instructions:
- Start with a base coat to protect your nails.
- Apply two coats of nude polish to all nails.
- Create the French tips using white polish.
- Once dry, place the flower decals on the nails, focusing on the tips.
- Finish with a top coat to secure the design.
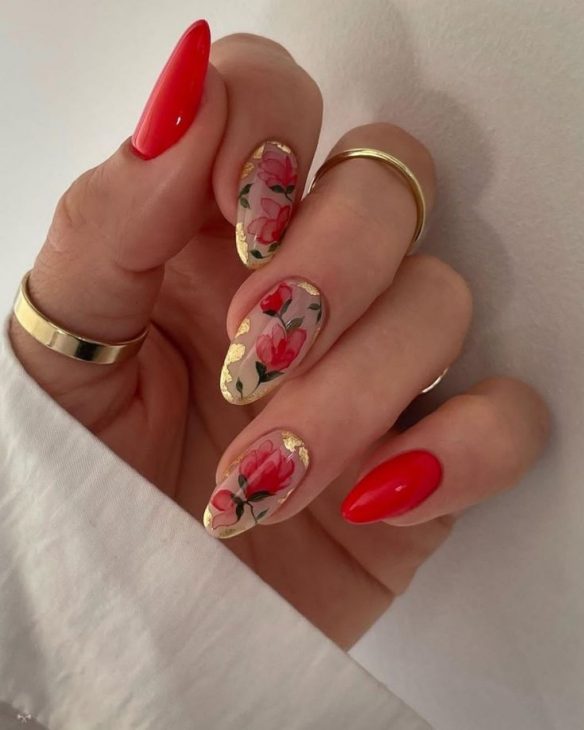
Bold Floral Accents
This design features a bold red base with striking floral accents. The combination of vibrant red and detailed floral art makes it a standout choice for fall nail art designs flowers. The almond shape enhances the overall elegance, making it perfect for special occasions.
Consumables:
-
- Red nail polish (e.g., OPI “Big Apple Red”)
- Clear polish for accent nails (e.g., Sally Hansen “Clear’d for Takeoff”)
- Pink and green flower decals
- Gold foil accents
- Top coat (e.g., Seche Vite Dry Fast Top Coat)
- DIY Instructions:
- Begin with a base coat to protect your nails.
- Apply two coats of red polish to all nails except the ring fingers.
- On the ring fingers, apply a clear polish base.
- Place the flower decals on the clear nails and add gold foil accents around them.
- Finish with a top coat to seal the design and add shine.
White Floral Elegance
This design combines a crisp white base with elegant floral details, perfect for a clean and sophisticated look. The detailed floral art in soft pastel colors adds a delicate touch, making it ideal for those who appreciate understated elegance. The square shape of the nails complements the design beautifully.
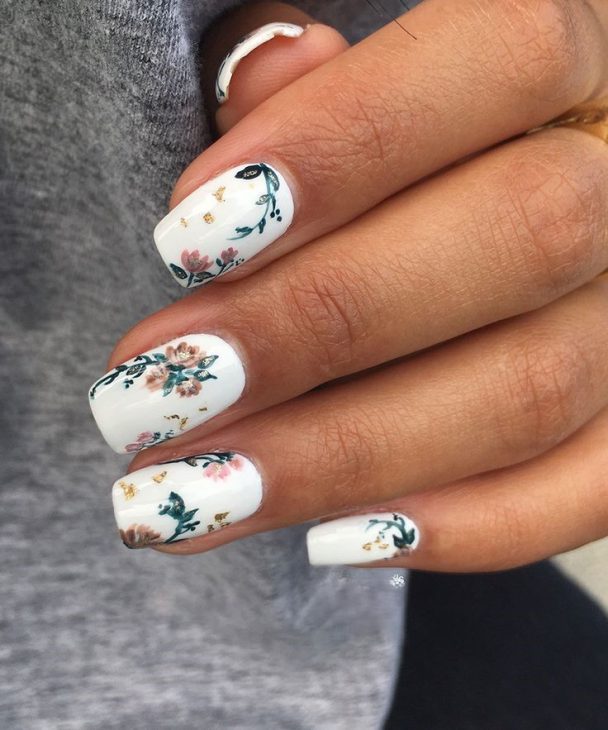
Consumables:
-
- White nail polish (e.g., Essie “Blanc”)
- Pink and green flower decals
- Gold foil accents
- Top coat (e.g., Zoya “Armor”)
- DIY Instructions:
- Apply a base coat to protect your nails.
- Paint your nails with two coats of white polish and let them dry.
- Place the flower decals on the nails, positioning them as desired.
- Add gold foil accents around the flowers.
- Seal the design with a top coat for a lasting finish.
Soft Pastel Elegance
This design blends soft pastel shades with delicate floral accents, creating a serene and elegant look perfect for fall. The combination of light blue and beige tones gives a refreshing yet warm feel, ideal for fall nail art designs flowers.
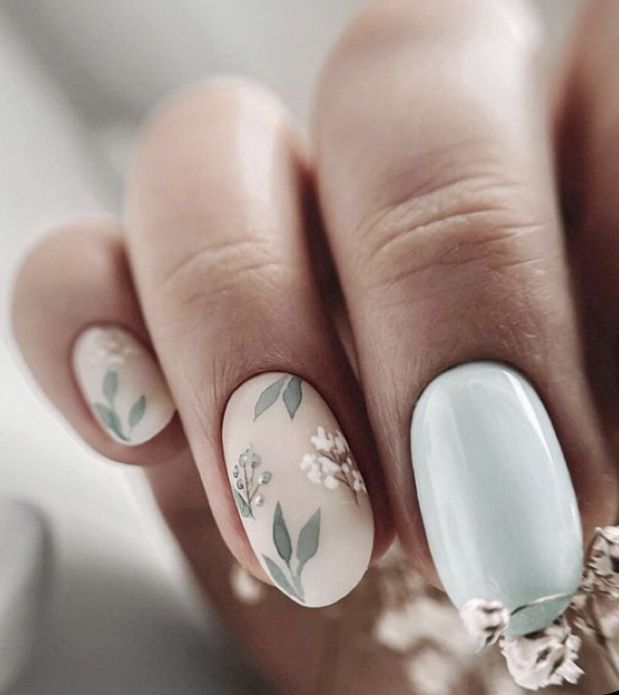
Consumables:
-
- Light blue nail polish (e.g., Essie “Find Me an Oasis”)
- Beige nail polish (e.g., OPI “My Vampire is Buff”)
- Green and white flower decals
- Top coat (e.g., Sally Hansen “Miracle Gel Top Coat”)
- DIY Instructions:
- Begin with a base coat to protect your nails.
- Apply two coats of light blue polish to the accent nails and two coats of beige polish to the rest.
- Once dry, place the flower decals on the beige nails, arranging them to create a cohesive design.
- Finish with a top coat to seal the design and add shine.
Bright Yellow Florals
For those who love a pop of color, this design combines bright yellow nails with delicate floral accents on a nude base. The contrast between the vibrant yellow and the subtle floral details makes it a standout design for fall nail art designs flowers.
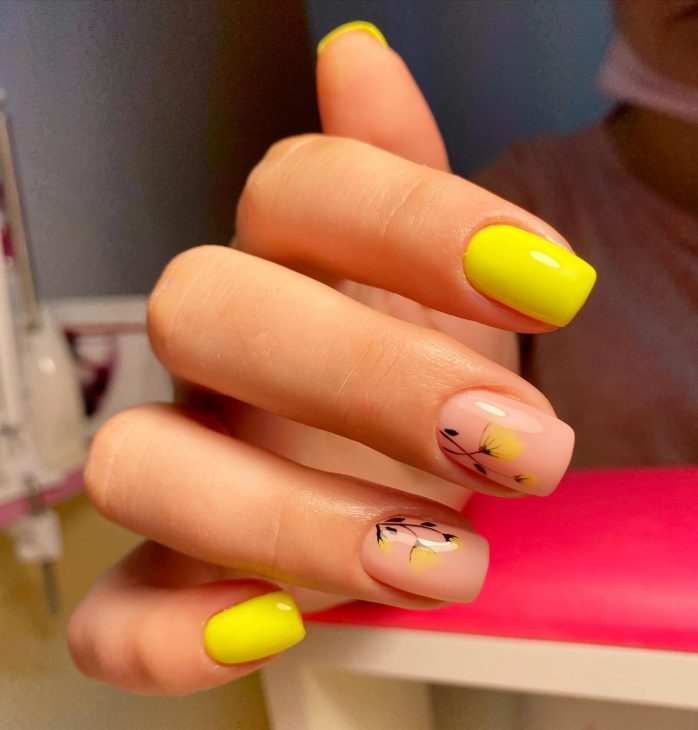
Consumables:
-
- Bright yellow nail polish (e.g., OPI “Sun, Sea, and Sand in My Pants”)
- Nude base polish (e.g., Essie “Ballet Slippers”)
- Yellow and black flower decals
- Top coat (e.g., CND “Vinylux Weekly Top Coat”)
- DIY Instructions:
- Apply a base coat to prepare your nails.
- Paint all nails with two coats of bright yellow polish, except for the accent nails.
- On the accent nails, apply two coats of nude polish.
- Place the flower decals on the accent nails, focusing on the tips.
- Seal the design with a top coat for a lasting finish.
Simple Blue Florals
This design is perfect for those who prefer simplicity. The nude base with small blue floral accents creates a clean and elegant look. The short, rounded nails make it practical and understated, ideal for everyday wear.
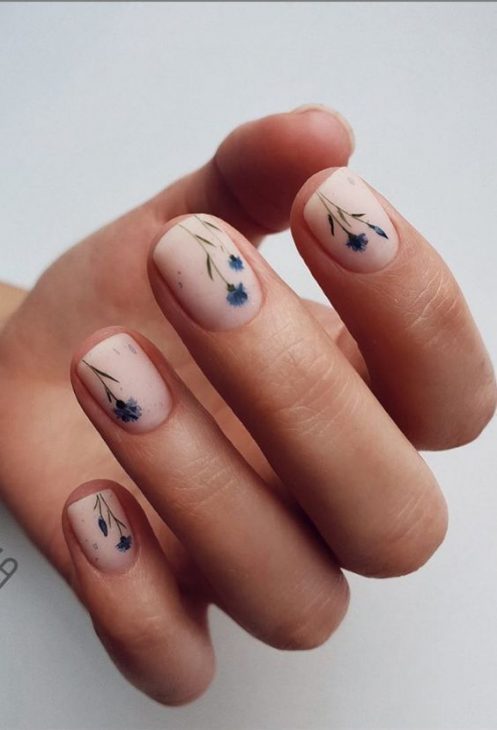
Consumables:
-
- Nude nail polish (e.g., Zoya “Rue”)
- Blue flower decals
- Top coat (e.g., Orly “Glosser”)
- DIY Instructions:
- Start with a base coat to protect your nails.
- Apply two coats of nude polish to all nails and let them dry.
- Place the blue flower decals on the nails, arranging them as desired.
- Finish with a top coat to secure the design.
Green and Floral Harmony
This design combines a rich green matte polish with elegant floral accents on a nude base. The contrast between the matte green and the glossy floral details creates a unique and stylish look perfect for fall flowers nail art.
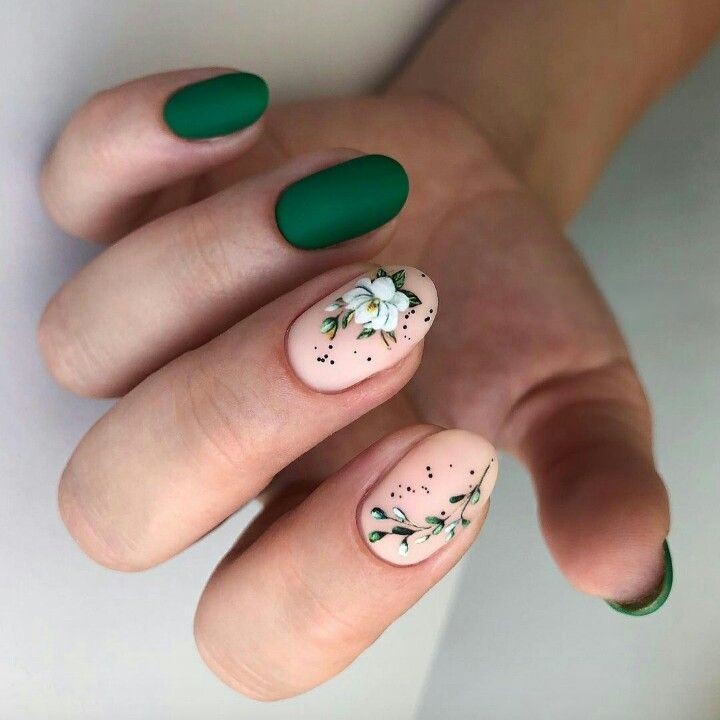
Consumables:
-
- Green matte nail polish (e.g., Essie “Power Clutch”)
- Nude base polish (e.g., OPI “Be There in a Prosecco”)
- White and green flower decals
- Top coat (e.g., Seche Vite Dry Fast Top Coat)
- DIY Instructions:
- Begin with a base coat to protect your nails.
- Apply two coats of green matte polish to the accent nails and two coats of nude polish to the rest.
- Once dry, place the flower decals on the nude nails, arranging them to create a cohesive design.
- Finish with a top coat to seal the design and add shine.
Nude and Pink Elegance
This design features a sophisticated nude base with bold pink floral accents. The almond shape enhances the elegance of the design, making it a perfect choice for those who appreciate refined nail art with a touch of color.
Consumables:
-
- Nude nail polish (e.g., Essie “Topless & Barefoot”)
- Clear polish for accent nails (e.g., Sally Hansen “Clear’d for Takeoff”)
- Pink and green flower decals
- Top coat (e.g., Orly “Glosser”)
- DIY Instructions:
- Apply a base coat to protect your nails.
- Paint all nails with two coats of nude polish, except for the ring fingers.
- On the ring fingers, apply a clear polish base.
- Place the flower decals on the clear nails, arranging them to create a cohesive design.
- Seal the design with a top coat for a lasting finish.
Save Pin