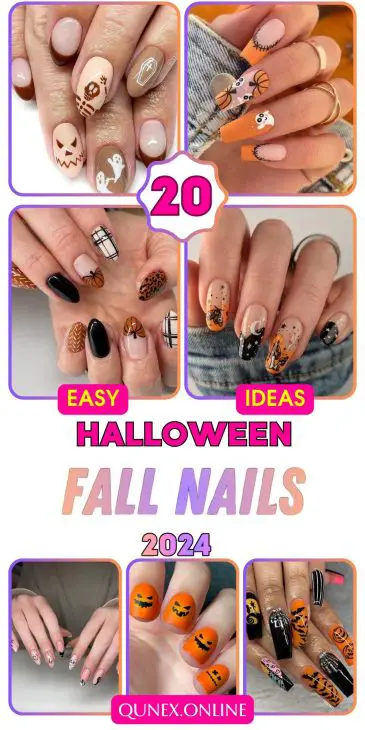
Fall Halloween Nails: Spooky and Stylish Ideas for Your Next Manicure
Halloween is just around the corner, and it’s the perfect time to get creative with your nail designs. Whether you’re looking for something spooky, cute, or simply inspired by the season, fall Halloween nails offer a variety of options to suit your style. In this article, I’ll share some fabulous fall Halloween nail designs, complete with detailed descriptions, consumables, and DIY instructions. Let’s dive into the world of eerie elegance!
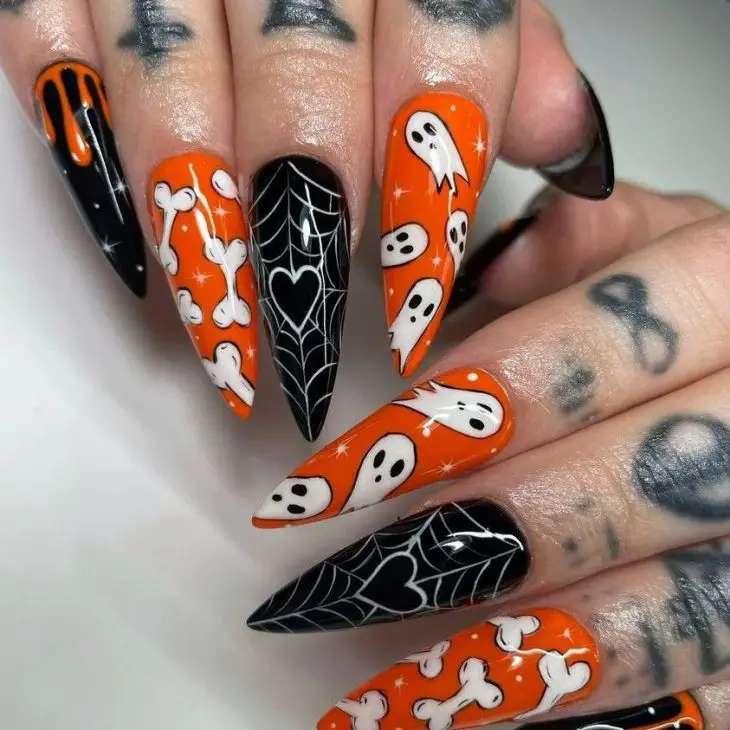
Ghostly Glamour and Spooky Spiderwebs
As a professional manicurist, I can confidently say that this ghost and spiderweb design is a standout for fall Halloween nails. The black and orange color scheme is classic for the season, and the intricate spiderwebs add a touch of spooky sophistication. The ghost and bone accents give it a playful yet eerie vibe, making it perfect for any Halloween event.
Consumables:
-
- Black and orange nail polish (OPI’s “Black Onyx” and “A Good Man-darin is Hard to Find”)
- White nail polish for the ghost and bone accents (Essie’s “Blanc”)
- Thin nail art brush for creating spiderwebs
- Top coat for sealing the design (Sally Hansen’s “Insta-Dri”)
- DIY Instructions:
- Start by applying a base coat to protect your nails.
- Paint alternating nails with black and orange polish.
- Use a thin brush to draw spiderwebs on the black nails with white polish.
- Paint ghost and bone shapes on the orange nails using the same white polish.
- Seal your design with a top coat for a long-lasting finish.
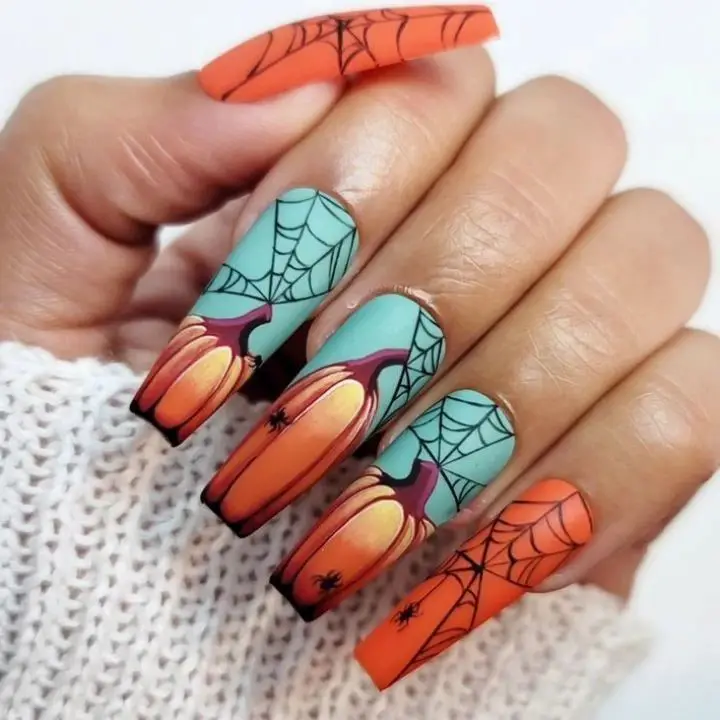
Pumpkin Perfection and Creepy Cobwebs
This pumpkin and cobweb design brings a vibrant and playful touch to fall Halloween nails. The orange pumpkins pop against the teal background, while the black cobwebs add a spooky contrast. This design is perfect for those who want a fun and festive look without being too scary.
Consumables:
-
- Teal nail polish for the base (OPI’s “Can’t Find My Czechbook”)
- Orange nail polish for the pumpkins (China Glaze’s “Orange Knockout”)
- Black nail polish for the cobwebs (Sally Hansen’s “Black Out”)
- Thin nail art brush for detailing
- Top coat for a glossy finish (Seche Vite’s “Dry Fast Top Coat”)
- DIY Instructions:
- Apply a base coat to all nails.
- Paint all nails with teal polish.
- Use a thin brush to draw pumpkin shapes with orange polish.
- Add cobweb details with black polish using the same thin brush.
- Finish with a top coat to protect your artwork.
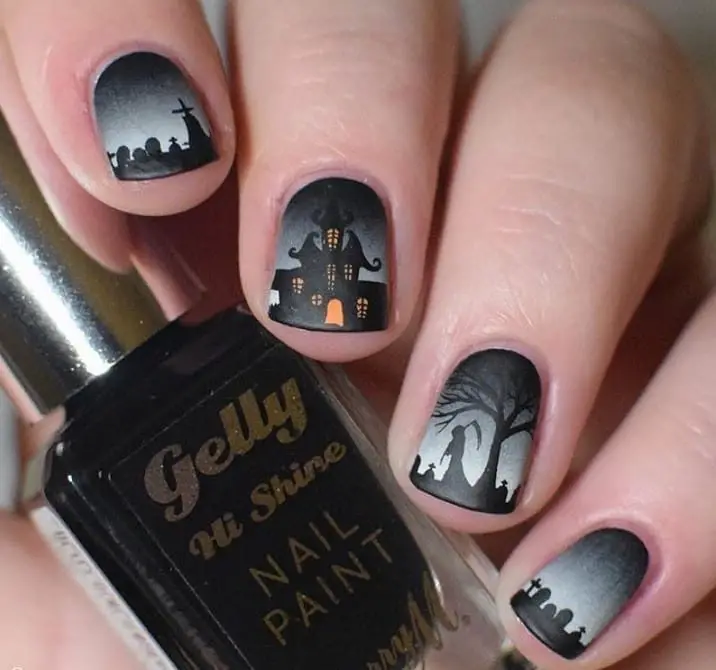
Haunted House and Graveyard Scene
For a more detailed and haunting look, this haunted house and graveyard scene is perfect for fall Halloween nails. The black and gray gradient creates a spooky night sky, and the intricate haunted house and graveyard silhouettes add depth and drama to the design.
Consumables:
-
- Black nail polish for the base (OPI’s “Black Onyx”)
- Gray nail polish for the gradient (Zoya’s “Dove”)
- Thin nail art brush for detailed silhouettes
- Top coat for durability (Essie’s “Good to Go”)
- DIY Instructions:
- Apply a base coat to protect your nails.
- Create a black to gray gradient on each nail using a sponge.
- Use a thin brush to paint haunted house and graveyard silhouettes with black polish.
- Apply a top coat to seal and protect your design.
Silver Ghosts and Stars
If you prefer a bit of sparkle, these silver ghost nails are both spooky and glamorous. The silver base with black and white ghost and star accents creates a whimsical, celestial look perfect for Halloween.

Consumables:
-
- Silver nail polish for the base (Essie’s “No Place Like Chrome”)
- Black and white nail polish for ghosts and stars (Sally Hansen’s “Black Out” and “White On”)
- Thin nail art brush for detailing
- Top coat for a shimmering finish (CND’s “Super Shiney”)
- DIY Instructions:
- Start with a base coat.
- Apply silver polish to all nails.
- Use a thin brush to paint ghost and star shapes with black and white polish.
- Finish with a top coat for added shine and protection.
Jack-O’-Lantern Delight
Celebrate Halloween with a classic Jack-O’-Lantern design. The vibrant orange pumpkins with expressive faces bring a playful and traditional Halloween vibe to your nails. The matte finish adds a modern twist to the classic look.

Consumables:
-
- Matte orange nail polish for the base (OPI’s “It’s a Piazza Cake”)
- Black nail polish for pumpkin faces (China Glaze’s “Liquid Leather”)
- Matte top coat for a smooth finish (OPI’s “Matte Top Coat”)
- DIY Instructions:
- Apply a base coat to all nails.
- Paint all nails with matte orange polish.
- Use a thin brush to draw pumpkin faces with black polish.
- Seal with a matte top coat for a sophisticated finish.
Jack-O’-Lantern Faces
As a professional manicurist, I can assure you that these Jack-O’-Lantern faces are perfect for fall Halloween nails. The matte orange base combined with black Jack-O’-Lantern faces creates a fun and festive look. The simple yet bold design is ideal for those who prefer a cute and straightforward Halloween manicure.
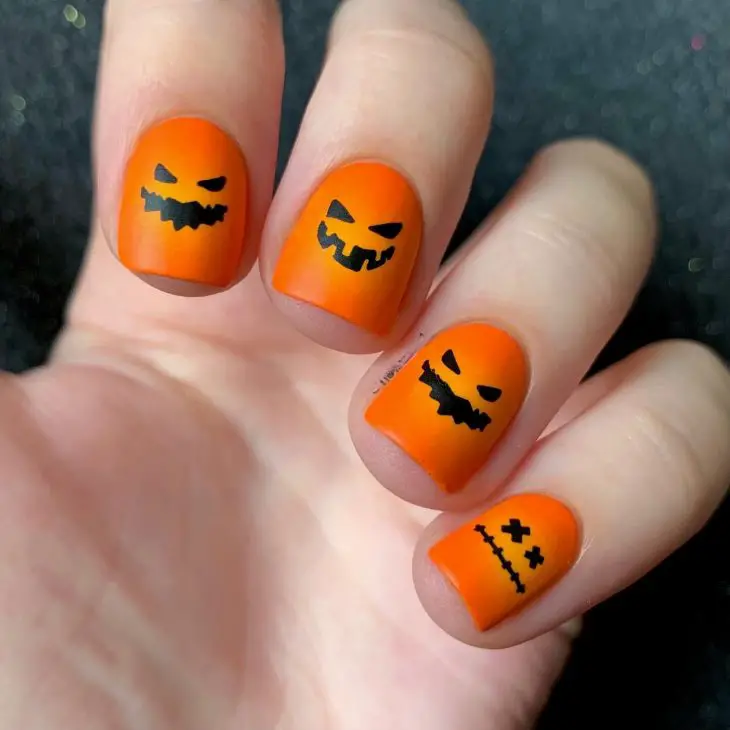
Consumables:
-
- Matte orange nail polish (Essie’s “Fall for NYC”)
- Black nail polish for the faces (OPI’s “Black Onyx”)
- Thin nail art brush for detailing
- Matte top coat (Revlon’s “Matte Top Coat”)
- DIY Instructions:
- Apply a base coat to protect your nails.
- Paint all nails with matte orange polish.
- Using a thin brush, draw Jack-O’-Lantern faces with black polish on each nail.
- Seal with a matte top coat to keep the look smooth and sophisticated.
Elegant Halloween Mix
This design is a striking combination of Halloween elements with a sophisticated twist. Featuring black and orange colors, pumpkins, spider webs, and unique accents, it’s a comprehensive design that captures the spirit of fall Halloween nails. The long coffin shape adds to the elegance of the manicure.
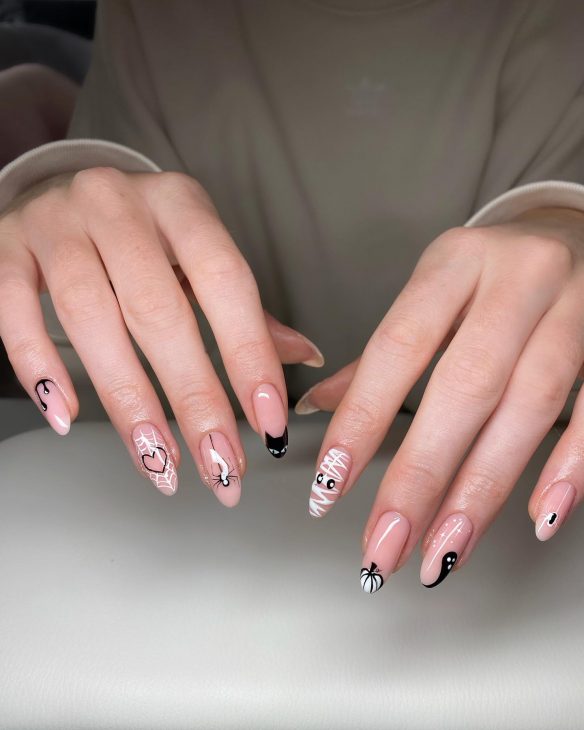
Consumables:
-
- Black and orange nail polish (Sally Hansen’s “Black Heart” and “Tangelo”)
- Nude base polish for the pumpkin accent nails (OPI’s “Samoan Sand”)
- Nail art brush for intricate designs
- Top coat for sealing (CND’s “Super Shiney”)
- DIY Instructions:
- Start with a base coat.
- Apply black polish to some nails and orange to others.
- Use a thin brush to paint pumpkins, spider webs, and other Halloween elements on the accent nails.
- Finish with a top coat to protect and shine.
Black and Pumpkin Butterfly Accent
This design features a chic black base with a standout pumpkin butterfly accent. It’s a perfect example of how a single detailed element can elevate fall Halloween nails. The almond shape adds a modern touch to this Halloween-inspired manicure.
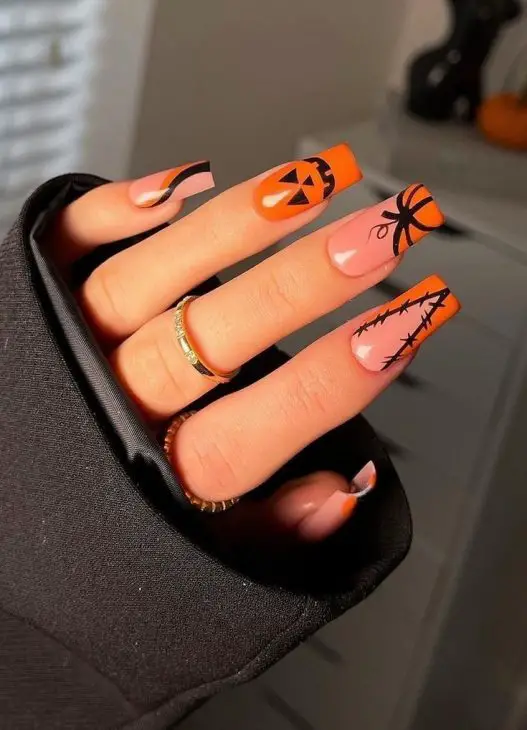
Consumables:
-
- Black nail polish for the base (OPI’s “Black Onyx”)
- Orange and black nail polish for the butterfly (Essie’s “Playing Koi” and “Licorice”)
- Thin nail art brush for detailing
- Top coat for longevity (Sally Hansen’s “Hard As Nails”)
- DIY Instructions:
- Apply a base coat to all nails.
- Paint all nails black except the accent nail, which should be nude.
- Draw a pumpkin butterfly on the accent nail using orange and black polish.
- Seal with a top coat for a long-lasting finish.
Halloween Mash-Up
This design is perfect for those who love a mix of Halloween themes. Featuring a haunted house, bats, pumpkins, and more, these nails are vibrant and eye-catching. The combination of different elements makes it a true fall Halloween nails masterpiece.
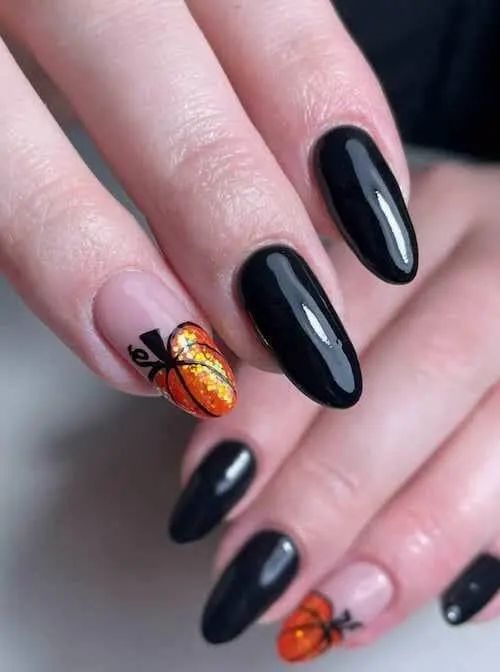
Consumables:
-
- Black, orange, yellow, and other colored nail polishes (China Glaze’s “Liquid Leather”, “Orange Knockout”, and “Yellow Polka Dot Bikini”)
- Thin nail art brushes for detailed designs
- Top coat for protection (Essie’s “Good to Go”)
- DIY Instructions:
- Start with a base coat on all nails.
- Paint each nail with a different base color.
- Use thin brushes to create detailed Halloween designs like haunted houses, bats, and pumpkins.
- Finish with a top coat to seal the designs.
Subtle Spooky Accents
For a more understated Halloween look, these nails feature subtle spooky accents like mummies, spider webs, and ghosts on a nude base. The delicate black and white details make it perfect for fall Halloween nails that are both chic and festive.
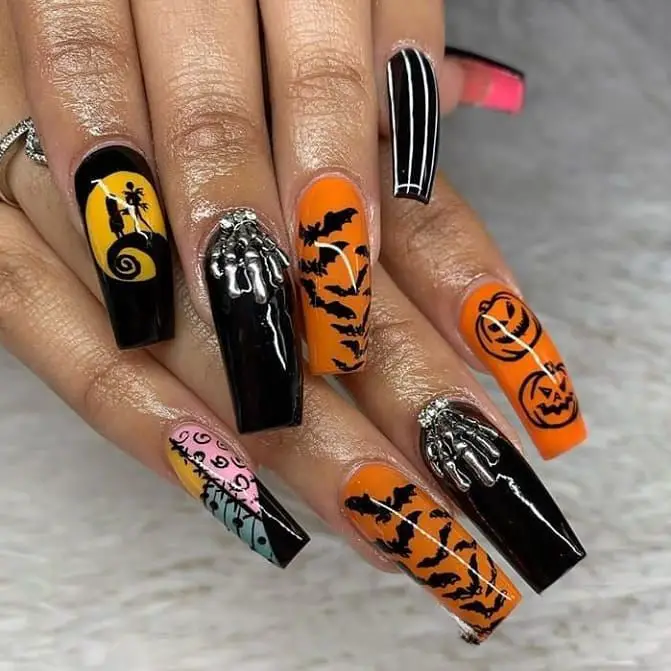
Consumables:
-
- Nude nail polish for the base (Essie’s “Ballet Slippers”)
- Black and white nail polish for the accents (OPI’s “Black Onyx” and “Alpine Snow”)
- Thin nail art brushes for detailing
- Top coat for a glossy finish (Seche Vite’s “Dry Fast Top Coat”)
- DIY Instructions:
- Apply a base coat to all nails.
- Paint all nails with nude polish.
- Use a thin brush to draw mummies, spider webs, and ghost accents with black and white polish.
- Seal with a top coat to protect your design.
Jack-O’-Lantern Faces on Almond Nails
For a fun and festive Halloween look, these Jack-O’-Lantern faces on almond-shaped nails are perfect. The matte orange base with black, expressive faces captures the Halloween spirit wonderfully. This design is ideal for those who want to make a bold statement with their nails during the spooky season.
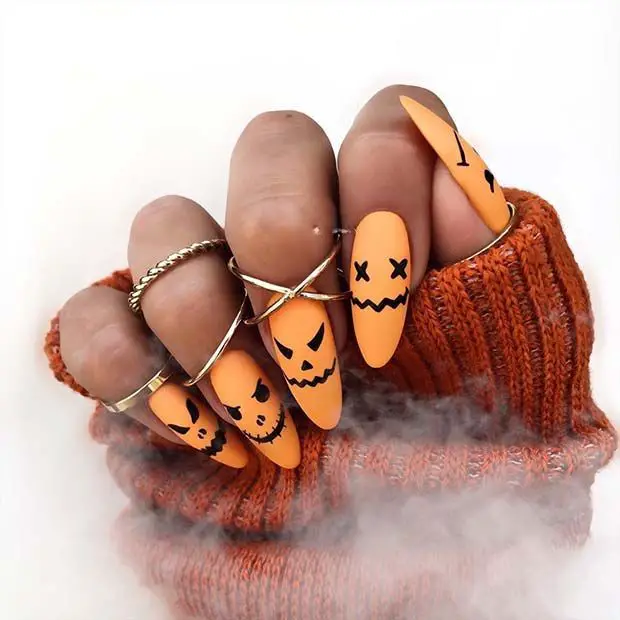
Consumables:
-
- Matte orange nail polish (Essie’s “Fall for NYC”)
- Black nail polish for the faces (OPI’s “Black Onyx”)
- Thin nail art brush for detailing
- Matte top coat (Revlon’s “Matte Top Coat”)
- DIY Instructions:
- Apply a base coat to protect your nails.
- Paint all nails with matte orange polish.
- Using a thin brush, draw Jack-O’-Lantern faces with black polish on each nail.
- Seal with a matte top coat to keep the look smooth and sophisticated.
Spider Web and Brown Fall Nails
This elegant design features a combination of brown and nude tones with intricate spider and web accents, perfect for fall Halloween nails. The contrast between the dark spiders and the lighter background creates a striking effect that is both spooky and stylish.
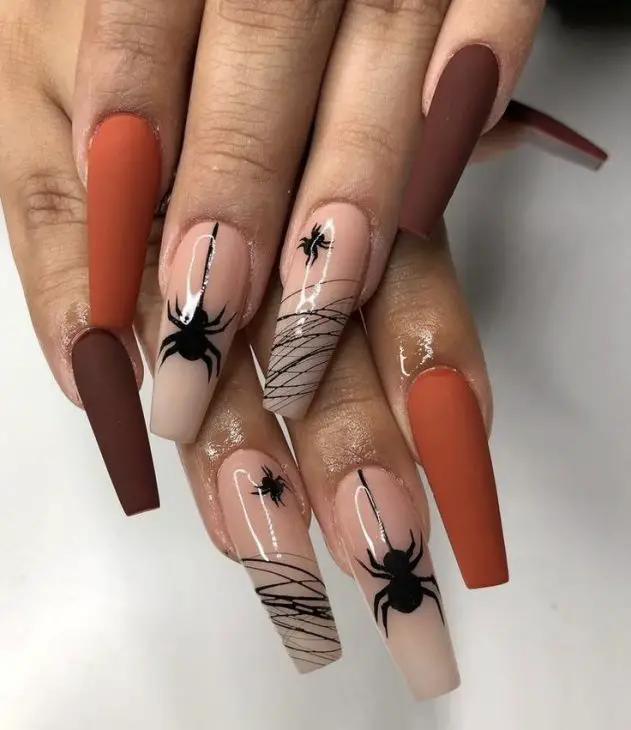
Consumables:
-
- Brown and nude nail polishes (OPI’s “Chocolate Moose” and Essie’s “Ballet Slippers”)
- Black nail polish for spider and web accents (Sally Hansen’s “Black Out”)
- Thin nail art brush for detailing
- Top coat for sealing (Seche Vite’s “Dry Fast Top Coat”)
- DIY Instructions:
- Apply a base coat to all nails.
- Paint some nails brown and others nude.
- Use a thin brush to draw spiders and webs on the nude nails with black polish.
- Seal with a top coat for a glossy finish.
Fall Plaid and Pumpkin Accent Nails
These nails combine fall plaid patterns with cute pumpkin accents, making them perfect for fall Halloween nails. The mix of black, white, and orange colors creates a cozy, autumnal feel that is great for the season.
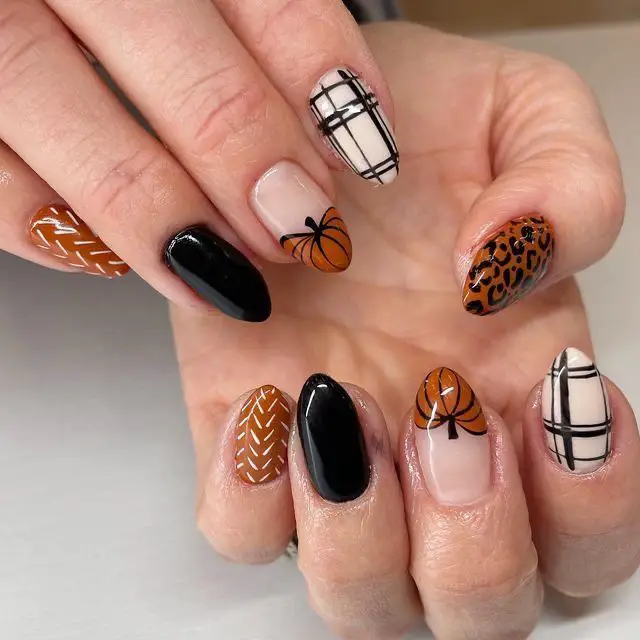
Consumables:
-
- Black, white, and orange nail polishes (OPI’s “Black Onyx”, Essie’s “Blanc”, and China Glaze’s “Orange Knockout”)
- Thin nail art brush for detailing
- Top coat for protection (CND’s “Super Shiney”)
- DIY Instructions:
- Start with a base coat on all nails.
- Paint plaid patterns on some nails using black and white polish.
- Draw pumpkin accents on other nails using orange polish and a thin brush.
- Finish with a top coat to protect the designs.
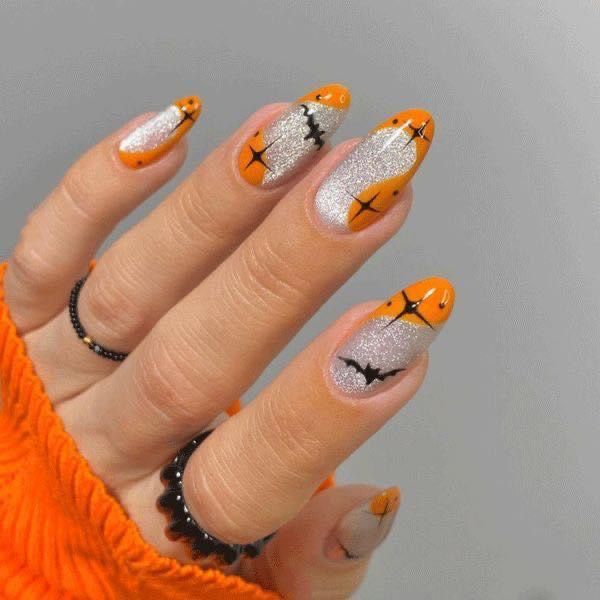
Glittery Bats and Orange Tips
For a glamorous take on fall Halloween nails, these glittery bats and orange tips are ideal. The silver glitter base with orange tips and black bat accents adds a touch of sparkle to your Halloween look.
Consumables:
-
- Silver glitter nail polish (Essie’s “Set in Stones”)
- Orange nail polish for the tips (OPI’s “It’s a Piazza Cake”)
- Black nail polish for bat accents (China Glaze’s “Liquid Leather”)
- Thin nail art brush for detailing
- Top coat for shine and durability (Sally Hansen’s “Mega Shine”)
- DIY Instructions:
- Apply a base coat to all nails.
- Paint nails with silver glitter polish.
- Add orange tips using a thin brush.
- Draw bat accents with black polish on the tips.
- Seal with a top coat to maintain the glittery finish.
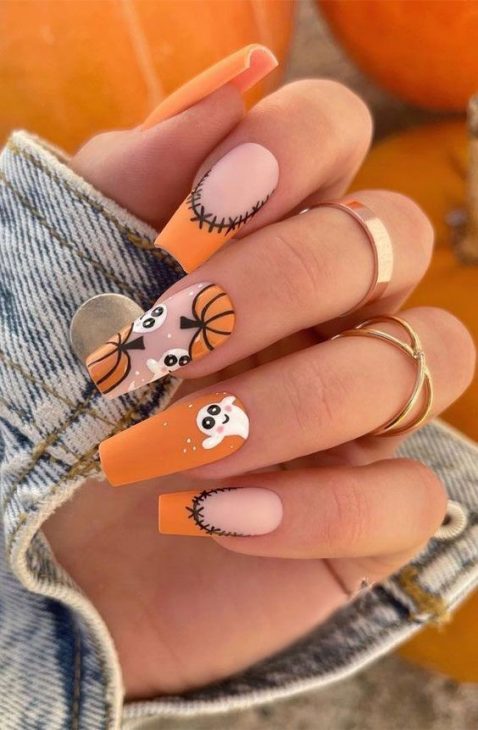
Cute Ghosts and Pumpkin Accents
This adorable design features cute ghosts and pumpkins on a pastel pink and orange base, perfect for a playful Halloween look. These fall Halloween nails are great for those who want to embrace the fun side of the holiday.
Consumables:
-
- Pastel pink and orange nail polishes (Essie’s “Fiji” and “Tangerine”)
- Black and white nail polishes for ghosts and pumpkins (OPI’s “Black Onyx” and “Alpine Snow”)
- Thin nail art brush for detailing
- Top coat for a glossy finish (CND’s “Super Shiney”)
- DIY Instructions:
- Apply a base coat to all nails.
- Paint nails with alternating pastel pink and orange polish.
- Use a thin brush to draw cute ghost and pumpkin accents with black and white polish.
- Finish with a top coat to protect your artwork.
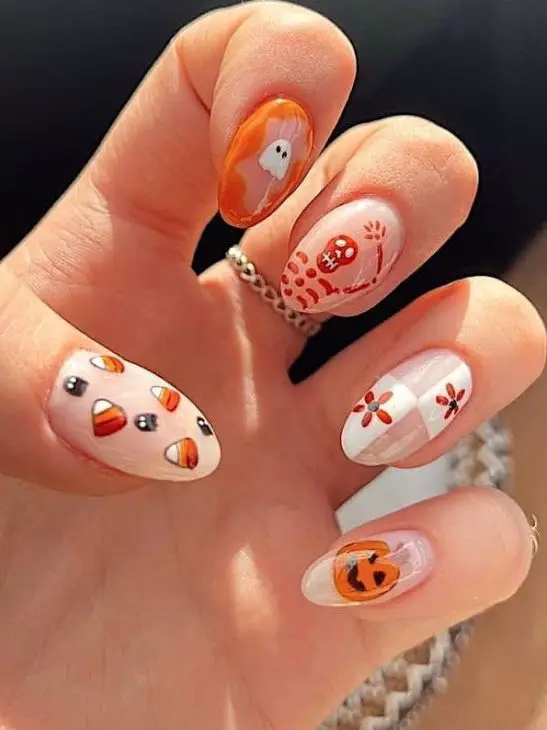
Playful Halloween Mix
This playful Halloween mix features a variety of festive elements such as candy corn, ghosts, and pumpkins. The design uses a combination of orange, white, and black colors to create a fun and spirited look, perfect for those who enjoy a more whimsical approach to Halloween nails.
Consumables:
-
- White, orange, and black nail polishes (Essie’s “Blanc”, OPI’s “It’s a Piazza Cake”, and China Glaze’s “Liquid Leather”)
- Thin nail art brushes for detailing
- Top coat for protection (Sally Hansen’s “Mega Shine”)
- DIY Instructions:
- Apply a base coat to all nails.
- Paint each nail with a different base color (white, orange).
- Use thin brushes to create candy corn, ghost, and pumpkin designs with black and orange polish.
- Seal with a top coat to protect your artwork.
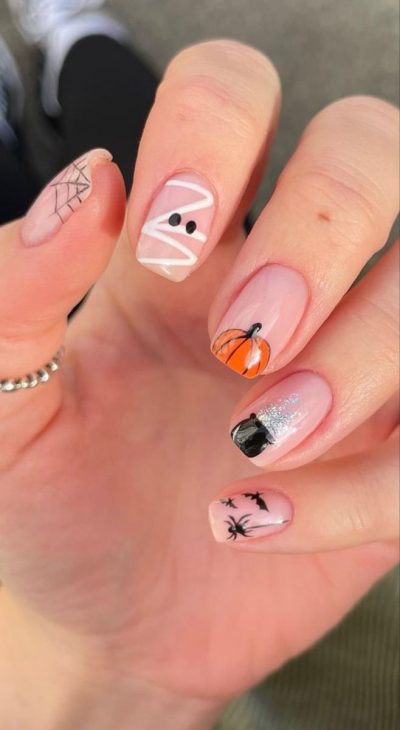
Mummy and Spider Webs
This design features a spooky mummy and intricate spider webs, making it perfect for fall Halloween nails. The simple yet effective use of black and white on a nude base gives a classic Halloween look that’s easy to achieve and maintain.
Consumables:
-
- Nude, white, black, and orange nail polishes (OPI’s “Samoan Sand”, Essie’s “Blanc”, and Sally Hansen’s “Black Out”)
- Thin nail art brushes for detailing
- Top coat for a glossy finish (CND’s “Super Shiney”)
- DIY Instructions:
- Apply a base coat to all nails.
- Paint all nails with a nude base polish.
- Use thin brushes to draw mummy wraps, spider webs, and other Halloween accents with black and white polish.
- Finish with a top coat to protect your design.
Ghosts and Bats
These nails feature an adorable and spooky combination of ghosts and bats, perfect for fall Halloween nails. The black, white, and orange colors create a playful and festive look that’s sure to catch the eye.
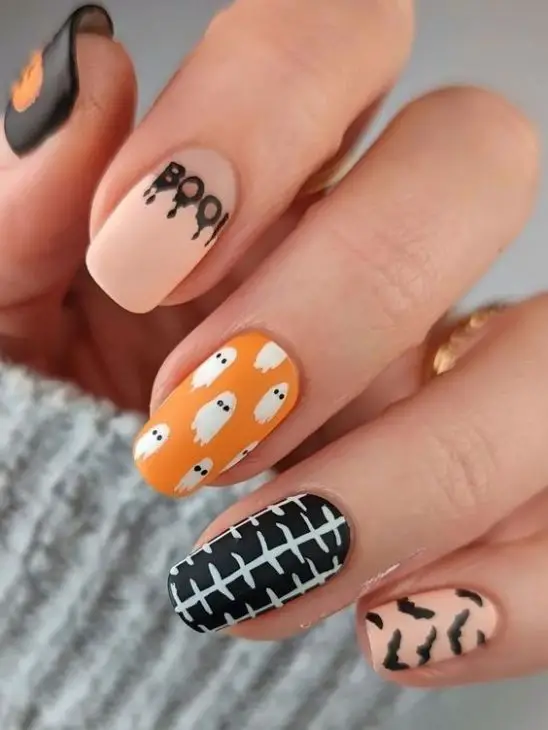
Consumables:
-
- Black, white, and orange nail polishes (OPI’s “Black Onyx”, Essie’s “Blanc”, and China Glaze’s “Orange Knockout”)
- Thin nail art brushes for detailing
- Top coat for durability (Seche Vite’s “Dry Fast Top Coat”)
- DIY Instructions:
- Apply a base coat to all nails.
- Paint nails with a combination of black, white, and orange polish.
- Use thin brushes to draw ghost and bat shapes with white and black polish.
- Seal with a top coat for a long-lasting finish.
Brown Fall Halloween Nails
For a more neutral and sophisticated Halloween look, these brown-themed nails feature pumpkins, ghosts, and skeletons. The warm brown tones make these fall Halloween nails perfect for those who prefer a more subdued and elegant approach to Halloween nail art.
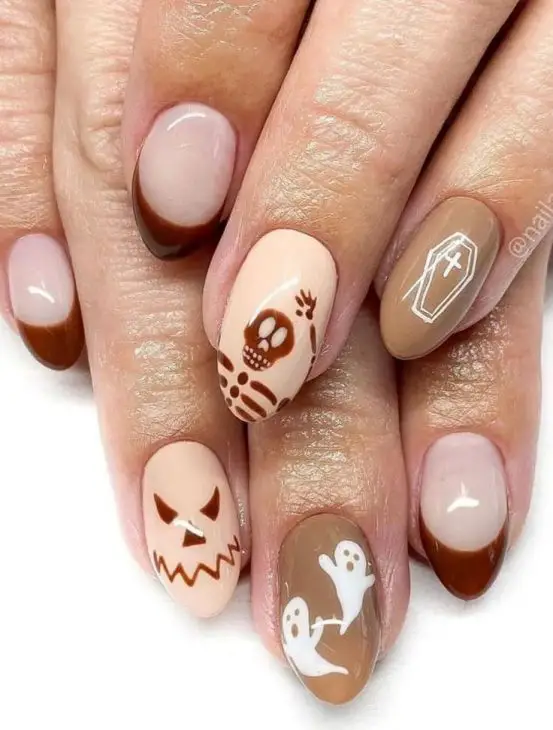
Consumables:
-
- Various shades of brown and nude nail polishes (Essie’s “Chocolate Cake”, OPI’s “Bare My Soul”)
- White and black nail polishes for accents (Essie’s “Blanc”, Sally Hansen’s “Black Out”)
- Thin nail art brushes for detailing
- Top coat for a glossy finish (CND’s “Super Shiney”)
- DIY Instructions:
- Apply a base coat to all nails.
- Paint nails with various shades of brown and nude.
- Use thin brushes to create pumpkins, ghosts, and skeletons with white and black polish.
- Finish with a top coat to protect your designs.
Starry Night Halloween Nails
This design features a beautiful starry night scene with black and orange accents, perfect for fall Halloween nails. The intricate details of the stars, moons, and bats create a magical and eerie look that’s perfect for the spooky season.
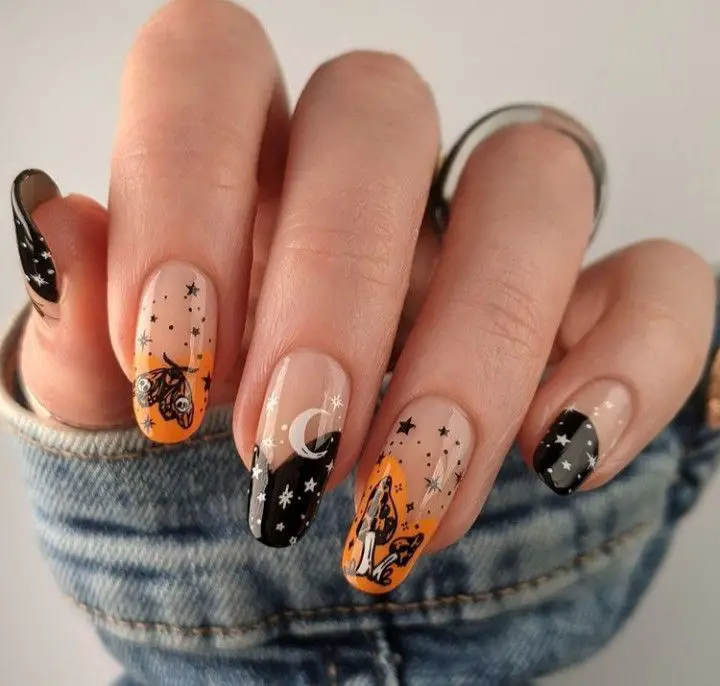
Consumables:
-
- Black, orange, and nude nail polishes (OPI’s “Black Onyx”, Essie’s “Playing Koi”, and “Ballet Slippers”)
- White nail polish for star accents (Essie’s “Blanc”)
- Thin nail art brushes for detailing
- Top coat for shine and durability (Seche Vite’s “Dry Fast Top Coat”)
- DIY Instructions:
- Apply a base coat to all nails.
- Paint nails with a nude base polish.
- Use thin brushes to draw stars, moons, and other celestial details with black and white polish.
- Add orange accents for a pop of color.
- Seal with a top coat for a glossy finish.
Save Pin
