Fall Leaf Nail Art: Embrace the Season with Stunning Designs
Fall is a season of transformation, and what better way to celebrate it than by incorporating the beauty of autumn leaves into your nail art? In this article, we’ll explore a variety of fall leaf nail art designs that capture the essence of the season. Each section will provide a detailed description, a list of consumables, and a step-by-step tutorial to help you recreate these stunning looks at home.
Golden Elegance
As a professional manicurist, I can confidently say that this design exudes elegance and simplicity. The nails feature a soft nude base with delicate gold leaf accents, creating a sophisticated yet subtle autumn vibe. The golden leaves are meticulously placed to give a graceful and refined look, perfect for any occasion.
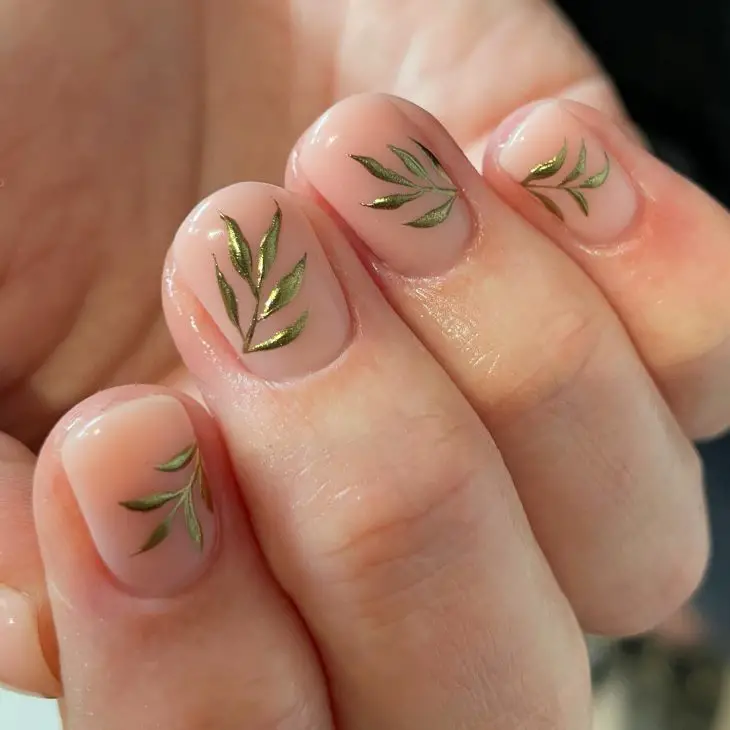
Consumables:
- Nude nail polish (e.g., Essie Ballet Slippers)
- Gold leaf nail stickers (e.g., Amazon Gold Leaf Nail Art Stickers)
- Clear top coat (e.g., Seche Vite Dry Fast Top Coat)
DIY Instructions:
- Apply two coats of the nude nail polish and let it dry completely.
- Carefully place the gold leaf stickers on each nail, pressing down to ensure they adhere properly.
- Finish with a clear top coat to seal the design and add shine.
Autumn Greenery
This design is a delightful mix of earthy greens and nude tones, perfect for the fall season. The green nails are accented with gold flakes and delicate leaf patterns, adding a touch of nature-inspired charm. The combination of colors and textures creates a harmonious and stylish look.
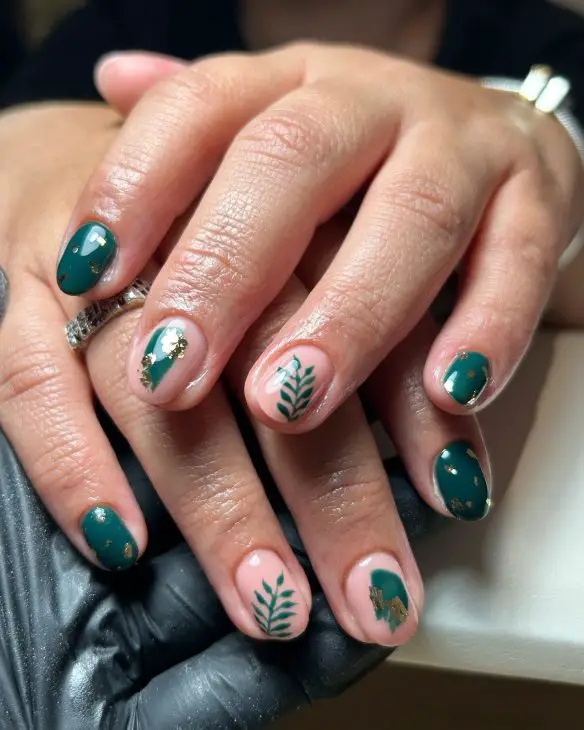
Consumables:
- Green nail polish (e.g., OPI Stay Off the Lawn)
- Nude nail polish (e.g., Essie Topless & Barefoot)
- Gold flakes (e.g., Born Pretty Gold Foil Flakes)
- Leaf nail stamps (e.g., MoYou London Tropical Collection)
DIY Instructions:
- Apply two coats of the green polish on half of your nails and the nude polish on the other half.
- Using the gold flakes, add accents to the green nails.
- Stamp leaf patterns onto the nude nails using the leaf nail stamps.
- Seal with a clear top coat.
Rainbow Leaves
For those who love a pop of color, this fall leaf nail art design is perfect. The nails feature a nude base with vibrant, multicolored leaf designs. Each leaf is intricately detailed, showcasing a spectrum of fall hues that bring a playful and lively touch to the manicure.
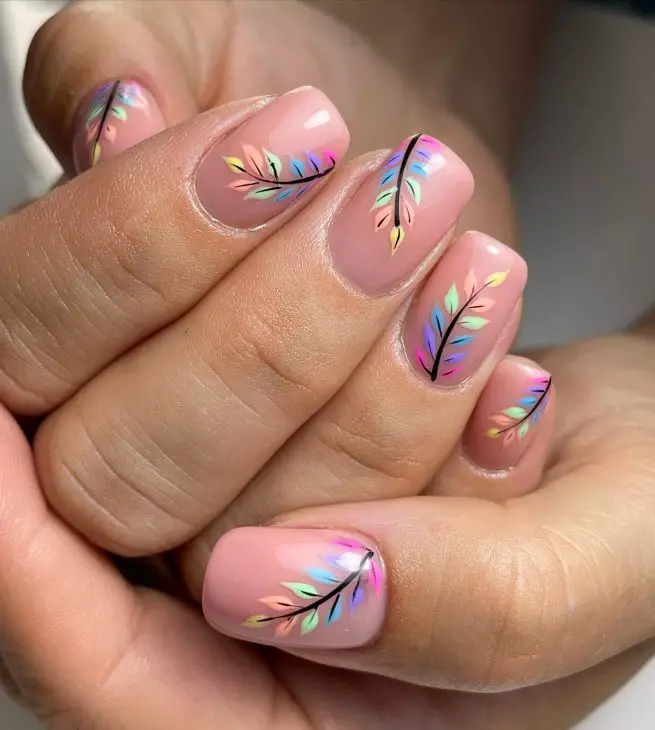
Consumables:
- Nude nail polish (e.g., OPI Bubble Bath)
- Multicolored nail polishes (e.g., Essie Fall Collection)
- Thin nail art brush (e.g., Winstonia Nail Art Brush Set)
- Clear top coat (e.g., Sally Hansen Miracle Gel Top Coat)
DIY Instructions:
- Apply two coats of the nude polish and let it dry.
- Using the thin brush, paint small leaf shapes in various colors across each nail.
- Once the leaves are dry, outline them with black polish for definition.
- Finish with a clear top coat to protect the design.
Matte Minimalism
This fall leaf nail art simple design is perfect for those who prefer a minimalist approach. The matte pink base is adorned with delicate black leaf outlines, creating a chic and understated look. The simplicity of this design makes it versatile and easy to wear with any outfit.
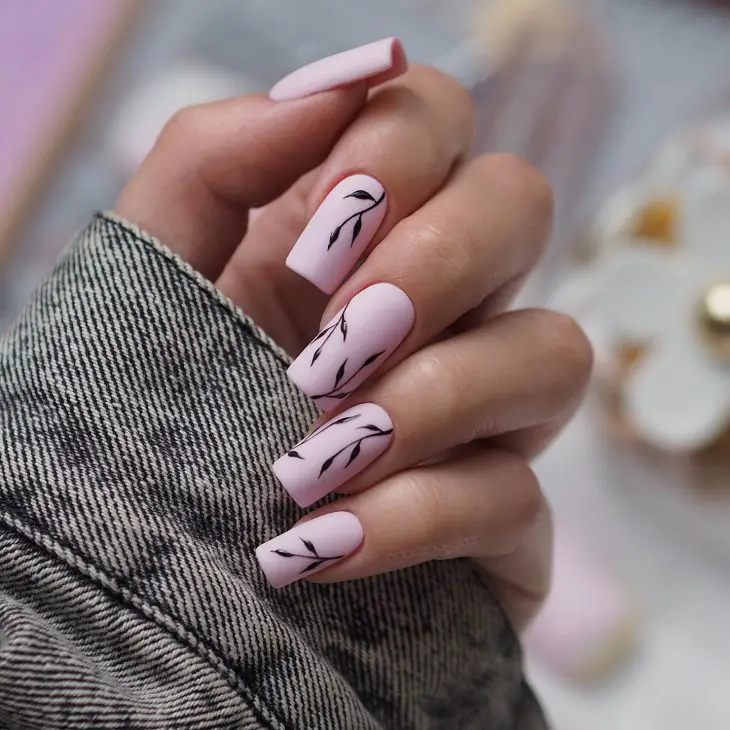
Consumables:
- Matte pink nail polish (e.g., Zoya Matte Velvet in Loredana)
- Black nail art pen (e.g., Sally Hansen I Heart Nail Art Pen)
- Matte top coat (e.g., OPI Matte Top Coat)
DIY Instructions:
- Apply two coats of the matte pink polish and let it dry.
- Using the black nail art pen, draw simple leaf outlines on each nail.
- Seal with a matte top coat to maintain the matte finish.
Luxurious Leaf Embellishments
This design features a white base with intricate 3D gold leaf embellishments, making it a standout choice for special occasions. The combination of the delicate leaf patterns and the luxurious gold accents creates a striking and elegant look.
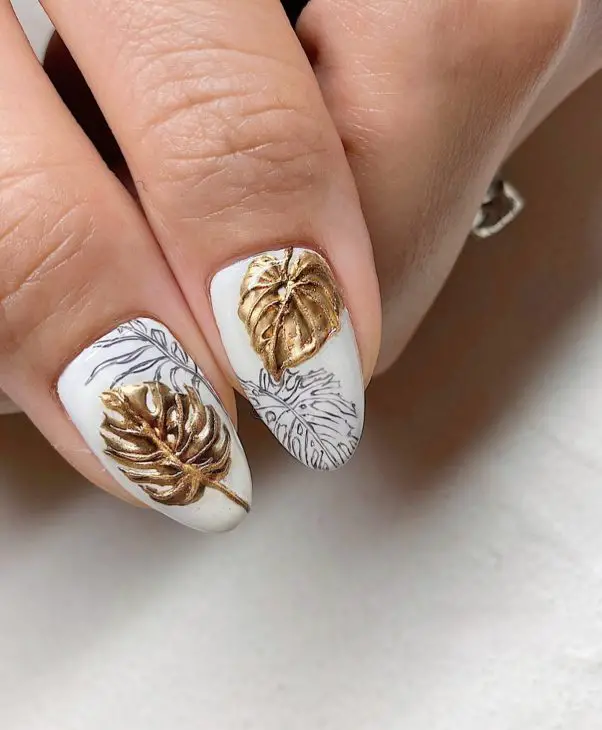
Consumables:
- White nail polish (e.g., OPI Alpine Snow)
- 3D gold leaf nail charms (e.g., Amazon 3D Nail Art Gold Leaf Charms)
- Nail glue (e.g., Kiss Precision Nail Glue)
- Clear top coat (e.g., Revlon Extra Life No Chip Top Coat)
DIY Instructions:
- Apply two coats of the white polish and let it dry.
- Attach the 3D gold leaf charms using nail glue.
- Finish with a clear top coat to secure the charms and add shine.
Green and Gold Elegance
As a professional manicurist, I can confidently say that this design exudes sophistication and charm. The nails feature a deep green base with intricate gold leaf accents, creating a luxurious autumn vibe. The combination of green and gold captures the essence of fall, making this design perfect for any seasonal event.
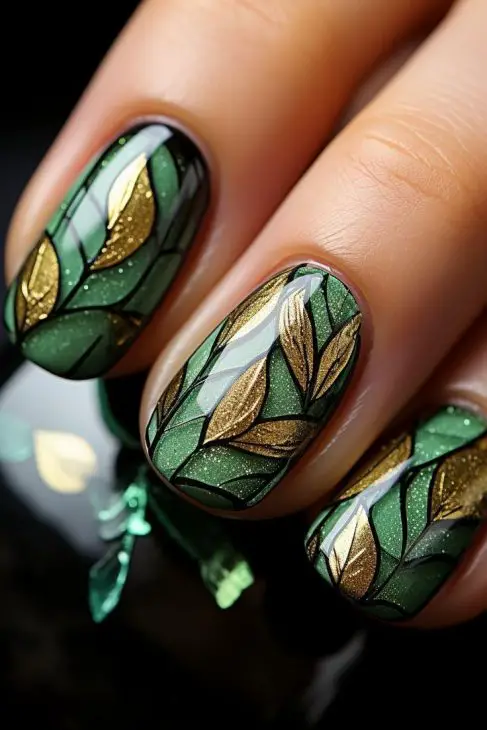
Consumables:
- Deep green nail polish (e.g., OPI Stay Off the Lawn)
- Gold leaf nail stickers (e.g., Amazon Gold Leaf Nail Art Stickers)
- Black nail art pen (e.g., Sally Hansen I Heart Nail Art Pen)
- Clear top coat (e.g., Seche Vite Dry Fast Top Coat)
DIY Instructions:
- Apply two coats of the deep green nail polish and let it dry completely.
- Carefully place the gold leaf stickers on each nail, ensuring they adhere properly.
- Use the black nail art pen to add fine details around the gold leaves.
- Finish with a clear top coat to seal the design and add shine.
Colorful Autumn Leaves
This design is a delightful mix of pastel and metallic colors, perfect for showcasing the vibrancy of autumn. The nails feature a lavender base with multicolored leaf patterns, creating a playful and eye-catching look. The use of metallic shades adds a touch of glamour to the overall design.
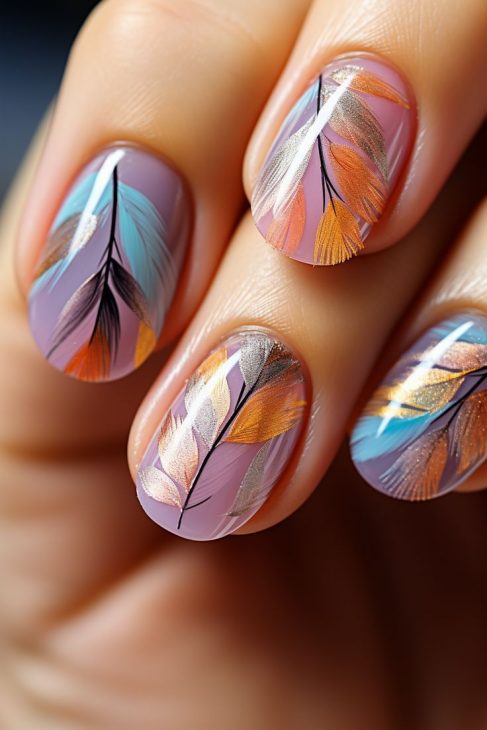
Consumables:
- Lavender nail polish (e.g., Essie Lilacism)
- Metallic nail polishes in various colors (e.g., Essie Metallics Collection)
- Thin nail art brush (e.g., Winstonia Nail Art Brush Set)
- Clear top coat (e.g., Sally Hansen Miracle Gel Top Coat)
DIY Instructions:
- Apply two coats of the lavender polish and let it dry.
- Using the thin brush, paint small leaf shapes in metallic colors across each nail.
- Once the leaves are dry, outline them with black polish for definition.
- Finish with a clear top coat to protect the design.
Rich Autumn Hues
For those who love the rich, warm colors of fall, this fall leaf nail art design is perfect. The nails feature a deep red base with detailed leaf patterns in shades of orange and gold. The intricate design captures the beauty of falling leaves, making it a perfect choice for the season.
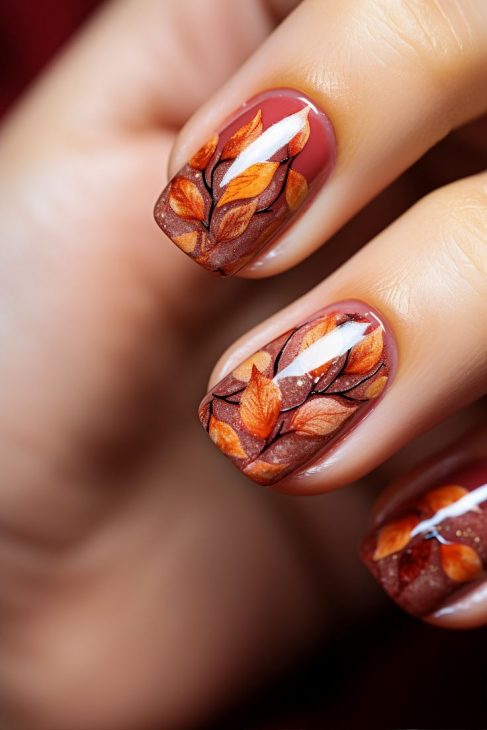
Consumables:
- Deep red nail polish (e.g., OPI Got the Blues for Red)
- Orange and gold nail polishes (e.g., Essie Fall Collection)
- Thin nail art brush (e.g., Winstonia Nail Art Brush Set)
- Clear top coat (e.g., Revlon Extra Life No Chip Top Coat)
DIY Instructions:
- Apply two coats of the deep red polish and let it dry.
- Using the thin brush, paint detailed leaf shapes in orange and gold across each nail.
- Once the leaves are dry, add fine details with black polish.
- Finish with a clear top coat to seal the design and add shine.
Artistic Autumn Leaves
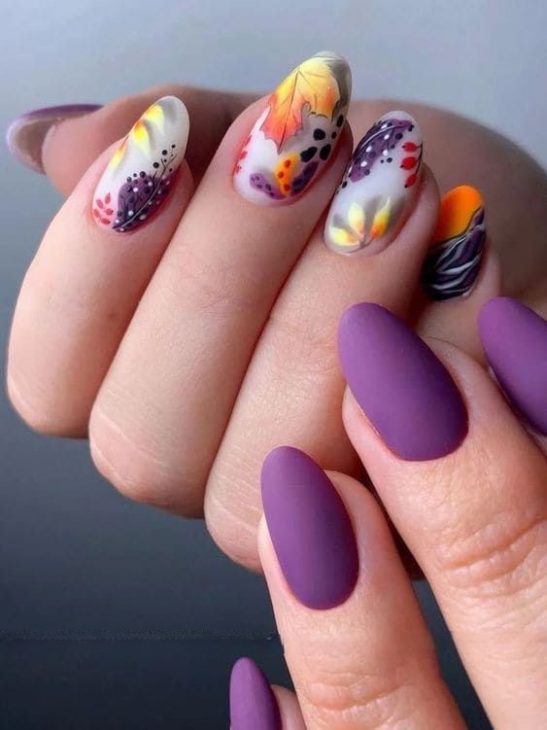
This design features a beautiful blend of purple hues and artistic leaf patterns, perfect for those who appreciate creative nail art. The nails showcase a matte purple base with intricate leaf designs in vibrant fall colors. The combination of matte and glossy finishes adds depth and interest to the design.
Consumables:
- Matte purple nail polish (e.g., Zoya Matte Velvet in Iris)
- Multicolored nail polishes (e.g., OPI Fall Wonders Collection)
- Thin nail art brush (e.g., Winstonia Nail Art Brush Set)
- Matte top coat (e.g., OPI Matte Top Coat)
DIY Instructions:
- Apply two coats of the matte purple polish and let it dry.
- Using the thin brush, paint detailed leaf shapes in various fall colors.
- Once the leaves are dry, add fine details with black polish.
- Finish with a matte top coat to maintain the matte finish.
Leafy Greens
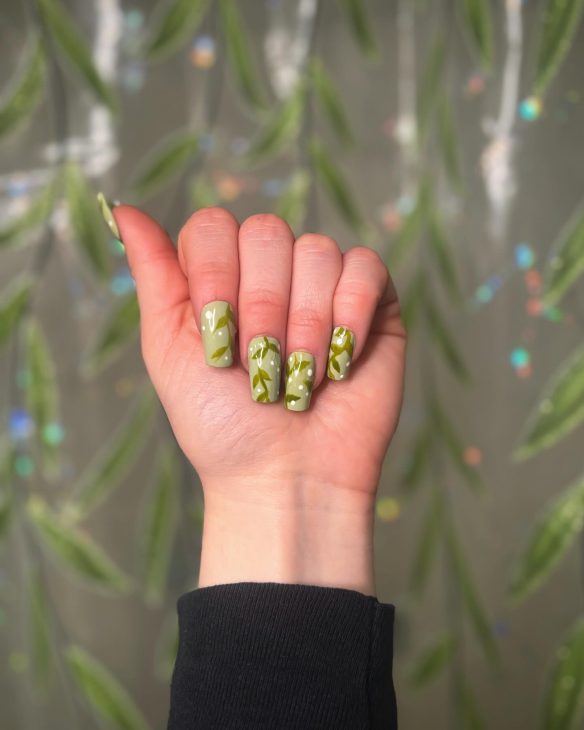
This design is perfect for those who love a fresh, natural look. The nails feature a light green base with simple leaf patterns, creating a subtle yet stylish autumn look. The simplicity of this design makes it versatile and easy to wear with any outfit.
Consumables:
- Light green nail polish (e.g., Essie Mint Candy Apple)
- Dark green nail polish (e.g., OPI Stay Off the Lawn)
- Thin nail art brush (e.g., Winstonia Nail Art Brush Set)
- Clear top coat (e.g., Seche Vite Dry Fast Top Coat)
DIY Instructions:
- Apply two coats of the light green polish and let it dry.
- Using the thin brush, paint simple leaf shapes in dark green across each nail.
- Finish with a clear top coat to protect the design and add shine.
Matte Browns with Gold Accents
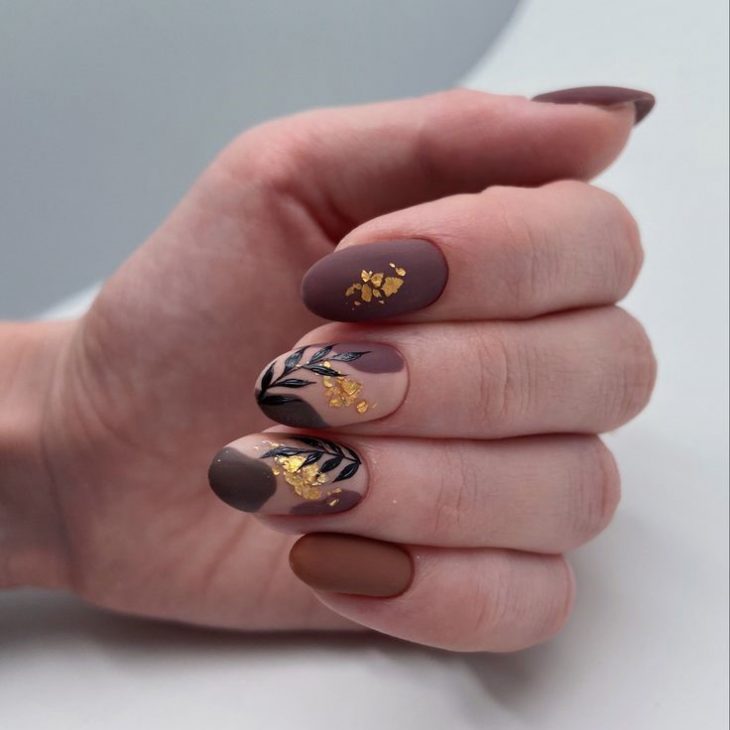
This fall leaf nail art design showcases a sophisticated blend of matte brown tones with gold leaf accents. The nails feature a rich brown base with delicate black leaf patterns and gold foil, adding a touch of elegance to the autumn-inspired look.
Consumables:
- Matte brown nail polish (e.g., Essie Take It Outside)
- Black nail art pen (e.g., Sally Hansen I Heart Nail Art Pen)
- Gold foil flakes (e.g., Born Pretty Gold Foil Flakes)
- Clear matte top coat (e.g., OPI Matte Top Coat)
DIY Instructions:
- Apply two coats of the matte brown nail polish and let it dry completely.
- Use the black nail art pen to draw leaf patterns on the nails.
- Apply gold foil flakes randomly on the nails to add a luxurious touch.
- Finish with a clear matte top coat to seal the design and maintain the matte finish.
Delicate Fall Leaves
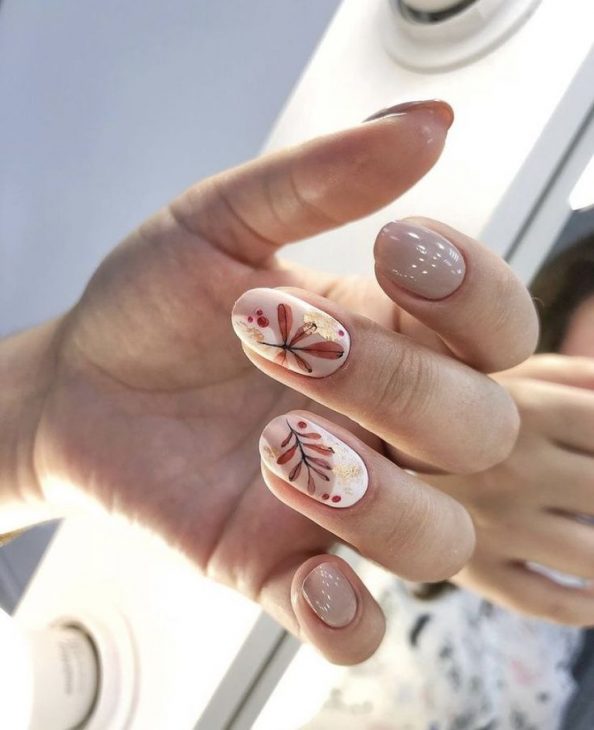
This design features a soft, nude base with delicate fall leaf patterns in shades of red and orange. The subtle use of gold accents adds a touch of sparkle to the otherwise understated look, making it perfect for everyday wear during the fall season.
Consumables:
- Nude nail polish (e.g., OPI Bubble Bath)
- Red and orange nail polishes (e.g., Essie Fall Collection)
- Thin nail art brush (e.g., Winstonia Nail Art Brush Set)
- Gold foil flakes (e.g., Born Pretty Gold Foil Flakes)
- Clear top coat (e.g., Seche Vite Dry Fast Top Coat)
DIY Instructions:
- Apply two coats of the nude nail polish and let it dry.
- Using the thin brush, paint small leaf shapes in red and orange on the nails.
- Add gold foil flakes for a subtle sparkle.
- Finish with a clear top coat to protect the design and add shine.
Autumn Harvest
This fall leaf nail art design is a celebration of autumn hues. The nails feature a mix of warm browns and oranges with detailed leaf patterns, creating a cozy and inviting look. The use of different shades adds depth and dimension to the design.
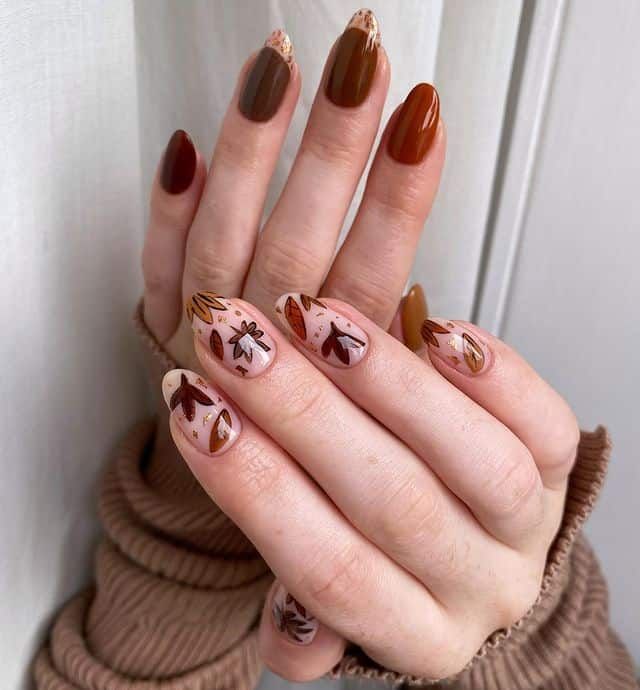
Consumables:
- Brown and orange nail polishes (e.g., OPI Fall Wonders Collection)
- Thin nail art brush (e.g., Winstonia Nail Art Brush Set)
- Clear top coat (e.g., Sally Hansen Miracle Gel Top Coat)
DIY Instructions:
- Apply a base coat of brown nail polish on half of the nails and orange on the other half.
- Using the thin brush, paint detailed leaf shapes in contrasting colors on each nail.
- Once the leaves are dry, add fine details with black polish.
- Finish with a clear top coat to seal the design and add shine.
Golden Fall Leaves
This design is perfect for those who love a touch of gold. The nails feature a nude base with intricate gold leaf patterns, creating a luxurious and elegant look. The combination of nude and gold makes this design versatile and suitable for any occasion.
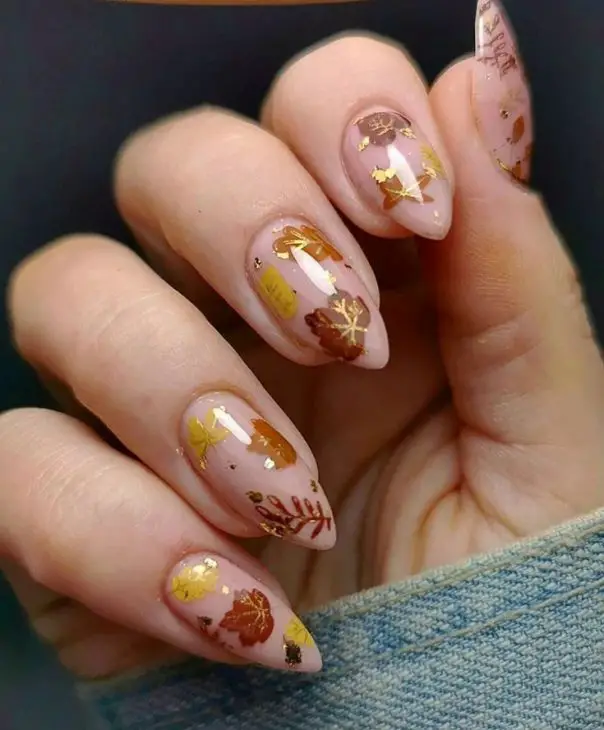
Consumables:
- Nude nail polish (e.g., Essie Topless & Barefoot)
- Gold leaf nail stickers (e.g., Amazon Gold Leaf Nail Art Stickers)
- Clear top coat (e.g., Revlon Extra Life No Chip Top Coat)
DIY Instructions:
- Apply two coats of the nude nail polish and let it dry.
- Carefully place the gold leaf stickers on each nail, pressing down to ensure they adhere properly.
- Finish with a clear top coat to seal the design and add shine.
Vibrant Fall Foliage
This fall leaf nail art design is a vibrant and bold celebration of fall colors. The nails feature a gradient base in green, yellow, and red, with detailed leaf patterns in gold. The striking colors and intricate details make this design a standout choice for the season.
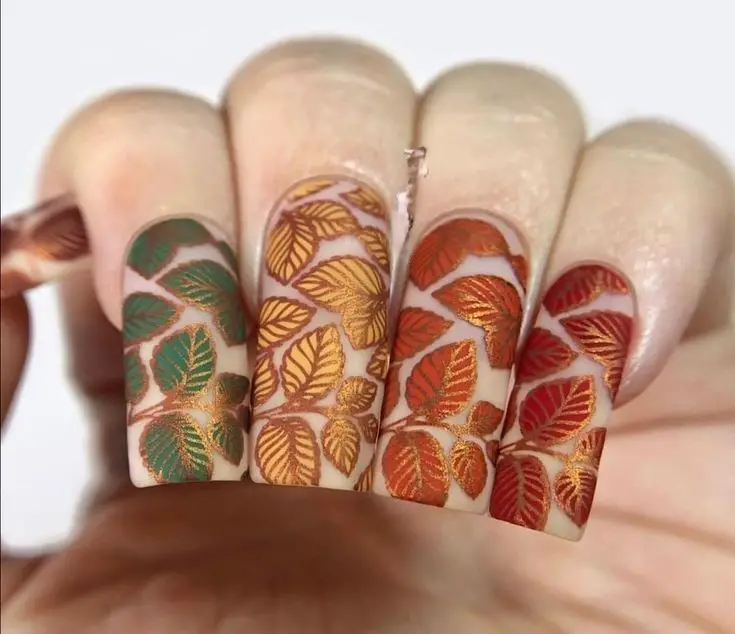
Consumables:
- Green, yellow, and red nail polishes (e.g., Essie Fall Collection)
- Gold nail art pen (e.g., Sally Hansen I Heart Nail Art Pen)
- Thin nail art brush (e.g., Winstonia Nail Art Brush Set)
- Clear top coat (e.g., Sally Hansen Miracle Gel Top Coat)
DIY Instructions:
- Apply a gradient base using the green, yellow, and red nail polishes.
- Using the thin brush, paint detailed leaf shapes in gold on each nail.
- Once the leaves are dry, outline them with black polish for definition.
- Finish with a clear top coat to protect the design and add shine.
Elegant Gold Leaves
This fall leaf nail art design features a chic nude base with elegant black leaf patterns and gold foil accents. The combination of the matte nude polish and the shiny gold details creates a sophisticated and luxurious look perfect for any autumn occasion.
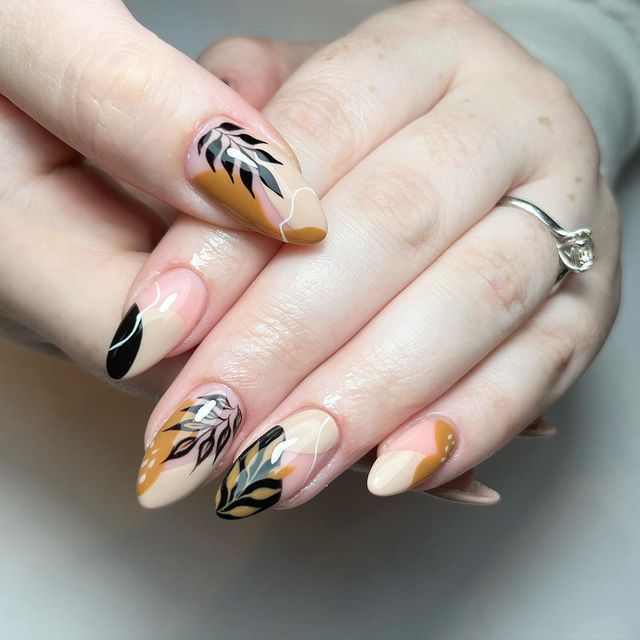
Consumables:
- Nude matte nail polish (e.g., OPI Matte Nail Envy)
- Black nail art pen (e.g., Sally Hansen I Heart Nail Art Pen)
- Gold foil flakes (e.g., Born Pretty Gold Foil Flakes)
- Clear top coat (e.g., Seche Vite Dry Fast Top Coat)
DIY Instructions:
- Apply two coats of the nude matte nail polish and let it dry completely.
- Use the black nail art pen to draw delicate leaf patterns on each nail.
- Carefully place gold foil flakes around the leaf patterns for an elegant touch.
- Finish with a clear top coat to seal the design and add shine.
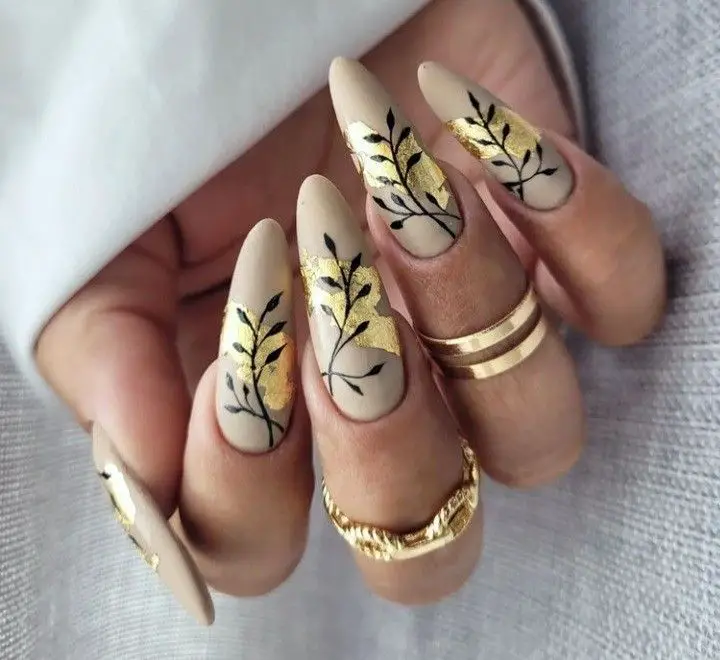
Earthy Tones and Leafy Details
This fall leaf nail art showcases a beautiful blend of earthy tones with detailed leaf patterns. The design combines shades of nude, brown, and orange with black leaf accents, creating a harmonious and stylish autumn look.
Consumables:
- Nude, brown, and orange nail polishes (e.g., Essie Fall Collection)
- Black nail art pen (e.g., Sally Hansen I Heart Nail Art Pen)
- Thin nail art brush (e.g., Winstonia Nail Art Brush Set)
- Clear top coat (e.g., Revlon Extra Life No Chip Top Coat)
DIY Instructions:
- Apply a mix of nude, brown, and orange polish on each nail, creating an abstract pattern.
- Use the black nail art pen to draw detailed leaf patterns over the colored base.
- Finish with a clear top coat to protect the design and add shine.
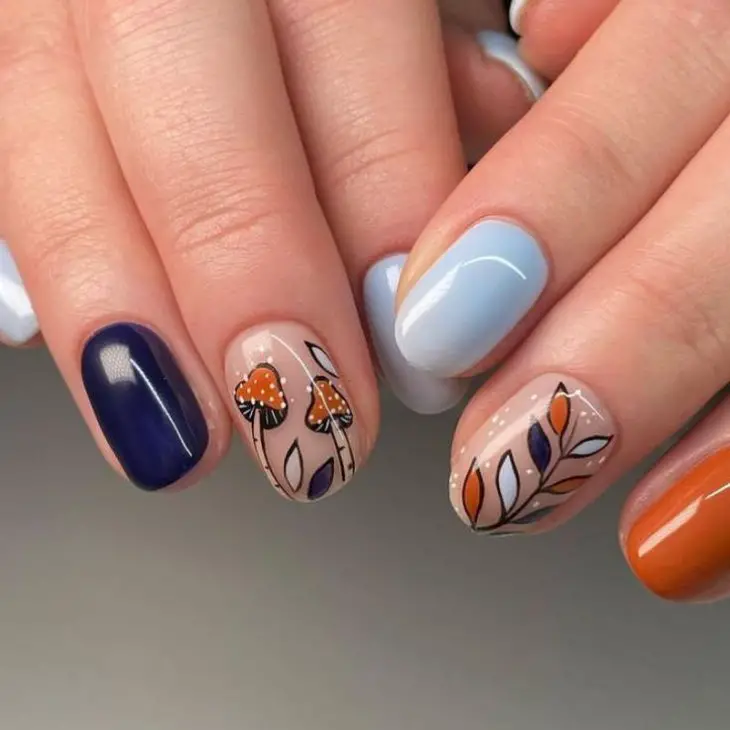
Fun Mushroom and Leaf Design
This playful design features a mix of deep blue, light blue, and orange polishes with cute mushroom and leaf patterns. The combination of vibrant colors and whimsical details makes this fall leaf nail art perfect for those who love a fun and unique look.
Consumables:
- Deep blue, light blue, and orange nail polishes (e.g., OPI Fall Wonders Collection)
- Black and white nail art pens (e.g., Sally Hansen I Heart Nail Art Pens)
- Thin nail art brush (e.g., Winstonia Nail Art Brush Set)
- Clear top coat (e.g., Sally Hansen Miracle Gel Top Coat)
DIY Instructions:
- Apply two coats of the deep blue, light blue, and orange polishes on different nails and let them dry.
- Using the black and white nail art pens, draw mushroom and leaf patterns on the accent nails.
- Add small details like dots and lines for a whimsical touch.
- Finish with a clear top coat to seal the design and add shine.
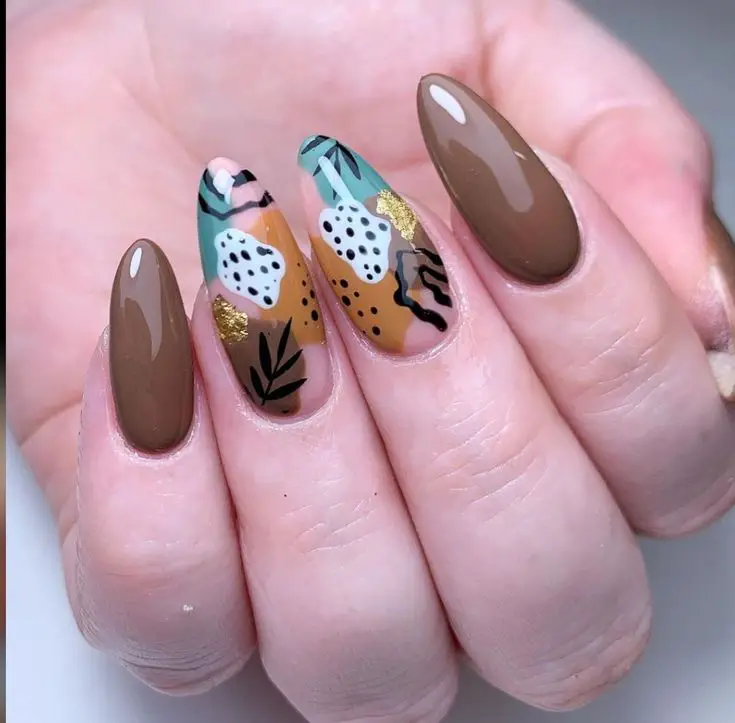
Abstract Autumn Art
This fall leaf nail art design features a mix of brown and nude tones with abstract patterns and leaf details. The design is accented with gold foil and black outlines, creating a modern and artistic look perfect for the fall season.
Consumables:
- Brown and nude nail polishes (e.g., Essie Fall Collection)
- Gold foil flakes (e.g., Born Pretty Gold Foil Flakes)
- Black nail art pen (e.g., Sally Hansen I Heart Nail Art Pen)
- Thin nail art brush (e.g., Winstonia Nail Art Brush Set)
- Clear top coat (e.g., Seche Vite Dry Fast Top Coat)
DIY Instructions:
- Apply a mix of brown and nude polish on each nail, creating an abstract base.
- Use the black nail art pen to outline leaf shapes and add other details.
- Place gold foil flakes around the design for a touch of elegance.
- Finish with a clear top coat to protect the design and add shine.
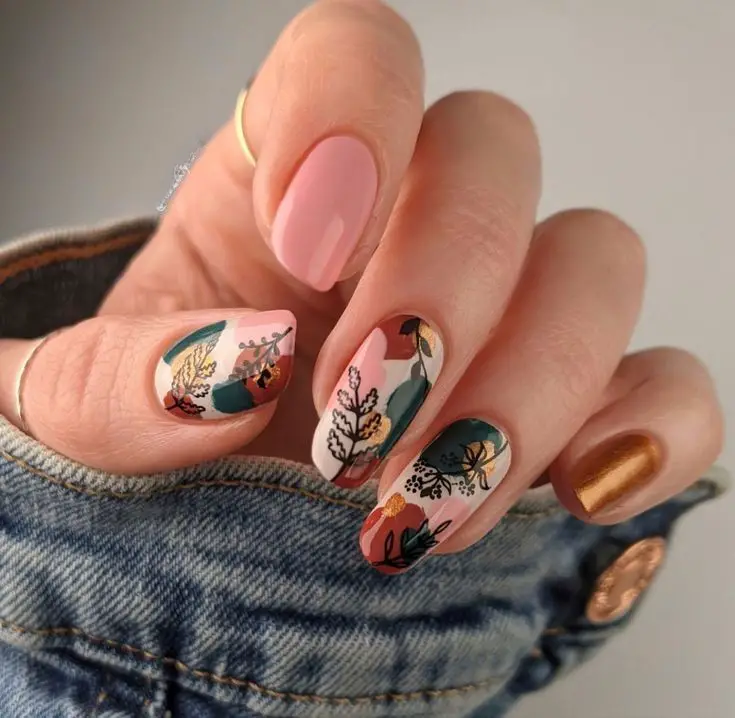
Autumn Garden
This vibrant and detailed fall leaf nail art design features a soft pink base with intricate leaf patterns in various fall colors. The combination of pink, green, and orange leaves creates a lively and festive look, perfect for celebrating the beauty of autumn.
Consumables:
- Soft pink nail polish (e.g., Essie Ballet Slippers)
- Green, orange, and black nail art pens (e.g., Sally Hansen I Heart Nail Art Pens)
- Thin nail art brush (e.g., Winstonia Nail Art Brush Set)
- Clear top coat (e.g., Revlon Extra Life No Chip Top Coat)
DIY Instructions:
- Apply two coats of the soft pink polish and let it dry completely.
- Using the green and orange nail art pens, draw leaf shapes on each nail.
- Outline the leaves with the black nail art pen for definition.
- Finish with a clear top coat to seal the design and add shine.
Save Pin
