The whisper of the waves, the touch of the soft sand, and the breeze of the ocean—what better way to welcome them than with the perfect beach nail designs? As we embrace the sunny vibes of 2024, let’s dive into the world of nail art that reflects the essence of the beach. Whether you’re planning a serene vacation or a vibrant beach party, your nails can be the accessory that complements your summer style.
Beach Nail Designs: A Canvas of Oceanic Charms
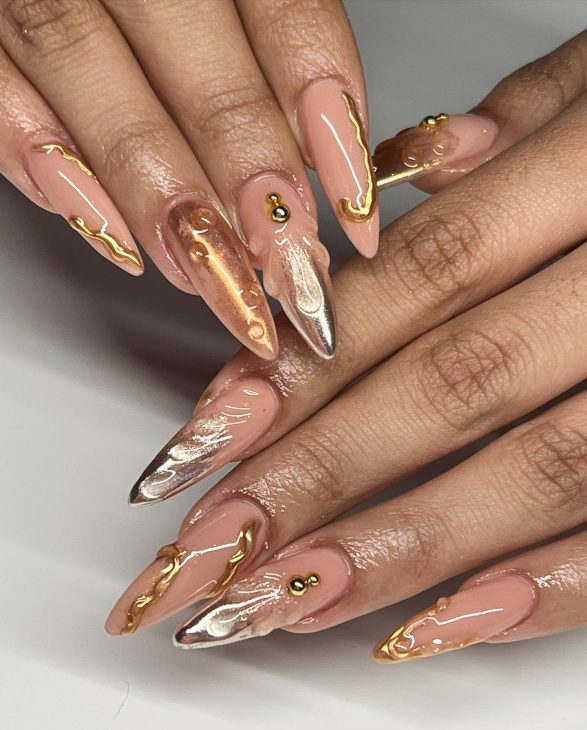
The serenity of the shore and the elegance of the sea are captured in this sophisticated nail design. Long, almond-shaped nails are the canvas for a harmonious blend of nude tones with delicate gold accents, reminiscent of the sun’s reflection on sandy beaches. Each nail is a work of art, featuring a unique marbling of soft pink and white, adorned with thin, wavy gold lines that mimic the gentle ripples of the sea. Small beads add a touch of glamor, making this design a symbol of luxury for any beach escapade.
Materials for Creation:
- Base Coat: OPI Natural Nail Base Coat
- Nude Polish: Essie’s “Bare With Me”
- White Polish: Sally Hansen’s “White On”
- Gold Striping Tape
- Gold Beads: Swarovski Small Round Gold Pearls
- Top Coat: Seche Vite Dry Fast Top Nail Coat
Begin with a solid base coat to protect your nails. Apply two coats of Essie’s “Bare With Me” for that perfect nude backdrop. With a fine brush, create the white marbling effect using Sally Hansen’s “White On.” Once dry, strategically place the gold striping tape to form wavy lines. Add the gold beads for an accent, and seal the design with Seche Vite top coat for a lasting finish.
Beach Nail Designs: Serene Seafoam Elegance
Evoking the ebb and flow of tides, these nails are a harmonious blend of seafoam green and white, adorned with rhinestone accents that capture the sparkle of the ocean. The use of translucent wave patterns over an ombre base creates a sense of depth, as if one is gazing into the clear waters of a secluded cove. The design is finished with a glossy top coat that enhances the nails’ reflective quality, adding to their aquatic allure.
Materials for Creation:
- Base Coat: CND Stickey Base Coat
- Seafoam Green Polish: China Glaze’s “For Audrey”
- White Polish: OPI’s “Alpine Snow”
- Rhinestones: Ocean Blue Swarovski Crystals
- Top Coat: INM Out the Door Fast Drying Top Coat
Begin with a base coat to ensure your manicure’s longevity. Apply a gradient of “For Audrey” and “Alpine Snow” to mimic the gentle transition from sand to sea. Once the ombre is dry, apply the wave patterns with a fine-tipped brush or stencil. Carefully place Swarovski crystals near the cuticle for a subtle nod to the treasures of the sea. Finish with a layer of fast-drying top coat for a sleek and durable surface.
DIY Tips: The ombre effect can be achieved by applying both colors on a sponge and dabbing them onto the nail. Use a thin brush dipped in nail polish remover to perfect the wave patterns. When placing the crystals, a dotting tool or toothpick dipped in a little top coat can help pick up and position them with precision.
Beach Nail Designs: Whispers of the Ocean
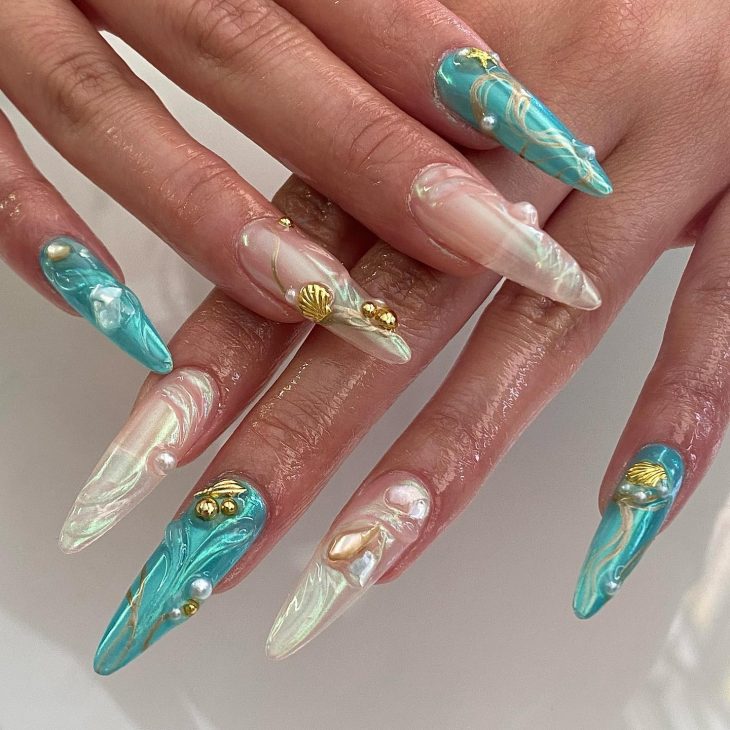
These nails offer a fresh take on the aquatic theme with a dreamy swirl of turquoise and pearlescent white, invoking images of waves and sea foam. The interplay of matte and gloss finishes gives the design a modern edge, while golden seashell and starfish embellishments provide a touch of whimsy. This set speaks to those who adore the magical moments where the sea meets the shore.
Materials for Creation:
- Base Coat: Orly Bonder Rubberized Basecoat
- Turquoise Polish: Essie’s “Turquoise & Caicos”
- Pearlescent White Polish: Essie’s “Tuck it in My Tux”
- Matte Top Coat: Essie Matte About You Finisher
- Gold Embellishments: Marine Life Metal Nail Studs
- Glossy Top Coat: Glisten & Glow Top Coat
To achieve this look, start with the Orly base coat for adhesion. Apply two coats of “Turquoise & Caicos” and let it dry. Then, with a sponge, add “Tuck it in My Tux” for the frothy wave effect. Alternate between matte and glossy finishes on different nails for a textured look. Adorn with gold marine life studs, applying them with a dab of top coat for secure placement.
Beach Nail Designs: Azure Waves and Beachy Bliss
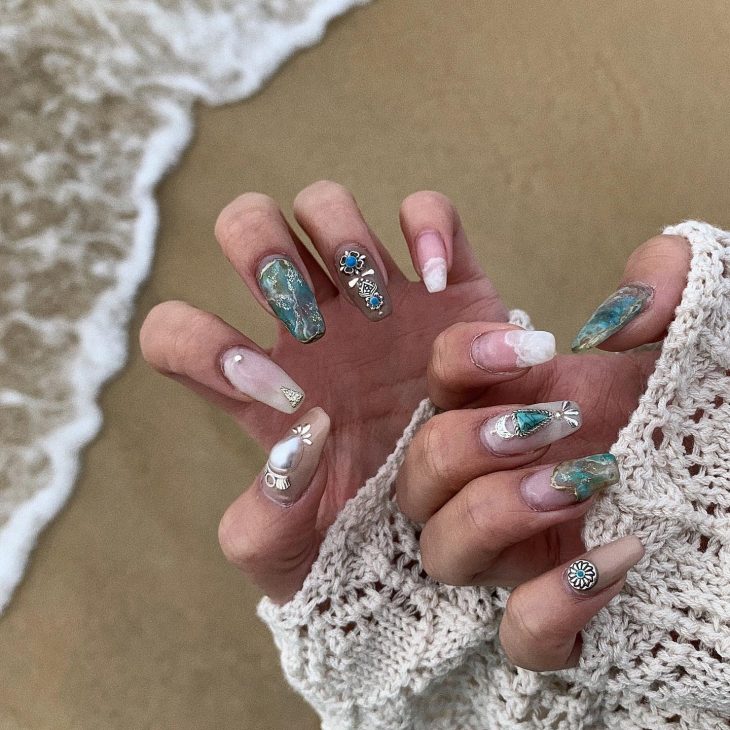
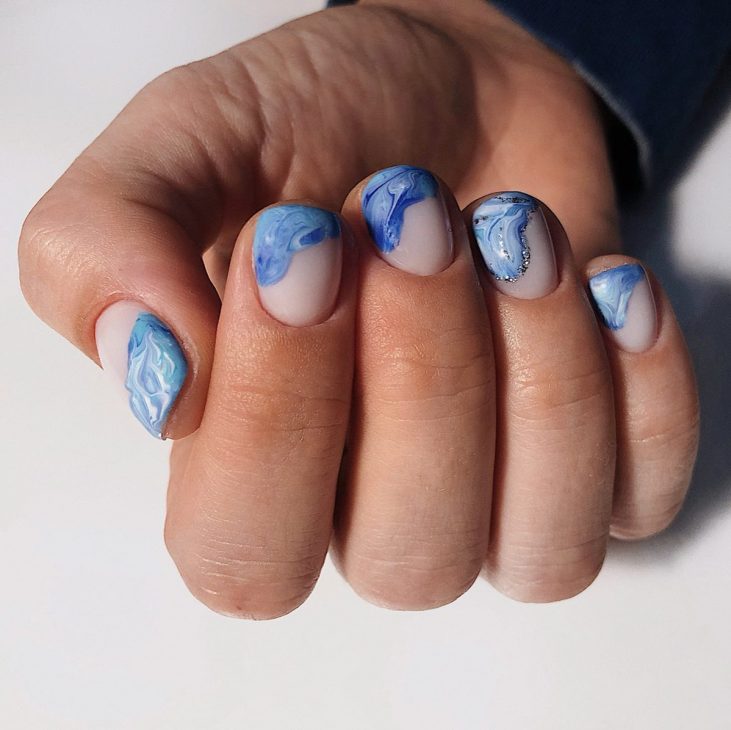
Short nails become a storytelling canvas with this charming design. Swirls of azure and a hint of marble evoke the playful spirit of the waves, while a single nail becomes a showcase with a crystalline embellishment representing the sparkling waters. This design is perfect for beach nail designs vacations simple, offering a hint of the ocean’s tranquility without overwhelming the senses.
Materials for Creation:
- Base Coat: Butter London Nail Foundation Priming Basecoat
- Azure Blue Polish: Zoya’s “Talia”
- Marble Accent: OPI’s “Kyoto Pearl”
- Crystals: Clear Swarovski Flat Backs
- Top Coat: China Glaze No-Chip Top Coat
Apply the base coat to protect your nails. Use “Talia” as the main color and gently blend “Kyoto Pearl” on select nails for the marble effect. For the accent nail, apply a small dot of top coat and place Swarovski crystals to catch the light. Seal with a no-chip top coat for lasting wear.
DIY Tips: To achieve the marble look, drop small dots of “Kyoto Pearl” into wet “Talia” and use a toothpick to swirl the colors together. For the crystals, use a wax pencil or a damp toothpick to pick them up and apply them with precision.
Beach Nail Designs: Coastal Charm and Shimmer
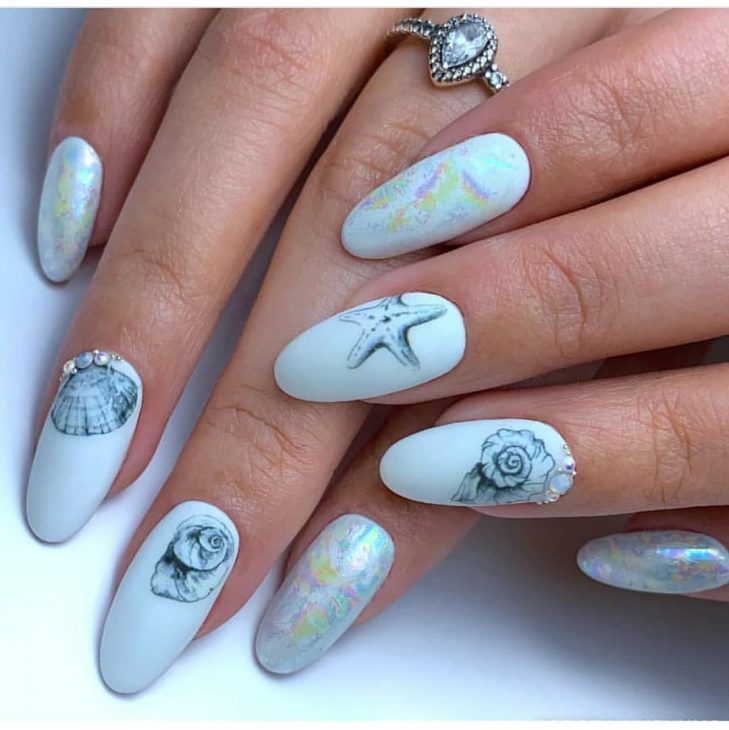
Long, almond-shaped nails are adorned with iridescent shimmer, reminiscent of the inside of seashells. This design features delicate maritime sketches—a starfish, a shell, and an elegant rose, likely a nod to beachside gardens. It’s an exquisite blend of beach nail designs acrylic and artistic flair, perfect for both day and night beach affairs.
Materials for Creation:
- Base Coat: Deborah Lippmann Hard Rock Nail Hardening Base and Top Coat
- White Polish: Essie’s “Blanc”
- Iridescent Topper: ILNP’s “Hush”
- Nail Art Pen: Sally Hansen I Heart Nail Art Pen, Black
- Rhinestones: Small Round Pearl Accents
- Top Coat: Deborah Lippmann Addicted To Speed Ultra Quick-Dry Top Coat
After the base coat, apply “Blanc” for a crisp white canvas. Add “Hush” on alternative nails for a magical shimmer. Use the nail art pen for delicate sketches and adorn with pearl accents for an elevated look. Complete with a quick-dry top coat for protection and shine.
DIY Tips: When sketching the designs, keep a steady hand and apply gentle pressure. You can practice the designs on paper before moving to your nails. Place the pearl accents while the top coat is tacky to ensure they stick without extra glue.
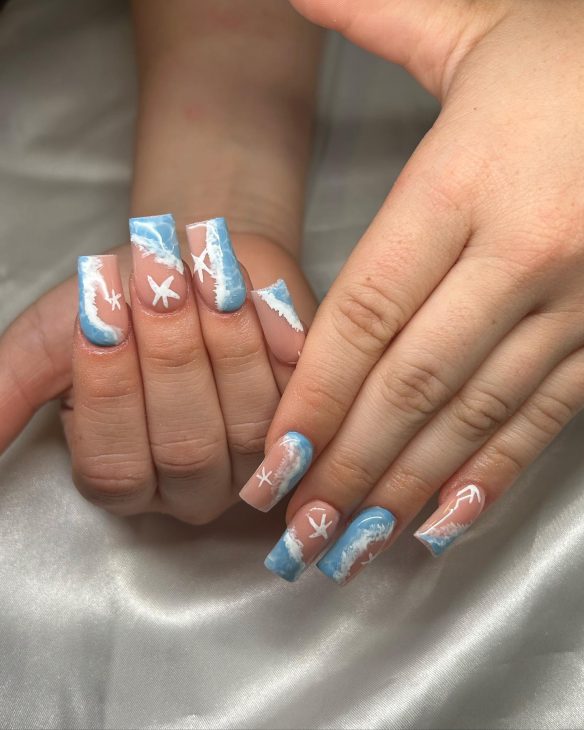
Beach Nail Designs: Sky and Sea Merge in Artistry
A playful set that captures the essence of a beach holiday, with bright blue skies and the white crests of waves depicted across the nails. The beach nail designs long allow for more creative space, featuring finely painted airplanes and clouds, celebrating the journey to the beach as much as the destination itself.
Materials for Creation:
- Base Coat: Essie Grow Stronger Base Coat
- Sky Blue Polish: OPI’s “Can’t Find My Czechbook”
- White Polish: China Glaze’s “White on White”
- Nail Art Brushes: Fine-tip Detailing Brushes
- Top Coat: Orly Won’t Chip Resistant Top Coat
Use Essie’s base coat for a firm foundation. Apply a sky blue polish as the base, then use “White on White” to create fluffy clouds and sea foam with a fine brush. Draw the airplane details with precision and seal your miniature artworks with a resistant top coat.
DIY Tips: For the clouds and wave crests, use the dabbing technique with a sponge to get a fluffy, textured look. A toothpick can help outline the airplanes before filling them in with a fine brush.
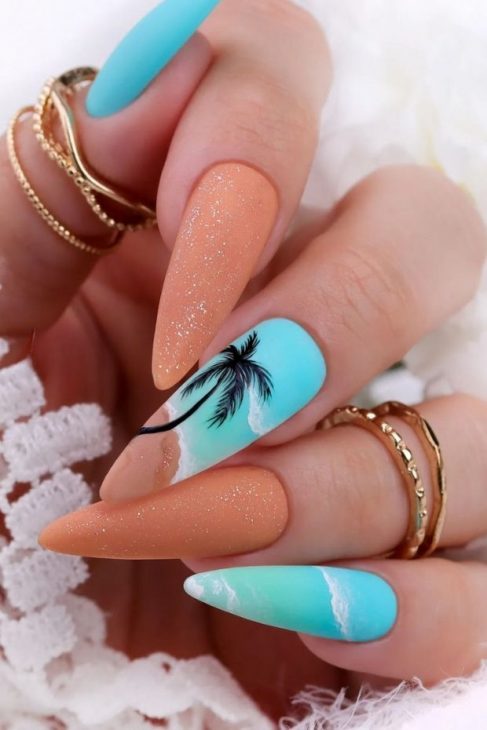
Beach Nail Designs: Sunset Hues and Palm Silhouettes
These vibrant nails are a sunset in motion, perfect for beach nail designs vacations short. Transitioning from a fiery orange to a serene pink, the colors mirror the sky at dusk. Palm tree silhouettes bring the tropical vibe to life, creating a design that’s both energetic and calming.

Materials for Creation:
- Base Coat: Orly Rubberized Base Coat
- Orange Polish: Essie’s “Tart Deco”
- Pink Polish: Essie’s “Fiji”
- Black Detailing: Acrylic Paint or Nail Art Pen
- Top Coat: Sally Hansen Insta-Dri Anti-Chip Top Coat
Start with a rubberized base to grip the bright colors. Sponge on “Tart Deco” and “Fiji” to create the gradient effect of a beach sunset. Use acrylic paint or a nail art pen for the palm trees, painting freehand or using a stencil for precision. Finish with a fast-drying top coat for instant beach readiness.
DIY Tips: For a smooth gradient, blend the edges where the two colors meet while the polish is still wet. For the palm trees, start with the trunk and work outwards to the fronds, keeping your hand steady. If using acrylic paint, ensure it’s fully dry before sealing with the top coat.
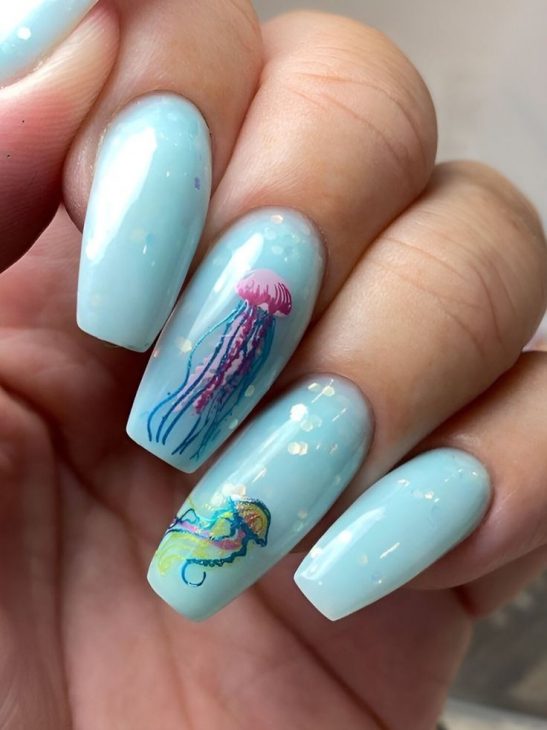
Beach Nail Designs: Marine Mystique
Delving into the depths of the ocean, these nails showcase the ethereal beauty of marine life with hand-painted jellyfish and a whimsical seahorse. The soft blue background suggests the vast and tranquil sea, speckled with gold flakes that mimic the subtle shimmer of sunlight filtering through water—a testament to beach nail designs ocean creativity.
Materials for Creation:
- Base Coat: Essie All in One Base
- Soft Blue Polish: China Glaze’s “Sea Spray”
- Detailing Colors: Acrylic Paint Set for Jellyfish and Seahorse
- Gold Leaf Flakes
- Top Coat: CND Vinylux Long Wear Top Coat
Begin with a nourishing base coat. Two coats of “Sea Spray” will evoke the sea’s calm. Use a fine brush and acrylic paints to detail the marine creatures. Sprinkle gold leaf flakes for a touch of oceanic sparkle. Seal with a long-wearing top coat for durability through beach adventures.
DIY Tips: Use a picture of a jellyfish and seahorse as a reference to paint your designs accurately. Apply the gold leaf flakes with a dry brush technique—gently press them onto the tacky polish surface. Always work in layers, allowing each to dry to prevent smudging.
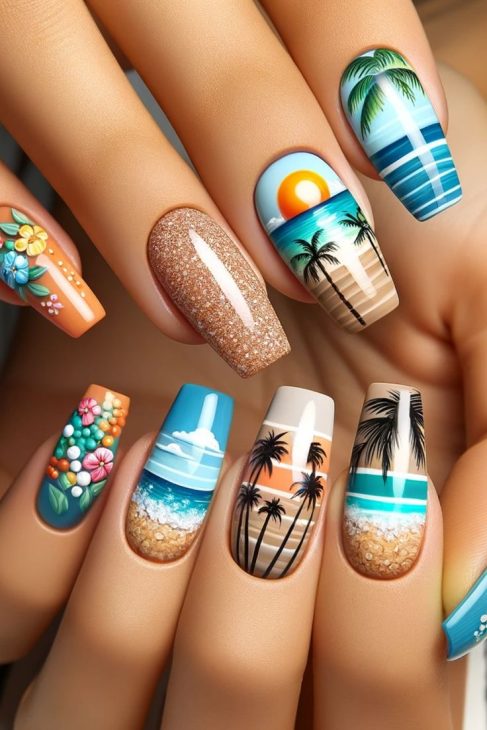
Beach Nail Designs: Tropical Escape
This is a breathtaking showcase of summer beach nail designs hawaii colors with a mix of hand-painted palm trees, serene sunset vistas, and vibrant floral motifs. Each nail tells a different story of the tropics, from golden sandy textures to cool blue ocean waves, encapsulating the diverse beauty of a tropical paradise.
Materials for Creation:
- Base Coat: OPI Natural Nail Base Coat
- Sunset Colors: A Range of Gel Polishes from Yellow to Deep Orange
- Palm Tree and Flower Colors: Acrylic Paint Set
- Textured Polish: Sally Hansen Sugar Coat in “Razzleberry”
- Top Coat: Gelish Top It Off Gel Sealer
A solid base is key. Layer the sunset colors for a gradient effect. Use fine brushes to add the tropical details with acrylic paint, allowing for precision and depth. For the sandy nail, apply “Razzleberry” for a sugary texture. Finish with a gel top coat under a UV lamp for a lasting holiday manicure.
DIY Tips: Blend your gradient with a sponge for a seamless sunset transition. The sandy texture can be amplified by patting on the textured polish while still wet. Practice your palm trees on paper beforehand to gain confidence in your strokes.
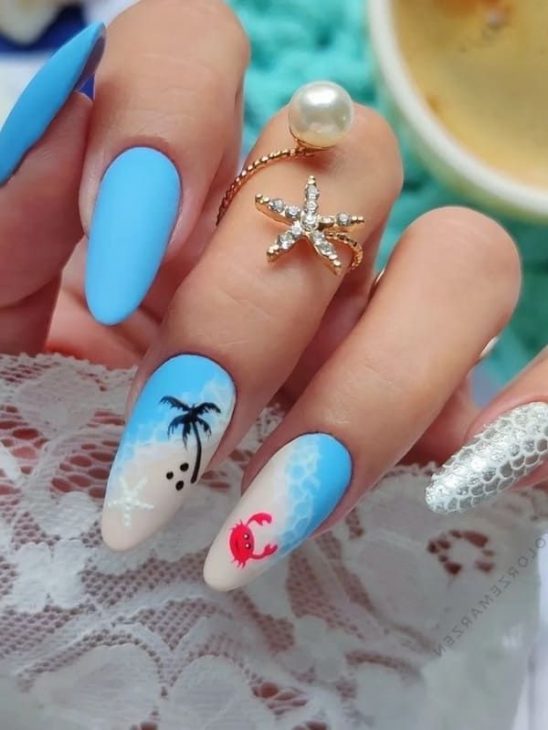
Beach Nail Designs: Ocean’s Embrace
A cool blue matte foundation provides a modern backdrop to the playful palm tree silhouettes and the cute crab design. Perfect for beach nail designs acrylic simple, these nails celebrate the fun side of summer with a pop of vivid color and crisp imagery, embodying the carefree spirit of a beach day.
Materials for Creation:
- Base Coat: Zoya Anchor Base Coat
- Blue Polish: Essie’s “Bikini So Teeny”
- Matte Top Coat: Essie Matte About You
- Black and Red Acrylic Paint for Designs
- Top Coat: Zoya Armor Top Coat
Anchor the design with a strong base coat. “Bikini So Teeny” is a playful blue that’s summertime in a bottle. After painting, apply the matte top coat for a contemporary finish. The palm trees and crab can be added with a detail brush dipped in acrylic paint. A clear top coat over the designs only will make them stand out.
DIY Tips: When working with matte finishes, apply the top coat swiftly to avoid streaks. Use a fine-pointed brush for the intricate designs, and don’t rush—patience will yield the best results. The contrast between matte and gloss will give your design an extra dimension.
Beach Nail Designs: Sand and Surf Fusion
These nails are an ode to the beach nail designs dip technique, with an ombre effect that simulates the merging of sand and sea. The palm tree accent adds a focal point, tying in the beach theme, while the sparkling glitter suggests the glistening shore under the sun.
Materials for Creation:
- Base Coat: DipWell Base Coat
- Dip Powders: Nude and Turquoise Shades
- Glitter Powder
- Palm Tree Decal or Sticker
- Activator: DipWell Activator
- Top Coat: DipWell Glossy Top Coat
A dip powder base sets the stage for a sturdy, long-lasting look. Carefully layer the nude and turquoise dip powders to create the ombre effect. Apply the glitter powder to mimic the sandy shimmer. Place a palm tree decal for an instant tropical touch. Use the activator to harden the powder, then finish with a glossy top coat.
DIY Tips: Ensure each layer of dip powder is brushed off thoroughly before applying the next. When applying the glitter, concentrate it towards the tip for a realistic “sand” look. A decal will give you a clean palm tree silhouette without the need for freehand drawing.
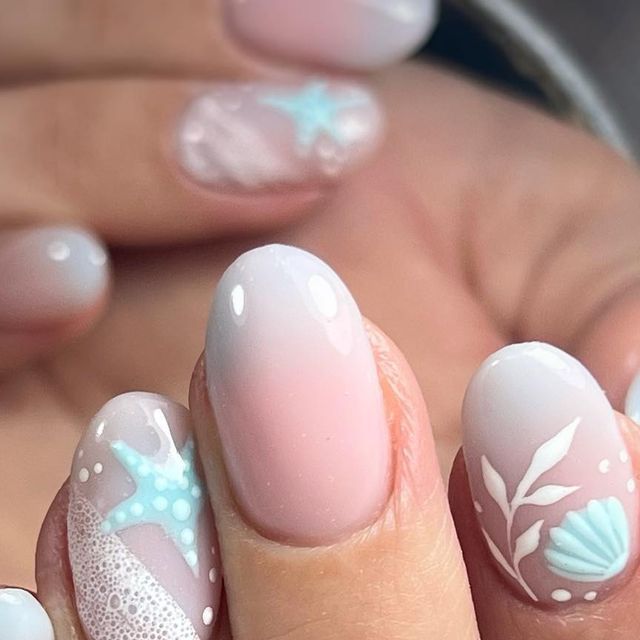
Beach Nail Designs: Soft Seaside Whispers
These nails breathe a soft whisper of the beach with pastel hues and marine motifs. Seafoam bubbles and delicate starfish on a muted background perfectly encapsulate beach nail designs simple and chic. The minimalist coral and seashell illustrations add an elegant touch of the ocean’s flora and fauna.
Materials for Creation:
- Base Coat: ORLY Bonder
- Pastel Polishes: Essie’s “Mint Candy Apple” and “Ballet Slippers”
- Dotting Tool for Bubbles
- Stickers or Decals: Starfish and Seashell Designs
- Top Coat: INM Out the Door Top Coat
Use the Bonder as a sticky base to hold the delicate designs. Paint the nails with “Mint Candy Apple” and “Ballet Slippers” in alternating fashion for a pastel base. For bubbles, dot white polish using a dotting tool. Apply pre-designed stickers for a no-fuss intricate motif. Seal everything with a fast-drying top coat.
DIY Tips: Place stickers on completely dry polish to avoid any smudging. If you’re feeling adventurous, you can hand-paint the sea motifs with a fine brush. The bubbles should be varied in size for a more natural effect.
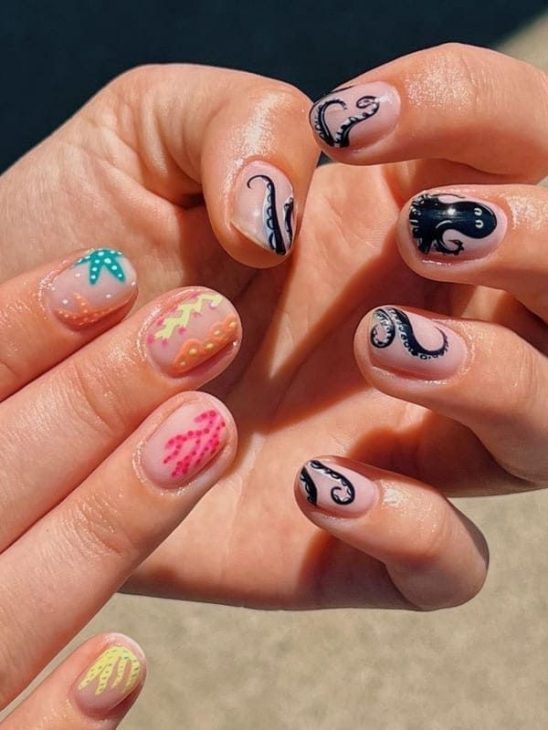
Beach Nail Designs: Vibrant Shores and Ocean Tales
This set tells vivid stories of beach fun with playful patterns and bold designs, perfect for beach nail designs bright colors. The fiery sunset hues and the whimsical waves offer a bold contrast against the oceanic black swirls. This manicure is for those who aren’t afraid to express their love for the beach with a pop of color.
Materials for Creation:
- Base Coat: Zoya Anchor Base Coat
- Bright Polishes: OPI’s “Hotter Than You Pink” and “No Room for the Blues”
- Black Nail Art Pen
- Top Coat: Essie Good To Go Top Coat
Start with Zoya’s base coat for long-lasting wear. Apply vibrant shades for a striking backdrop, using a sponge for a gradient effect where needed. Create swirls and waves with a nail art pen. Finish with Essie’s top coat for a protective, glossy sheen.
DIY Tips: To keep the lines crisp, steady your hand by resting it on a flat surface. If using a sponge for gradients, apply the polish in thin layers to avoid bulkiness. Make sure each color dries completely before adding a new one.
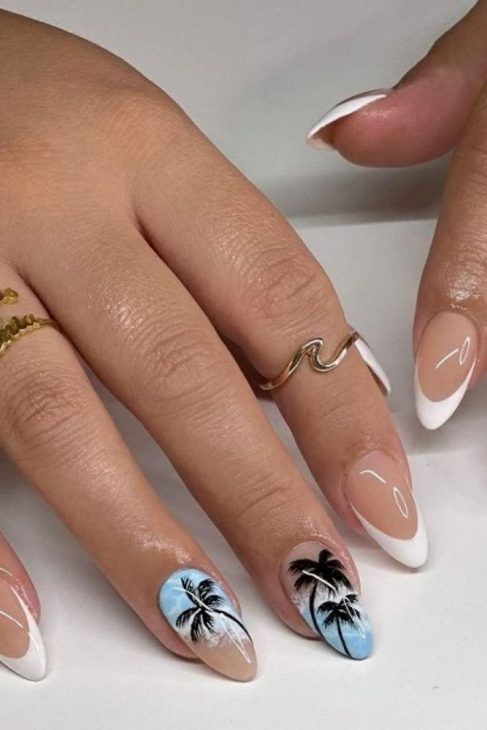
Beach Nail Designs: Palm Silhouettes on Twilight Shores
A dreamy beach evening is beautifully encapsulated in these beach nail designs acrylic coffin nails. The white and soft peach hues offer a muted, yet elegant background for the black palm silhouettes that stand stark and majestic, capturing the serene mood of a tropical sunset.
Materials for Creation:
- Base Coat: Sally Hansen Miracle Cure
- Peach Polish: Essie’s “Peach Side Babe”
- White Polish: OPI’s “Alpine Snow”
- Black Acrylic Paint for Palms
- Top Coat: Seche Vite Dry Fast Top Coat
Prep nails with a strengthening base coat. Apply “Peach Side Babe” and “Alpine Snow” for an ombré sunset effect. Use a thin brush and black acrylic paint to hand-draw the palm trees for a bold silhouette. Top it off with Seche Vite for a durable, glossy finish.
DIY Tips: For the palm trees, start with the trunk and work your way up to the fronds, fanning them out for a realistic look. Use a sponge to blend the colors softly, and don’t rush the process to ensure a smooth gradient.
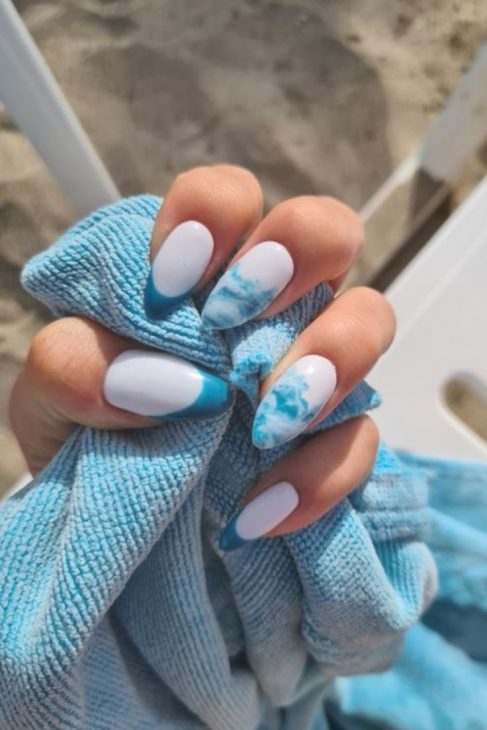
Beach Nail Designs: Cool Waves and Coastal Vibes
In these beach nail designs acrylic simple, cool blue and white shades merge to mimic the refreshing waves of the ocean. The manicure combines matte and glossy finishes for a tactile experience, while the marbled effect of the blue polish suggests the gentle movement of water caressing the shore.
Materials for Creation:
- Base Coat: Essie Strong Start
- Blue Polish: Essie’s “Bikini So Teeny”
- Matte Top Coat: Matte About You by Essie
- Glossy Top Coat: Essie Gel Setter Top Coat
- Top Coat: Essie Gel Setter Top Coat
Kick things off with a fortifying base coat. Apply two coats of “Bikini So Teeny,” then dab on white polish with a sponge for a marbled wave effect. Use a matte top coat on select nails for contrast, leaving others glossy for depth and interest.
DIY Tips: Create the marbled effect by lightly touching the sponge to the nail, letting the colors mix slightly. Experiment with different pressures to achieve a look you love. Apply the matte top coat with care, as it can streak if overworked.
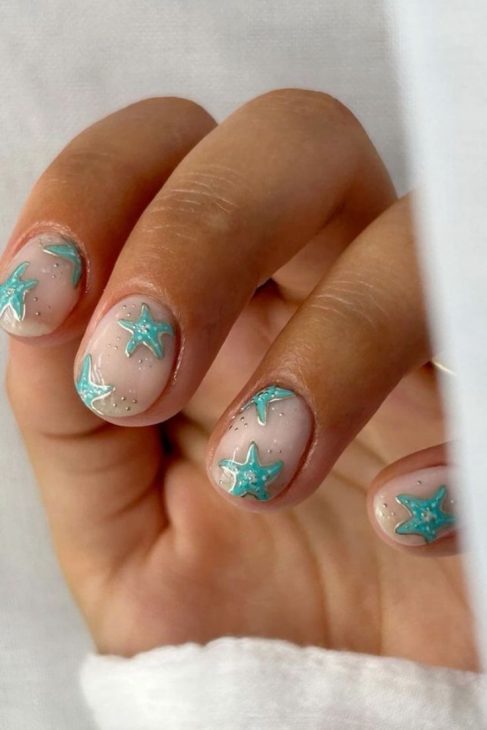
Beach Nail Designs: Starfish Wonders
This delicate design is a celebration of the sea’s treasures with translucent starfish set against a soft, shimmering backdrop. It exemplifies beach nail designs short nails, offering an understated elegance that’s perfect for any seaside occasion.
Materials for Creation:
- Base Coat: Essie First Base Base Coat
- Sheer Polish: OPI’s “Bubble Bath”
- Starfish Stickers or Decals
- Fine Glitter: Iridescent Cosmetic Grade
- Top Coat: Revlon Extra Life No Chip Top Coat
Protect your nails with a base coat. Apply “Bubble Bath” for a barely-there look, then while still tacky, place starfish stickers as focal points. Dust on fine glitter for a subtle sea sparkle. Seal with a long-lasting top coat.
DIY Tips: For a perfectly placed decal, use tweezers and apply it while the polish is still a bit sticky. For the glitter, tap off excess from the brush to distribute it lightly, just like seafoam on the shore.
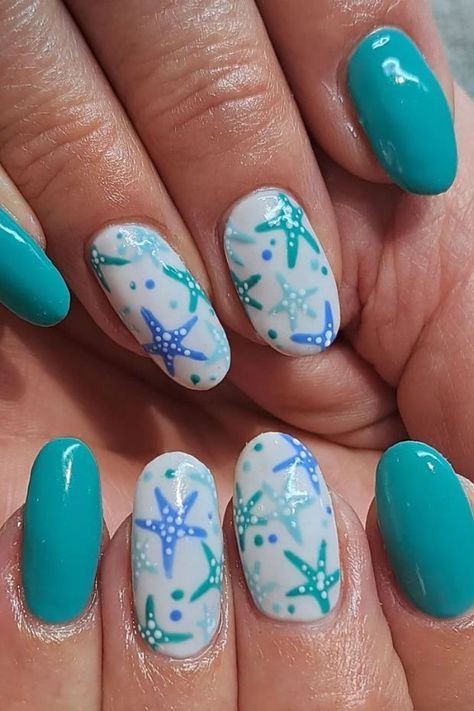
Beach Nail Designs: Under the Sea Adventure
These nails transport you under the waves with vivid starfish and seagrass designs set against an aquatic blue background. The design is lively, embodying beach nail designs acrylic, perfect for those who adore the vibrancy of marine life.
Materials for Creation:
- Base Coat: CND Stickey Base Coat
- Teal Polish: Essie’s “Naughty Nautical”
- White Polish for Base of Designs: OPI’s “Alpine Snow”
- Nail Art Brushes and Dotting Tools
- Top Coat: Butter LONDON Hardwear Shine UV Top Coat
Lay the foundation with a sticky base coat for color endurance. Apply two coats of “Naughty Nautical” as your ocean canvas. Sketch starfish and seagrass onto the white base using a fine brush and dotting tools for precision. Top it all with a UV shine top coat for a glowing finish.
DIY Tips: Use the dotting tool to create the center of the starfish, drawing outwards for the arms. Mix a little white with teal on a palette to get different shades for seagrass, adding dimension to your marine scene.
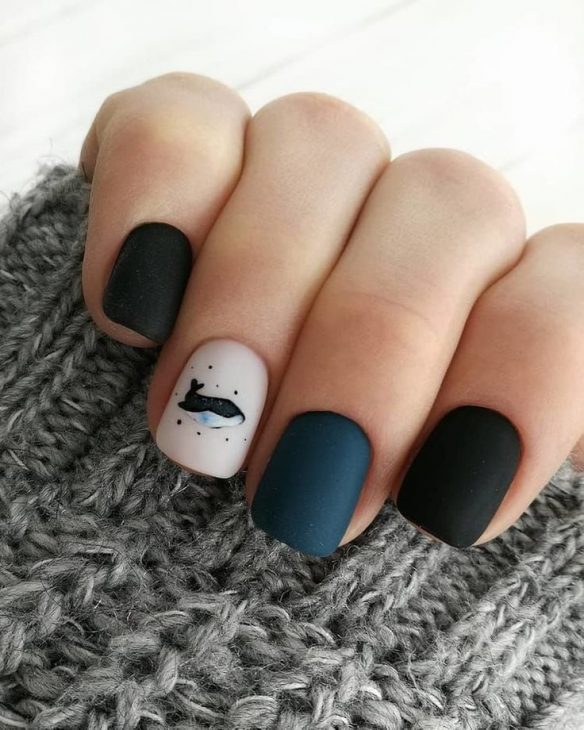
Beach Nail Designs: Moody Seas and Whimsical Skies
Featuring deep sea blues and a whimsical whale, these beach nail designs simple capture the contrasting moods of the ocean. The mix of matte and gloss finishes adds a contemporary twist, perfect for those who want their nails to tell a story of the sea.
Materials for Creation:
- Base Coat: ORLY Bonder Rubberized Basecoat
- Matte Polish: OPI’s “Matte Top Coat”
- Glossy Polish: China Glaze’s “Fifth Avenue”
- Nail Art Pen: Black
- Top Coat: Seche Vite Dry Fast Top Coat
Start with a rubberized base for grip. Use “Fifth Avenue” for the glossy nails and apply OPI’s matte top coat for the muted effect on others. The whale can be drawn with a nail art pen or a fine brush dipped in black polish. Use Seche Vite on just the art to make it stand out against the matte.
DIY Tips: For the whale, sketch lightly with a pencil on the matte polish before going over with your nail art pen for precision. Apply the glossy top coat sparingly to avoid saturating the matte finish.
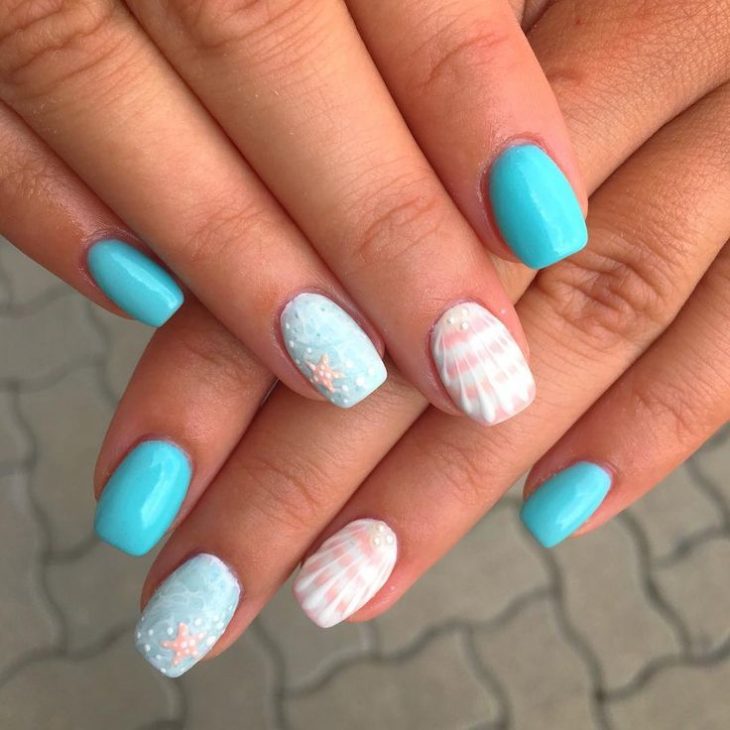
Beach Nail Designs: Coastal Harmony
The soothing combination of sky blue and white in these nails captures the gentle harmony of the coastline. The inclusion of delicate shell designs in white makes for a beach nail designs dip look, giving a nod to the natural beauty found along sandy shores.
Materials for Creation:
- Base Coat: OPI Nail Envy
- Sky Blue Polish: China Glaze’s “For Audrey”
- Shell Stickers or Decals
- White Polish for Accents: Sally Hansen’s “White On”
- Top Coat: Sally Hansen Insta-Dri Anti-Chip Top Coat
Fortify nails with a strong base. “For Audrey” provides a serene blue, reminiscent of clear skies. Add white accents or place shell stickers for a beachy vibe. A quick-dry top coat keeps your design pristine.
DIY Tips: If using decals, ensure your polish is dry to avoid any lifting. For hand-painted shells, use a thin brush and steady strokes to achieve a crisp design. Layering a dab of the blue polish over the white can create a subtle, iridescent effect like real shells.
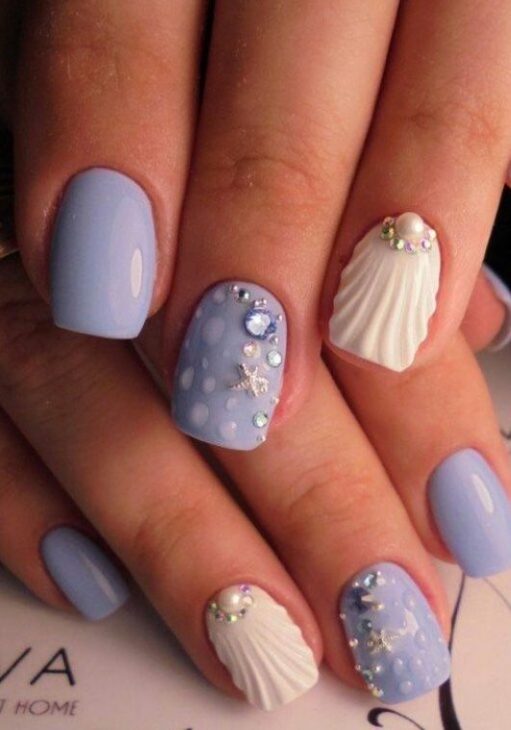
Beach Nail Designs: Seaside Elegance
This nail design brings to mind serene days spent by the shore, with a touch of elegance. Soft periwinkle blue provides a tranquil base, while textured white accents reminiscent of seashells give a 3D effect. Crystals and starfish appliqués add a luxurious touch, perfect for a beach nail designs acrylic statement.
Materials for Creation:
- Base Coat: Orly Nail Defense
- Periwinkle Polish: Essie’s “Virgin Snow”
- Textured White Polish: OPI’s “Alpine Snow”
- Crystals and Starfish Appliqués
- Dotting Tool for Precision
- Top Coat: Sally Hansen Miracle Gel Top Coat
Begin with Orly’s protective base. Layer “Virgin Snow” for a cool, calming hue. Use “Alpine Snow” to create the seashell texture on accent nails, perhaps with a stippling technique. Place crystals and starfish appliqués with a dotting tool for pinpoint accuracy. Finish with Sally Hansen’s gel top coat for a lasting sheen.
DIY Tips: To create the seashell effect, use the textured polish and a fan brush to create ridges. While the polish is tacky, gently place the appliqués; the tackiness will help them stick without additional glue. Apply the top coat around the appliqués to avoid dulling their shine.
Save Pin