Hey beauty lovers! Summer is here and a great way to match the beachy mood is with some ocean vibe nails. No matter if you’re a nail art expert or just beginning to try it, I’ll show you some ocean vibe nails that will make you wish for sand, sea air and lots of seashells. Ready to dive in? Let’s ride this wave together!
Blue Waves of Serenity
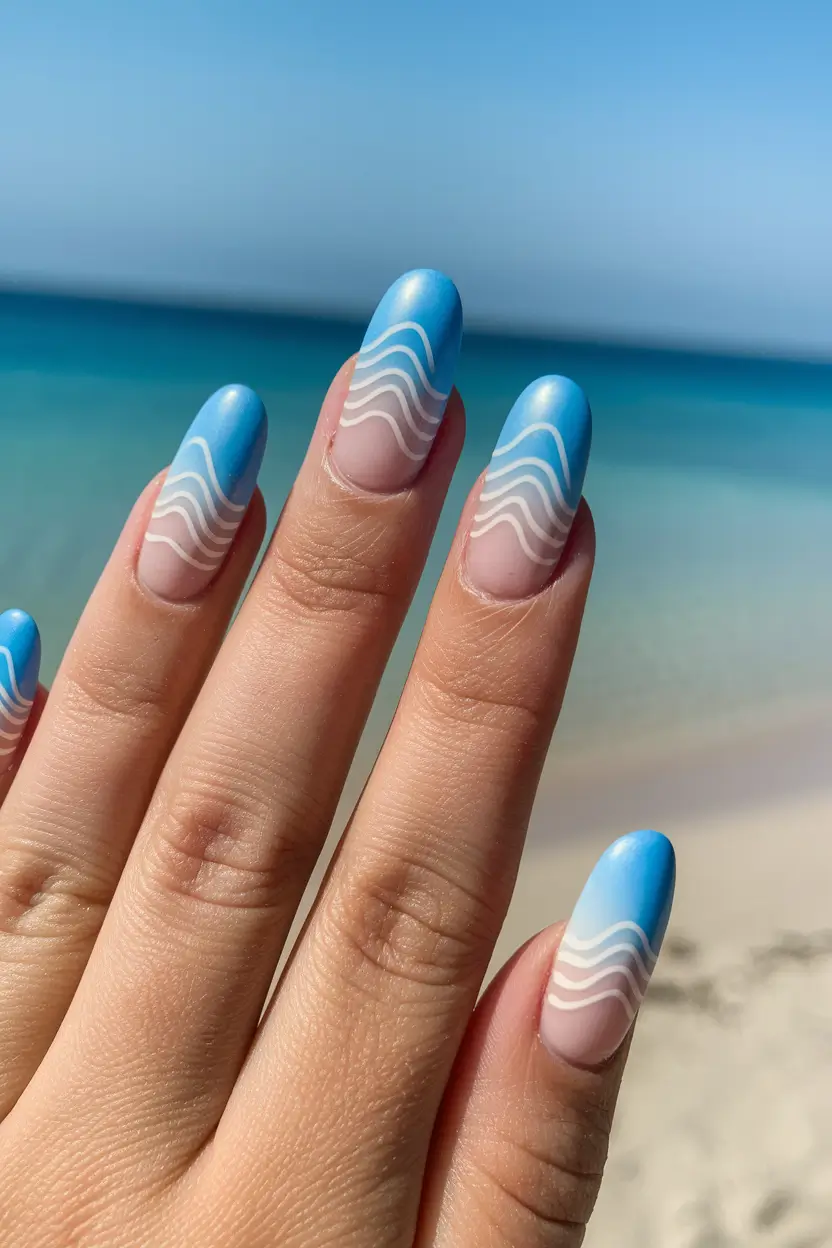
Summer ocean vibe nails are all about this pretty blue swirl look. The soft lines and subtle features give a calm and stylish feeling which is ideal for any day spent by the ocean. The combination of light and dark blue in the painting is like a cool breeze on a sunny day—calming and very appealing.
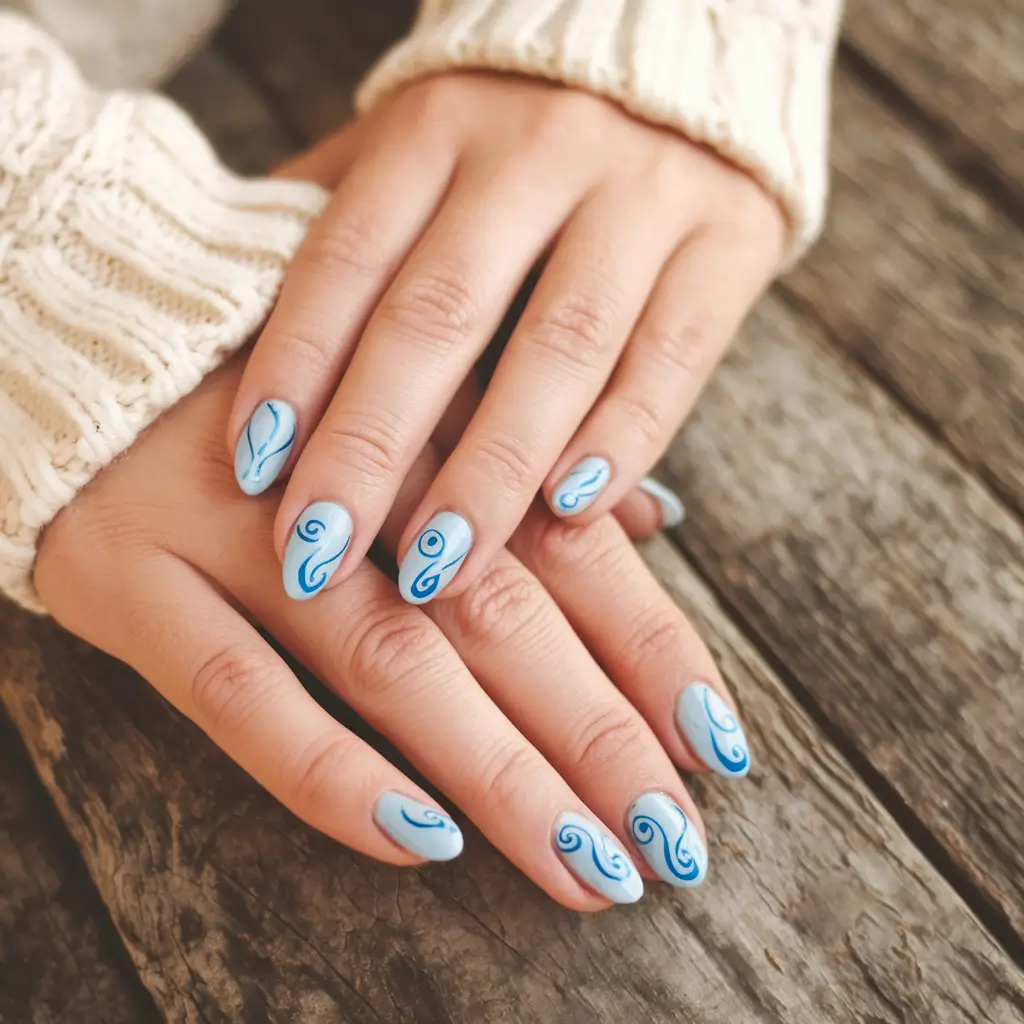
I usually like using pastel blue tones for ocean-themed paintings, though these shades were especially bright and full of depth. To achieve this look, I’d recommend using Essie’s “Bikini So Teeny” as a base and a fine detailing brush to add fluid waves in darker blue (like OPI’s “My Pal Joey”). Seche Vite helps your nails look glossy and brightens any nail art.
It might look hard to get this design in your own home, but it’s actually not that complicated. After you have prepared the nails, put on the base blue color and let it dry completely. After that, use a striping brush to paint the darker blue lines in a wavy, flowing way. Finish off the meal by drizzling a glossy sauce to keep the sea-like taste.
Whenever I put on this design, it reminds me of the ocean and the sand. It’s like a mini beach vacation on my fingertips. And honestly, who doesn’t want that?
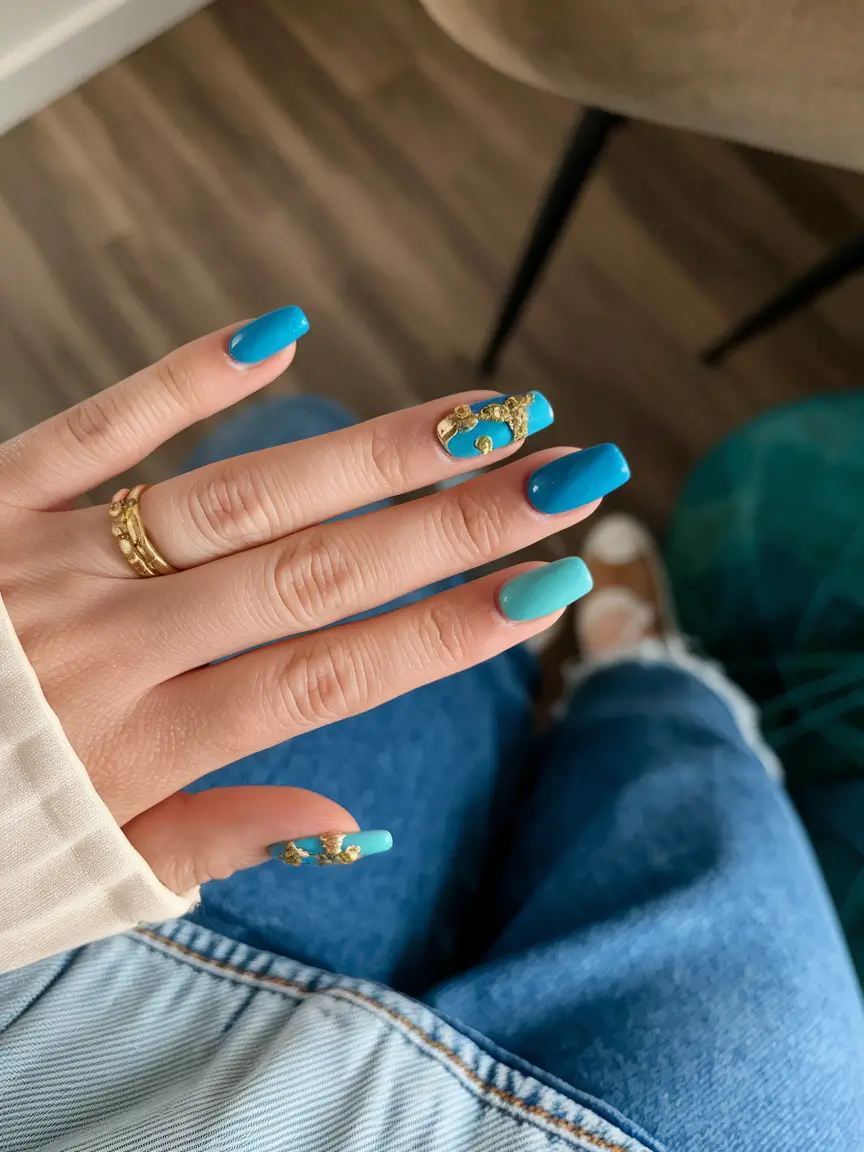
Golden Touches by the Sea
Golden ocean vibe nails are possible and this set demonstrates it. Seeing soft pink and detailed golden 3D shapes reminds me of sunny beaches and pretty seashells. There’s a smooth and stylish feel, as if you were sipping a drink at a sunset beach bar.
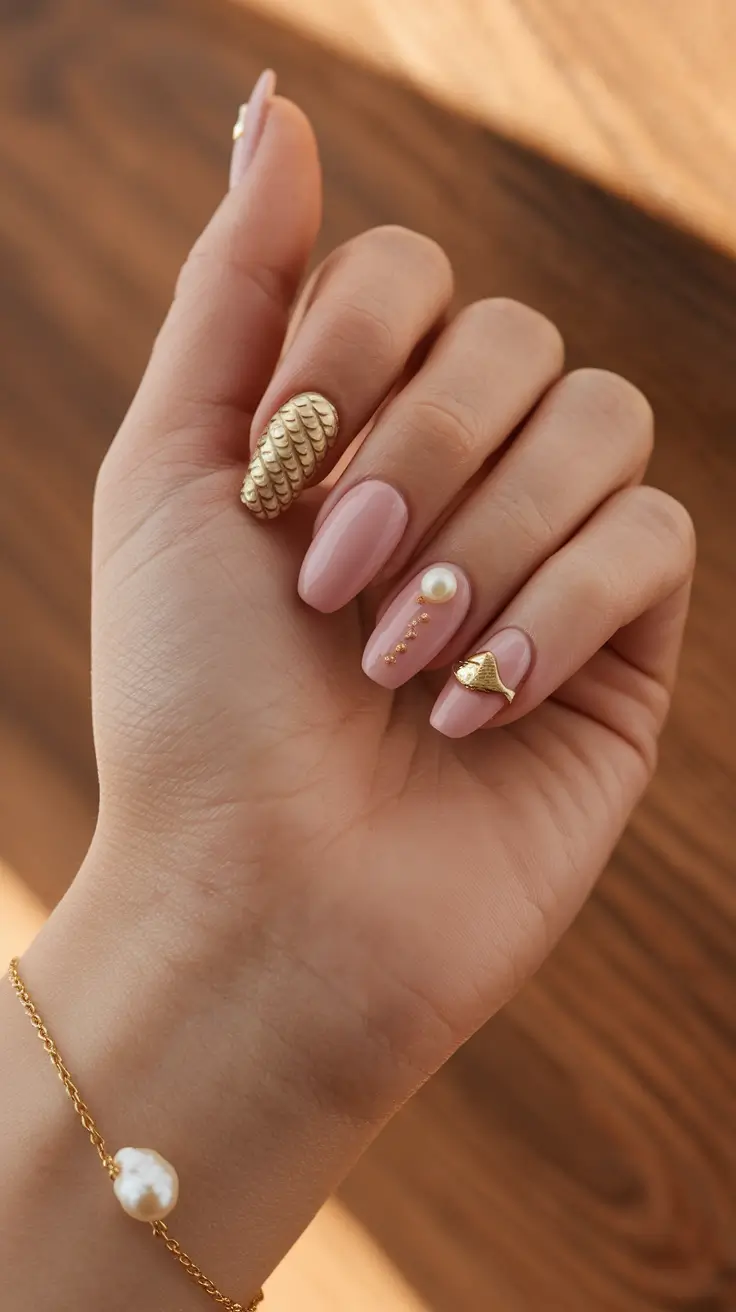
To recreate this ocean vibe nails 3D look, I’d go with OPI’s “Bubble Bath” for the base pink, plus some gold nail art charms and embellishments (try Born Pretty’s metallic studs or Ciaté’s gold nail pearls). Nail glue with good holding power and a dotting tool are useful for applying them with accuracy.
Start by shaping your nails (almond or square—whatever suits your vibe) and applying a neutral pink base. After that, use nail glue to stick the gold 3D pieces: seashells, pearls and scales. Apply a top coat to the figure so that every detail is preserved.
These nails make me feel like a sea goddess who has just come out of the ocean onto a yacht. It’s definitely ocean vibe nails easy to fall in love with.
Star-Spangled Sea Adventures
I never realized how much fun ocean vibe nails blue could be! As soon as I see this design, I think of summer nights spent near the sea, watching the stars. It’s both adorable and shows patriotism, but it fits summer festivals and beach parties perfectly.
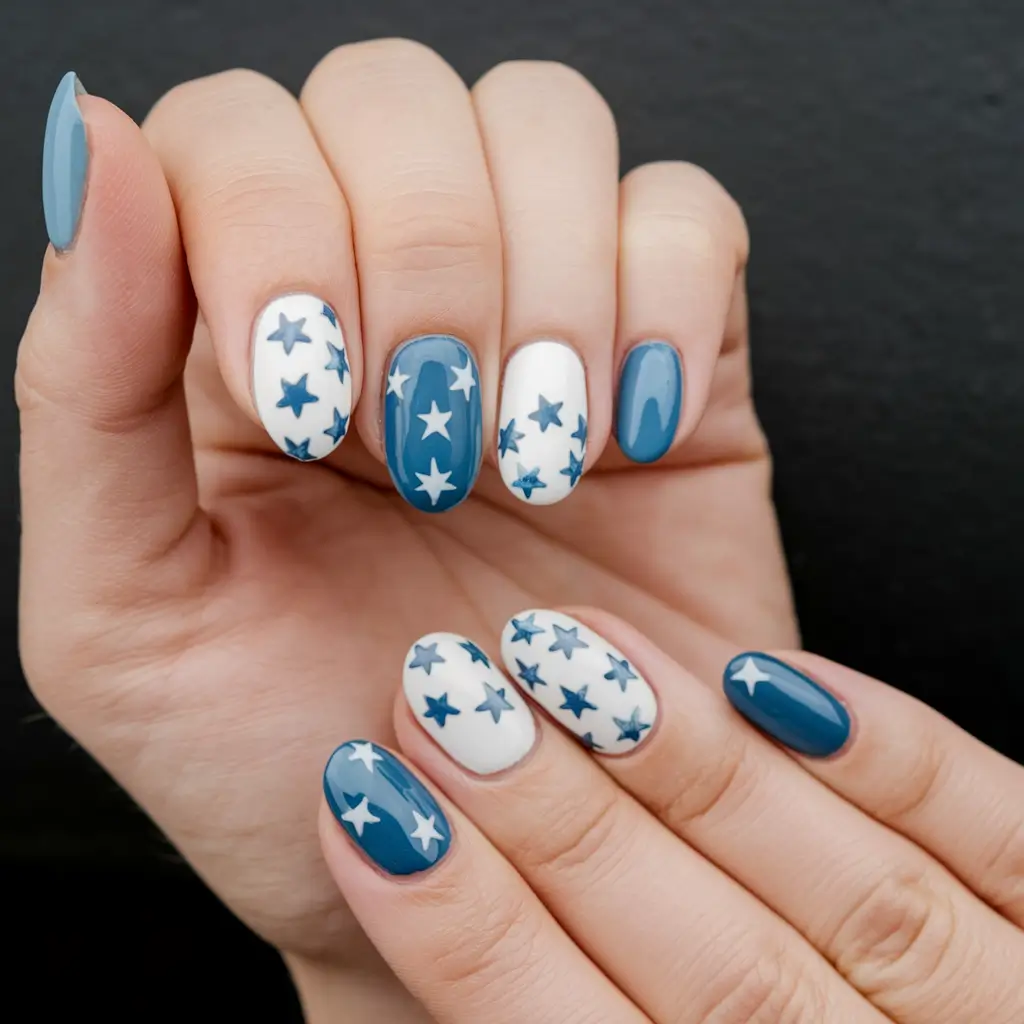
The star details are what make this design and I just love them. I would put Essie’s “Blanc” as the base and add Sally Hansen’s “Pacific Blue” as the accent color. Stamping kits and nail stickers are very helpful for the stars.
Paint the white polish on the first set of nails and the blue on the second set. When the design is dry, use different colors to add stars: blue stars on white and white stars on blue. Finish the job by applying a glossy top coat so the sunshine shines on your car.
Looking at my nails always makes me think of camping by the beach and watching fireworks by the sea. It’s a cute ocean vibe nails idea that’s equal parts fun and nostalgic.
Seaside Lace Elegance
A combination of soft blue and white lace gives a look that is both romantic and classic. The design captures the carefree summer ocean vibe nails look that is simple to wear and really stands out. It’s a manicure that shows you’re ready for brunch by the ocean, but also looks great for a last-minute road trip.
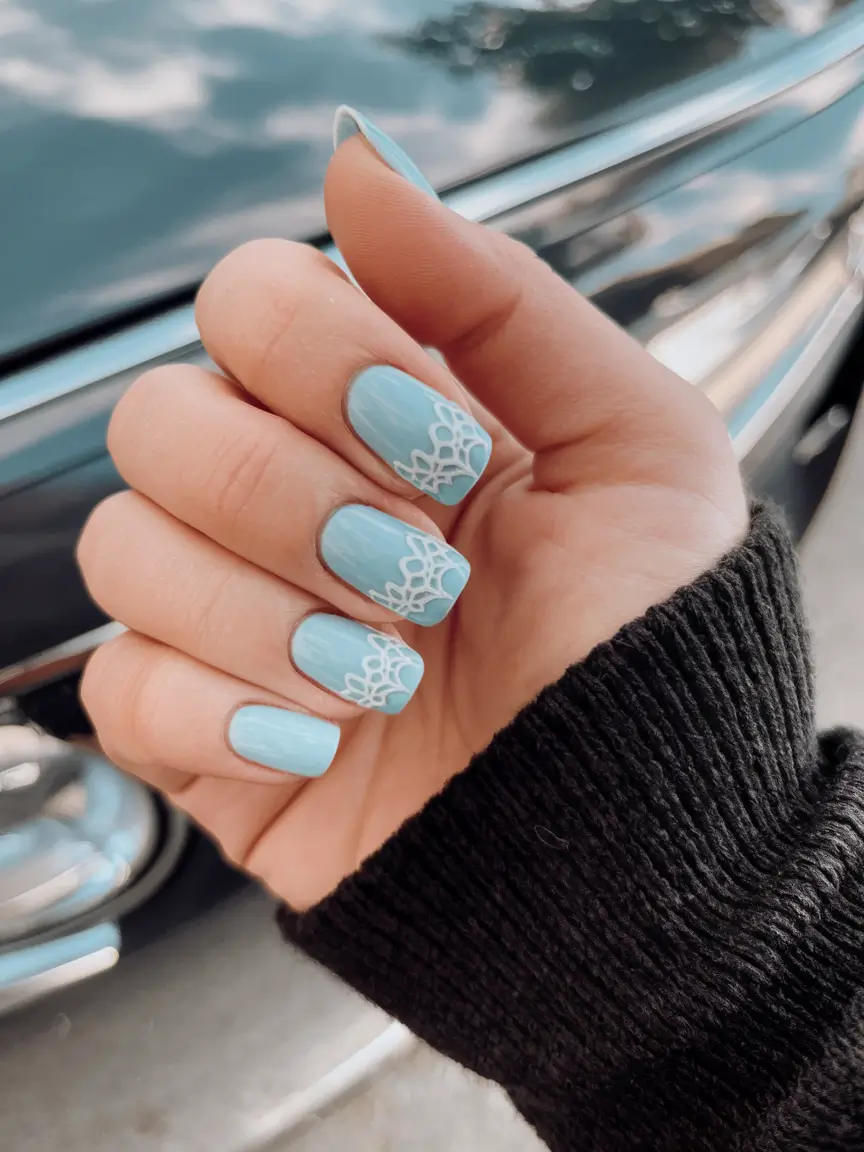
This look comes together beautifully with Essie’s “Find Me an Oasis” for the base and a crisp white polish (like OPI’s “Alpine Snow”) for the lace details. A fine nail art brush will be your buddy and being patient is important as well.
When the nails are ready, put on a layer of blue base and let it dry. Then, with a steady hand (or a stamping plate if you’re fancy), draw on those white lace lines, focusing on the tips for that soft, dreamy effect. Apply a high-gloss top coat to give your model a glossy look like at the beach.
Wearing these nails usually makes me feel as if I’m on a romantic trip, even when I’m just at home. They’re ocean vibe nails simple yet so charming.
Sun-Kissed Beach Day Vibes
When summer arrives, a little messy fun is fun and this nail design makes it possible. The ocean dream team nails are bright orange, playful blue and sweet starfish. It’s basically a vacation in a manicure.
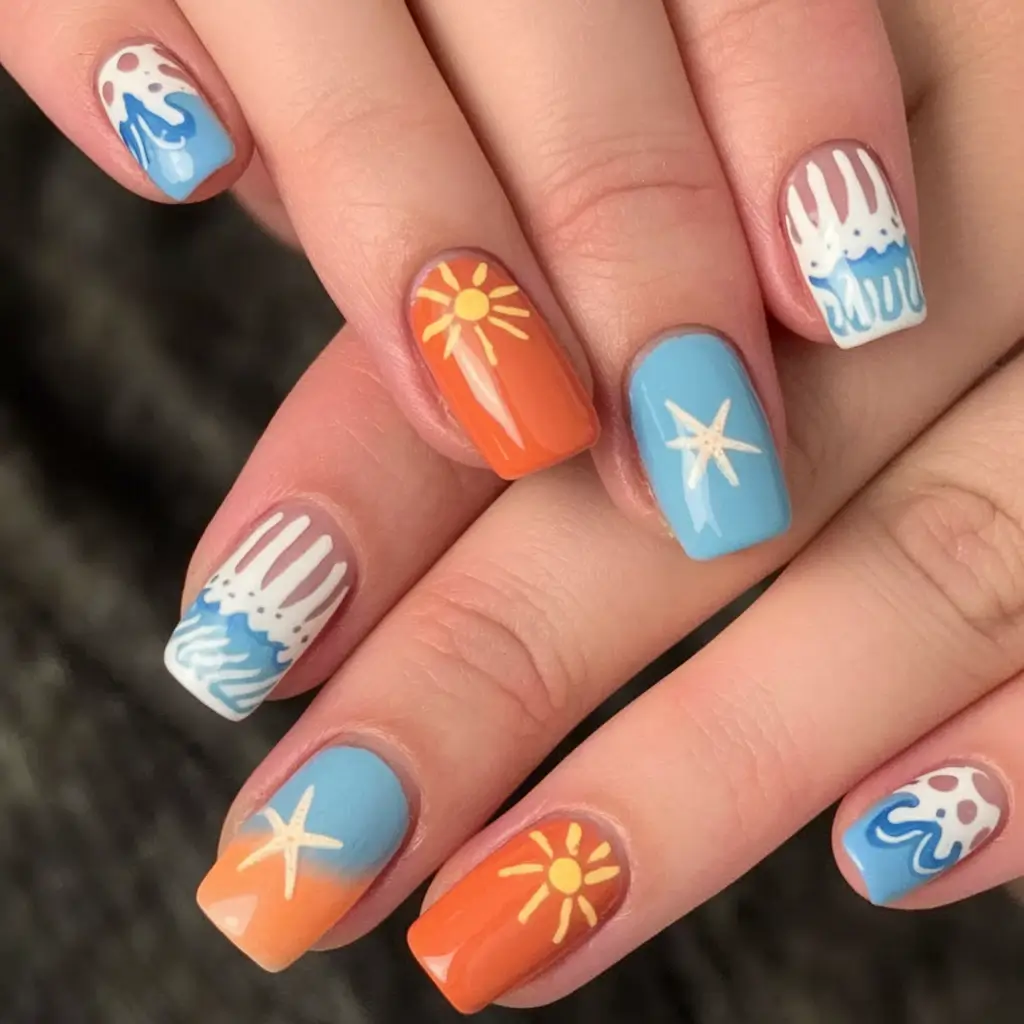
I’d use OPI’s “It’s a Boy!” as the blue base and Essie’s “Tart Deco” for the orange accents. A fine detail brush (or dotting tool) is key for painting the sun and starfish shapes, while a crisp white polish highlights the waves.
Start with a fun combination of blue and orange for the base colors if you decide to do it yourself. After the background is dry, add suns, stars and waves with the fine brush. Finish the painting with a glossy top layer to guard it and keep all the colors shining.
I think of summer beach parties and sun chasing with friends whenever I see these nails. Ocean vibe nails are simple to like and simple to wear all through the season.
Seashell Dreams on Blush Pink
There is a special charm to the contrast between a soft pink and seashells and starfish. The pink look from this ocean vibe is a summer favorite — it’s playful and chic and goes great with both beach time and sunset drinks. I think the white 3D shells and starfish make your nails look like they have just come out of the ocean and are glowing with sunshine. It’s like bringing a bit of the ocean home, one nail at a time. This style works well for anyone who wants their nails to look like the ocean and who wants to add a touch of art to their summer nails.

If you’re looking to recreate this at home, you’ll need a delicate pink gel polish (think OPI’s “Mod About You” or Essie’s “Fiji”), plus a white 3D gel or acrylic for the shells and starfish. A dotting tool or a small brush is useful for putting on those cute dotted designs. A steady hand is a must, but the end result is so worth it!
Prepare your nails by applying a good base coat at the beginning. Paint two layers of the pink polish and cure them under a UV lamp. Next, use your 3D gel or acrylic to sculpt the shells and starfish — it’s okay if they’re a little uneven, that’s the beauty of ocean-inspired designs! Apply a top coat to seal the whole manicure and give it a glossy finish.
Personally, I think this design is a total mood-lifter. Whenever I see my hands, I remember the fun days I had by the sea. It’s also a conversation starter — people always ask where I got them done! Ocean vibe nails are so special because they remind you of summer no matter where you are.
Beachy 3D White Waves
White and pink together may seem simple, but this manicure is very unique. The simple design with dots and starfish in this ocean vibe nails 3d makes it look very ocean-like. It looks like a picture of ocean foam coming onto the beach. This ocean vibe nails design gives off a mix of class and fun. The 3D elements are put in just the right spots, so each nail looks like its own little seascape.
I prefer to use a medium pink gel base with a slight gloss when I do this style. Nail polishes by Gelish and LeChat such as “Pink Smoothie” and “Petal Soft,” are recommended. White sculpting gel or acrylic can be used to make the 3D parts and a fine detail brush is good for painting the dots and starfish. Be patient and let every layer dry before putting on the top coat.
You might think making this at home is hard, but it gets much easier once you know how. After you have the base color, take a small brush with some white gel and paint the starfish and waves. Cure between layers to avoid smudging. To give your nails a glossy ocean look, end with a top coat you don’t need to wipe off.
For me, this design is a must-try for summer. It has a relaxed beachy feeling that makes you feel like you’re on holiday, even when you’re just eating lunch. Also, it looks great with breezy dresses and your favorite beach jewelry.
Shimmering Seashell Chic
Ever wanted to feel like a real-life mermaid? The seashells and dots on this manicure give off that beachy feeling on a pink base. The ocean vibe nails cute style offers a sophisticated look that adds a little magic to your hands. The seashells are detailed and sculpted which gives the nails a 3D look that stands out and is interesting to look at — ideal for when you want your nails to speak for themselves. This design feels fresh, breezy, and endlessly summer-ready.

My suggestion for this one is “Ballet Slippers” by Essie which is a pink gel polish. To get the 3D seashell style, apply white builder gel or acrylic with a small sculpting brush to make the ridges. Coat the seashells with a good layer of top coat to make them shine just like the ocean has polished them.
Start the manicure by buffing your nails and applying a good base coat. Paint one layer of pink gel polish, let it dry and then apply another layer, curing after each one. After that, shape the seashells and dots with the builder gel or acrylic. It may take a while, but it will be worth all the time you spend on it. Seal the piece with a glossy top coat after everything has dried to achieve the underwater look.
I always feel like a summer goddess when I put on this look. It goes really well with light beach outfits and a relaxed mood. Plus, it’s sure to turn heads at every summer party!
Sun-Kissed Shell Art
The idea of this design is to make your nails shine like the summer sun. The soft pink base makes a great background for the crisp white shells and starfish which adds a breezy, beachy feel to your nails. The 3D textures are not very strong but are easy to notice — perfect for people who want a simple and elegant ocean vibe nails look. It gives you the feeling of being on a beach with the sea breeze right away.
I like to use a light pink gel (try “Blushing Bride” from CND) as the base. The shells and dots are best made from white sculpting gel or acrylic. A dotting tool or detail brush is needed to create the details in the ocean.
Prepare your nails and put on your base color as the foundation. Cure each layer to perfection. After that, use white gel to shape the shells and starfish and let every part dry before proceeding. Apply a high-gloss top coat at the end to keep the beachy shine.
I feel that this design is a way to enjoy the relaxed mood of summer. It looks good in the office and also at a beach party. It’s one of my go-to ocean vibe nails designs — trust me, you’ll want to show these off every chance you get!
Golden Glow on Blue Waters
Want to make your ocean vibe nails even better? This design is pure magic. The base of bright blue suggests the sea and the gold highlights make the design more elegant and glamorous. The little gold touches are like the sun shining on the water which gives your nails a lovely touch of class and fun. The design looks like a summer treasure hunt, bringing together bold and delicate art.
I think a bright blue gel polish, for example, “Butler Please” by Essie or “Ski Teal We Drop” by OPI, would be perfect for this style. You can get the golden effect with gold foil or a metallic gold gel. I always like to add a little loose gold glitter for a little more shine — it makes me feel like I’m wearing the ocean.
For making it at home, paint your nails blue with two coats, curing them in between. Put the gold foil or paint on the accent nails, using a detail brush to make sure the design is precise. Seal the whole piece by applying a high-gloss top coat at the end.
I often hear lots of compliments when I put on this design. It gives you that special feeling like you’re a beach goddess. It’s actually not difficult to make at home using only a few things and some patience. So, what are you waiting for? Put on these ocean-inspired nail designs and let your mermaid spirit come out.
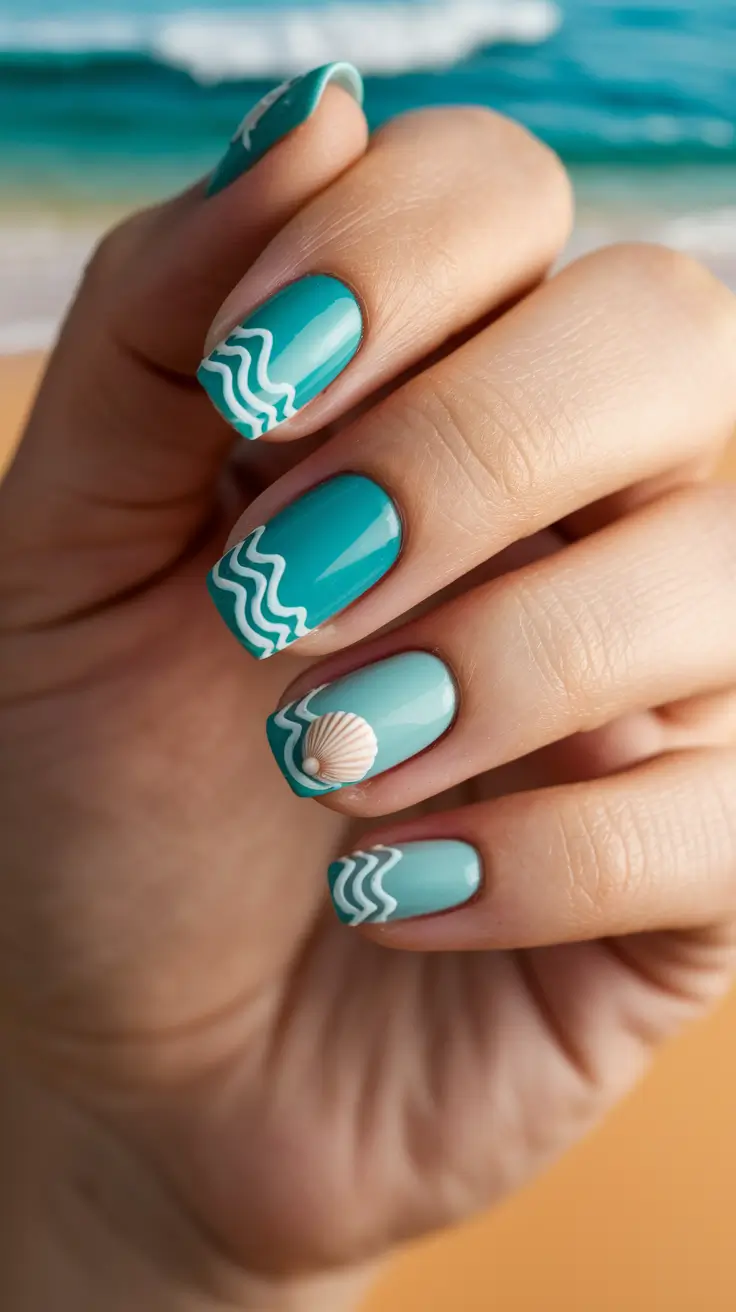
Teal Wave Dreams
The teal waves against these neutral nails are so captivating. They capture the main idea of ocean vibe nails by being effortless, calm and a little whimsical. The almond shape is perfect for a little extra style, so these nails are great for summer trips or romantic dinners by the water.
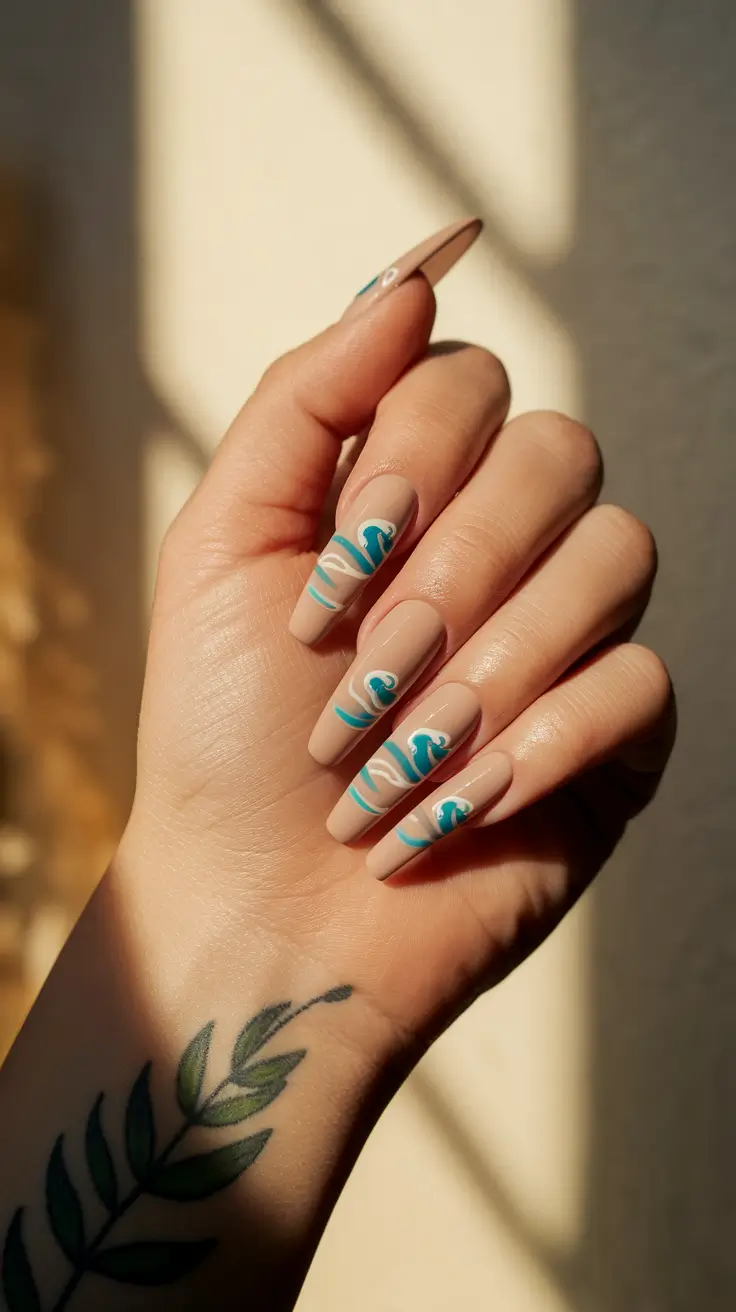
The first step would be to use Essie’s “Ballet Slippers” for a gentle, natural-looking base. I would then use a fine brush and a teal color such as “Teal the Cows Come Home” by OPI to make the wave lines. Draw some white lines to add depth and dimension and your painting will look like the ocean.
I feel like I’m on a gentle wave whenever I put on this outfit and I’m ready for whatever the day brings. The design is simple and still manages to be really enjoyable on your nails.
Seashell Summer Chic
Having bright turquoise nails and white seashells is the perfect way to show summer ocean vibe nails. The lively colors make me think of the beach as soon as I see them on tanned skin. They give the nails a modern and fun appearance.
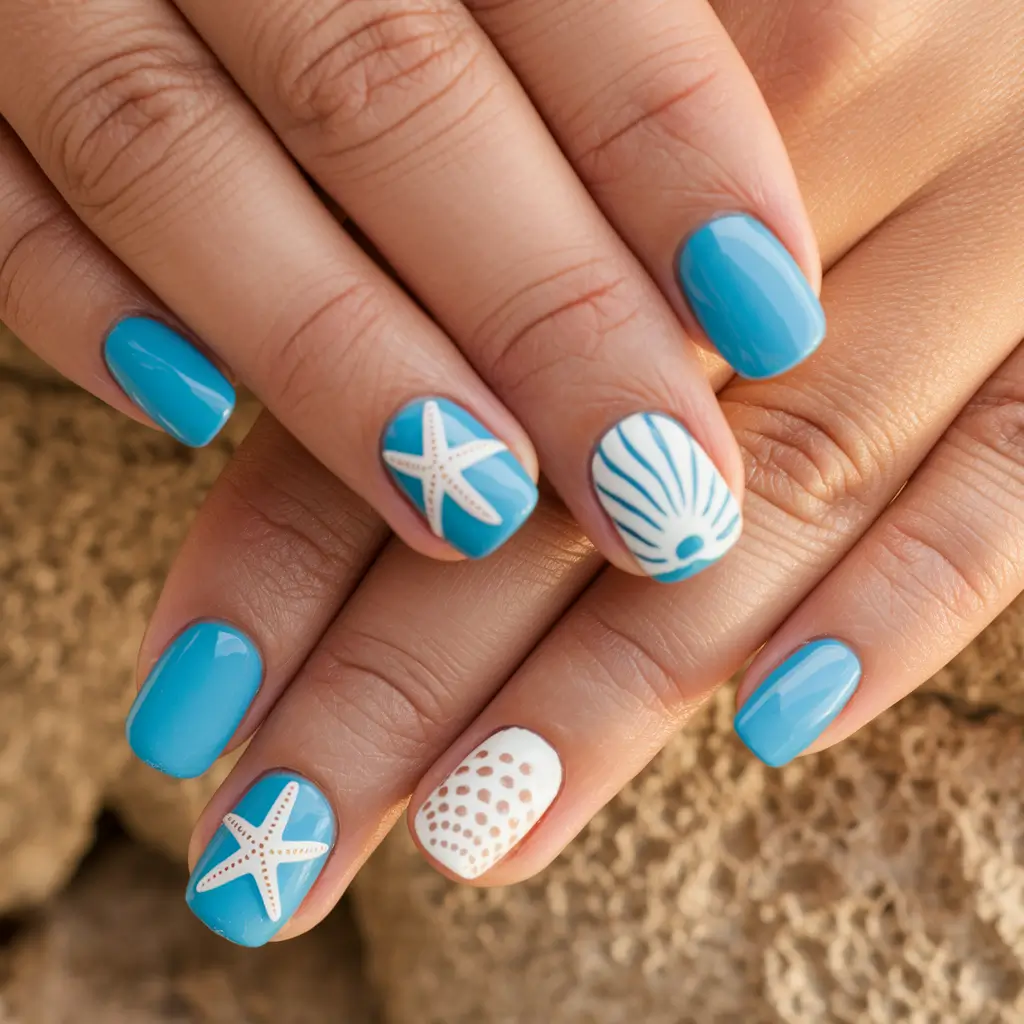
I find that Sally Hansen’s “Breezy Blue” and Essie’s “In the Cab-ana” give the best turquoise results. Use a fine brush or a nail stamp with a sharp white polish such as OPI’s Alpine Snow for the seashell details. End the manicure by adding a shiny top coat to keep everything bright and summery.
This design always reminds me of going into the ocean or finding seashells on the beach. This is a simple and sweet nail design that any beach lover will love.
Mermaid Shell Magic
The seashell-decorated blue nails are my favorite ocean vibe design. The combination of blue and white seashells makes you feel like you are at the sea. I think square nails are great because they have a fun look but also look elegant which makes them perfect for both parties and casual beach days.
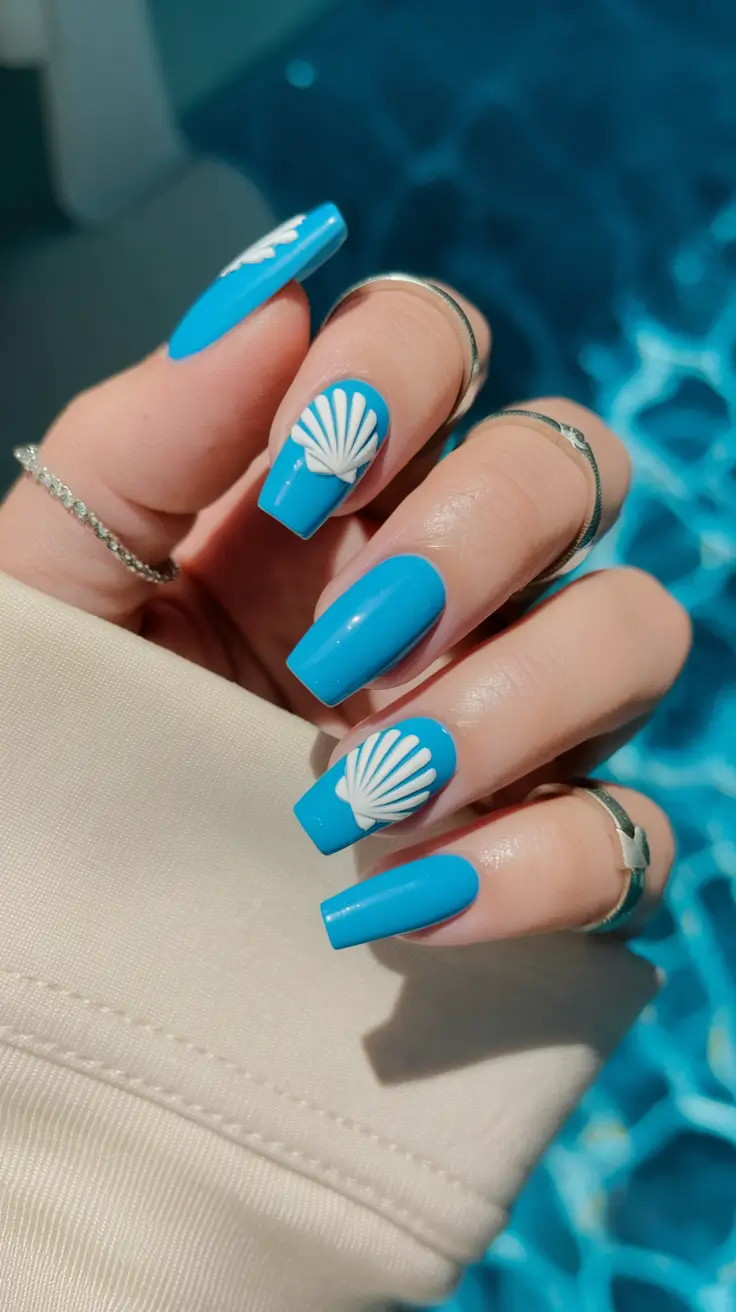
I think using OPI’s “My Pal Joey” or Sally Hansen’s “Pacific Blue” as the main color and white for the seashells, would look great. You can use a stamping plate to get the shell detail or you can draw them by hand if you have steady hands. You need a good top coat to lock everything together.
As soon as I wear this, I feel like summer is here. It inspires you to get your sunglasses and go enjoy the sun at the beach. Ocean vibe nails are easy to do but with a stylish touch.
Palm Paradise
There’s nothing more summery than ocean vibe nails with palm trees against light green and pink. Its cheerful design says “vacation” and is ideal for summer parties, whether you’re at the pool or the backyard.
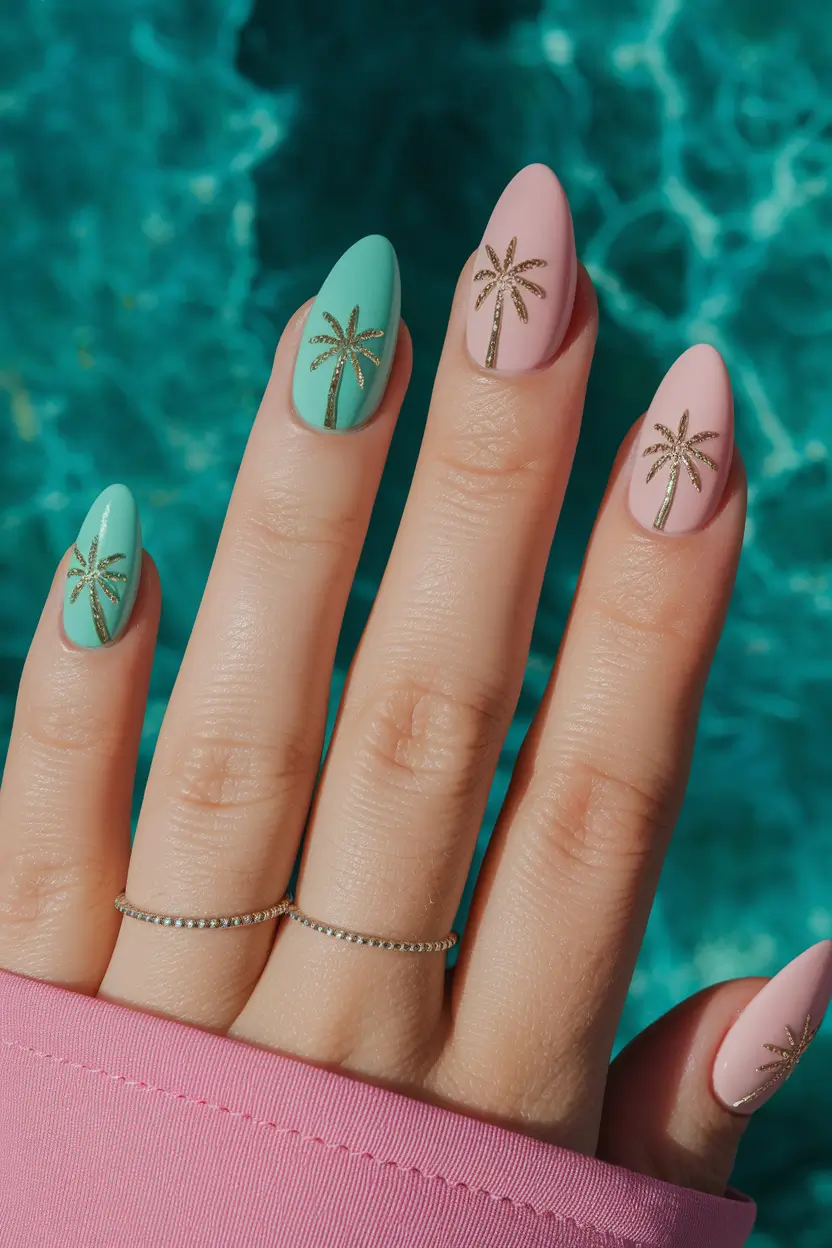
I like to use Essie’s polishes “Mint Candy Apple” and “Pinkies Up,” and use a thin gold nail art pen or brush to paint the palm trees. Seal the design with a glossy top coat to make it shine like summer.
Whenever I have these nails on, I just feel like I’m enjoying a piña colada and dancing at the beach. This ocean vibe nails idea is fun and simple to make your own with your favorite colors.
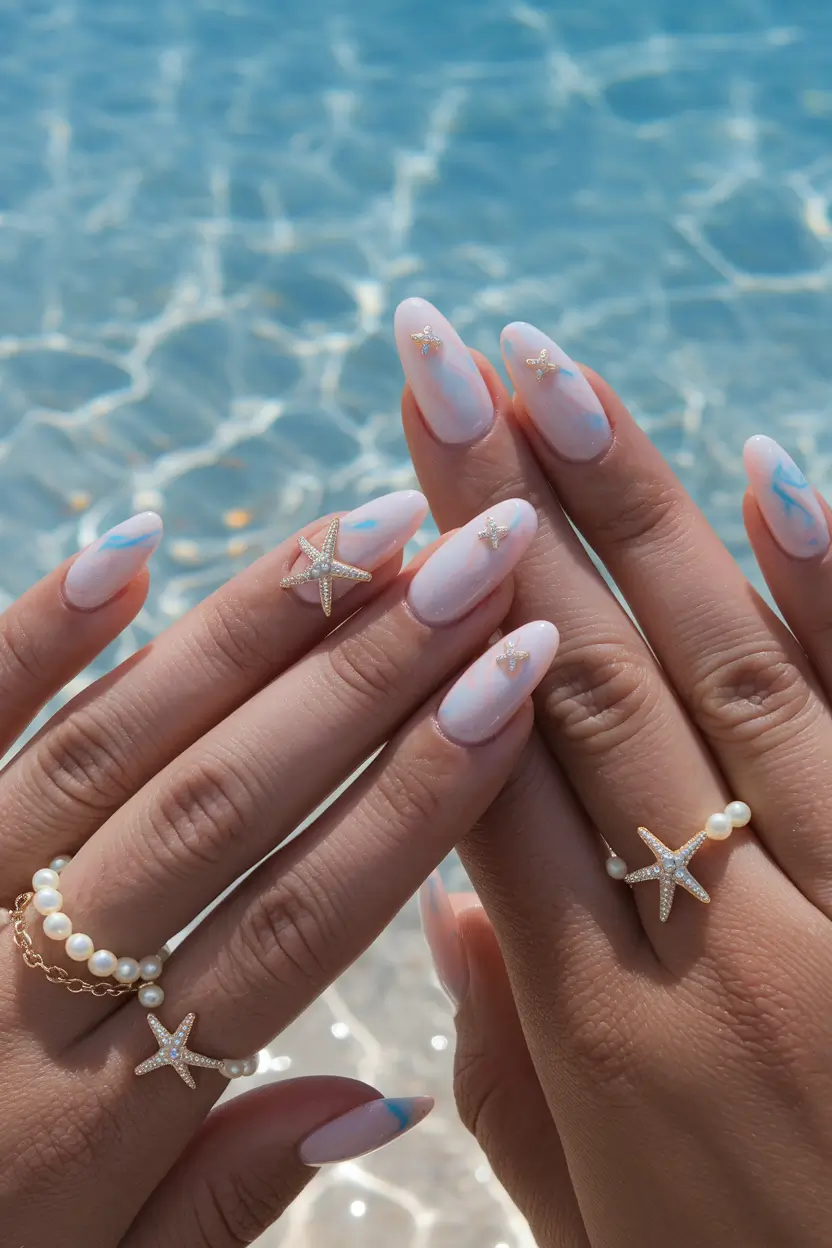
Starfish Sparkle
These ocean vibe nails are all about the sparkle. Blues and pinks in soft pastels create a lovely base for the 3D starfish which look like undersea treasures. It’s both elegant and fun which makes it perfect for a summer evening outside.
To achieve this design, I’d use Essie’s “Fiji” as a base and a fine detail brush with OPI’s “It’s a Boy!” for the soft blue swirls. Apply the starfish charms with a strong nail glue to get the desired 3D effect. A gel top coat will hold everything in place and add shine.
These nails make me think of the time I used to collect seashells as a kid and every starfish feels like a little treasure. It’s a fun 3d nail design that looks both old and new at the same time.
Golden Starfish Accent on Blue Tips
I am so charmed by these nails which have a lovely mix of pink and blue, with gold starfish for a finishing touch. This new version of ocean vibe nails blue is both gentle and stands out. The blue tips are like the bright skies and waves of summer and the starfish add a touch of beach style. I like that the design is both simple and bold which is the kind of nail look I prefer for summer.
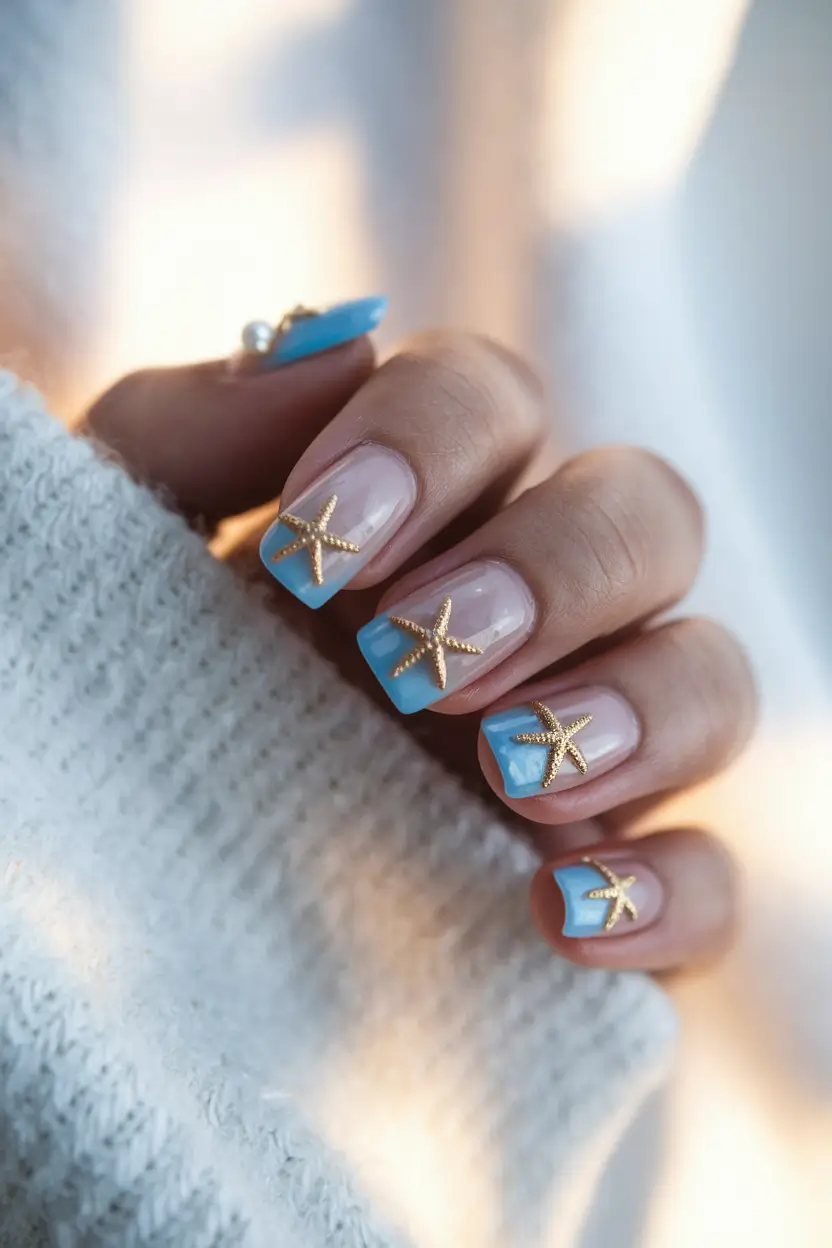
I think a good base for this design is a sheer pink gel polish like Essie’s “Ballet Slippers” or OPI’s “Bubble Bath.” A rich turquoise like “Ski Teal We Drop” by OPI can be used to create the blue tips. Usually, golden starfish are in the form of nail charms or stickers and you can fix them on your nails with a little nail glue or add them to your top coat.
If you want to copy this at home, make your nails into a soft square or almond shape to get the ocean vibe nails look. Paint the nails with pink polish twice, then use a thin brush or striping tape to paint the tips blue. Use tweezers to put on the starfish charms and finish with a top coat. Easy, right? And yet so striking.
Actually, this design reminds me of walking along the boardwalk with the fresh sea air in my hair. It’s a summery nail style that looks great at the beach and also at a romantic dinner outside.
Blue Waves and White Starfish Tips
What I enjoy most is a fun take on the French manicure and this design does it perfectly. The base color is creamy pink and it’s decorated with blue and white starfish, making the nails look like they’re from the ocean and are hard to resist. The combination of blue tips and white highlights is like a perfect day at the beach, so this design is the best for ocean vibe nails simple and ocean vibe nails white.
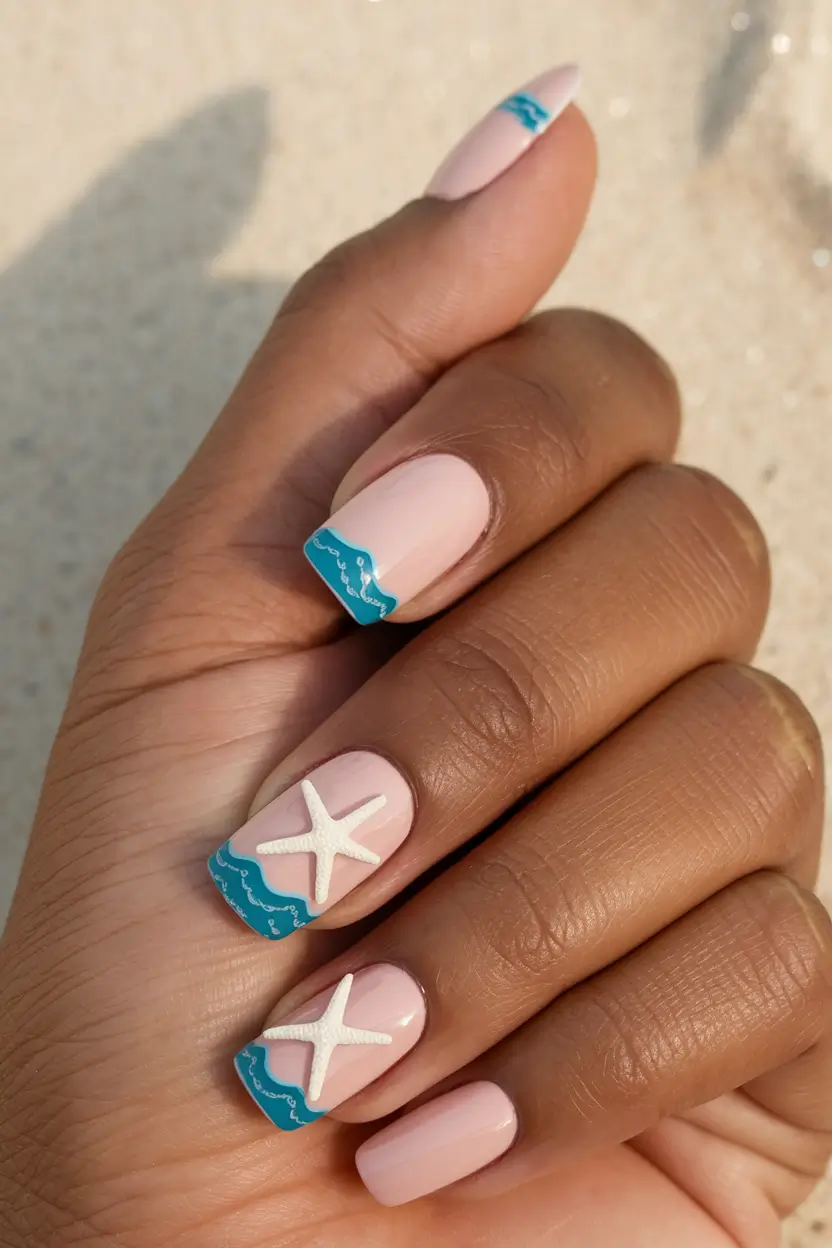
You should use a soft pink gel polish for the base such as OPI’s “Bare My Soul,” and a turquoise blue for the tips. Paint the white starfish with a small detail brush and white gel or acrylic paint. You can use a thin striping brush to make delicate wave lines. You should apply top coat to make sure the starfish stay safe.
To copy this at home, first put on two coats of pink polish, allowing the first coat to dry before adding the second. After that, paint the wave tips with a blue detail brush. When the paint is dry, use a small brush or dotting tool to put on the starfish details. Seal it all with a top coat, and you’re ready to hit the beach — or at least look like you did!
This design always brings a smile to my face. It’s light-hearted and well-made and it reminds us that summer is all about enjoying yourself, sun and showing your true self.
Crystal Blue Waves with Sparkling Stones
If you want a design that combines glamour and the feeling of being at the ocean, this is for you. The blue is soothing, the white waves are delicate and the rhinestones sparkle, making ocean vibe nails easy a perfect combination of blue, sea and art. It’s a manicure that’s sure to catch the light (and attention) wherever you go. The crystals are placed all over, giving a sparkling effect to every gesture.
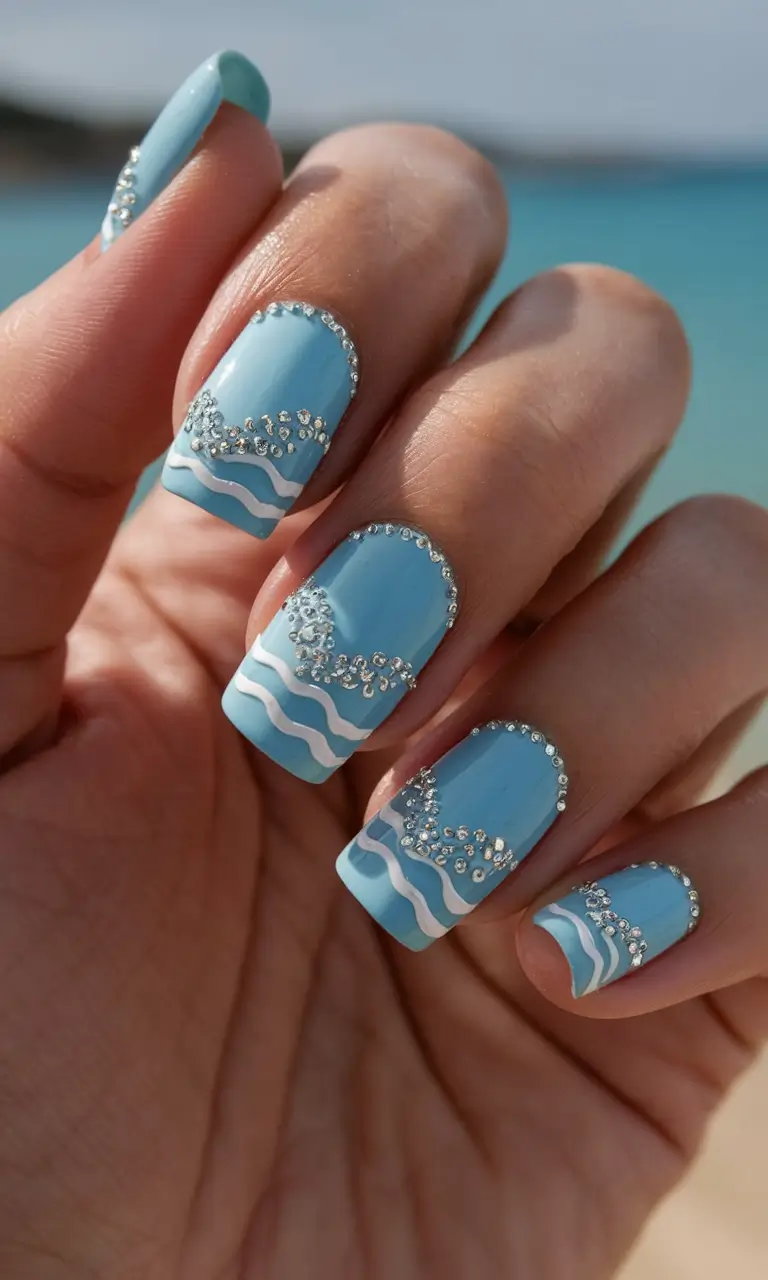
I suggest using a sky blue gel polish such as Gelish’s “My One Blue Love,” to make it happen. Apply a white gel polish using a fine detail brush to make the wave pattern. You can pick small crystals by brands such as Swarovski or Born Pretty for your rhinestones. Days of wear are possible with a thick top coat or nail glue.
The first step in DIY is to put on two layers of blue polish and cure them each time. Then, draw the wave lines with white gel. Use tweezers and a tiny amount of nail glue to stick the crystals on the nails. Finish the job by applying a good top coat to seal everything and give it a shiny effect.
Whenever I have this design on, I feel like I’m at a beach party. It has the perfect touch of summer ocean style and glamour which is great for any event, from parties to relaxing by the pool.
Teal Palm Trees and Rhinestones
Go for a tropical getaway with this fun and elegant design that steps up ocean vibe nails. The delicate teal palm trees on the white base become even more beautiful when rhinestones are added which shimmer like the sun reflecting on water. It is a mix of ocean vibe nails white and ocean vibe nails cute and the sparkle makes you feel like a summer goddess.
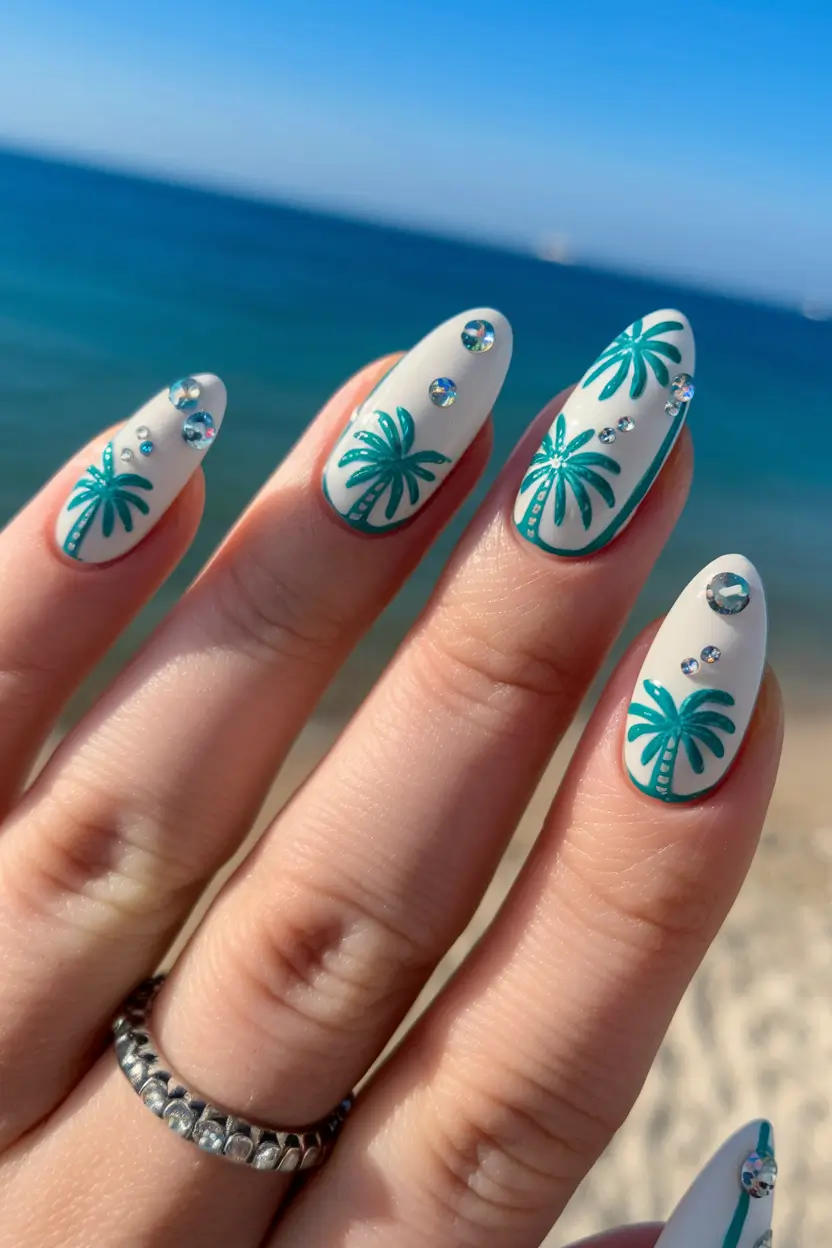
Paint the nails white with a bright white gel polish and use teal gel or acrylic for the palm trees. Rhinestones of various sizes add a playful pop. I enjoy that a dotting tool or nail art brush makes it easy to do this design at home.
Apply a first coat of white polish, cure it and then apply another coat. After that, use your teal gel to draw the palm trees, making sure each one is dry before you go to the next. Stick rhinestones in place with a small amount of nail glue and finish by applying a top coat. It looks like an ocean vibe nail design that comes from a dreamy tropical landscape.
Every time I put on this outfit, I feel I have a bit of paradise with me. Whenever I’m at the beach or want to feel like summer in the office, I grab a smoothie.
Ombre Blue with Golden Seashells
This design is the best example of ocean vibe nails — a beautiful ombre from soft pink to ocean blue, with golden seashells and starfish that look like real gems from the sea. It gives you the ocean vibe nails look with almond nails, but keeps things fun. The use of gold makes this manicure special and memorable.
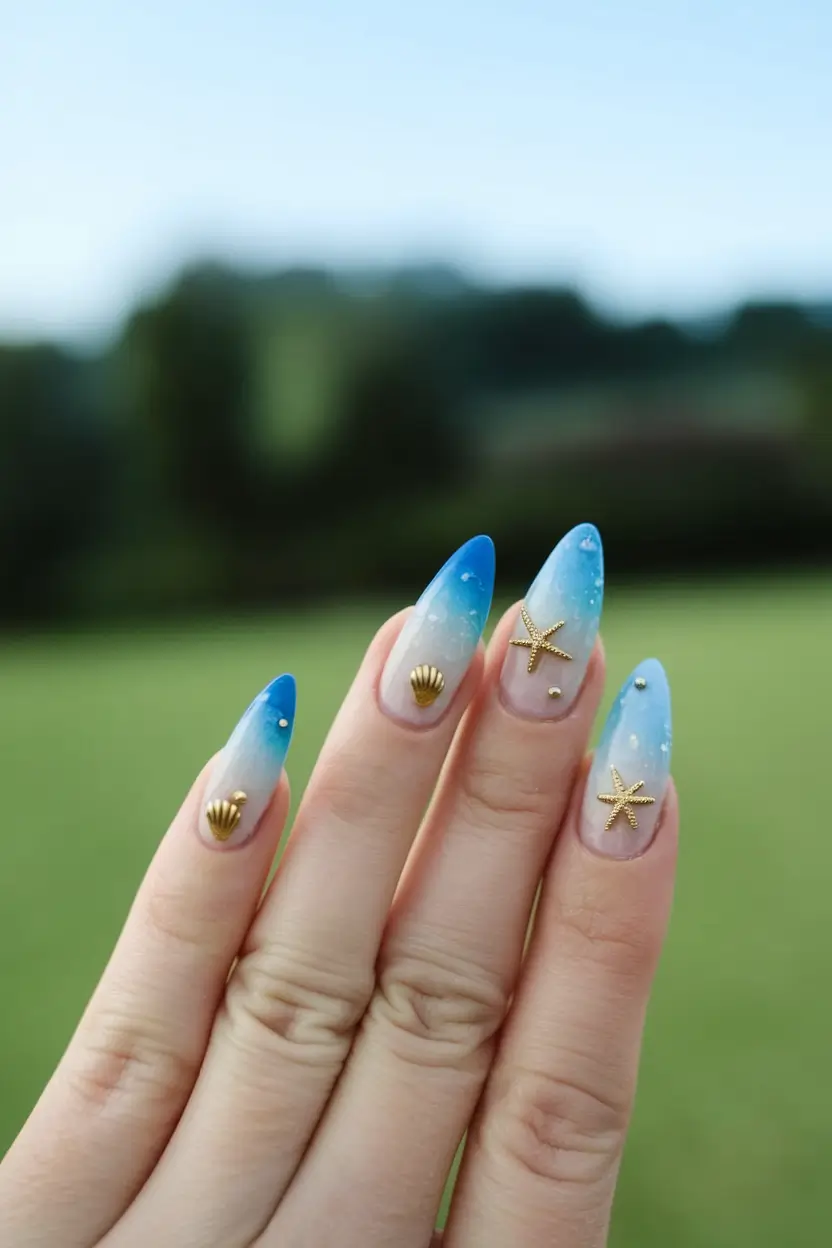
If you want to do this at home, pick a pink-to-blue gradient polish or mix a soft pink with a bright blue nail color. You can get some gold seashell and starfish charms at your local nail supply store for the embellishments. Nail glue is your best friend here — trust me, those little treasures will stay put!
Shape your nails into an almond shape to start, because it looks great with ocean vibe nails. After that, use a sponge or an ombre brush to blend the pink and blue polishes together. When the nails are dry, glue the gold charms on and finish with a top coat.
Every time I wear this, I feel like a real beach queen. It matches well with airy dresses, the cool ocean air and a happy summer mood.
Seaside Gradient Bliss
A little goes a long way and this gradient from ocean blue to pure white shows that well. The design is subtle, like the ocean breeze and it makes you think of the horizon where the sky and sea meet. The almond shape gives the fingers a longer, slimmer look which makes this look a simple way to embrace summer’s style.
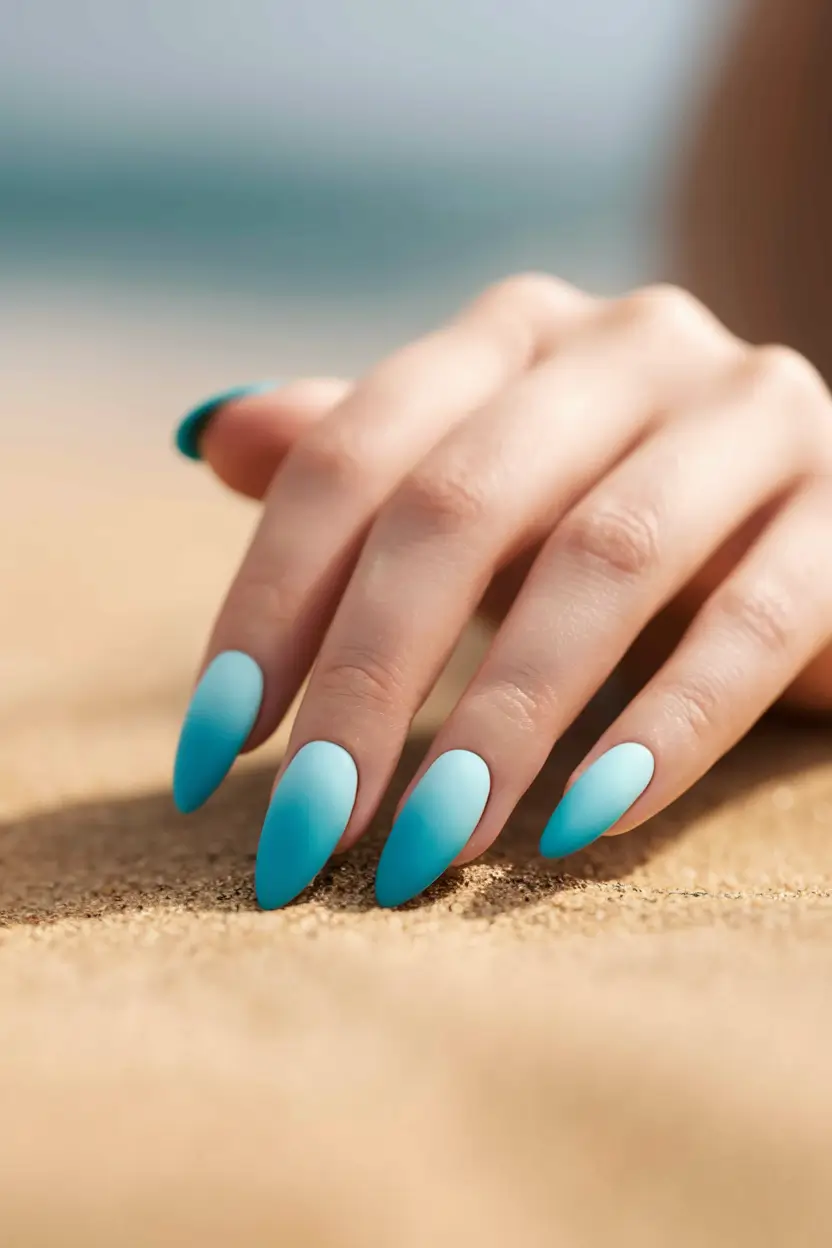
A makeup sponge and OPI’s “Alpine Snow” and Essie’s “Butler Please” polishes are what I’d suggest to copy this design. Blend the colors together by dabbing the sponge over the nail. Put a matte top coat on to create a velvety, sunny beach look.
They remind me of when I walk on the beach early in the morning and the ocean is calm and the sky is gentle. This look is easy to do and looks like summer with just one look.
Waves and Shells on Turquoise
A manicure with bright turquoise nails, wavy white lines and a seashell looks like ocean vibe nails with a fun twist. The design allows you to feel the motion of the sea, so it is perfect for any beach trip.
I think “Turquoise & Caicos” from Essie would be a good base and “Alpine Snow” from OPI for the white part. A little shell charm can be attached to your bracelet with nail glue for a cute beachy look. A top coat with a glossy finish will help everything look glossy in the sun.
I think of being near the ocean, collecting shells and watching the waves, all right on your phone. Anyone who wants a bit of the beach can choose this simple ocean vibe nail design.
Ocean Swirl Ombré
When you want your nails to look like a piece of the ocean, this ocean vibe nails blue design will make a statement. Soft pinks mix with vibrant blues to make a motion that looks like waves which is both soothing and interesting to watch.
I’d suggest using OPI’s “It’s a Boy!” and Essie’s “French Affair” to achieve this dreamy combo. Swirl the colors together with a detail brush to get the desired marbled look. Top the artwork with a high-gloss varnish to make the colors shine.
As soon as I see these nails, I feel like going to the beach and having an exciting ocean adventure. This ocean vibe nails idea is both trendy and simple to customize.
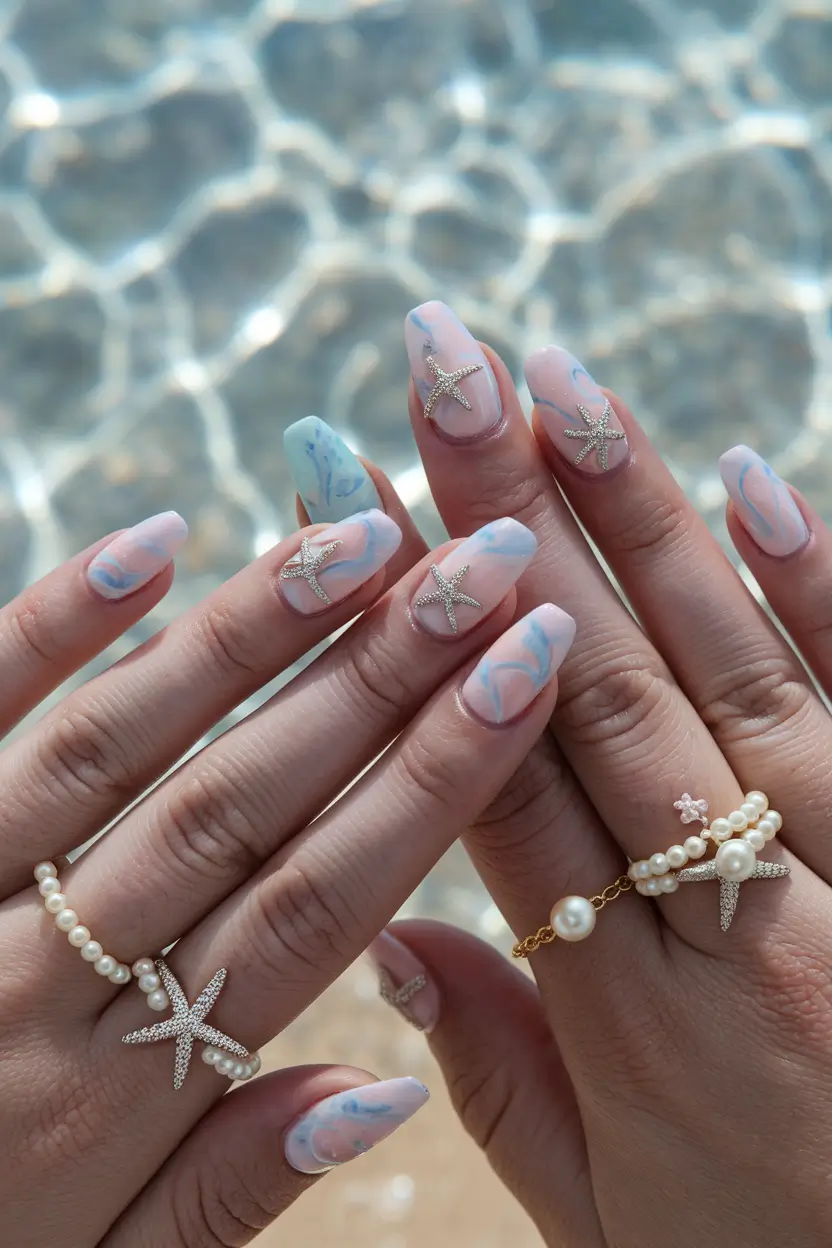
Marine Life Elegance
If I imagine ocean vibe nails that really show the beauty of the sea, these are the designs I see. The combination of soft pink, blue and detailed 3D starfish and turtles gives the nails a fun and elegant look. I feel like the ocean’s magic goes with me wherever I am.
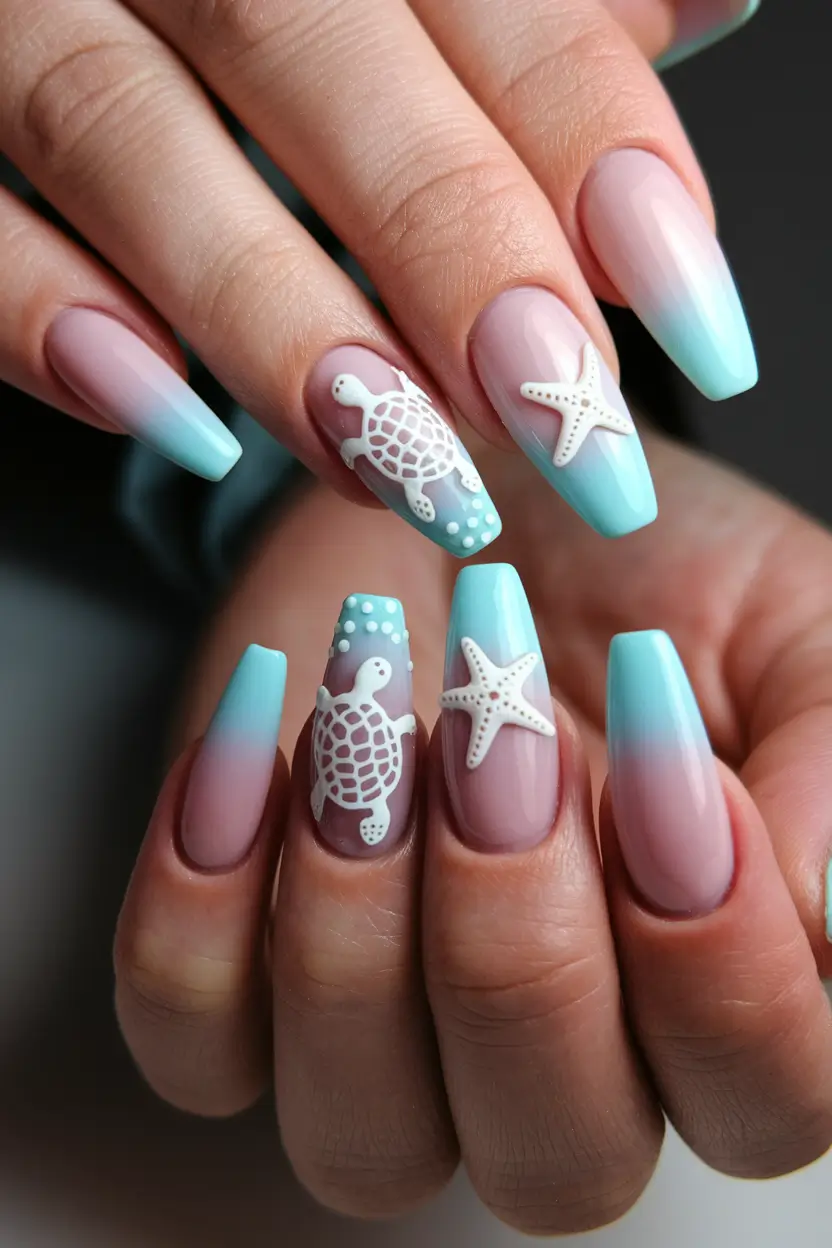
This look calls for pastel shades—try Essie’s “Fiji” and OPI’s “It’s a Boy!” for the gradient base. You can use nail glue to attach the starfish and turtle charms which will make your nails stand out. Putting on a thick gel top coat will make sure your nails are secure all summer.
Whenever I put on this style, I feel like a mermaid queen. This design has a 3d ocean effect that makes a statement in a gentle way, so it fits any summer event.
Save Pin