Summer Nail Extensions 2024: A Comprehensive Guide
Summer is just around the corner, and it’s the perfect time to revamp your nail game. Are you ready to explore the hottest trends in summer nail extensions for 2024? From vibrant colors to unique shapes, summer nail extensions offer endless possibilities to express your style. In this guide, we’ll dive deep into the latest summer nail extensions designs, providing you with detailed descriptions, expert opinions, and DIY tips. Let’s get started!
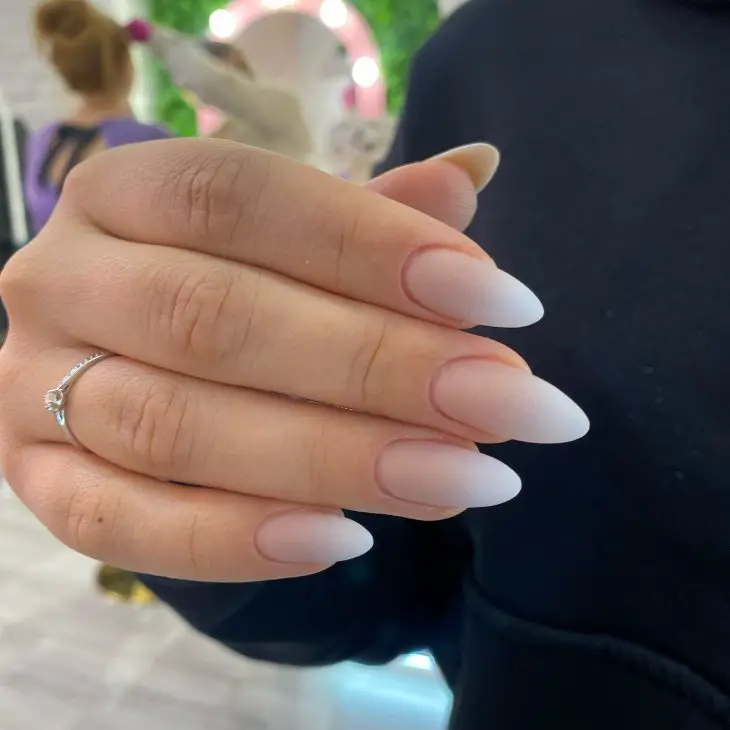
Classic Ombré Almond Nails
When it comes to summer nail extensions, the ombré trend remains a timeless favorite. These classic ombré almond nails blend soft pinks and whites, creating a chic and elegant look that’s perfect for any summer occasion. The smooth gradient effect elongates the nails, giving them a sophisticated edge. The almond shape is not only trendy but also versatile, suitable for both casual and formal settings.
Materials Needed:
- Base coat: OPI Nail Strengthener
- Pink polish: Essie Ballet Slippers
- White polish: OPI Alpine Snow
- Top coat: Seche Vite Dry Fast Top Coat
- Sponge: Beauty Blender Mini
- Nail file: OPI Crystal Nail File
Recommendations:
-
- Use the OPI Nail Strengthener to ensure your nails stay strong and healthy under the extensions.
- Essie Ballet Slippers offers a delicate pink hue that’s perfect for achieving the ombré effect.
- Seche Vite’s top coat provides a high-gloss finish and quick drying time.
DIY Instructions:
-
- Start with a base coat to protect your natural nails.
- Apply a light layer of pink polish as the base color.
- Dab white polish onto a sponge and gently apply it to the tips of your nails, creating a gradient effect.
- Repeat the sponging process until you achieve the desired ombré look.
- Finish with a top coat for added shine and durability.
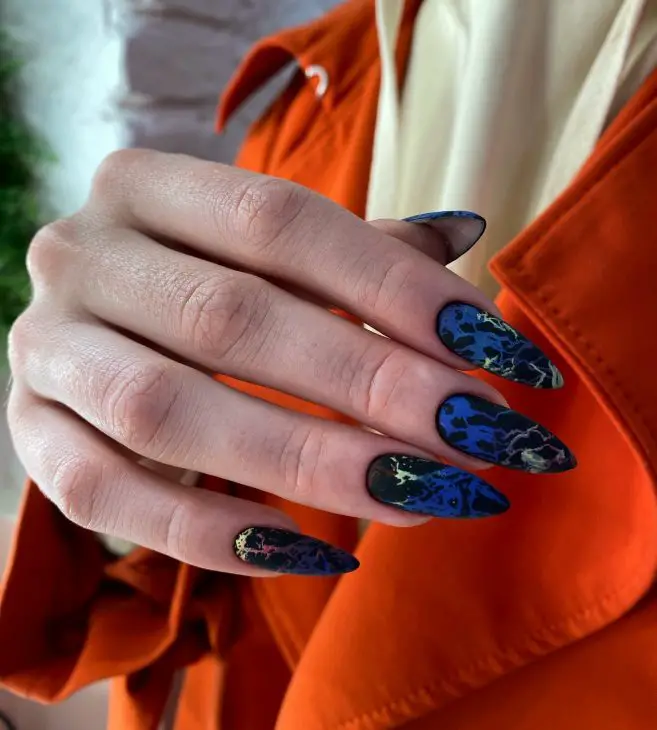
Dark Marble Coffin Nails
For a bold and dramatic summer look, these dark marble coffin nails are a must-try. The intricate marble pattern in shades of blue, black, and hints of gold exudes a luxurious vibe, making your nails the ultimate accessory. The coffin shape, with its squared-off tips, adds an edgy touch that’s perfect for those who love to make a statement.
- Materials Needed:
- Base coat: Sally Hansen Hard As Nails
- Blue polish: China Glaze Frostbite
- Black polish: Essie Licorice
- Gold foil: Born Pretty Gold Nail Foil
- Top coat: Essie Gel Couture Top Coat
- Fine nail art brush: Winstonia Nail Art Brush
Recommendations:
- Sally Hansen Hard As Nails provides a sturdy base for long-lasting extensions.
- China Glaze Frostbite gives a vibrant blue that’s ideal for the marble effect.
- Essie Gel Couture Top Coat ensures a high-shine, gel-like finish without the need for a UV lamp.
- DIY Instructions:
- Apply a base coat to your nails.
- Paint your nails with the blue polish and let it dry completely.
- Using a fine nail art brush, create random black marble patterns on each nail.
- Add small pieces of gold foil to the design for a touch of luxury.
- Seal the design with a top coat to ensure longevity and shine.
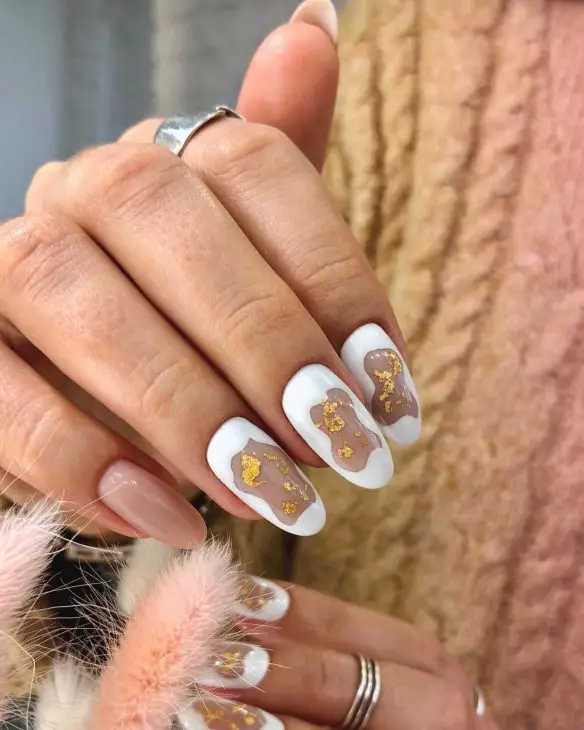
Abstract White and Gold Square Nails
These abstract white and gold square nails are the epitome of elegance and creativity. The unique design combines white polish with clear sections and gold flakes, creating a stunning visual contrast. The square shape adds a modern twist, making these nails perfect for anyone looking to stay on trend with summer nail extensions square designs.
- Materials Needed:
- Base coat: Orly Bonder
- White polish: Zoya Purity
- Gold flakes: Sally Hansen Big Glitter Top Coat
- Top coat: Deborah Lippmann Gel Lab Pro
- Striping tape: Makartt Nail Striping Tape
- Nail file: Revlon Shape-N-Buff
Recommendations:
- Orly Bonder ensures a strong bond between your natural nails and the polish.
- Zoya Purity provides an opaque white that’s perfect for creating sharp contrasts.
- Deborah Lippmann’s Gel Lab Pro top coat offers a professional gel-like finish at home.
- DIY Instructions:
- Start with a base coat to protect your nails.
- Use striping tape to section off areas of your nails.
- Apply white polish to the designated sections and let it dry.
- Add gold flakes to the clear sections for a touch of glamour.
- Remove the striping tape and seal the design with a top coat.
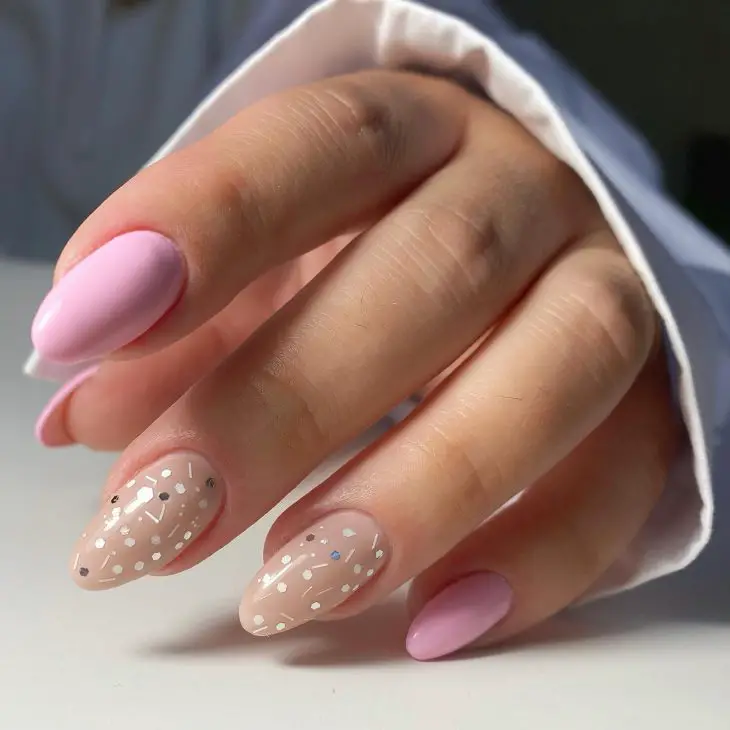
Pink Glitter Almond Nails
These pink glitter almond nails bring a playful and elegant vibe to your summer look. The combination of soft pink polish with delicate glitter accents on select nails creates a subtle yet eye-catching design. The almond shape is perfect for adding a touch of sophistication while maintaining a fun, youthful feel.
Materials Needed:
- Base coat: Essie All In One Base
- Pink polish: OPI Pink-ing of You
- Glitter polish: Sally Hansen Hard As Nails Xtreme Wear in Disco Ball
- Top coat: Seche Vite Dry Fast Top Coat
- Fine brush: Makartt Nail Art Brush
Recommendations:
-
- Essie All In One Base helps protect and strengthen your nails.
- OPI Pink-ing of You offers a beautiful soft pink that complements various skin tones.
- Seche Vite’s top coat ensures a long-lasting, glossy finish.
DIY Instructions:
-
- Apply a base coat to your nails to protect them.
- Paint all nails with the pink polish and allow it to dry.
- Use a fine brush to apply glitter polish to selected nails or sections of nails for a sparkling accent.
- Seal the design with a top coat to enhance shine and durability.
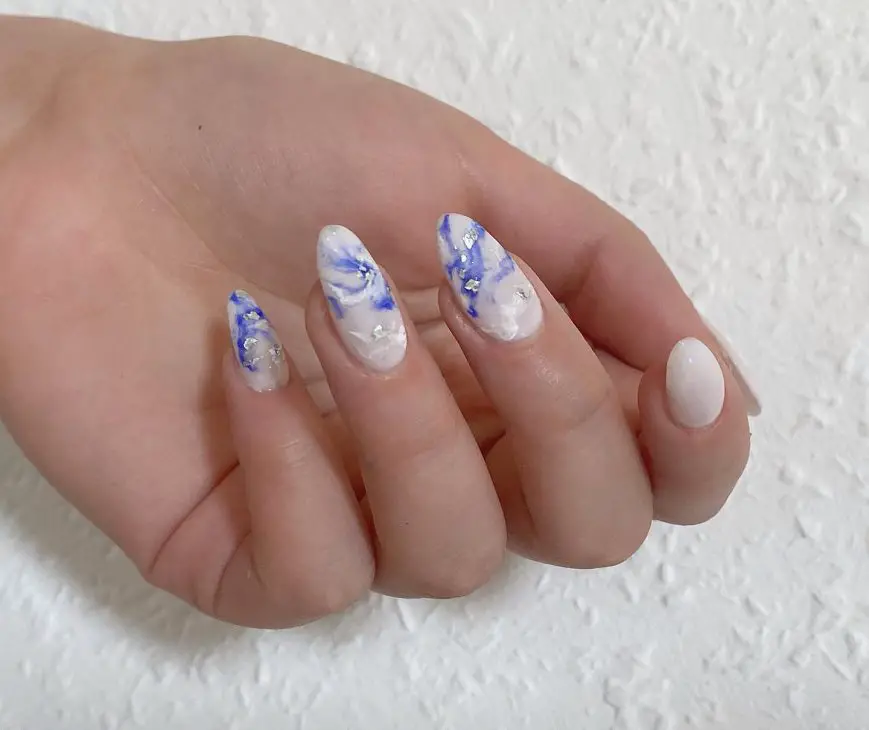
Blue Marble Nails
These blue marble nails are a stunning example of how to incorporate artistic designs into your summer manicure. The mix of blue and white swirls, accented with touches of silver foil, creates a mesmerizing effect reminiscent of ocean waves. The almond shape further enhances the elegance of this design.
Materials Needed:
- Base coat: Orly Bonder
- Blue polish: Essie Butler Please
- White polish: OPI Alpine Snow
- Silver foil: Born Pretty Silver Nail Foil
- Top coat: Deborah Lippmann Gel Lab Pro
- Nail art brush: Winstonia Nail Art Brush
Recommendations:
-
- Orly Bonder ensures a strong bond between your natural nails and the polish.
- Essie Butler Please provides a vibrant blue perfect for marble designs.
- Deborah Lippmann’s Gel Lab Pro top coat offers a professional gel-like finish at home.
DIY Instructions:
-
- Apply a base coat to your nails.
- Paint your nails with white polish as a base and let it dry.
- Use a nail art brush to create blue swirls on each nail.
- Add small pieces of silver foil for an extra touch of elegance.
- Seal the design with a top coat to ensure longevity and shine.
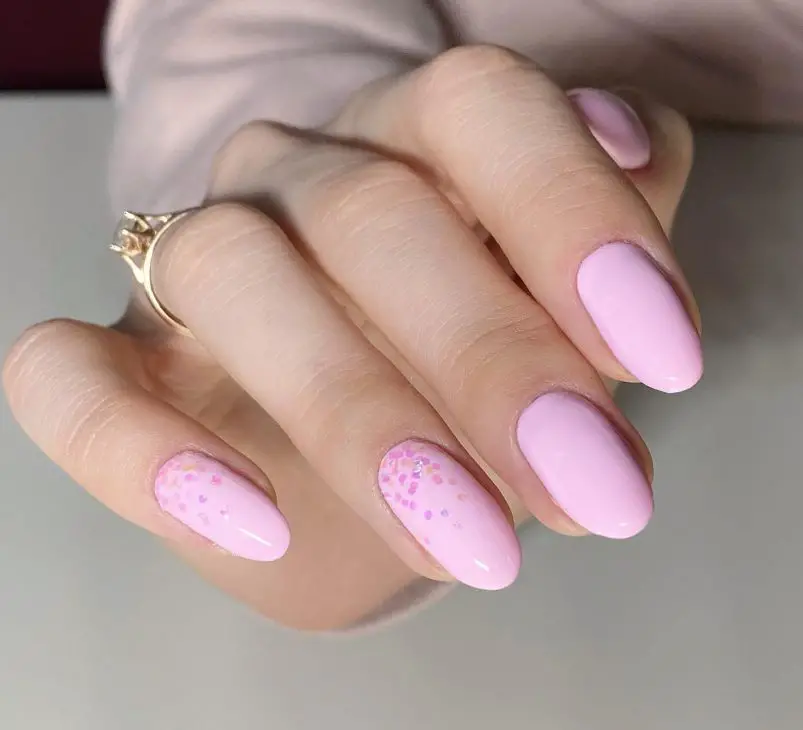
Light Pink Glitter Nails
These light pink glitter nails are perfect for those who love a subtle yet glamorous look. The soft pink polish is complemented by delicate glitter accents on the ring fingers, creating a simple yet stylish design. This look is ideal for adding a touch of sparkle to your everyday summer style.
Materials Needed:
- Base coat: Sally Hansen Double Duty
- Pink polish: Zoya Dot
- Glitter polish: China Glaze Fairy Dust
- Top coat: Essie Gel Couture Top Coat
- Nail file: Revlon Shape-N-Buff
Recommendations:
-
- Sally Hansen Double Duty acts as both a base and top coat, providing extra protection.
- Zoya Dot offers a beautiful, opaque light pink.
- Essie Gel Couture Top Coat ensures a high-shine, gel-like finish without the need for a UV lamp.
DIY Instructions:
-
- Start with a base coat to protect your nails.
- Apply two coats of the light pink polish and let them dry.
- Use the glitter polish on your ring fingers or add glitter accents to other nails as desired.
- Finish with a top coat to enhance the shine and durability of your manicure.
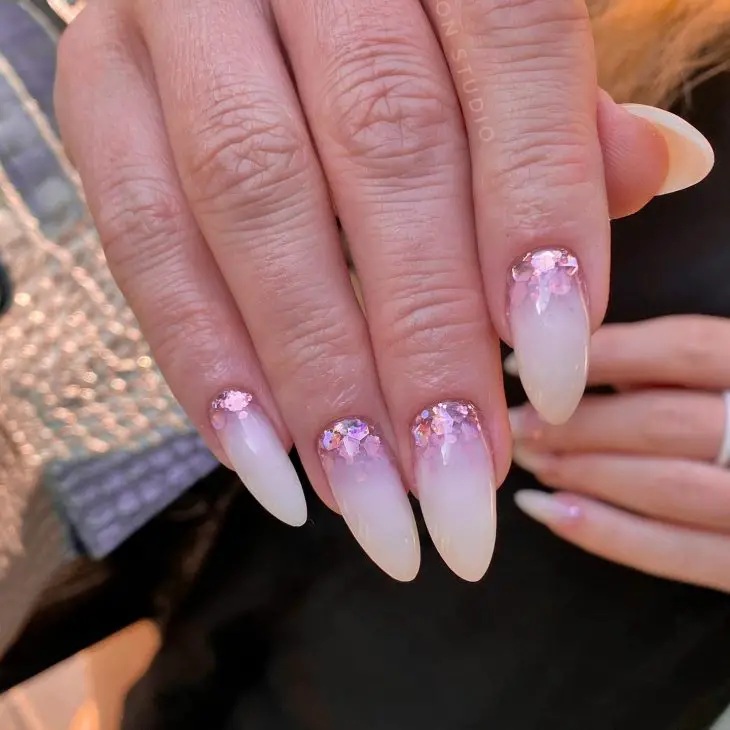
Pink Ombre Glitter Nails
These pink ombre glitter nails are perfect for anyone looking to add some sparkle to their summer. The gradient from pink to white with glitter accents creates a dreamy, ethereal look. The almond shape adds a touch of elegance, making this design ideal for both casual outings and special occasions.
Materials Needed:
- Base coat: OPI Nail Envy
- Pink polish: Essie Fiji
- White polish: Essie Blanc
- Glitter polish: OPI Snowflakes in the Air
- Top coat: Seche Vite Dry Fast Top Coat
- Sponge: Beauty Blender Mini
Recommendations:
-
- OPI Nail Envy helps strengthen and protect your nails.
- Essie Fiji offers a lovely pink that’s perfect for ombre designs.
- Seche Vite’s top coat provides a high-gloss finish and quick drying time.
DIY Instructions:
-
- Apply a base coat to your nails to protect them.
- Apply a light layer of pink polish as the base color.
- Dab white polish onto a sponge and gently apply it to the tips of your nails, creating a gradient effect.
- Add glitter polish to the tips or entire nail for extra sparkle.
- Finish with a top coat for added shine and durability.
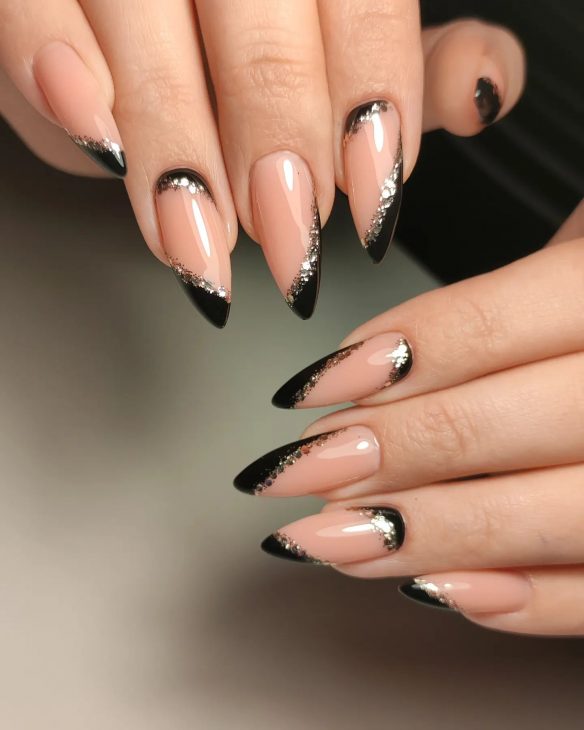
Black and Nude Glitter Nails
These black and nude glitter nails are a stunning example of a sophisticated and chic summer nail extensions design. The nude base provides a subtle background that contrasts beautifully with the bold black tips and glitter accents. This design is perfect for those who want to make a statement without going overboard.
Materials Needed:
- Base coat: Essie All In One Base
- Nude polish: OPI Samoan Sand
- Black polish: Essie Licorice
- Glitter: Born Pretty Holographic Glitter
- Top coat: Seche Vite Dry Fast Top Coat
- Fine brush: Makartt Nail Art Brush
Recommendations:
-
- Essie All In One Base helps protect and strengthen your nails.
- OPI Samoan Sand offers a perfect nude shade for a natural look.
- Seche Vite’s top coat ensures a long-lasting, glossy finish.
DIY Instructions:
-
- Apply a base coat to your nails to protect them.
- Paint all nails with the nude polish and allow it to dry.
- Use a fine brush to apply black polish to the tips of your nails.
- Add glitter accents along the edge of the black tips for a sparkling effect.
- Seal the design with a top coat to enhance shine and durability.
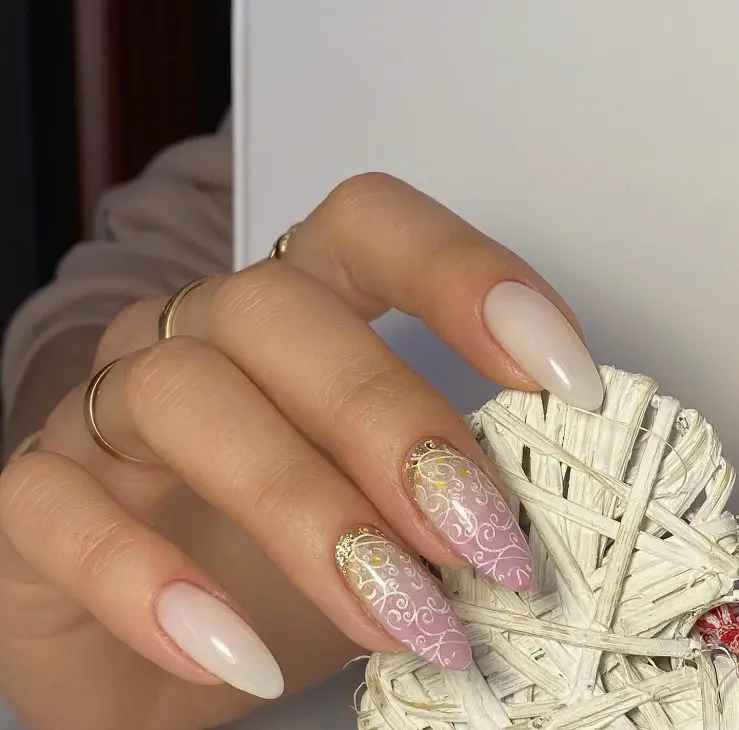
Pink and Gold Filigree Nails
These pink and gold filigree nails are a beautiful and intricate design perfect for those who love a touch of elegance. The soft pink base is adorned with delicate gold filigree patterns, creating a luxurious look that’s ideal for summer events. The almond shape enhances the overall elegance of the design.
Materials Needed:
- Base coat: Orly Bonder
- Pink polish: Zoya Bella
- Gold filigree stickers: Born Pretty Gold Nail Stickers
- Top coat: Deborah Lippmann Gel Lab Pro
- Fine brush: Winstonia Nail Art Brush
Recommendations:
-
- Orly Bonder ensures a strong bond between your natural nails and the polish.
- Zoya Bella offers a lovely pink shade that’s perfect for a delicate look.
- Deborah Lippmann’s Gel Lab Pro top coat offers a professional gel-like finish at home.
DIY Instructions:
-
- Apply a base coat to your nails.
- Paint your nails with the pink polish and let it dry.
- Apply gold filigree stickers to each nail, positioning them carefully for a symmetrical look.
- Use a fine brush to apply gold accents if needed.
- Seal the design with a top coat to ensure longevity and shine.
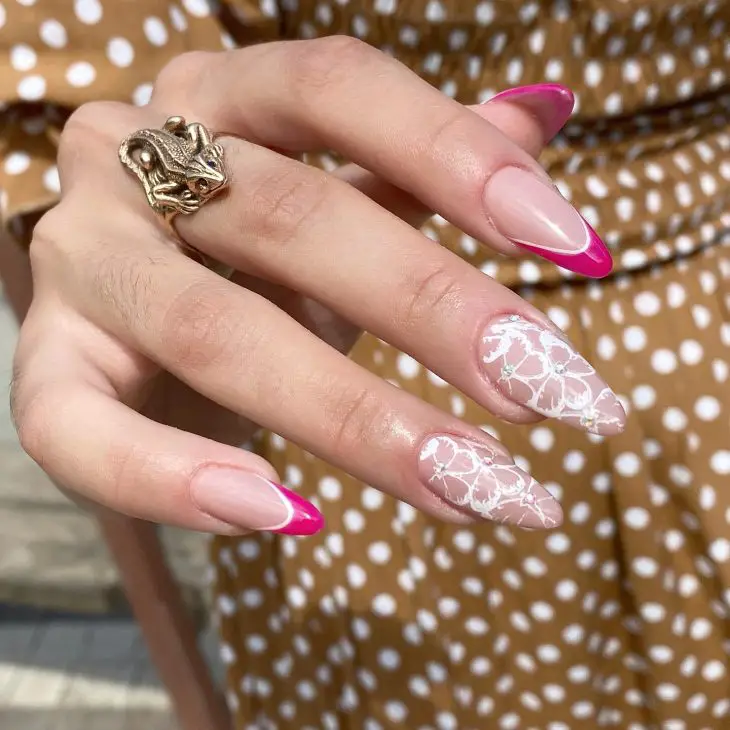
Pink French Tip Nails with Floral Accent
These pink French tip nails with floral accents are a delightful blend of classic and modern styles. The bright pink tips add a pop of color, while the delicate white floral designs on select nails provide a feminine touch. This design is perfect for those who want a playful yet elegant look for summer.
Materials Needed:
- Base coat: Sally Hansen Double Duty
- Pink polish: Essie Fiesta
- White polish: OPI Alpine Snow
- Floral nail stickers: Born Pretty White Floral Stickers
- Top coat: Essie Gel Couture Top Coat
- Fine brush: Makartt Nail Art Brush
Recommendations:
-
- Sally Hansen Double Duty acts as both a base and top coat, providing extra protection.
- Essie Fiesta offers a vibrant pink that’s perfect for summer.
- Essie Gel Couture Top Coat ensures a high-shine, gel-like finish without the need for a UV lamp.
DIY Instructions:
-
- Start with a base coat to protect your nails.
- Apply two coats of the pink polish to the tips of your nails and let them dry.
- Use a fine brush to create floral designs with the white polish, or apply floral stickers for a more detailed look.
- Finish with a top coat to enhance the shine and durability of your manicure.
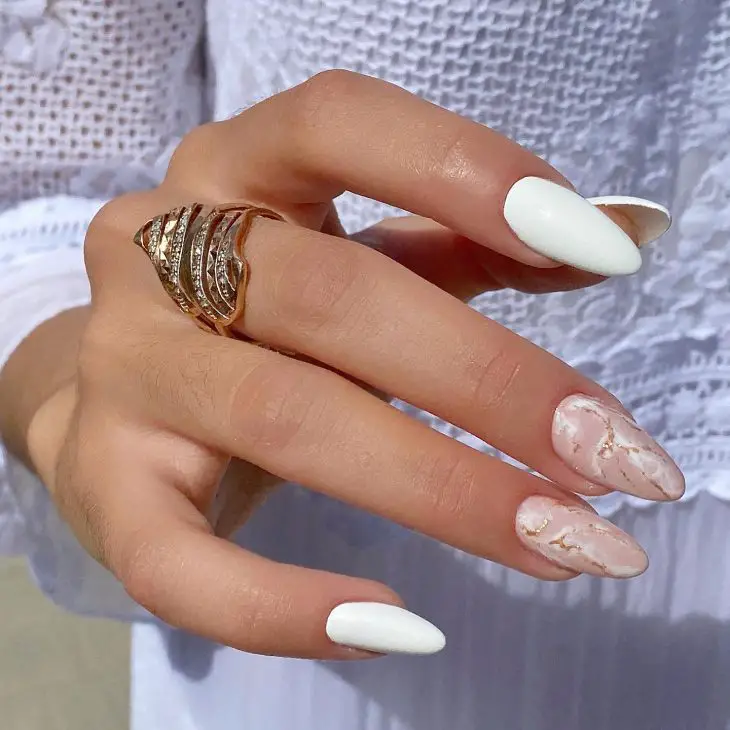
White and Marble Nails
These white and marble nails are a sophisticated and trendy option for summer nail extensions. The pure white polish provides a clean and crisp look, while the marble accents add a touch of elegance and modernity. This design is perfect for those who want a minimalist yet stylish look for summer.
Materials Needed:
- Base coat: OPI Nail Envy
- White polish: Essie Blanc
- Marble effect polish: China Glaze Marble Collection
- Top coat: Seche Vite Dry Fast Top Coat
- Fine brush: Winstonia Nail Art Brush
Recommendations:
-
- OPI Nail Envy helps strengthen and protect your nails.
- Essie Blanc provides an opaque white that’s perfect for a clean look.
- Seche Vite’s top coat provides a high-gloss finish and quick drying time.
DIY Instructions:
-
- Apply a base coat to your nails to protect them.
- Apply two coats of the white polish and let them dry.
- Use a fine brush to create marble effects with the marble effect polish on select nails.
- Finish with a top coat to ensure a glossy and long-lasting finish.
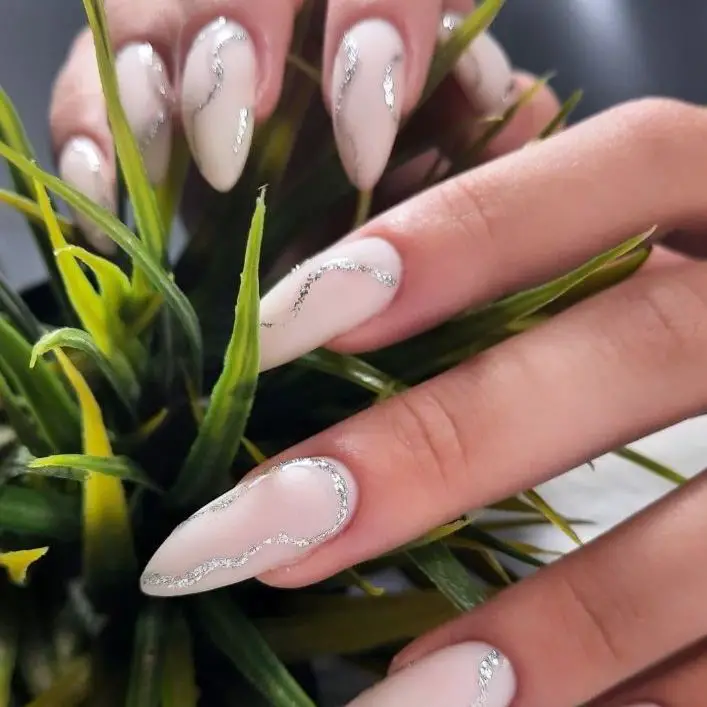
Silver Wave Almond Nails
These silver wave almond nails offer a delicate and elegant look, perfect for summer. The nude base provides a neutral canvas, while the silver wave accents add a touch of sparkle and sophistication. The almond shape complements the design, making it suitable for both everyday wear and special occasions.
- Materials Needed:
- Base coat: Essie All In One Base
- Nude polish: OPI Bubble Bath
- Silver glitter polish: Essie Set in Stones
- Top coat: Seche Vite Dry Fast Top Coat
- Fine brush: Makartt Nail Art Brush
Recommendations:
- Essie All In One Base helps protect and strengthen your nails.
- OPI Bubble Bath offers a perfect nude shade for a natural look.
- Seche Vite’s top coat ensures a long-lasting, glossy finish.
- DIY Instructions:
- Apply a base coat to your nails to protect them.
- Paint all nails with the nude polish and allow it to dry.
- Use a fine brush to apply silver glitter polish in wave patterns on each nail.
- Seal the design with a top coat to enhance shine and durability.
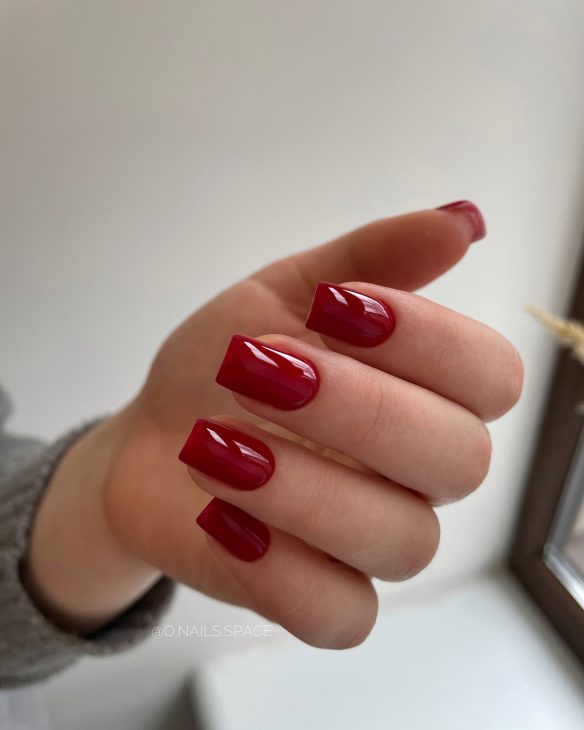
Classic Red Square Nails
These classic red square nails are a timeless choice for any summer occasion. The bold red polish is striking and elegant, perfect for making a statement. The square shape adds a modern twist to the classic red manicure, making it versatile for both casual and formal settings.
Materials Needed:
- Base coat: Orly Bonder
- Red polish: Essie Russian Roulette
- Top coat: Deborah Lippmann Gel Lab Pro
- Nail file: OPI Crystal Nail File
Recommendations:
-
- Orly Bonder ensures a strong bond between your natural nails and the polish.
- Essie Russian Roulette provides a vibrant red that’s perfect for summer.
- Deborah Lippmann’s Gel Lab Pro top coat offers a professional gel-like finish at home.
DIY Instructions:
-
- Apply a base coat to your nails.
- Apply two coats of the red polish, allowing each coat to dry completely.
- Finish with a top coat to ensure a high-shine, long-lasting finish.
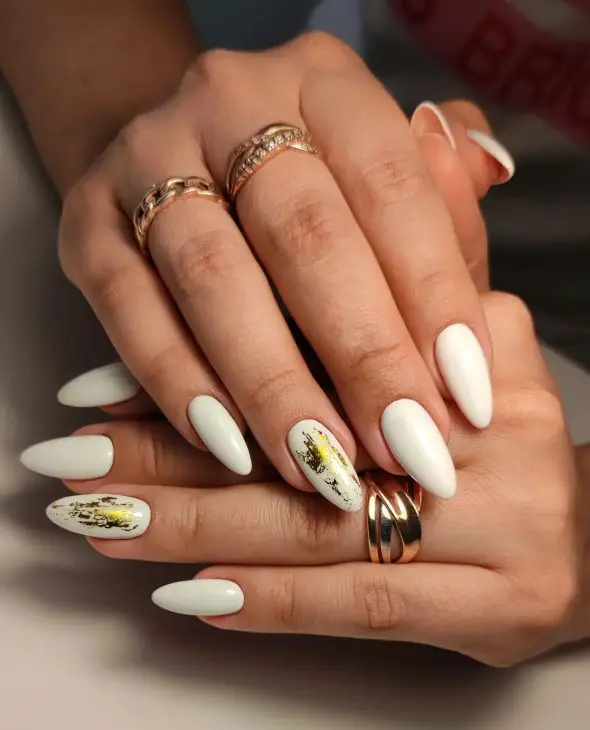
White and Gold Almond Nails
These white and gold almond nails are perfect for those who want to add a touch of glamour to their summer look. The crisp white polish serves as a clean backdrop for the gold foil accents, creating a chic and luxurious design. The almond shape adds an elegant flair to the overall look.
- Materials Needed:
- Base coat: Sally Hansen Double Duty
- White polish: Zoya Purity
- Gold foil: Born Pretty Gold Nail Foil
- Top coat: Essie Gel Couture Top Coat
- Fine brush: Winstonia Nail Art Brush
Recommendations:
- Sally Hansen Double Duty acts as both a base and top coat, providing extra protection.
- Zoya Purity offers an opaque white that’s perfect for a clean look.
- Essie Gel Couture Top Coat ensures a high-shine, gel-like finish without the need for a UV lamp.
- DIY Instructions:
- Start with a base coat to protect your nails.
- Apply two coats of the white polish and let them dry.
- Use a fine brush to apply gold foil accents to each nail.
- Seal the design with a top coat to ensure longevity and shine.
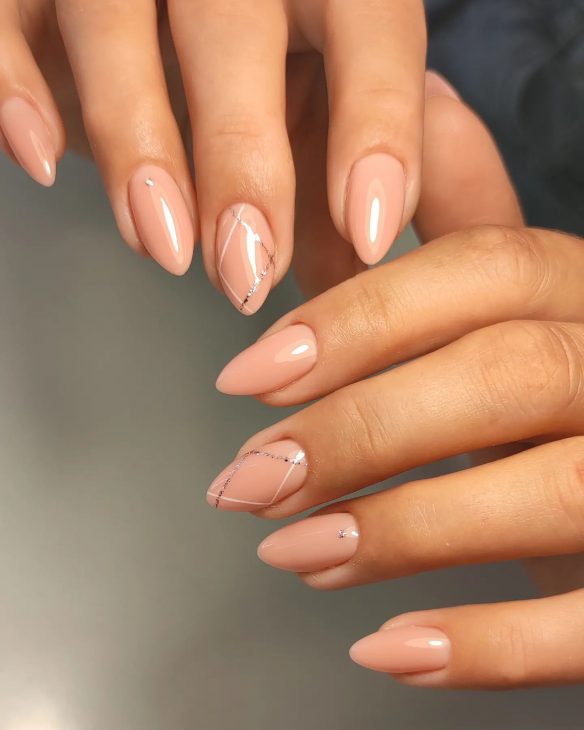
Nude and Silver Line Nails
These nude and silver line nails are a subtle yet stylish option for summer nail extensions. The nude base provides a soft and natural look, while the silver line accents add a touch of elegance and sophistication. The almond shape enhances the overall delicate appearance of the nails.
Materials Needed:
- Base coat: OPI Nail Envy
- Nude polish: Essie Spin the Bottle
- Silver striping tape: Makartt Silver Striping Tape
- Top coat: Seche Vite Dry Fast Top Coat
- Fine brush: Winstonia Nail Art Brush
Recommendations:
-
- OPI Nail Envy helps strengthen and protect your nails.
- Essie Spin the Bottle provides a beautiful nude shade.
- Seche Vite’s top coat provides a high-gloss finish and quick drying time.
DIY Instructions:
-
- Apply a base coat to your nails to protect them.
- Apply two coats of the nude polish and let them dry.
- Use silver striping tape or a fine brush to create silver line accents on each nail.
- Finish with a top coat to ensure a glossy and long-lasting finish.
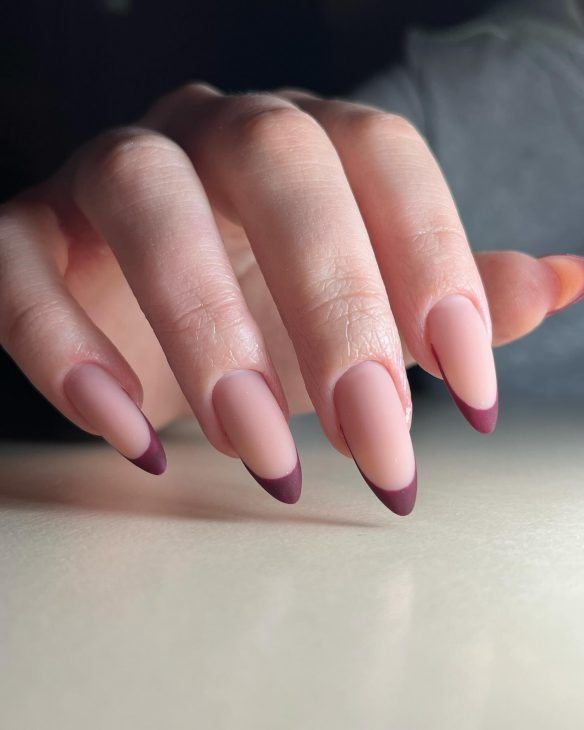
Matte Burgundy French Tips
These matte burgundy French tips are a sophisticated twist on the classic French manicure. The matte nude base paired with deep burgundy tips creates an elegant and modern look. The almond shape enhances the overall chic aesthetic, making it perfect for any summer occasion.
- Materials Needed:
- Base coat: Essie All In One Base
- Nude polish: OPI Bubble Bath
- Burgundy polish: Essie Bordeaux
- Matte top coat: OPI Matte Top Coat
- Fine brush: Makartt Nail Art Brush
Recommendations:
- Essie All In One Base helps protect and strengthen your nails.
- OPI Bubble Bath offers a perfect nude shade for a natural look.
- OPI Matte Top Coat provides a trendy matte finish.
- DIY Instructions:
- Apply a base coat to your nails to protect them.
- Paint all nails with the nude polish and allow it to dry.
- Use a fine brush to apply burgundy polish to the tips of your nails.
- Finish with a matte top coat to achieve the desired look.
Geometric and Glitter Square Nails
These geometric and glitter square nails combine elegance with a touch of fun. The beige base is accented with black geometric lines and a striking glitter polish, creating a bold yet sophisticated design. The square shape adds a modern edge, making these nails perfect for both casual and formal summer events.
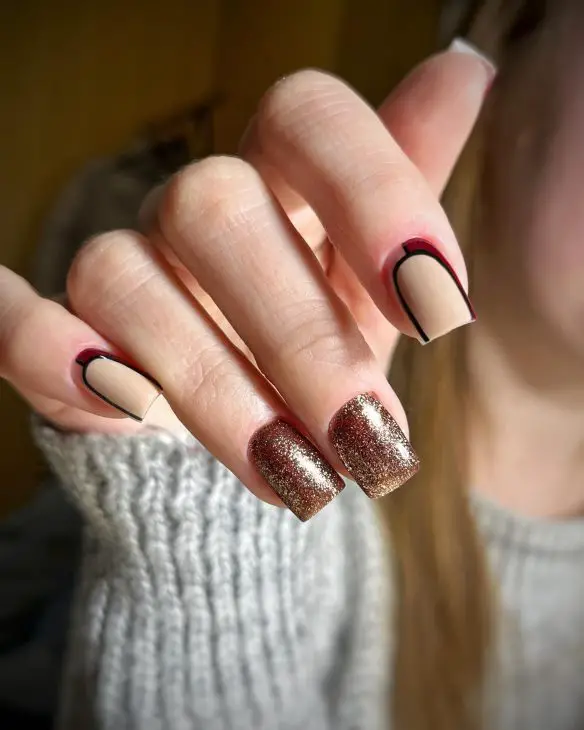
Materials Needed:
- Base coat: Orly Bonder
- Beige polish: Zoya Avery
- Black polish: Essie Licorice
- Glitter polish: China Glaze Fairy Dust
- Top coat: Deborah Lippmann Gel Lab Pro
- Fine brush: Winstonia Nail Art Brush
Recommendations:
-
- Orly Bonder ensures a strong bond between your natural nails and the polish.
- Zoya Avery provides a perfect beige shade for a neutral look.
- Deborah Lippmann’s Gel Lab Pro top coat offers a professional gel-like finish at home.
DIY Instructions:
-
- Apply a base coat to your nails.
- Paint all nails with the beige polish and let it dry.
- Use a fine brush to create geometric lines with black polish on some nails.
- Apply glitter polish to selected nails for a sparkling effect.
- Seal the design with a top coat to ensure longevity and shine.
Pink Glitter Ombre Stiletto Nails
These pink glitter ombre stiletto nails are perfect for adding a touch of glamour to your summer look. The gradient from pink to white with a glitter overlay creates a dreamy, ethereal appearance. The stiletto shape enhances the elegance and drama of this design.
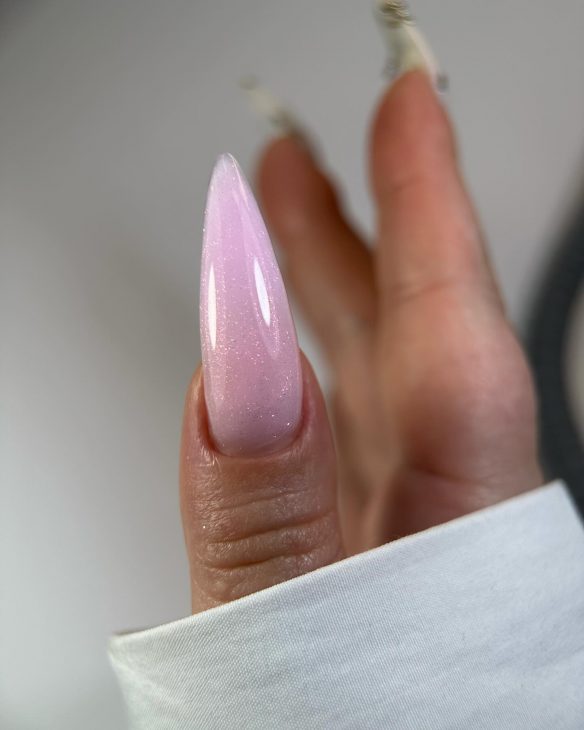
- Materials Needed:
- Base coat: Sally Hansen Double Duty
- Pink polish: Essie Fiji
- White polish: Essie Blanc
- Glitter polish: OPI Snowflakes in the Air
- Top coat: Essie Gel Couture Top Coat
- Sponge: Beauty Blender Mini
Recommendations:
- Sally Hansen Double Duty acts as both a base and top coat, providing extra protection.
- Essie Fiji offers a lovely pink that’s perfect for ombre designs.
- Essie Gel Couture Top Coat ensures a high-shine, gel-like finish without the need for a UV lamp.
- DIY Instructions:
- Start with a base coat to protect your nails.
- Apply a light layer of pink polish as the base color.
- Dab white polish onto a sponge and gently apply it to the tips of your nails, creating a gradient effect.
- Add glitter polish to the tips or entire nail for extra sparkle.
- Finish with a top coat for added shine and durability.
Penguin and Yellow Square Nails
These penguin and yellow square nails are a fun and whimsical choice for summer. The vibrant yellow polish paired with the cute penguin design creates a playful and eye-catching look. The square shape adds a modern twist, making these nails perfect for those who love bold and unique designs.
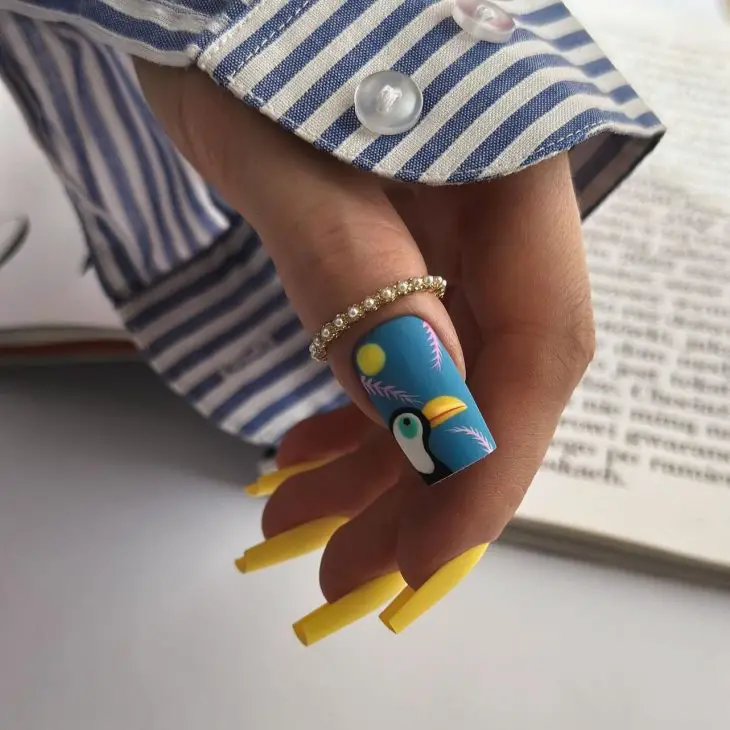
Materials Needed:
- Base coat: OPI Nail Envy
- Yellow polish: China Glaze Happy Go Lucky
- Blue polish: Essie Butler Please
- White polish: OPI Alpine Snow
- Black polish: Essie Licorice
- Nail art pens: Sally Hansen I Heart Nail Art Pen
- Top coat: Seche Vite Dry Fast Top Coat
- Fine brush: Winstonia Nail Art Brush
Recommendations:
-
- OPI Nail Envy helps strengthen and protect your nails.
- China Glaze Happy Go Lucky offers a vibrant yellow that’s perfect for summer.
- Seche Vite’s top coat provides a high-gloss finish and quick drying time.
DIY Instructions:
-
- Apply a base coat to your nails to protect them.
- Paint all nails with the yellow polish and let it dry.
- Use a fine brush to create the penguin design with blue, white, and black polishes on one nail.
- Use nail art pens for finer details.
- Seal the design with a top coat to ensure a glossy and long-lasting finish.
Black and White Geometric Nails
These black and white geometric nails are a striking and modern choice for summer. The combination of bold black stripes, white accents, and nude base creates a sophisticated and edgy look. The geometric design adds a contemporary touch, making these nails perfect for those who love to make a statement.
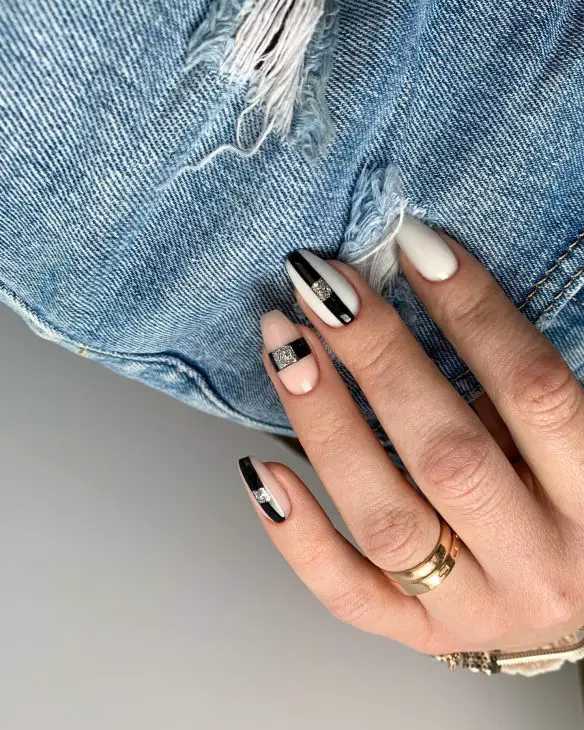
- Materials Needed:
- Base coat: Essie All In One Base
- Nude polish: OPI Samoan Sand
- Black polish: Essie Licorice
- White polish: Essie Blanc
- Glitter polish: China Glaze Fairy Dust
- Top coat: Seche Vite Dry Fast Top Coat
- Striping tape: Makartt Nail Striping Tape
- Fine brush: Winstonia Nail Art Brush
Recommendations:
- Essie All In One Base helps protect and strengthen your nails.
- OPI Samoan Sand offers a perfect nude shade for a natural look.
- Seche Vite’s top coat ensures a long-lasting, glossy finish.
- DIY Instructions:
- Apply a base coat to your nails to protect them.
- Paint all nails with the nude polish and allow it to dry.
- Use striping tape to create geometric shapes and lines on your nails.
- Apply black and white polishes within the taped sections to create a geometric pattern.
- Add glitter polish to selected areas for a touch of sparkle.
- Remove the striping tape and seal the design with a top coat to enhance shine and durability.
Save Pin
