20 Ideas Summer Neon Orange Nails Trends 2024
Summer is just around the corner, and it’s time to get your nails ready for the season! Are you looking to add a vibrant pop of color to your manicure? Look no further than neon orange nails. This trend is taking over 2024 with its bold and bright appeal. Let’s dive into some stunning neon orange nail designs that will make your summer unforgettable.
Vibrant Neon with Butterfly Accent
This striking neon orange nail design is perfect for those who want to make a bold statement. The vibrant color is eye-catching and exudes summer vibes. The accent nail, featuring a delicate butterfly design, adds a whimsical touch that’s both playful and elegant.
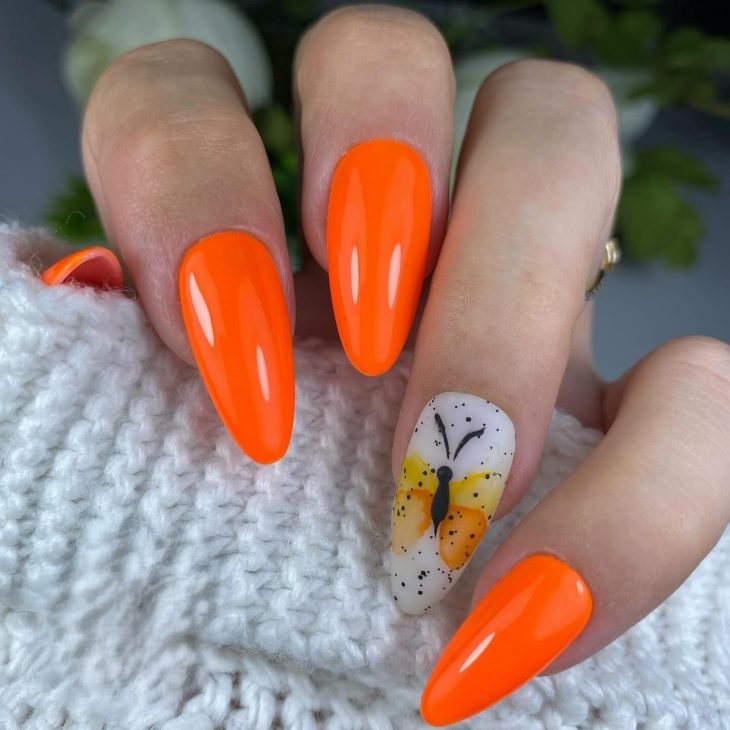
The glossy finish ensures that your nails shine brightly in the summer sun.
Consumables:
- Neon orange nail polish (e.g., ORLY’s ‘Melt Your Popsicle’)
- White nail polish for the base of the accent nail
- Butterfly nail stickers or decals
- Fine black nail art pen for detailing
- High-shine top coat (e.g., Seche Vite Dry Fast Top Coat)
DIY Instructions:
- Start with a base coat to protect your nails.
- Apply two coats of neon orange polish on all nails except the accent nail.
- On the accent nail, apply two coats of white polish.
- Once dry, place the butterfly sticker or use a fine brush to paint the butterfly design.
- Add small black dots around the butterfly for extra detail.
- Finish with a high-shine top coat to seal the design and add gloss.
Neon French Tips
French tips are timeless, and this neon twist brings a modern flair to the classic design. The combination of nude and neon orange creates a chic yet fun look that’s perfect for any summer outing.
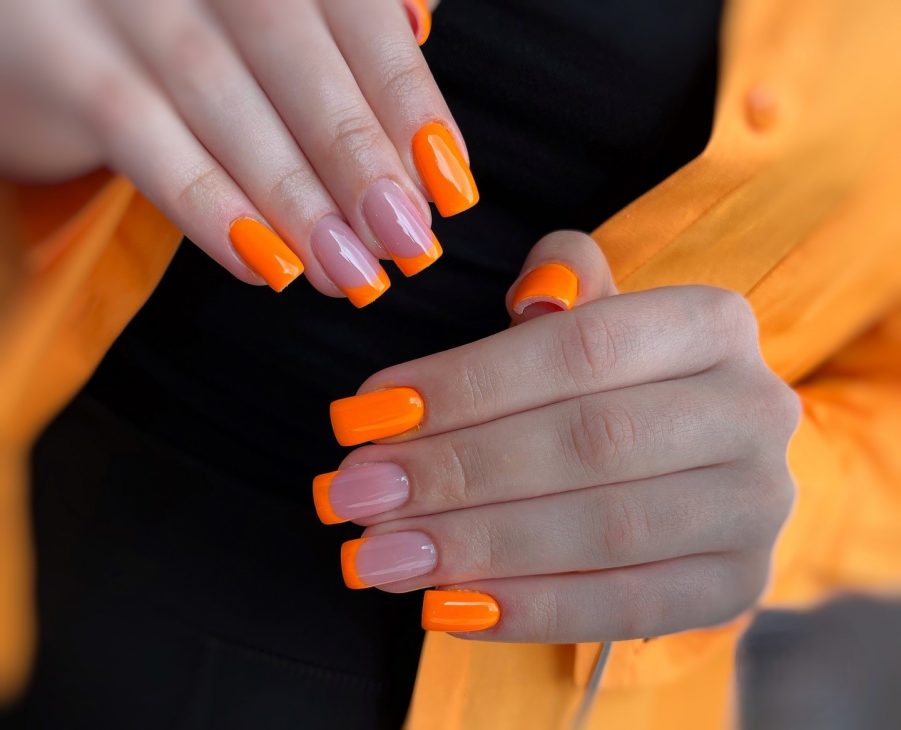
The square shape of the nails adds a touch of sophistication, making this design versatile for both casual and formal occasions.
Consumables:
- Nude or light pink base polish (e.g., Essie’s ‘Ballet Slippers’)
- Neon orange polish for the tips
- French tip guides or nail tape
- Top coat for shine and durability
DIY Instructions:
- Apply a base coat to all nails.
- Paint your nails with the nude or light pink polish and let it dry completely.
- Use French tip guides or nail tape to create a clean line for the tips.
- Paint the tips with neon orange polish.
- Remove the guides carefully and touch up if needed.
- Apply a top coat to protect the design and add a glossy finish.
Abstract Neon Designs
These neon orange nails with abstract designs are perfect for those who love a bit of art on their fingertips. The mix of neon orange and colorful abstract patterns creates a dynamic look that is sure to turn heads.
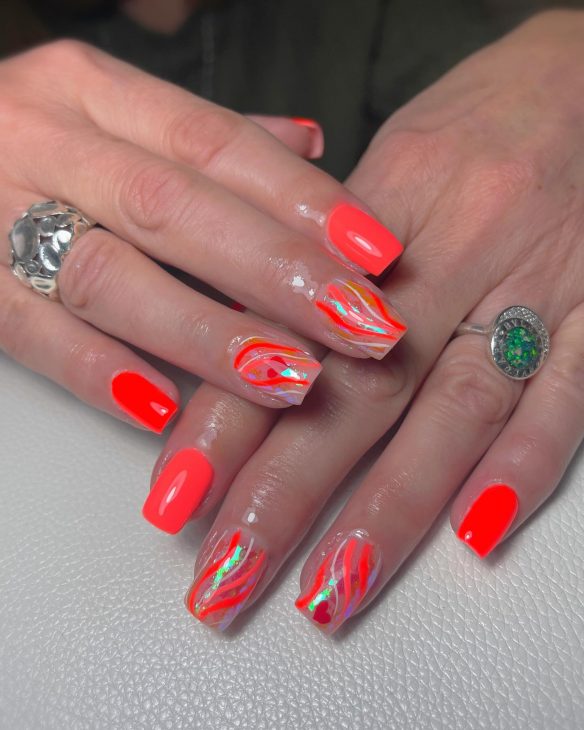
The design is vibrant, playful, and full of life, embodying the essence of summer.
Consumables:
- Neon orange base polish
- Assorted neon colors for the abstract design (e.g., neon pink, yellow, and green)
- Fine nail art brushes or dotting tools
- Top coat to seal the design
DIY Instructions:
- Apply a base coat to all nails.
- Paint all nails with the neon orange polish and let it dry.
- Use fine nail art brushes or dotting tools to create abstract patterns with the other neon colors.
- Allow the design to dry completely.
- Apply a top coat to protect the nail art and add shine.
Chic and Subtle Stripes
This nail design is perfect for those who want to incorporate neon orange in a sophisticated manner. The combination of nude and neon orange with subtle gold glitter stripes creates a chic and elegant look. The design is balanced and not overpowering, making it suitable for various occasions, from casual outings to more formal events.
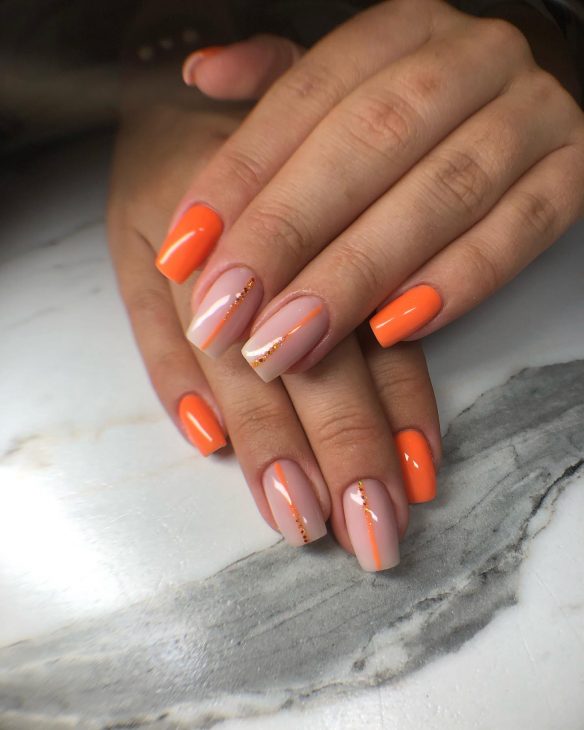
Consumables:
- Nude base polish (e.g., OPI’s ‘Samoan Sand’)
- Neon orange polish (e.g., China Glaze’s ‘Orange Knockout’)
- Gold glitter polish or striping tape
- Top coat (e.g., Essie’s ‘Gel Couture Top Coat’)
DIY Instructions:
- Start with a base coat to protect your nails.
- Apply two coats of nude polish on all nails and let it dry completely.
- Use striping tape to create a straight line on each accent nail.
- Paint neon orange on the tips and add a thin line of gold glitter polish next to the striping tape.
- Carefully remove the tape and touch up if needed.
- Finish with a top coat to seal the design and add a glossy finish.
Glitter French Tips
These nails offer a fresh take on the classic French manicure. The neon orange tips are paired with a glittery gradient, adding a touch of sparkle to the vibrant color. This design is both playful and glamorous, perfect for those who want to shine all summer long.
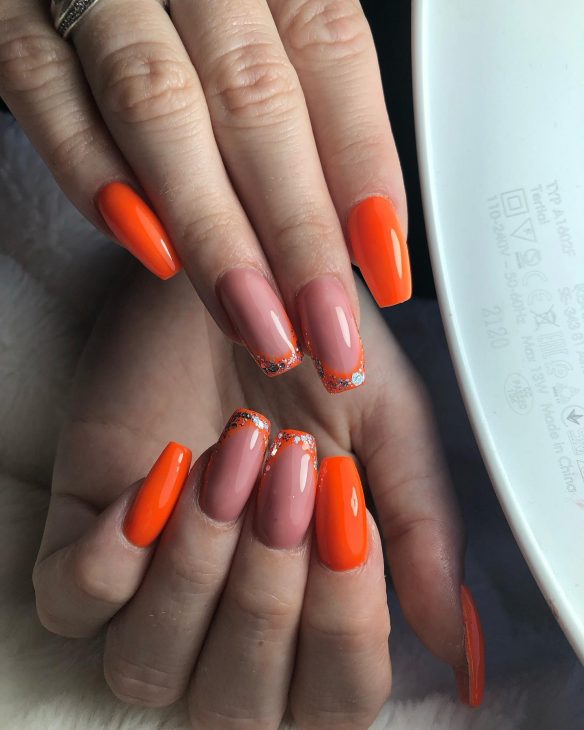
Consumables:
- Nude base polish (e.g., Essie’s ‘Mademoiselle’)
- Neon orange polish (e.g., ORLY’s ‘Tropical Pop’)
- Orange glitter polish
- Top coat (e.g., Sally Hansen’s ‘Insta-Dri Top Coat’)
DIY Instructions:
- Apply a base coat to all nails.
- Paint the nails with the nude base polish and let it dry.
- Use French tip guides or freehand paint the tips with neon orange polish.
- Add the orange glitter polish starting at the tips and blend it downwards for a gradient effect.
- Apply a top coat to protect the design and add shine.
Botanical Neon Art
This design combines the vibrant energy of neon orange with delicate botanical art. The contrast between the bright orange and the muted nude base, along with the black leaf accents, creates a striking and artistic look. It’s a perfect blend of bold and subtle, ideal for nail art enthusiasts who love unique designs.
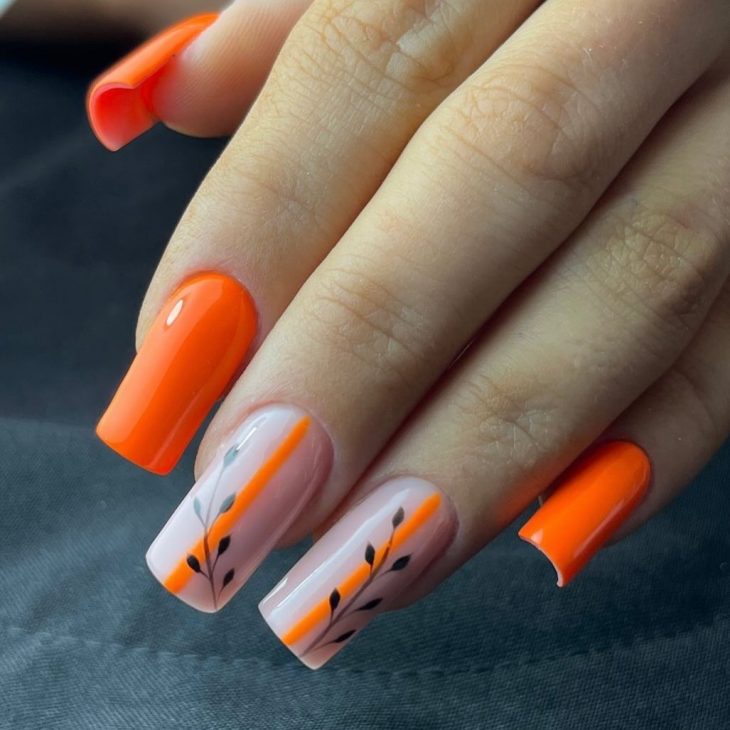
Consumables:
- Nude base polish (e.g., Zoya’s ‘Taylor’)
- Neon orange polish (e.g., CND’s ‘Electric Orange’)
- Black nail art pen or brush for leaf designs
- Top coat (e.g., OPI’s ‘Top Coat’)
DIY Instructions:
- Start with a base coat to protect your nails.
- Apply the nude polish on all nails and let it dry.
- Paint a vertical stripe of neon orange on each nail.
- Use a black nail art pen or brush to draw delicate leaf designs along the orange stripe.
- Seal with a top coat for a glossy finish.
Neon Geometric French
This geometric French design is a modern twist on the traditional French manicure. The neon orange paired with white and adorned with tiny gems creates a bold, contemporary look. The sharp lines and bright colors make this design a standout choice for the summer.
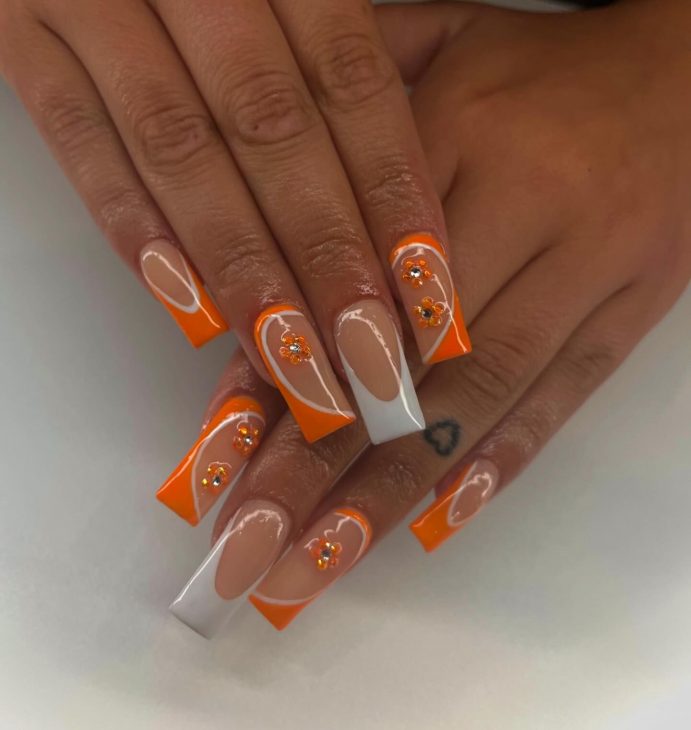
Consumables:
- Nude base polish (e.g., Essie’s ‘Topless & Barefoot’)
- Neon orange polish (e.g., Color Club’s ‘East Austin’)
- White polish for geometric shapes
- Small nail gems
- Top coat (e.g., Deborah Lippmann’s ‘Addicted To Speed’)
DIY Instructions:
- Apply a base coat to protect your nails.
- Paint all nails with the nude polish and let it dry.
- Use nail tape to create geometric shapes and paint with white polish.
- Fill in some sections with neon orange polish.
- Add small nail gems for extra detail.
- Finish with a top coat to secure the gems and add a glossy finish.
Abstract Neon Waves
This nail design features a stunning blend of neon orange and abstract waves on a nude base. The bold orange waves add a dynamic and modern touch to the nails, making them perfect for those who want to stand out. The glossy finish enhances the vibrant colors, ensuring your nails catch the light beautifully.
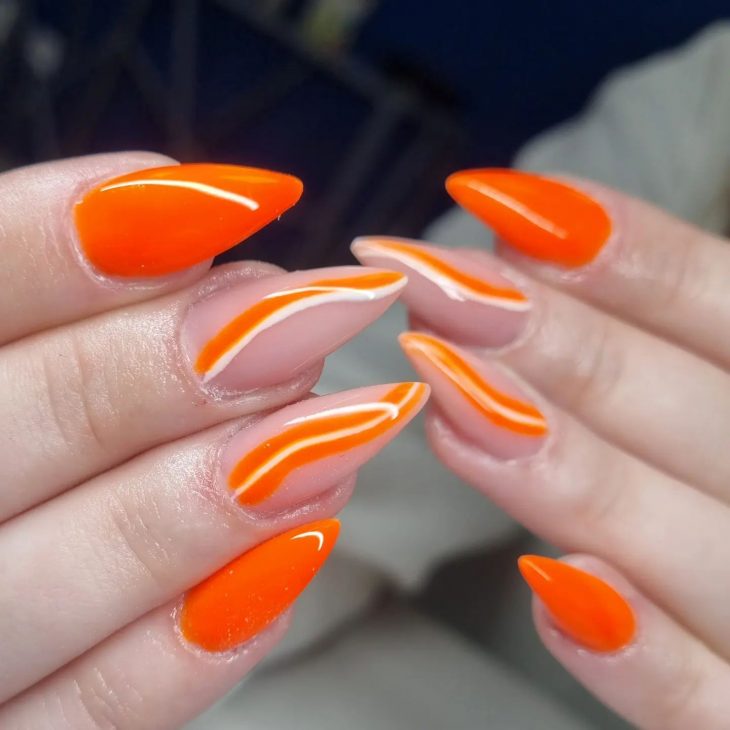
Consumables:
- Nude base polish (e.g., OPI’s ‘Put it in Neutral’)
- Neon orange polish (e.g., Essie’s ‘Tangerine Tease’)
- White polish for outlining waves
- Fine nail art brush
- Top coat (e.g., Sally Hansen’s ‘Insta-Dri Top Coat’)
DIY Instructions:
- Apply a base coat to all nails.
- Paint your nails with the nude base polish and let it dry completely.
- Use a fine nail art brush to create abstract wave designs with the neon orange polish.
- Outline the waves with white polish for added contrast.
- Finish with a top coat to protect the design and add shine.
Glitter and Neon Swirls
This design combines neon orange with glitter and swirls for a playful and eye-catching look. The mix of solid neon orange, glitter accents, and wavy lines creates a fun and lively manicure perfect for summer. The glitter adds a touch of sparkle, making these nails ideal for both day and night events.
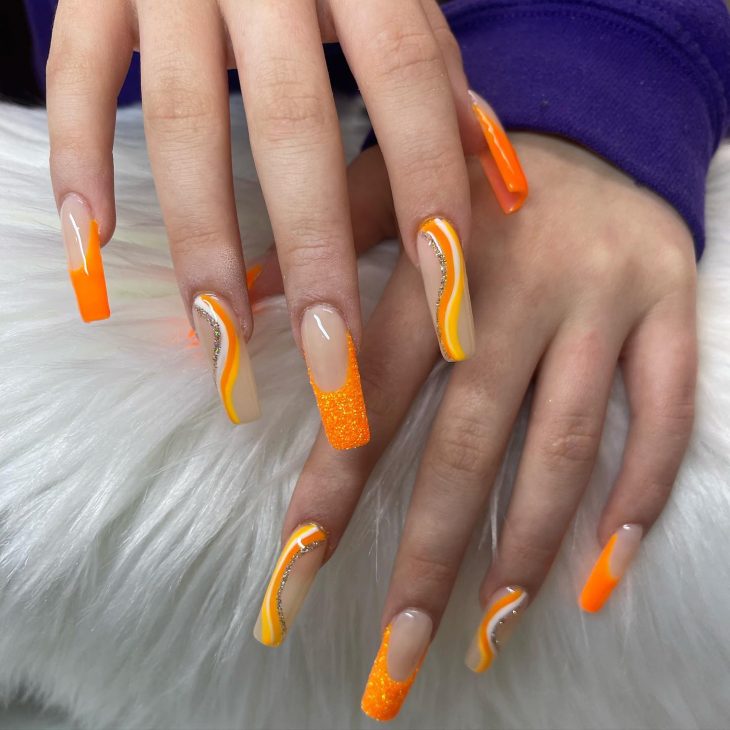
Consumables:
- Nude base polish (e.g., Zoya’s ‘Chantal’)
- Neon orange polish (e.g., China Glaze’s ‘Orange Knockout’)
- Yellow glitter polish
- Nail art gems
- Fine nail art brush
- Top coat (e.g., Seche Vite Dry Fast Top Coat)
DIY Instructions:
- Start with a base coat to protect your nails.
- Apply the nude polish to all nails and let it dry.
- Paint some nails entirely with neon orange and others with glitter polish.
- Use a fine brush to add swirly lines and accents in neon orange on the glitter nails.
- Add nail art gems for extra sparkle.
- Finish with a top coat to seal the design and add gloss.
Bold Neon with Accent Glitter
These nails are a bold statement with their vibrant neon orange color. The accent nail with glitter adds a touch of glamour, making the overall look both striking and elegant. The pointed almond shape enhances the drama of the neon color, perfect for those looking to make a strong impression.
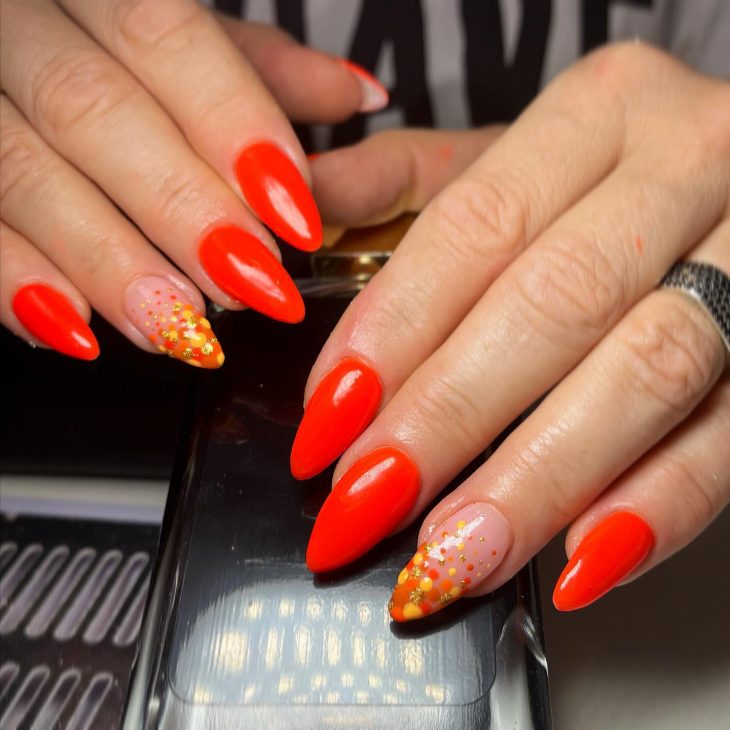
Consumables:
- Neon orange polish (e.g., ORLY’s ‘Melt Your Popsicle’)
- Nude base polish for accent nail (e.g., Essie’s ‘Ballet Slippers’)
- Orange glitter polish
- Top coat (e.g., OPI’s ‘Top Coat’)
DIY Instructions:
- Apply a base coat to protect your nails.
- Paint all nails with neon orange polish except for the accent nail.
- On the accent nail, apply the nude base polish and let it dry.
- Add orange glitter polish to the accent nail.
- Seal with a top coat for a glossy finish.
Tribal Neon Art
This nail design combines neon orange with tribal-inspired black patterns on a nude base. The contrast between the bright neon and the intricate black designs creates a bold and unique look. This manicure is perfect for those who love detailed and artistic nail art.
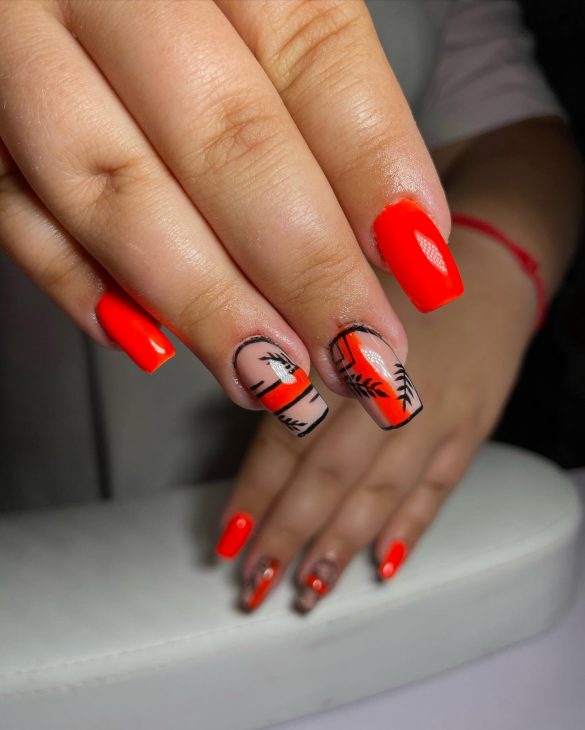
Consumables:
- Nude base polish (e.g., OPI’s ‘Samoan Sand’)
- Neon orange polish (e.g., Essie’s ‘Tangerine Tease’)
- Black nail art pen or brush for tribal designs
- Top coat (e.g., Sally Hansen’s ‘Insta-Dri Top Coat’)
DIY Instructions:
- Apply a base coat to protect your nails.
- Paint all nails with the nude base polish and let it dry.
- Create tribal patterns using a black nail art pen or brush over the neon orange base.
- Finish with a top coat to protect the design and add shine.
Fierce Neon Leopard
This design combines the wild charm of leopard print with the boldness of neon orange. The leopard accent nails are a striking contrast against the solid neon, creating a fierce and adventurous look. This manicure is perfect for anyone looking to add a bit of wild fun to their summer style.
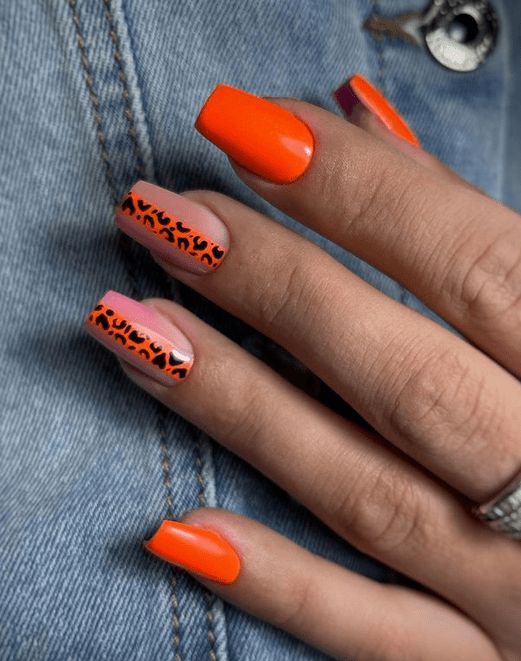
Consumables:
- Neon orange polish (e.g., China Glaze’s ‘Orange Knockout’)
- Nude base polish for accent nails (e.g., OPI’s ‘Bubble Bath’)
- Black nail art pen for leopard spots
- Top coat (e.g., Seche Vite Dry Fast Top Coat)
DIY Instructions:
- Apply a base coat to protect your nails.
- Paint all nails with neon orange polish except for the accent nails.
- On the accent nails, apply the nude base polish and let it dry.
- Use a black nail art pen to create leopard spots.
- Seal with a top coat for a glossy finish.
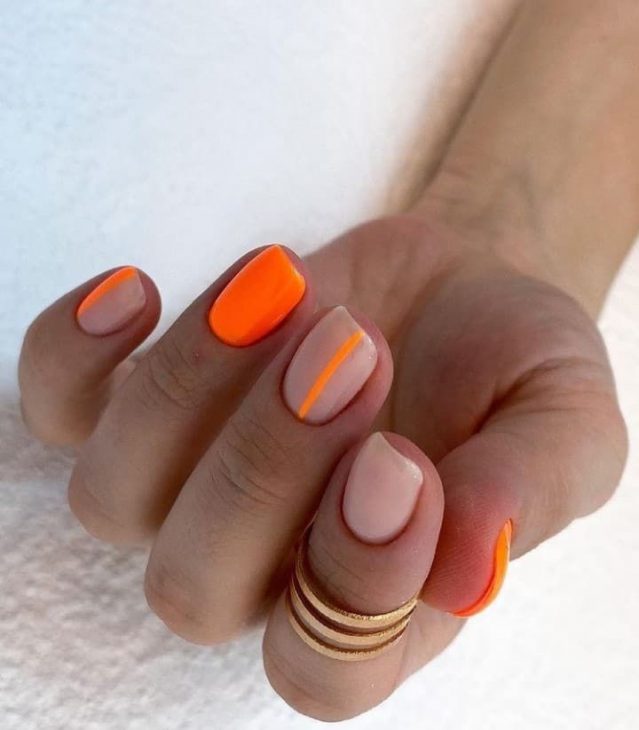
Minimalist Neon Stripes
This design is a minimalist’s dream, combining simplicity with a pop of neon. The single stripe of neon orange on nude nails creates a clean and modern look that is both understated and stylish. Perfect for those who prefer a subtle yet impactful manicure.
Consumables:
- Nude base polish (e.g., Essie’s ‘Ballet Slippers’)
- Neon orange polish (e.g., Essie’s ‘Tangerine Tease’)
- Fine nail art brush or striping tape
- Top coat (e.g., Sally Hansen’s ‘Insta-Dri Top Coat’)
DIY Instructions:
- Apply a base coat to protect your nails.
- Paint all nails with the nude base polish and let it dry.
- Use a fine nail art brush or striping tape to create a single neon orange stripe on each nail.
- Finish with a top coat to seal the design and add shine.
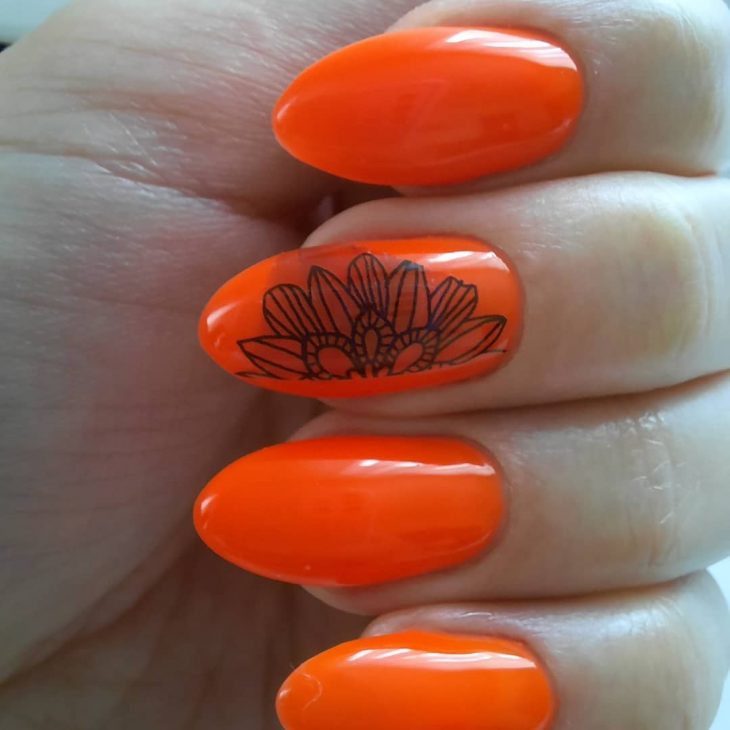
Floral Neon Accent
This nail design pairs the vibrancy of neon orange with a delicate floral accent. The black floral design on the accent nail adds a touch of elegance to the bold neon, creating a beautiful and balanced look. Ideal for those who love combining bold colors with intricate details.
Consumables:
- Neon orange polish (e.g., ORLY’s ‘Melt Your Popsicle’)
- Black nail art pen or stamping plate for floral design
- Top coat (e.g., OPI’s ‘Top Coat’)
DIY Instructions:
- Apply a base coat to protect your nails.
- Paint all nails with neon orange polish and let it dry.
- Use a black nail art pen or stamping plate to create the floral design on the accent nail.
- Seal with a top coat for a glossy finish.
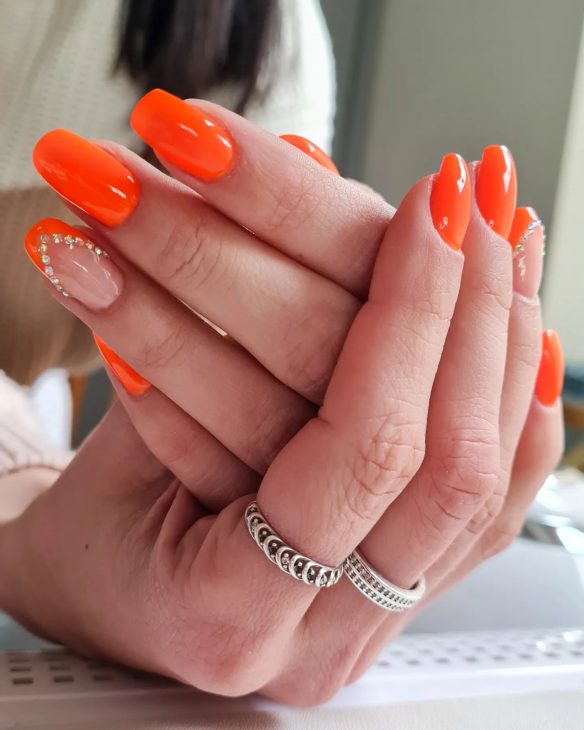
Elegant Neon with Rhinestones
These nails are the epitome of summer elegance. The neon orange polish is beautifully complemented by the rhinestone accents on the ring fingers, adding a touch of glamour. This design is perfect for summer weddings, parties, or any occasion where you want to shine.
Consumables:
- Neon orange polish (e.g., Essie’s ‘Tangerine Tease’)
- Nude base polish for accent nails (e.g., OPI’s ‘Samoan Sand’)
- Small rhinestones or gems
- Top coat (e.g., Deborah Lippmann’s ‘Addicted To Speed’)
DIY Instructions:
- Apply a base coat to protect your nails.
- Paint all nails with neon orange polish except for the accent nails.
- On the accent nails, apply the nude base polish and let it dry.
- Carefully place rhinestones in a desired pattern using a small dot of top coat or nail glue.
- Seal with a top coat to secure the rhinestones and add a glossy finish.
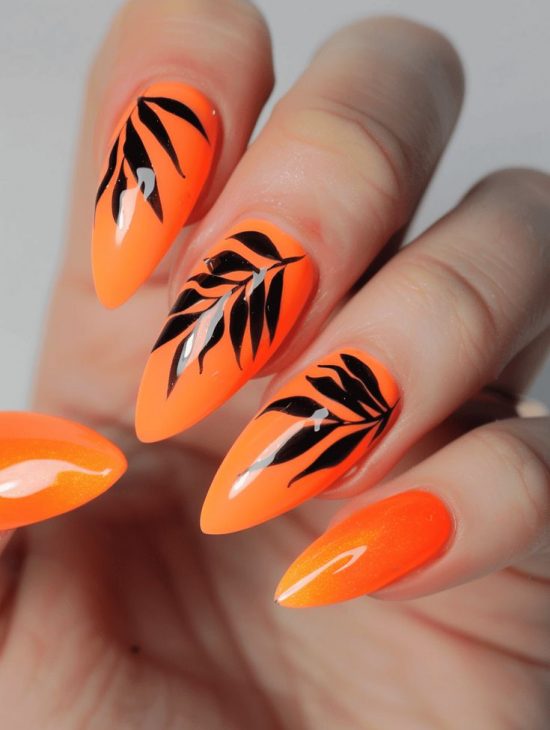
Tropical Neon Leaves
This design features a bold neon orange base with intricate black leaf patterns. The contrast between the neon and the black creates a striking and sophisticated look. Perfect for summer, this design is both eye-catching and elegant, making it ideal for tropical vacations or beach outings.
Consumables:
- Neon orange polish (e.g., China Glaze’s ‘Orange Knockout’)
- Black nail art pen or brush for leaf designs
- Top coat (e.g., Seche Vite Dry Fast Top Coat)
DIY Instructions:
- Apply a base coat to protect your nails.
- Paint all nails with neon orange polish and let it dry.
- Use a black nail art pen or brush to draw intricate leaf patterns on each nail.
- Seal with a top coat for a glossy finish.
Starry Neon Sky
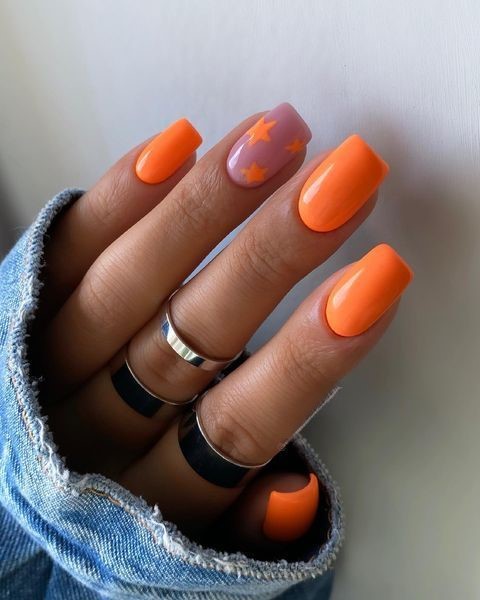
This nail design combines neon orange with a dreamy purple accent nail featuring star designs. The mix of vibrant neon and soft purple creates a balanced and enchanting look. The stars add a whimsical touch, making this manicure perfect for summer nights and starry skies.
Consumables:
- Neon orange polish (e.g., Essie’s ‘Tangerine Tease’)
- Light purple polish for accent nail (e.g., OPI’s ‘Do You Lilac It?’)
- Yellow polish for stars
- Fine nail art brush or star decals
- Top coat (e.g., Sally Hansen’s ‘Insta-Dri Top Coat’)
DIY Instructions:
- Apply a base coat to protect your nails.
- Paint all nails with neon orange polish except for the accent nail.
- On the accent nail, apply light purple polish and let it dry.
- Use a fine brush to paint yellow stars on the purple accent nail.
- Finish with a top coat to seal the design and add shine.
Matte Neon Elegance
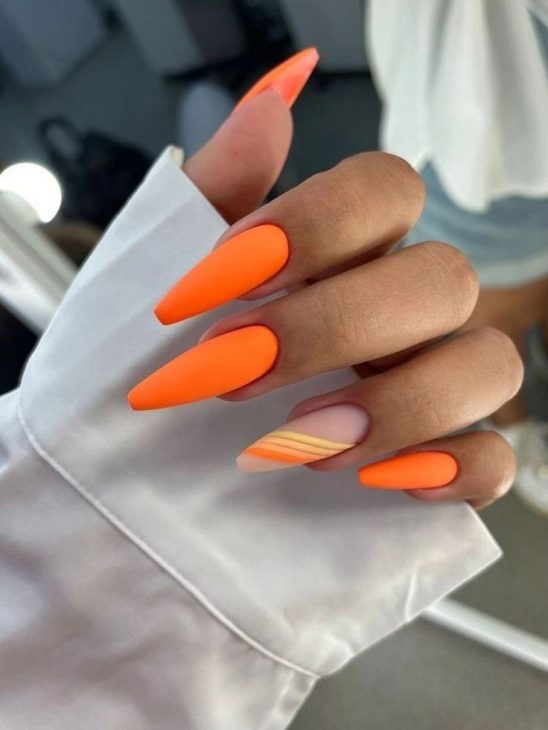
This matte neon orange design exudes elegance with its sleek, sophisticated look. The addition of subtle yellow and nude stripes on the accent nail adds a touch of modernity. This manicure is perfect for those who love bold colors but prefer a more understated finish.
Consumables:
- Matte neon orange polish (e.g., ORLY’s ‘Neon Heat’ with a matte top coat)
- Nude base polish for accent nail (e.g., Essie’s ‘Ballet Slippers’)
- Yellow polish for stripes
- Fine nail art brush or striping tape
- Matte top coat (e.g., OPI’s ‘Matte Top Coat’)
DIY Instructions:
- Apply a base coat to protect your nails.
- Paint all nails with matte neon orange polish and let it dry.
- On the accent nail, apply nude polish and let it dry.
- Use a fine brush or striping tape to create yellow stripes on the accent nail.
- Finish with a matte top coat to seal the design.
Neon Ombre Perfection
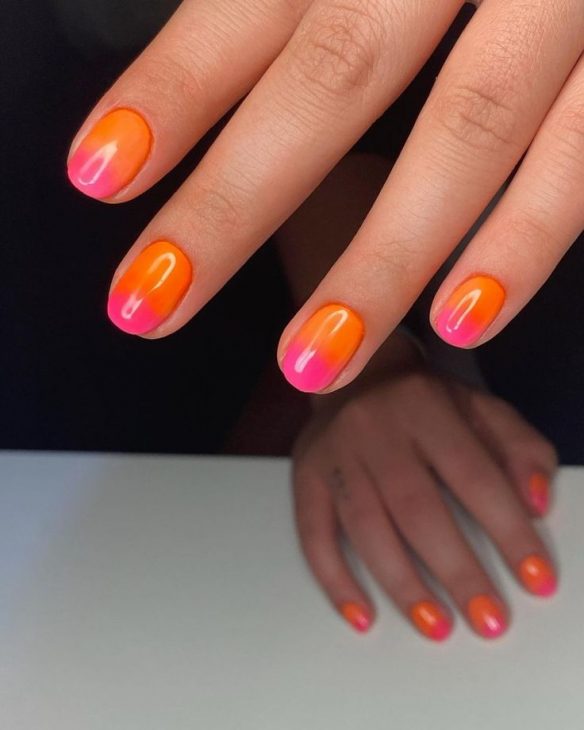
This ombre design blends neon orange with neon pink, creating a vibrant gradient effect. The transition from orange to pink is smooth and flawless, making this manicure a true showstopper. Perfect for summer parties, this design is both bold and beautiful.
Consumables:
- Neon orange polish (e.g., China Glaze’s ‘Flip Flop Fantasy’)
- Neon pink polish (e.g., ORLY’s ‘Beach Cruiser’)
- Makeup sponge for blending
- Top coat (e.g., Seche Vite Dry Fast Top Coat)
DIY Instructions:
- Apply a base coat to protect your nails.
- Paint all nails with neon orange polish and let it dry.
- Use a makeup sponge to apply the neon pink polish at the tips, blending it into the orange for an ombre effect.
- Repeat until the desired gradient is achieved.
- Finish with a top coat to seal the design and add shine.
Neon Orange Checkerboard
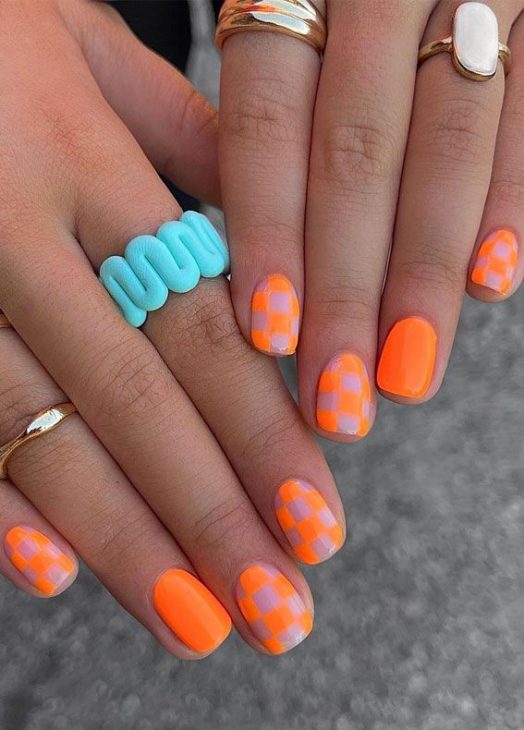
This nail design combines the playful charm of a checkerboard pattern with the vibrant energy of neon orange. The alternating neon orange and nude squares create a striking visual effect that is both fun and trendy. This manicure is perfect for adding a bold statement to your summer look while maintaining a chic and stylish vibe.
Consumables:
- Neon orange polish (e.g., Essie’s ‘Tangerine Tease’)
- Nude base polish (e.g., OPI’s ‘Bubble Bath’)
- Fine nail art brush or striping tape
- Top coat (e.g., Seche Vite Dry Fast Top Coat)
DIY Instructions:
- Apply a base coat to protect your nails.
- Paint all nails with the nude base polish and let it dry.
- Use a fine nail art brush or striping tape to create a checkerboard pattern, alternating between neon orange and nude squares.
- Carefully fill in the neon orange squares.
- Seal with a top coat for a glossy finish.
Save Pin
