Summer Short Square Nails 2024: Chic and Trendy Options for a Radiant Season
As the warmer months roll in, the allure of bright, cheerful nail art becomes irresistible. But who says you need long claws to flaunt the latest trends? This year, summer short square nails are making a significant comeback, offering a chic canvas for playful designs and subtle elegance. Are you looking for fresh inspo that blends style with practicality? Look no further!
Gleaming Midnight Mosaic
Dive into the depths of this enchanting mosaic design, where the interplay of light captures the essence of a starry night. Using a base of deep black, the nails are adorned with iridescent green glitters arranged in a randomized mosaic pattern. The overall look is both mesmerizing and sophisticated, perfect for summer evenings.
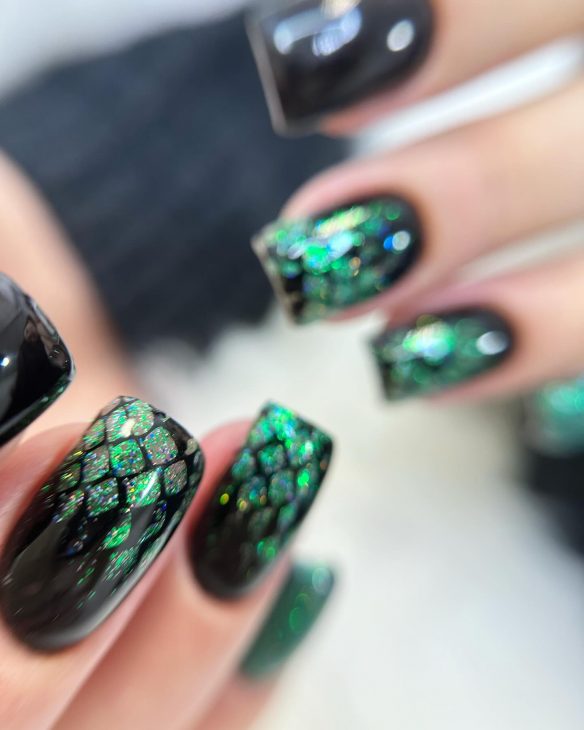
Materials Needed:
- Black gel polish
- Green iridescent glitter
- Top coat (glossy finish)
- Fine-tip brush or dotting tool
DIY Instructions: Begin with a thorough base coat to protect your nails. Apply two coats of black gel polish, curing under a UV lamp between layers. While the second layer is tacky, use a fine-tip brush to place green glitter pieces, creating a random mosaic pattern. Seal your artwork with a high-gloss top coat for lasting shine and protection.
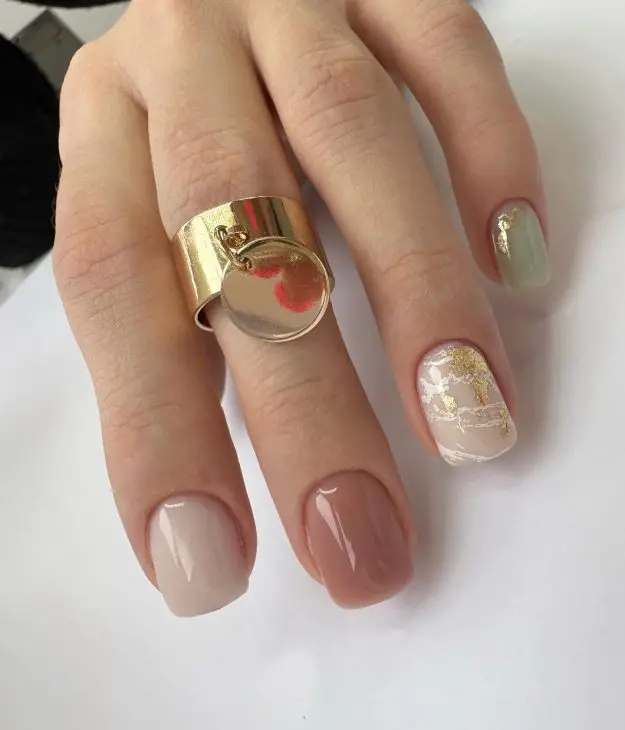
Soft Pastel Elegance
This design epitomizes the gentle charm of summer with its pastel shades and delicate gold accents. The nails feature a base of soft pink and muted green, with one nail showcasing a detailed floral pattern in gold foil. It’s a subtle nod to summer gardens in full bloom, ideal for day events or casual outings.
Materials Needed:
- Pastel pink and green gel polishes
- Gold foil
- Thin art brush
- Matte top coat
DIY Instructions: Start with a clean base coat. Apply two coats of pastel gel polish, alternating colors per nail. Use a thin art brush to apply adhesive for the gold foil on one nail, then carefully place the foil. Finish with a matte top coat for a contemporary look.
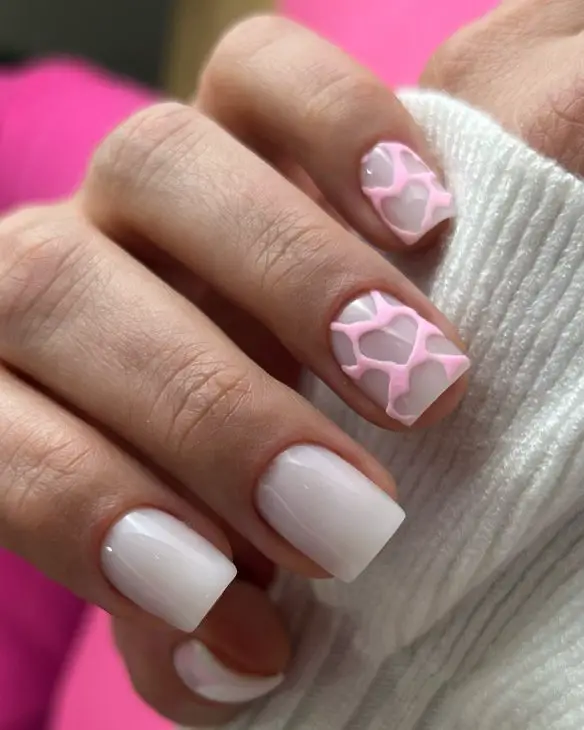
Playful Pink Geometrics
Embrace the playful side of summer with these geometrically inspired nails. The design features a crisp white base overlaid with pink geometric patterns, creating a fresh and dynamic look. This style is particularly flattering on short square nails, adding an illusion of length without the maintenance.
Materials Needed:
- White and pink gel polishes
- Striping tape
- Detail brush
- Glossy top coat
DIY Instructions: Apply a base coat, then two layers of white gel polish, curing in between. Use striping tape to outline your geometric designs, then fill in with pink polish. Remove the tape while the polish is still wet, and finish with a glossy top coat to enhance the design’s vibrancy.
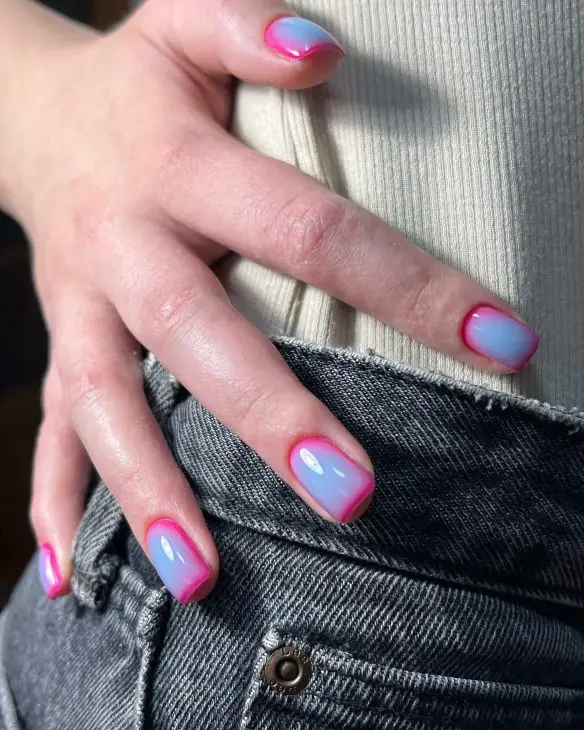
Sunrise Gradient Charm
This nail design captures the awe-inspiring hues of a summer sunrise. With a perfect gradient transition from pink to a soft blue, these nails evoke feelings of a serene morning sky. The addition of a subtle white dot enhances the design, giving it a unique flair that’s both cute and stylish.
Materials Needed:
- Pink and blue gel polish
- White polish for the dot
- Sponge for gradient effect
- High gloss top coat
DIY Instructions: Start with a base coat to protect your nails. Apply a light pink polish as the base color. Using a sponge, dab on blue polish, blending it with the pink to create a smooth gradient. Add a small white dot at the peak of each nail using a dotting tool. Finish with a glossy top coat to seal the design.
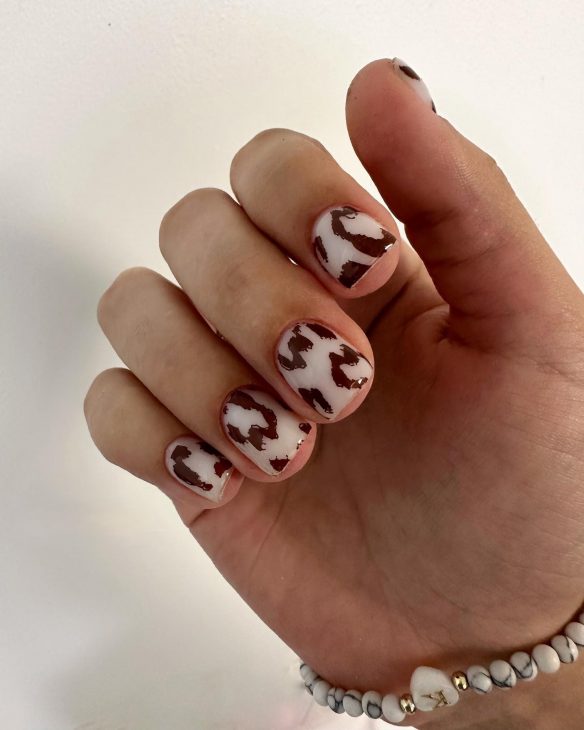
Chocolate Cow Print
Unleash your wild side with this playful chocolate cow print design. Set against a nude base, the brown patches are randomly placed, creating a fun and whimsical pattern that’s perfect for casual summer outings or a unique twist on everyday style.
Materials Needed:
- Nude polish as base
- Chocolate brown polish for the patches
- Small detail brush
- Matte top coat for a modern finish
DIY Instructions: Apply a nude base coat and let it dry completely. Dip your detail brush in chocolate brown polish and paint random cow-like patches on each nail. There’s no need for perfection here—irregular shapes make it more authentic! Finish with a matte top coat to enhance the earthy feel of the design.
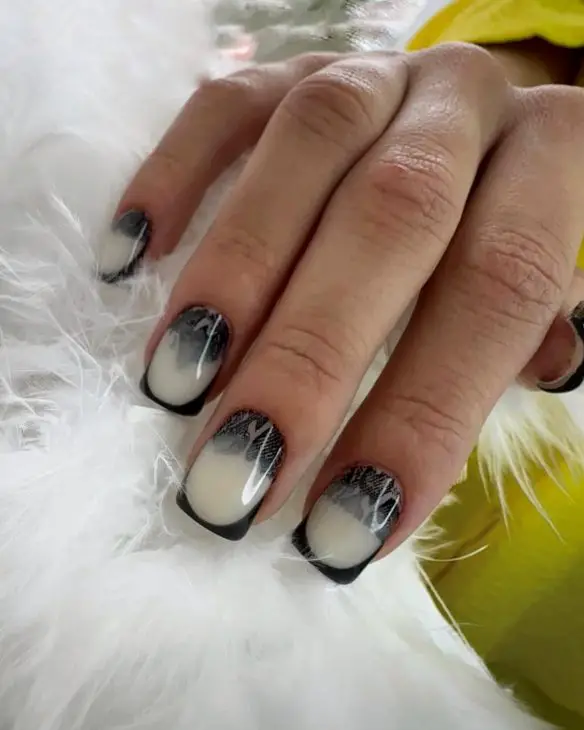
Sophisticated Smoky Ombre
This smoky ombre design exudes sophistication with a seamless blend of white and gray, accented by a dramatic black tip. It’s a perfect choice for those looking to make a statement with their nails this summer, combining elegance with a touch of edginess.
Materials Needed:
- White, gray, and black gel polish
- Sponge for ombre effect
- Fine brush for sharp tips
- High shine top coat
DIY Instructions: Begin with a white base coat. Use a sponge to apply a mid-tone gray in the middle of the nails, blending it upwards. Add black to the tips using a fine brush, creating a sharp, clean line. Seal the design with a high shine top coat for durability and gloss.
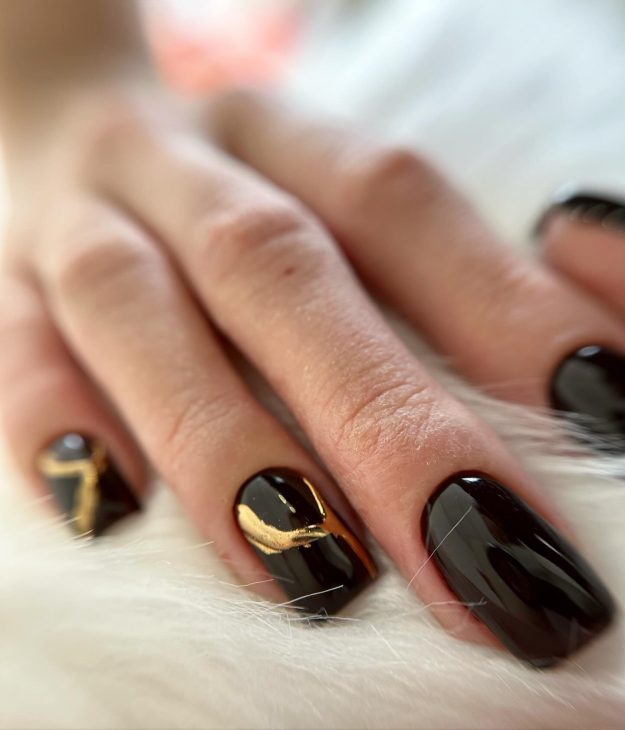
Elegant Golden Swirls on Deep Maroon
This design brings luxury to your fingertips with deep maroon polished nails, each adorned with a delicate golden swirl. This look is both regal and modern, perfect for evening events or as a sophisticated choice for any summer gathering.
Materials Needed:
- Deep maroon gel polish
- Gold metallic polish for the swirls
- Fine liner brush
- Top coat for a glossy finish
DIY Instructions: Paint your nails with two coats of deep maroon, ensuring each layer is dry before proceeding. Using a fine liner brush, draw intricate golden swirls on one or two accent nails. Finish with a glossy top coat to both protect and enhance the metallic sheen.
Zesty Lemonade Vibes
Brighten your summer days with these vibrant lemon-yellow tips paired with a neutral base. The playful outline of a lemon slice adds a fun twist, perfect for beach days or summer picnics. This design is not only eye-catching but also a sweet nod to summertime refreshments.
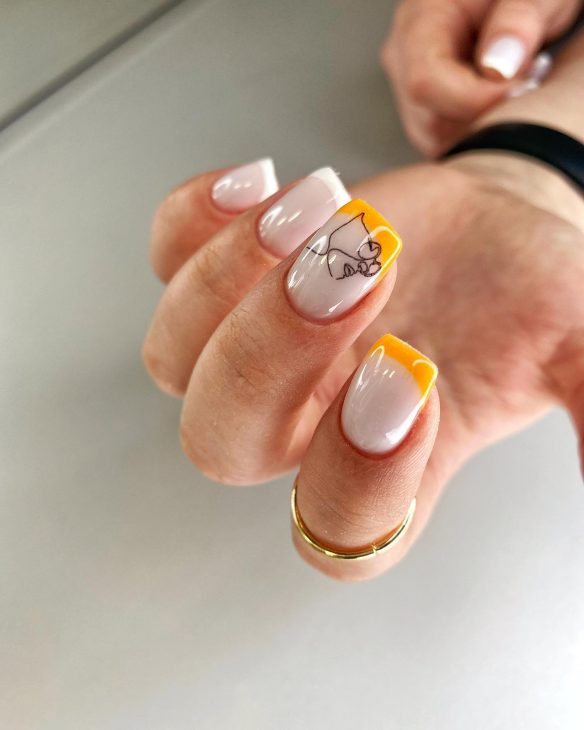
Materials Needed:
- Neutral beige gel polish
- Lemon yellow polish for the tips and details
- Thin detailing brush
- High gloss top coat
DIY Instructions: Apply a neutral beige base coat and let it dry. Paint the tips with a vivid lemon yellow polish. Use a detailing brush to add a subtle lemon slice design on the accent nail. Finish with a high gloss top coat for a bright, durable finish.
Cool Mint Waves
These nails feature a soothing mint green base with white wavy designs that mimic the refreshing ocean waves. Ideal for a cool, casual summer look, this design is simple yet bright, making it a perfect match for any summer outfit.
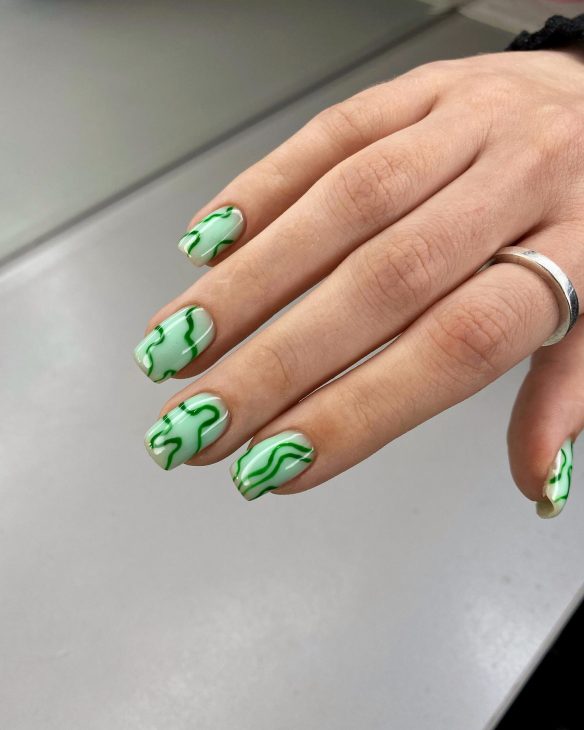
Materials Needed:
- Mint green polish
- White polish for the waves
- Detail brush
- Matte top coat for a modern touch
DIY Instructions: Start with a mint green base. Once dry, use a detail brush to paint wavy, white lines across each nail. The waves don’t need to be perfect—let their freeform nature add to the charm. Seal with a matte top coat for a chic finish.
Golden Flakes on Pink Blush
Embrace elegance with this soft pink base adorned with delicate gold flakes. The subtle flowers design created by the flakes adds a touch of luxury and femininity, making it a perfect choice for weddings or summer evening events.
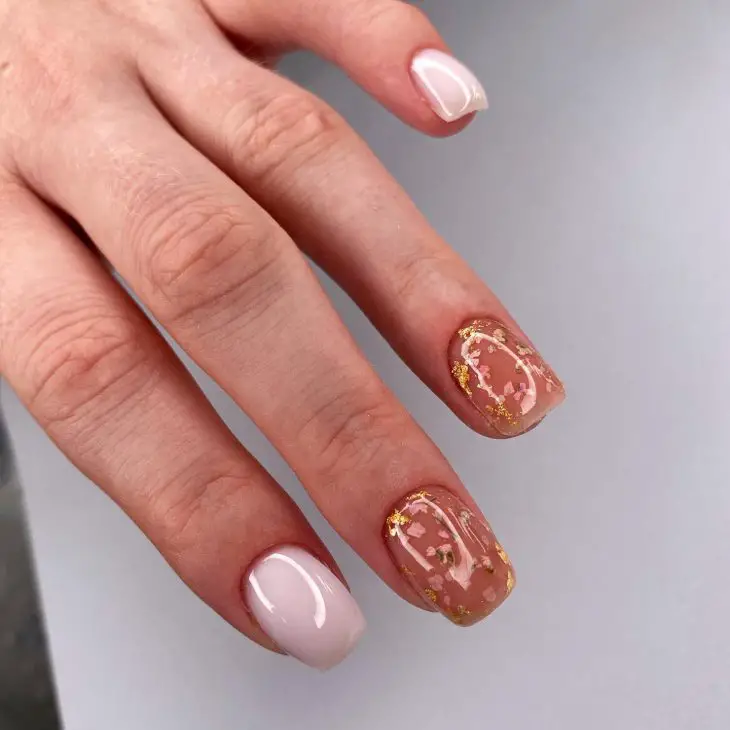
Materials Needed:
- Soft pink gel polish
- Gold leaf flakes
- Tweezers to place flakes
- Glossy top coat for a smooth finish
DIY Instructions: Paint your nails with a soft pink polish as the base. Using tweezers, gently place gold leaf flakes onto the nails while the polish is still tacky to form a scattered floral pattern. Apply a glossy top coat to secure the flakes and enhance their shimmer.
Butterfly Fantasy
This whimsical design features white bases with detailed blue butterfly wings, complemented by golden stars. It’s a magical touch that’s both inspiring and cute, ideal for those looking to add a fantasy element to their summer style.
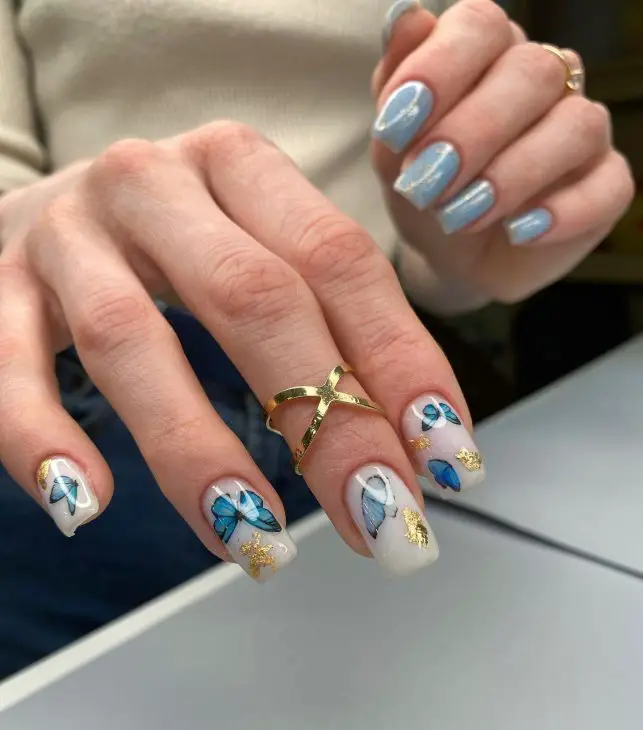
Materials Needed:
- White gel polish for the base
- Blue and black polish for butterfly details
- Gold polish for stars
- Fine detailing brushes
DIY Instructions: Apply a white base coat. Use fine brushes to draw intricate butterfly wings in blue and black on each nail. Add small gold stars for an enchanting finish. Seal everything with a high gloss top coat to ensure the details pop and last long.
Glistening Gold Leaf
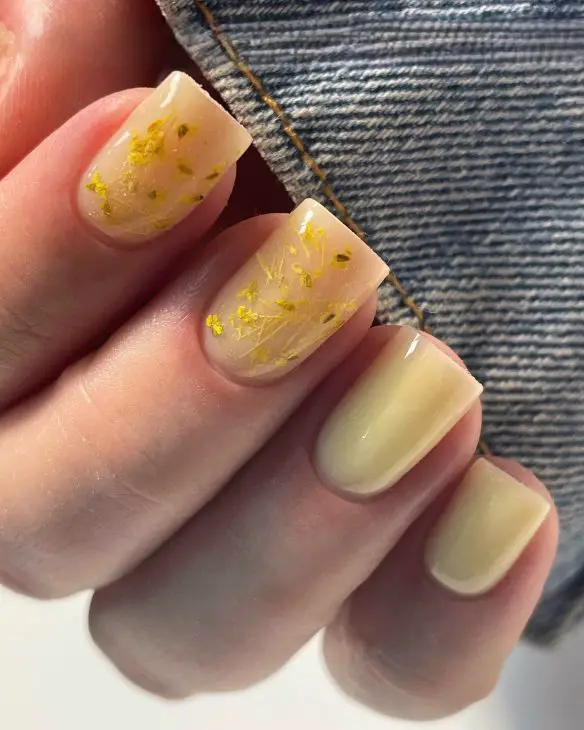
This subtle yet stunning design features a transparent base speckled with golden leaf pieces, embodying a minimalist but luxurious aesthetic. The light captures the golden flakes beautifully, making it a versatile choice for both day and night summer activities.
Materials Needed:
- Clear gel polish
- Gold leaf flakes
- Tweezers to apply flakes
- High gloss top coat
DIY Instructions: Apply a layer of clear gel polish as the base. Using tweezers, carefully place small pieces of gold leaf on the nails while the polish is still tacky. Apply another layer of clear gel to encapsulate the gold flakes. Finish with a high gloss top coat for a smooth, shiny finish that enhances the sparkle of the gold.
Bold Red and White Elegance
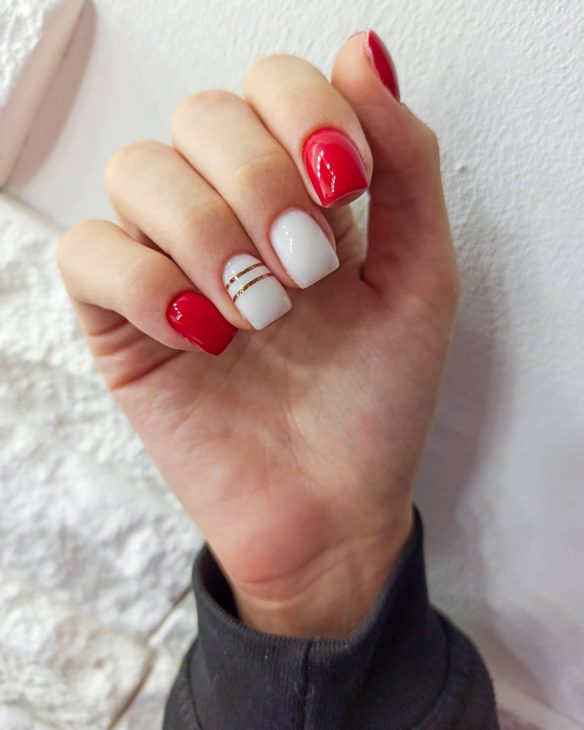
Classic with a modern twist, this design uses bold red and pristine white to create a striking contrast, complemented by elegant gold striping. Perfect for those who want to make a statement, it’s a chic option for both formal events and casual summer nights out.
Materials Needed:
- Red and white gel polish
- Gold striping tape
- Detail brush
- Top coat for a seamless finish
DIY Instructions: Paint the nails alternating between red and white. Once dry, use gold striping tape to add thin lines across the white nails for a touch of luxury. Apply a top coat to secure the tape and polish, ensuring a long-lasting wear.
Marbled Artistry
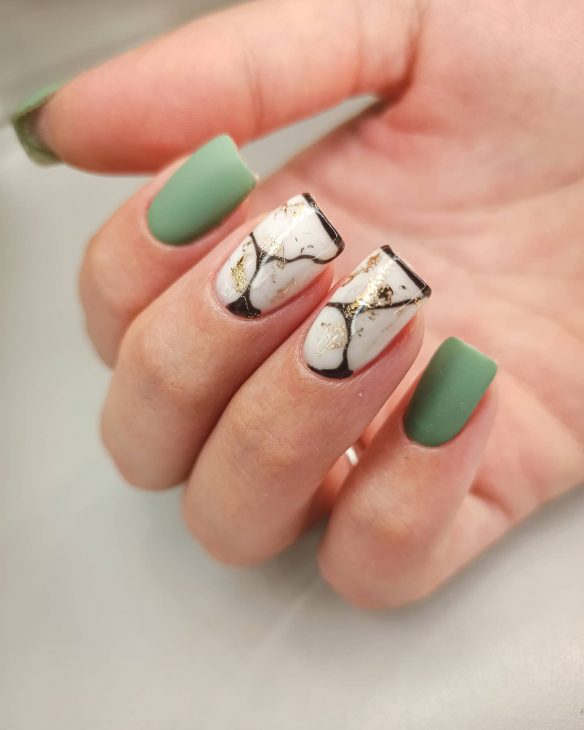
This design features a sophisticated marbling effect in white and grey tones, accented with gold cracks for a luxurious look. The matte finish on the green sections adds a contemporary edge, making this design a true artwork on your nails.
Materials Needed:
- White and grey gel polish for marbling
- Gold leaf for detailing
- Matte top coat for the green areas
- Glossy top coat for the marbled effect
DIY Instructions: Apply a base coat of white gel polish. Add drops of grey polish and swirl with a detail brush to create a marbling effect. Apply gold leaf in a cracked pattern over the marbled nails. For the solid nails, use a matte green polish. Finish with a glossy top coat on the marbled nails and a matte coat on the green for contrast.
Delicate Floral on Nude
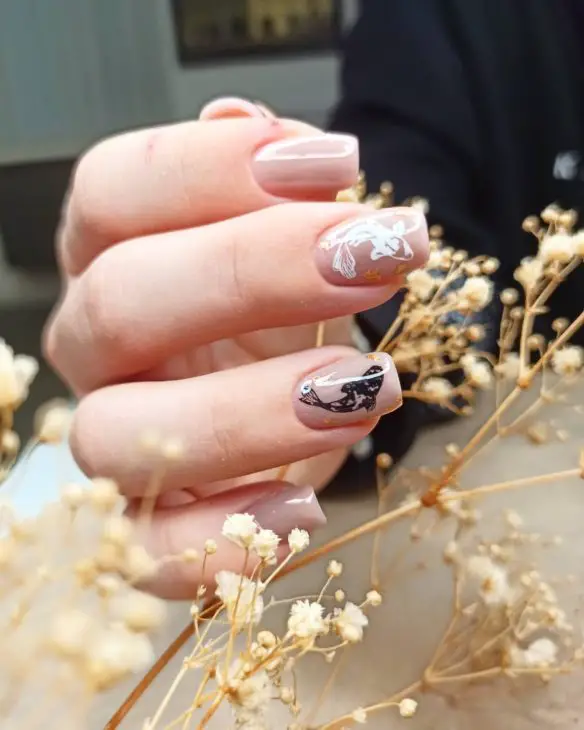
This soft and feminine design features a nude base with delicate white and brown floral accents, creating a gentle yet detailed look. The subtle use of color makes it a suitable choice for everyday wear or special occasions in the summer.
Materials Needed:
- Nude gel polish
- White and brown polish for floral details
- Fine detailing brush
- Top coat for a glossy finish
DIY Instructions: Start with a nude base coat. Use a fine detailing brush to hand-paint small flowers using white and brown polish. Focus on creating soft, simple floral patterns for a natural look. Seal the design with a glossy top coat to protect the details and add shine.
Lavender Dreams
A perfect blend of soft lavender and striking pink creates a playful yet sophisticated look. The abstract silver lines add an artistic touch, making this design ideal for those who love a pop of color and a hint of metallic flair.
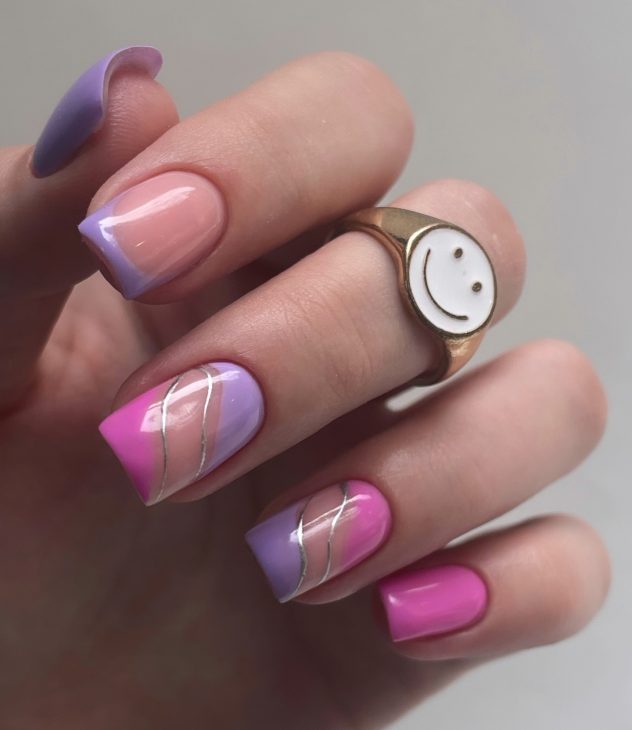
Materials Needed:
- Lavender and pink gel polish
- Silver striping tape
- Top coat for a glossy finish
DIY Instructions: Apply a base coat of lavender gel polish. Once dry, apply pink polish on alternate tips, creating a diagonal split. Use silver striping tape to add thin, abstract lines across each nail for a modern touch. Seal with a glossy top coat for lasting shine and protection.
Spring Blossom
This design features a delicate blossom theme on a sheer pink base, adorned with tiny blue and gold accents that mimic the beauty of spring flowers. It’s both elegant and bright, perfect for spring and summer seasons.
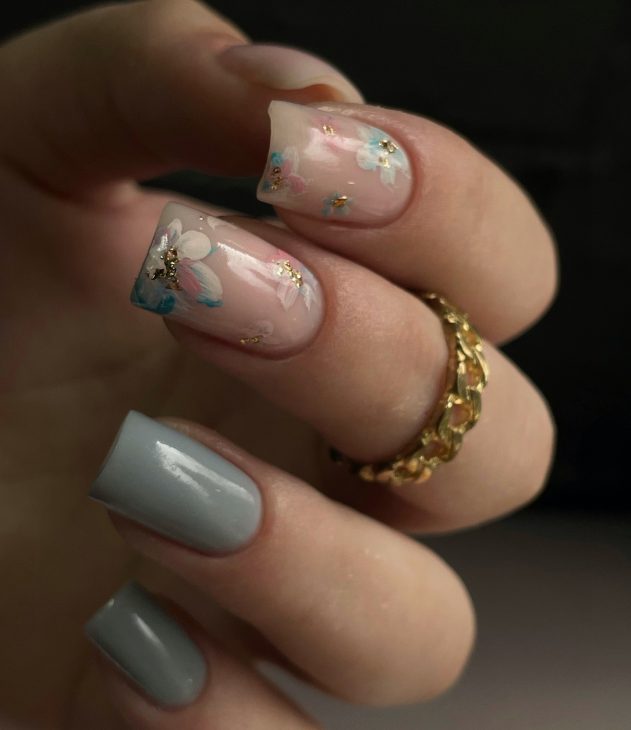
Materials Needed:
- Sheer pink gel polish
- Blue and gold acrylic paint
- Fine detail brush
- High gloss top coat
DIY Instructions: Start with a sheer pink base coat. Use a fine detail brush to paint small blossoms in blue, adding gold centers to each flower. Apply a high gloss top coat to enhance the intricate details and ensure durability.
Blue Dot Gradient
This minimalist white design is elevated with a gradient of blue dots, creating a cool, cascading effect. It’s a simple yet chic option that’s versatile enough for both casual outings and more formal occasions.
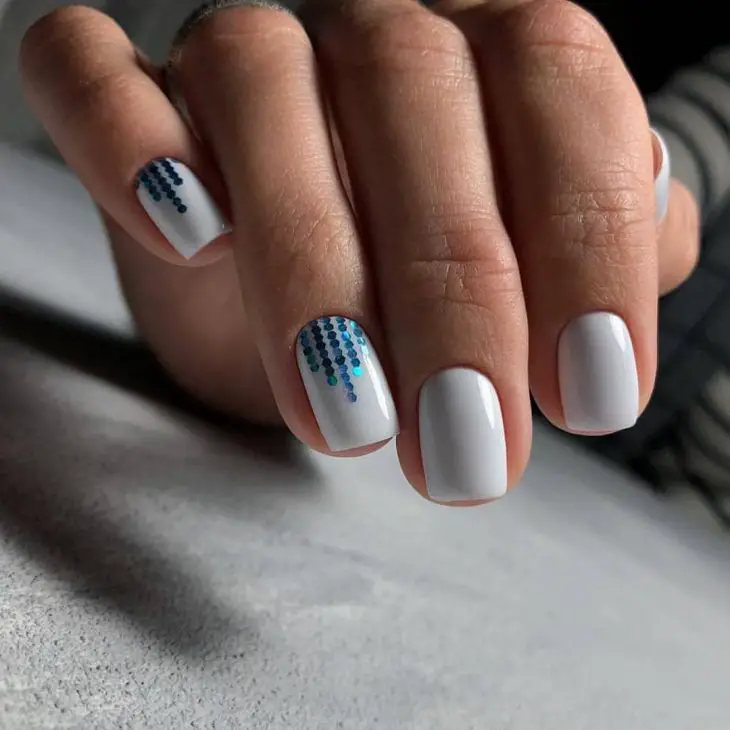
Materials Needed:
- White gel polish
- Blue polish in various shades
- Dotting tool
- Glossy top coat
DIY Instructions: Paint your nails with white gel polish as the base. Using a dotting tool, apply a gradient of blue dots starting from the cuticle and fading towards the middle of the nail. Use lighter shades of blue as you move up for a gradient effect. Finish with a glossy top coat for a smooth and shiny look.
Romantic Red Hearts
Celebrate love with this romantic design featuring bold red hearts on a clean white base. The random placement of hearts and the subtle use of red create a playful yet intimate nail art choice, perfect for date nights or Valentine’s celebrations.
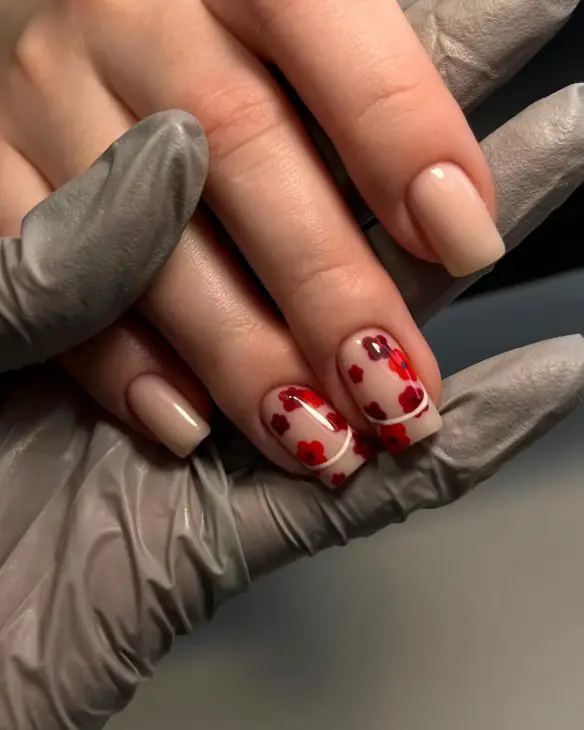
Materials Needed:
- White and red gel polish
- Fine detail brush
- Matte top coat
DIY Instructions: Apply a white gel polish as the base. Use a fine detail brush to paint red hearts randomly on each nail. Consider varying the size of the hearts for added interest. Finish with a matte top coat to give a modern, soft-focus effect to the design.
Sunshine Yellow
Embrace the vibrant spirit of summer with this electrifying sunshine yellow nail design. The nails are a brilliant canvas for playful text overlays like “You make me happy,” which adds a personal touch and a pop of positivity. It’s the perfect choice for those who want their manicure to make a bright, cheerful statement.
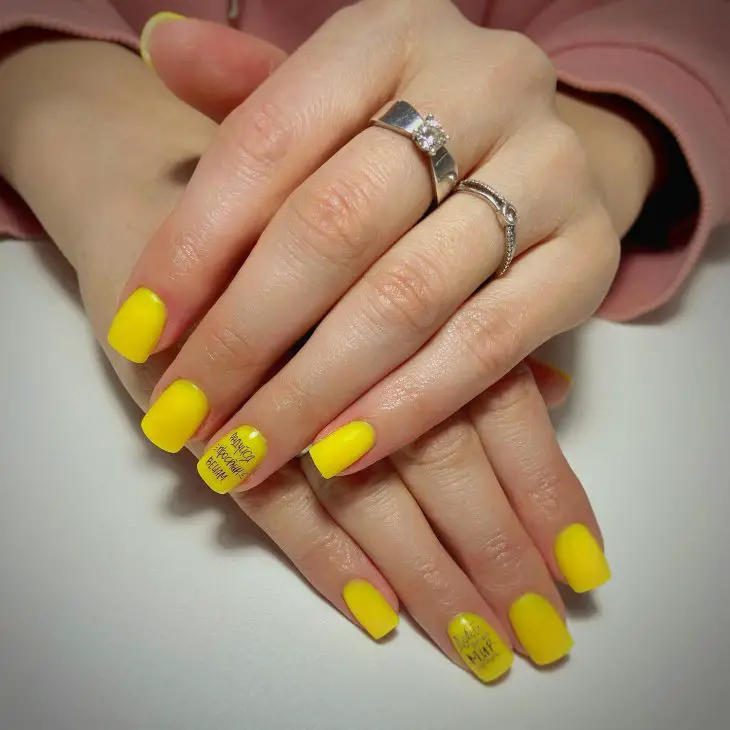
Materials Needed:
- Sunshine yellow gel polish
- Black nail art pen for text
- Top coat for a glossy finish
DIY Instructions: Apply two coats of sunshine yellow gel polish, allowing each coat to dry completely. Use a black nail art pen to carefully write inspirational quotes or phrases on select nails. Finish with a clear top coat to protect the design and enhance the vibrancy of the yellow.
Save Pin
