20 Ideas Tropical Nail Designs 2024: Bringing the Beach to Your Fingertips
Are you dreaming of sandy beaches and tropical getaways? Even if you can’t escape to a paradise island right now, you can bring the tropical vibes to your nails! Tropical nail designs for 2024 are all about vibrant colors, intricate patterns, and that carefree vacation feel. Whether you’re preparing for a beach vacation or simply want to infuse your everyday look with some tropical flair, these nail designs are perfect for you. Let’s dive into the hottest tropical nail designs for 2024 that you can flaunt this summer.
Tropical Leaf Ombre Nails
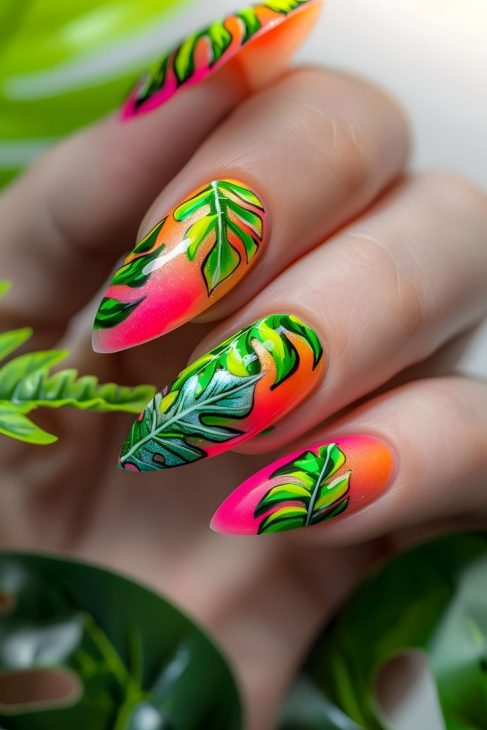
Tropical leaf ombre nails are a bold and vibrant choice that screams summer. The gradient from hot pink to orange provides a perfect sunset backdrop, while the detailed green leaf designs add a fresh and lively touch. This design is perfect for those who love bright colors and intricate details. The almond shape of the nails complements the tropical theme, making the design appear elongated and elegant.
Consumables List
- Hot pink nail polish (OPI – “Hotter Than You Pink”)
- Orange nail polish (Essie – “Tangerine Tease”)
- Green nail polish for leaf designs (China Glaze – “Tree Hugger”)
- Fine nail art brush (recommended: Winstonia Nail Art Brush)
- Base coat (Sally Hansen – “Hard as Nails”)
- Top coat (Seche Vite – “Dry Fast Top Coat”)
DIY Instructions
- Prep Your Nails: Start with a clean base. Apply a base coat to protect your nails.
- Create the Ombre Effect: Apply the hot pink polish on the upper half of your nail and the orange polish on the lower half. Use a makeup sponge to blend the colors seamlessly.
- Add Leaf Details: Once the ombre base is dry, use a fine nail art brush to paint green leaf patterns on your nails. Be patient and let each layer dry before adding more details.
- Seal the Design: Finish with a top coat to protect your artwork and add a glossy finish.
Tropical Greenery Nail Art
Tropical greenery nail art is a subtle yet stylish way to bring the tropics to your nails. This design features a mix of solid green nails and nails with intricate leaf patterns on a white base. The combination is both classy and playful, perfect for beach vacations or any summer event. The short square shape adds a modern touch, making the design versatile and easy to maintain.

Consumables List
- Dark green nail polish (OPI – “Stay Off the Lawn”)
- Light green nail polish (Zoya – “Josie”)
- White nail polish (Essie – “Blanc”)
- Fine nail art brush (recommended: Beetles Nail Art Liner Brush)
- Base coat (CND – “Stickey Base Coat”)
- Top coat (Essie – “Good to Go”)
DIY Instructions
- Prep Your Nails: Apply a base coat to each nail.
- Paint Solid Nails: Paint two nails on each hand with the dark green polish.
- Create Leaf Pattern: For the nails with the leaf pattern, start with a white base. Once dry, use a fine brush to paint leaf designs with light green polish.
- Finish Up: Apply a top coat to all nails to seal and protect the design.
Tropical Palm Leaves on Black Base
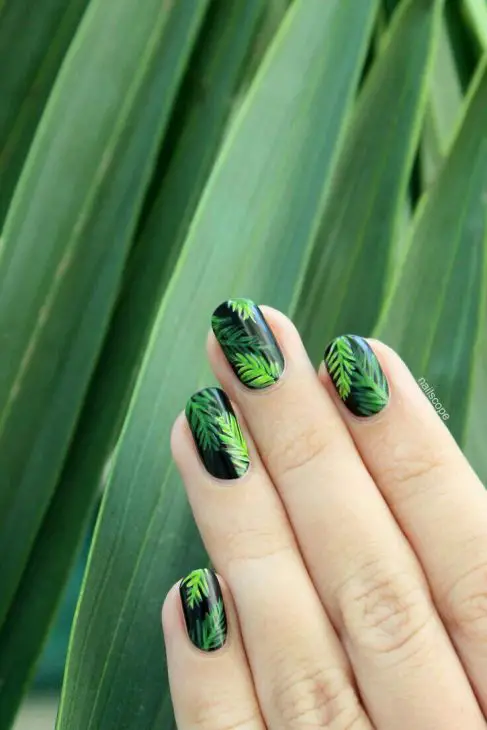
For a more dramatic and sophisticated look, tropical palm leaves on a black base are stunning. This design uses a dark backdrop to make the vibrant green leaves pop. The combination is both chic and edgy, perfect for evening beach parties or a night out during your beach vacation. The short almond shape nails make the design practical yet stylish.
Consumables List
- Black nail polish (OPI – “Black Onyx”)
- Green nail polish for leaves (Sally Hansen – “Green Thumb”)
- Fine nail art brush (recommended: Maniology Detail Liner Brush)
- Base coat (Orly – “Bonder Base Coat”)
- Top coat (Essie – “Gel Couture Top Coat”)
DIY Instructions
- Prep Your Nails: Apply a base coat.
- Apply Black Base: Paint all nails with black nail polish and let them dry completely.
- Add Palm Leaves: Use a fine brush to paint green palm leaves on each nail. Allow each layer to dry before adding more details.
- Seal the Design: Apply a top coat to add shine and longevity to your manicure.
Tropical Flowers on Blue Base
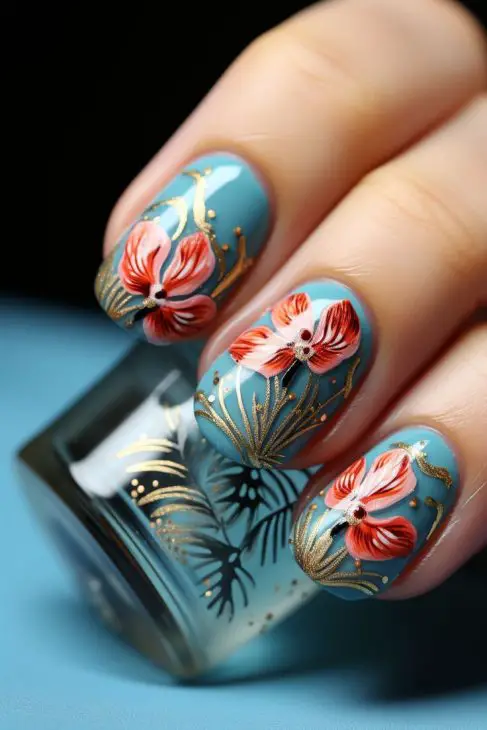
Tropical flowers on a blue base offer a sophisticated yet vibrant look that is perfect for any beach vacation. The blue base color resembles the ocean, while the delicate red flowers with golden accents add a touch of elegance and luxury. This design is ideal for those who love intricate nail art with a touch of glam. The short almond shape makes it practical for everyday wear while still looking chic.
Consumables List
- Blue nail polish (Essie – “Butler Please”)
- Red nail polish for flowers (OPI – “Big Apple Red”)
- Gold nail polish for accents (China Glaze – “Gold Digger”)
- Fine nail art brush (recommended: Winstonia Nail Art Brush)
- Base coat (Sally Hansen – “Hard as Nails”)
- Top coat (Seche Vite – “Dry Fast Top Coat”)
DIY Instructions
- Prep Your Nails: Start with a clean base. Apply a base coat to protect your nails.
- Apply Blue Base: Paint all your nails with the blue polish and let them dry completely.
- Add Flower Details: Using the fine brush, paint red flowers on each nail. Add golden accents to enhance the design. Let each layer dry before adding more details.
- Seal the Design: Finish with a top coat to protect your artwork and add a glossy finish.
Vibrant Tropical Jungle
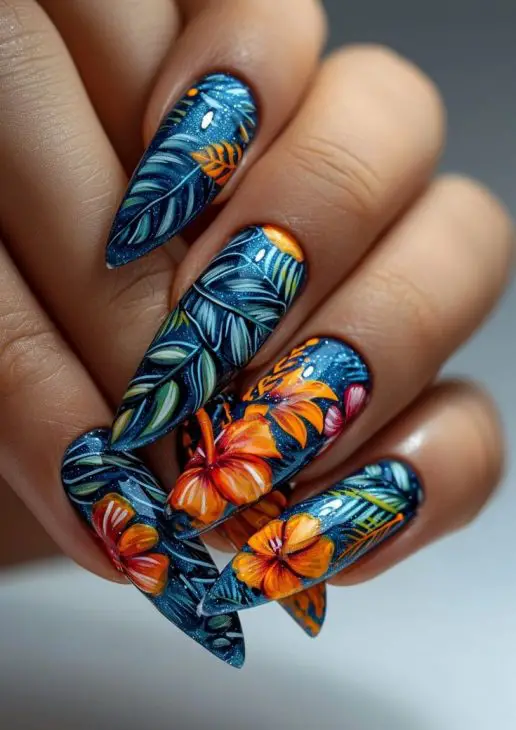
The vibrant tropical jungle nail design is perfect for those who love bold and colorful patterns. The dark blue base serves as a perfect canvas for the bright orange and pink flowers along with lush green leaves. This design is a true statement piece, capturing the essence of a tropical rainforest. The long stiletto shape adds an extra touch of drama and elegance, making it ideal for special occasions or beach vacations.
Consumables List
- Dark blue nail polish (Zoya – “Indigo”)
- Orange nail polish for flowers (Sally Hansen – “Sun Kissed”)
- Pink nail polish for flowers (Essie – “Pink Parka”)
- Green nail polish for leaves (OPI – “Jade is the New Black”)
- Fine nail art brush (recommended: Maniology Detail Liner Brush)
- Base coat (Orly – “Bonder Base Coat”)
- Top coat (Essie – “Gel Couture Top Coat”)
DIY Instructions
- Prep Your Nails: Apply a base coat.
- Apply Dark Blue Base: Paint all nails with dark blue nail polish and let them dry completely.
- Add Floral and Leaf Details: Using a fine brush, paint orange and pink flowers along with green leaves. Allow each layer to dry before adding more details.
- Seal the Design: Apply a top coat to add shine and longevity to your manicure.
Bright Tropical Blossoms
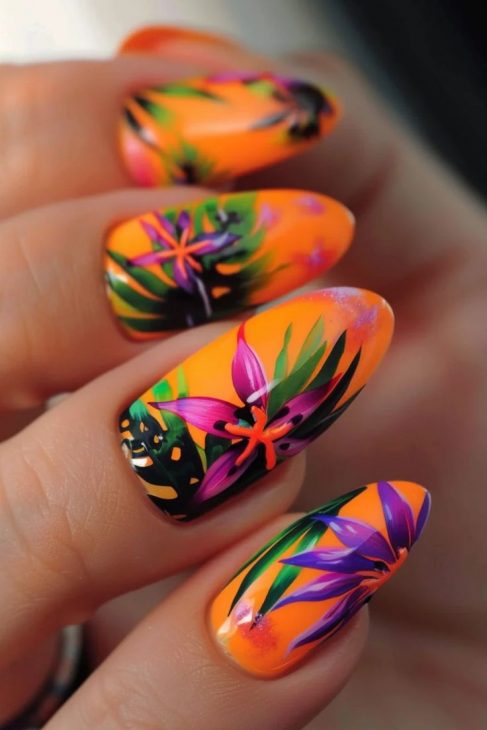
Bright tropical blossoms on an orange base create a fun and lively look that’s perfect for summer. The neon orange backdrop highlights the vibrant purple and green flowers, making the design pop. This nail art is excellent for short, almond-shaped nails, as it adds a burst of color and energy without being overwhelming. It’s a great choice for those who love bold and playful nail designs.
Consumables List
- Neon orange nail polish (China Glaze – “Orange Knockout”)
- Purple nail polish for flowers (OPI – “Do You Lilac It?”)
- Green nail polish for leaves (Zoya – “Josie”)
- Fine nail art brush (recommended: Beetles Nail Art Liner Brush)
- Base coat (CND – “Stickey Base Coat”)
- Top coat (Essie – “Good to Go”)
DIY Instructions
- Prep Your Nails: Apply a base coat to each nail.
- Apply Neon Orange Base: Paint all nails with neon orange polish and let them dry.
- Add Floral Details: Use a fine brush to paint purple flowers and green leaves. Let each layer dry before adding more details.
- Finish Up: Apply a top coat to seal and protect the design.
Tropical Paradise Scene
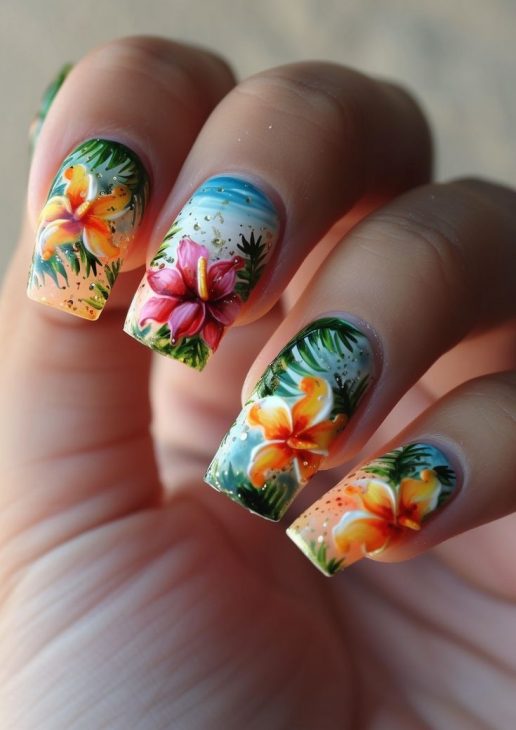
A tropical paradise scene on your nails is like carrying a mini vacation with you wherever you go. This design features a beach sunset with vibrant flowers and lush greenery, capturing the essence of a tropical getaway. The detailed artwork and gradient background create a stunning visual effect. This design works beautifully on short square nails, making it practical yet incredibly eye-catching.
Consumables List
- Gradient nail polish set for sunset (OPI – “Sunrise… Bedtime!”, Essie – “Roarrrrange”, and China Glaze – “Lemon Fizz”)
- Pink and orange nail polish for flowers (Sally Hansen – “Fuchsia Power” and “Sun Kissed”)
- Green nail polish for leaves (Essie – “Mojito Madness”)
- Fine nail art brush (recommended: Maniology Detail Liner Brush)
- Base coat (Orly – “Bonder Base Coat”)
- Top coat (Seche Vite – “Dry Fast Top Coat”)
DIY Instructions
- Prep Your Nails: Apply a base coat.
- Create Gradient Background: Use a sponge to apply the gradient polishes for a sunset effect. Let them dry completely.
- Add Floral and Leaf Details: Use a fine brush to paint pink and orange flowers along with green leaves. Allow each layer to dry before adding more details.
- Seal the Design: Apply a top coat to add shine and longevity to your manicure.
Tropical Floral Accent Nails
Tropical floral accent nails are a delightful way to incorporate vibrant colors and floral patterns into your manicure. The combination of neon orange nails with accent nails featuring multicolored flowers on a white base creates a striking contrast that is perfect for summer. This design is ideal for short nails, making it practical for everyday wear while still providing a pop of tropical color.

Consumables List
- Neon orange nail polish (China Glaze – “Orange Knockout”)
- White nail polish for accent nails (Essie – “Blanc”)
- Multicolored nail polish for flowers (OPI – “Big Apple Red”, Essie – “Butler Please”, Sally Hansen – “Sun Kissed”, Zoya – “Josie”)
- Fine nail art brush (recommended: Winstonia Nail Art Brush)
- Base coat (Sally Hansen – “Hard as Nails”)
- Top coat (Seche Vite – “Dry Fast Top Coat”)
DIY Instructions
- Prep Your Nails: Start with a clean base. Apply a base coat to protect your nails.
- Apply Base Colors: Paint all nails with neon orange polish, except for the accent nails, which should be painted white.
- Add Floral Details: Using the fine brush, paint multicolored flowers on the white accent nails. Let each layer dry before adding more details.
- Seal the Design: Finish with a top coat to protect your artwork and add a glossy finish.
Tropical Abstract Art
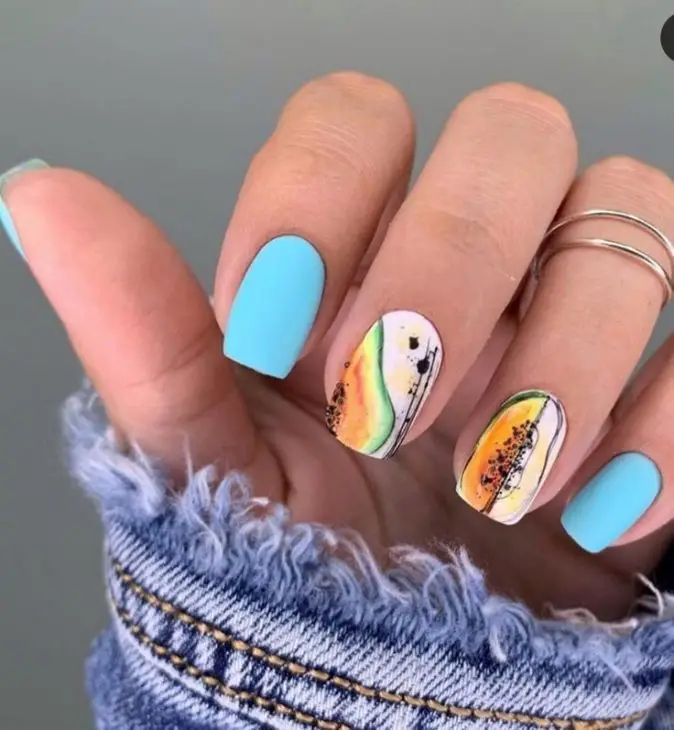
Tropical abstract art nails are a chic and modern take on tropical nail designs. The light blue nails serve as a cool backdrop, while the accent nails feature a stunning abstract design with a mix of orange, green, and black. This design is perfect for beach vacations, offering a sophisticated yet playful look that’s easy to achieve.
Consumables List
- Light blue nail polish (OPI – “It’s a Boy!”)
- White nail polish for accent nails (Essie – “Blanc”)
- Orange, green, and black nail polishes for abstract design (China Glaze – “Orange Knockout”, Zoya – “Josie”, OPI – “Black Onyx”)
- Fine nail art brush (recommended: Maniology Detail Liner Brush)
- Base coat (Orly – “Bonder Base Coat”)
- Top coat (Essie – “Gel Couture Top Coat”)
DIY Instructions
- Prep Your Nails: Apply a base coat.
- Apply Base Colors: Paint all nails with light blue polish, except for the accent nails, which should be painted white.
- Create Abstract Art: Use a fine brush to apply abstract patterns with orange, green, and black polishes on the white accent nails. Let each layer dry before adding more details.
- Seal the Design: Apply a top coat to add shine and longevity to your manicure.
Tropical Lily Nails
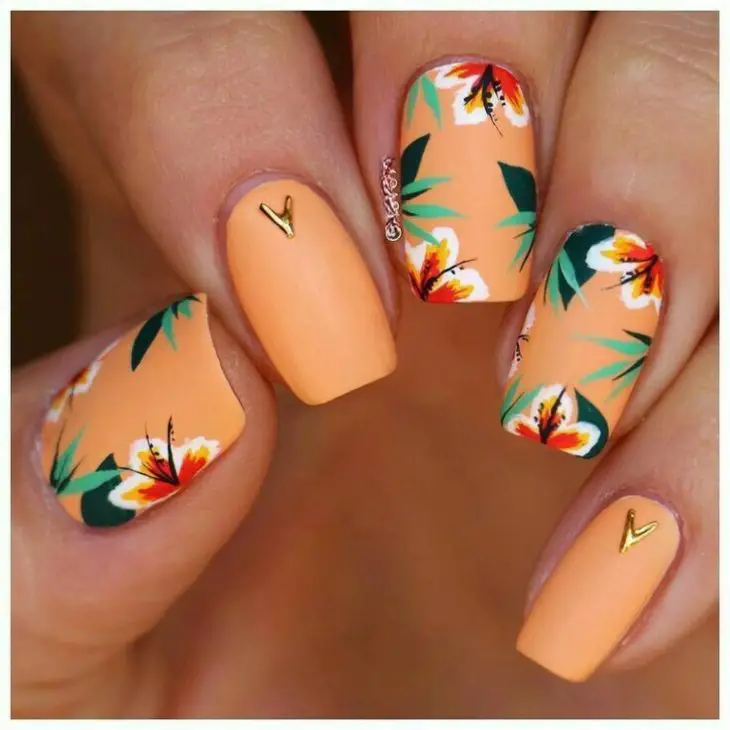
Tropical lily nails are a beautiful and elegant design that brings a touch of nature to your manicure. The peach-colored base provides a soft and warm backdrop, while the delicate lily flowers with green leaves add a fresh and tropical feel. This design is perfect for short square nails, offering a classy and refined look that’s suitable for any occasion.
Consumables List
- Peach nail polish (Essie – “Peach Daiquiri”)
- White nail polish for flowers (OPI – “Alpine Snow”)
- Red and green nail polishes for floral details (Sally Hansen – “Fuchsia Power”, Zoya – “Josie”)
- Fine nail art brush (recommended: Beetles Nail Art Liner Brush)
- Base coat (CND – “Stickey Base Coat”)
- Top coat (Essie – “Good to Go”)
DIY Instructions
- Prep Your Nails: Apply a base coat to each nail.
- Apply Peach Base: Paint all nails with peach polish and let them dry.
- Add Floral Details: Use a fine brush to paint white lilies with red centers and green leaves. Let each layer dry before adding more details.
- Finish Up: Apply a top coat to seal and protect the design.
Tropical Bright Leaves
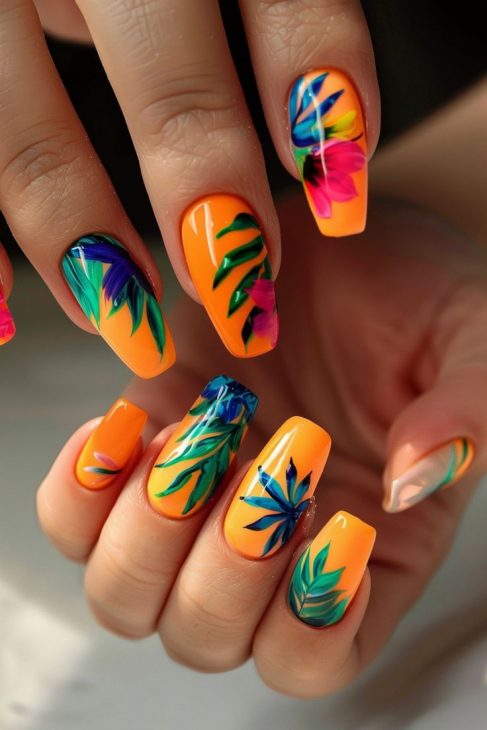
Tropical bright leaves nails are a fun and vibrant choice for anyone looking to add a bit of flair to their manicure. The neon orange base serves as a perfect canvas for the bright green, blue, and pink leaves. This design is bold and eye-catching, making it ideal for beach vacations or summer parties. The short square shape keeps the look practical and easy to maintain.
Consumables List
- Neon orange nail polish (China Glaze – “Orange Knockout”)
- Green, blue, and pink nail polishes for leaves (OPI – “Jade is the New Black”, Essie – “Butler Please”, Sally Hansen – “Fuchsia Power”)
- Fine nail art brush (recommended: Maniology Detail Liner Brush)
- Base coat (Orly – “Bonder Base Coat”)
- Top coat (Seche Vite – “Dry Fast Top Coat”)
DIY Instructions
- Prep Your Nails: Apply a base coat.
- Apply Neon Orange Base: Paint all nails with neon orange nail polish and let them dry completely.
- Add Leaf Details: Using a fine brush, paint green, blue, and pink leaves on each nail. Allow each layer to dry before adding more details.
- Seal the Design: Apply a top coat to add shine and longevity to your manicure.
Tropical Leafy Patterns
This tropical leafy pattern combines warm hues of orange and cool tones of grey and white, adorned with intricate black leaf designs. The accent nails feature detailed leaf patterns in black, which stand out beautifully against the orange and grey bases. This design is ideal for those who appreciate a mix of bold and neutral colors, providing a modern yet tropical vibe.

Consumables List
- Orange nail polish (OPI – “Cajun Shrimp”)
- Grey nail polish (Essie – “Chinchilly”)
- White nail polish (OPI – “Alpine Snow”)
- Black nail polish for leaf details (China Glaze – “Liquid Leather”)
- Fine nail art brush (recommended: Winstonia Nail Art Brush)
- Base coat (Sally Hansen – “Hard as Nails”)
- Top coat (Seche Vite – “Dry Fast Top Coat”)
DIY Instructions
- Prep Your Nails: Start with a clean base. Apply a base coat to protect your nails.
- Apply Base Colors: Paint your nails with orange, grey, and white polishes as shown in the design.
- Add Leaf Details: Use the fine brush to paint black leaf patterns on the accent nails. Let each layer dry before adding more details.
- Seal the Design: Finish with a top coat to protect your artwork and add a glossy finish.
Tropical Matte Elegance
For a minimalist yet elegant look, tropical matte nails with subtle white leaf designs on a peach and beige base are perfect. The matte finish adds a sophisticated touch, while the delicate white leaves give a nod to tropical themes without being too bold. This design is great for those who prefer understated yet stylish nails, suitable for any occasion.

Consumables List
- Peach nail polish (Essie – “Peach Side Babe”)
- Beige nail polish (OPI – “Samoan Sand”)
- White nail polish for leaf details (China Glaze – “White on White”)
- Fine nail art brush (recommended: Maniology Detail Liner Brush)
- Matte top coat (Essie – “Matte About You”)
- Base coat (CND – “Stickey Base Coat”)
DIY Instructions
- Prep Your Nails: Apply a base coat to each nail.
- Apply Base Colors: Paint your nails with peach and beige polishes.
- Add Leaf Details: Use a fine brush to paint white leaf patterns on the accent nails. Let each layer dry before adding more details.
- Finish Up: Apply a matte top coat to seal and protect the design.
Tropical Floral Tips
Tropical floral tips are a vibrant and playful design perfect for summer. The bright orange base is complemented by delicate floral accents on a nude background, creating a lively yet balanced look. This design is ideal for almond-shaped nails, offering a fresh and fun vibe that’s perfect for beach vacations.

Consumables List
- Bright orange nail polish (OPI – “No Tan Lines”)
- Nude nail polish for base (Essie – “Ballet Slippers”)
- Green and orange nail polishes for floral details (Zoya – “Josie”, Essie – “Tart Deco”)
- Fine nail art brush (recommended: Beetles Nail Art Liner Brush)
- Base coat (Orly – “Bonder Base Coat”)
- Top coat (Seche Vite – “Dry Fast Top Coat”)
DIY Instructions
- Prep Your Nails: Apply a base coat.
- Apply Base Colors: Paint your nails with bright orange and nude polishes.
- Add Floral Details: Use a fine brush to paint green and orange floral patterns on the nude accent nails. Let each layer dry before adding more details.
- Seal the Design: Apply a top coat to add shine and longevity to your manicure.
Tropical Blue and Orange Fusion
The tropical blue and orange fusion design is a bold and striking choice for anyone looking to make a statement. The combination of matte blue and bright orange nails, along with floral accents, creates a vibrant and energetic look. This design is perfect for those who love contrasting colors and intricate patterns, making it ideal for summer beach parties.

Consumables List
- Matte blue nail polish (Zoya – “Dory”)
- Bright orange nail polish (China Glaze – “Orange Knockout”)
- White nail polish for floral base (Essie – “Blanc”)
- Blue and orange nail polishes for floral details (OPI – “No Tan Lines”, Zoya – “Sailor”)
- Fine nail art brush (recommended: Maniology Detail Liner Brush)
- Matte top coat (Essie – “Matte About You”)
- Base coat (CND – “Stickey Base Coat”)
DIY Instructions
- Prep Your Nails: Apply a base coat.
- Apply Base Colors: Paint your nails with matte blue and bright orange polishes.
- Add Floral Details: Use a fine brush to paint floral patterns on the white accent nails with blue and orange polishes. Let each layer dry before adding more details.
- Finish Up: Apply a matte top coat to seal and protect the design.
Vibrant Tropical Florals
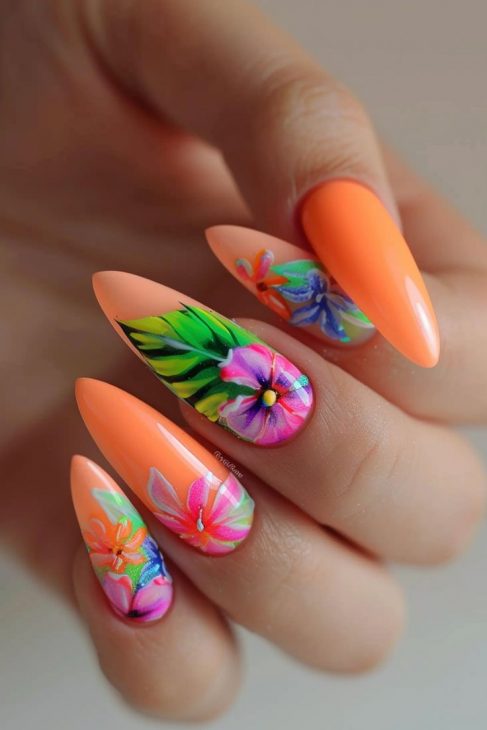
These vibrant tropical florals on a bright orange base create a stunning and eye-catching look. The detailed flowers in pink, purple, and blue, combined with lush green leaves, make this design perfect for those who love bold and colorful nail art. The almond shape adds elegance and elongates the fingers, making this design ideal for beach vacations and summer parties.
Consumables List
- Bright orange nail polish (China Glaze – “Orange Knockout”)
- Pink, purple, and blue nail polishes for flowers (OPI – “Mod About You”, Essie – “Butler Please”, Zoya – “Malia”)
- Green nail polish for leaves (Essie – “Mojito Madness”)
- Fine nail art brush (recommended: Winstonia Nail Art Brush)
- Base coat (Sally Hansen – “Hard as Nails”)
- Top coat (Seche Vite – “Dry Fast Top Coat”)
DIY Instructions
- Prep Your Nails: Start with a clean base. Apply a base coat to protect your nails.
- Apply Orange Base: Paint all your nails with bright orange polish and let them dry completely.
- Add Floral and Leaf Details: Using the fine brush, paint flowers in pink, purple, and blue, and add green leaves. Let each layer dry before adding more details.
- Seal the Design: Finish with a top coat to protect your artwork and add a glossy finish.
Subtle Tropical Elegance
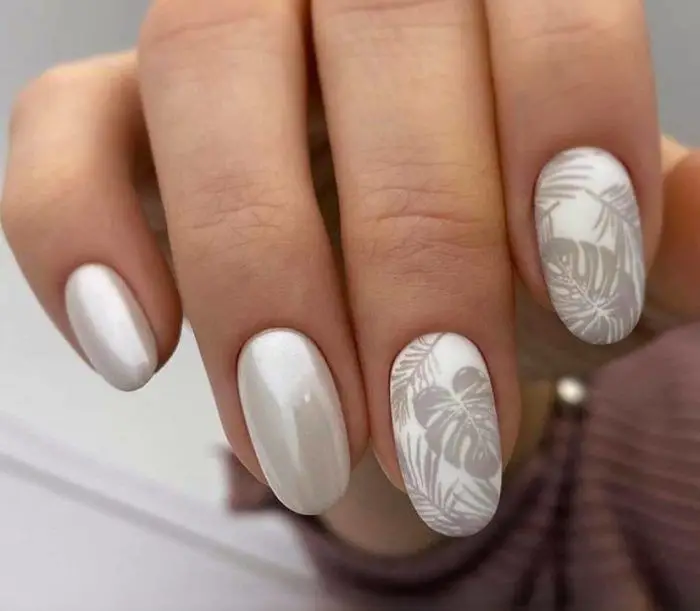
For a more subtle and elegant look, these nails feature delicate tropical leaf patterns on a white base. The monochromatic design adds a touch of sophistication and is perfect for those who prefer a more understated approach to tropical nail art. The short almond shape makes this design practical for everyday wear while maintaining a chic appearance.
Consumables List
- White nail polish (OPI – “Alpine Snow”)
- Light grey nail polish for leaf details (Essie – “Chinchilly”)
- Fine nail art brush (recommended: Maniology Detail Liner Brush)
- Base coat (Orly – “Bonder Base Coat”)
- Top coat (Essie – “Gel Couture Top Coat”)
DIY Instructions
- Prep Your Nails: Apply a base coat to each nail.
- Apply White Base: Paint all your nails with white polish and let them dry.
- Add Leaf Details: Use a fine brush to paint light grey tropical leaf patterns on the accent nails. Let each layer dry before adding more details.
- Finish Up: Apply a top coat to seal and protect the design.
Modern Tropical Art
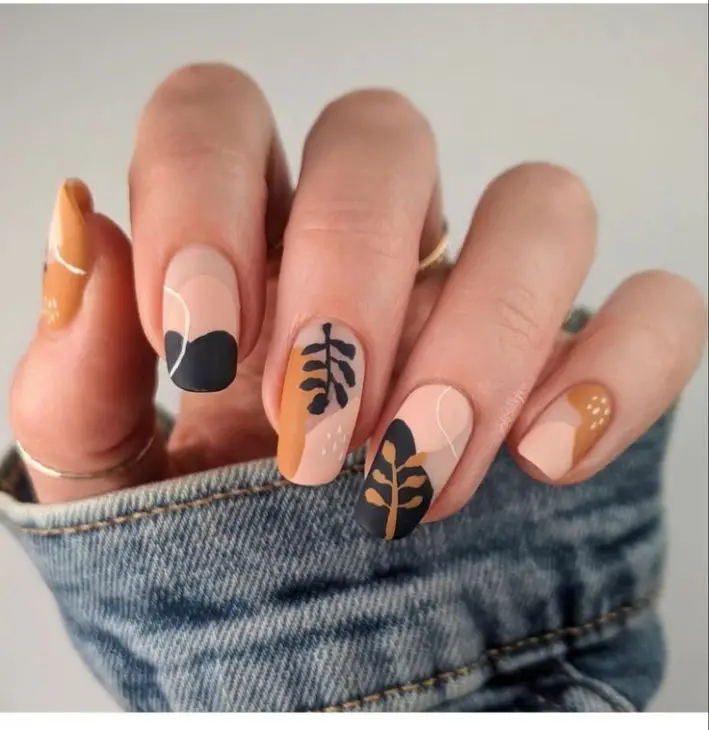
This modern tropical art design features a mix of nude, black, and mustard colors with abstract leaf patterns. The combination of geometric shapes and botanical elements creates a trendy and artistic look. This design is perfect for those who love a contemporary twist on tropical themes, making it suitable for both casual and formal settings.
Consumables List
- Nude nail polish (Essie – “Ballet Slippers”)
- Black nail polish (OPI – “Black Onyx”)
- Mustard nail polish (China Glaze – “Mustard the Courage”)
- Fine nail art brush (recommended: Beetles Nail Art Liner Brush)
- Base coat (CND – “Stickey Base Coat”)
- Top coat (Seche Vite – “Dry Fast Top Coat”)
DIY Instructions
- Prep Your Nails: Apply a base coat.
- Apply Base Colors: Paint your nails with nude, black, and mustard polishes as shown in the design.
- Add Abstract Art and Leaf Details: Use a fine brush to paint black and mustard leaf patterns on the accent nails. Let each layer dry before adding more details.
- Seal the Design: Apply a top coat to add shine and longevity to your manicure.
Olive and Floral Accents
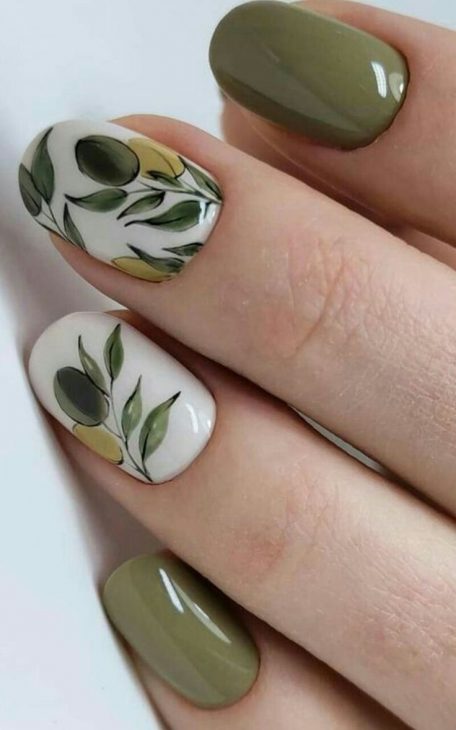
This design combines olive green nails with white accent nails featuring delicate olive branch patterns. The mix of solid colors and intricate botanical details creates a fresh and natural look. This design is perfect for those who love earthy tones and simple yet elegant nail art. The short square shape adds practicality while maintaining a stylish appearance.
Consumables List
- Olive green nail polish (Essie – “Sew Psyched”)
- White nail polish for accent nails (OPI – “Alpine Snow”)
- Green and yellow nail polishes for olive branch details (Zoya – “Josie”, China Glaze – “Lemon Fizz”)
- Fine nail art brush (recommended: Maniology Detail Liner Brush)
- Base coat (Orly – “Bonder Base Coat”)
- Top coat (Seche Vite – “Dry Fast Top Coat”)
DIY Instructions
- Prep Your Nails: Apply a base coat.
- Apply Base Colors: Paint your nails with olive green and white polishes.
- Add Olive Branch Details: Use a fine brush to paint green and yellow olive branches on the white accent nails. Let each layer dry before adding more details.
- Finish Up: Apply a top coat to seal and protect the design.
Bright Floral Paradise
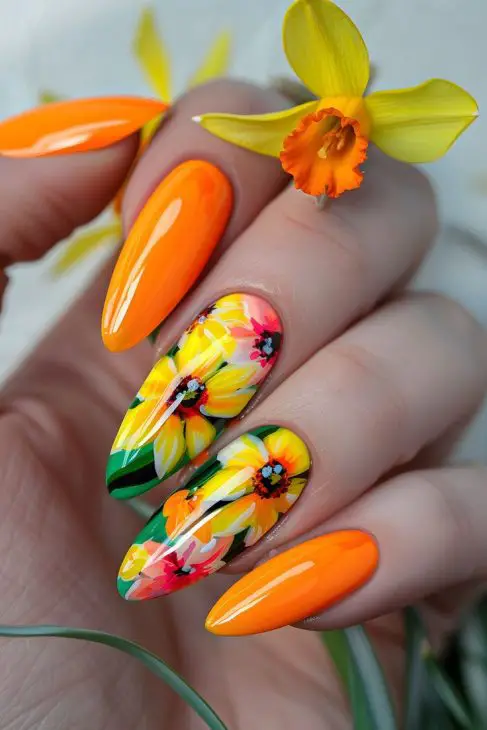
This bright floral paradise design is a vibrant and cheerful choice for the summer season. The bright orange base is eye-catching and lively, while the accent nails feature stunning floral designs in yellow, pink, and green. The detailed flowers add depth and dimension to the nails, creating a tropical paradise on your fingertips. The almond shape enhances the elegance and elongates the fingers, making this design perfect for beach vacations and sunny days.
Consumables List
- Bright orange nail polish (China Glaze – “Orange Knockout”)
- Yellow, pink, and green nail polishes for floral details (OPI – “Need Sunglasses?”, Essie – “Mod Square”, Zoya – “Josie”)
- Fine nail art brush (recommended: Winstonia Nail Art Brush)
- Base coat (Sally Hansen – “Hard as Nails”)
- Top coat (Seche Vite – “Dry Fast Top Coat”)
DIY Instructions
- Prep Your Nails: Start with a clean base. Apply a base coat to protect your nails.
- Apply Orange Base: Paint all your nails with bright orange polish and let them dry completely.
- Add Floral and Leaf Details: Using the fine brush, paint flowers in yellow and pink, and add green leaves. Let each layer dry before adding more details.
- Seal the Design: Finish with a top coat to protect your artwork and add a glossy finish.
Save Pin

