Vacation Nail Art 2024: Unleashing Your Inner Beach Babe
Vacations are the perfect excuse to flaunt your nails with eye-catching designs that scream relaxation and fun. Whether you’re hitting the beach, exploring a tropical paradise, or just soaking up the summer vibes, your nails should be as stunning as your destination. In this article, we’ll explore the best vacation nail art for 2024, with designs that cater to every style and nail length. Let’s dive into the top trends and DIY tips to make your vacation nails stand out.
Tropical Blue Blossoms
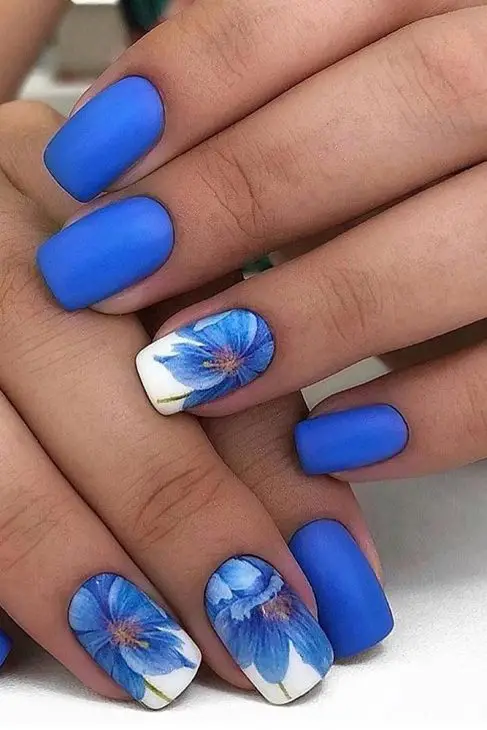
When it comes to vacation nail art designs, nothing says tropical paradise quite like blue blossoms on a matte backdrop. This design combines vibrant blue hues with delicate floral accents, creating a stunning contrast that’s perfect for a beach getaway.
This nail design is a fantastic choice for those who love a pop of color with a touch of elegance. The matte blue base adds sophistication, while the floral details bring a fresh, tropical vibe. It’s an ideal look for any beach vacation, exuding both style and relaxation.
Consumables
- Matte blue nail polish (e.g., OPI’s Matte Top Coat)
- White nail polish for the base
- Blue floral nail decals or a fine nail art brush
- Clear top coat for sealing the design
DIY Instructions
- Apply a matte blue polish to all nails except the accent nails.
- For the accent nails, use a white polish as the base.
- Once dry, apply blue floral decals or use a fine brush to paint the flowers on the white nails.
- Seal the design with a clear top coat to ensure longevity.
Aqua Anchor Vibes
For a more playful vacation nail art idea, consider these aqua nails adorned with nautical elements. This design is perfect for those who love the sea and want to showcase their adventurous spirit.
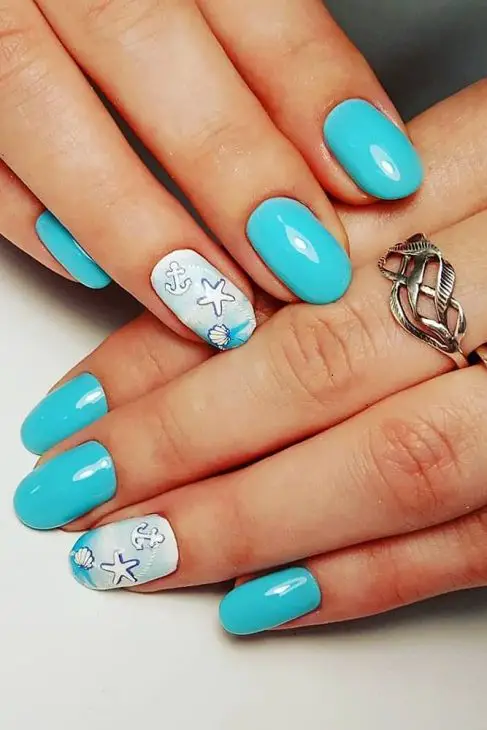
The aqua base color is refreshing and vibrant, making it an excellent choice for a summer vacation. The nautical accents, including anchors and starfish, add a fun, maritime touch that’s sure to draw attention.
Consumables
- Aqua nail polish (e.g., Essie’s Mint Candy Apple)
- White nail polish for accent nails
- Nautical nail stickers or stamping kit
- Clear top coat
DIY Instructions
- Apply aqua polish to all nails, leaving a few for accent designs.
- Paint the accent nails with a white base.
- Once the white polish is dry, apply nautical stickers or use a stamping kit to add anchors and starfish.
- Finish with a clear top coat to protect your design.
Fruity Delight
Inject some fun into your vacation nail art short nails with a fruity design that’s perfect for summer. This look features vibrant colors and playful patterns, making it a delightful choice for any warm-weather getaway.
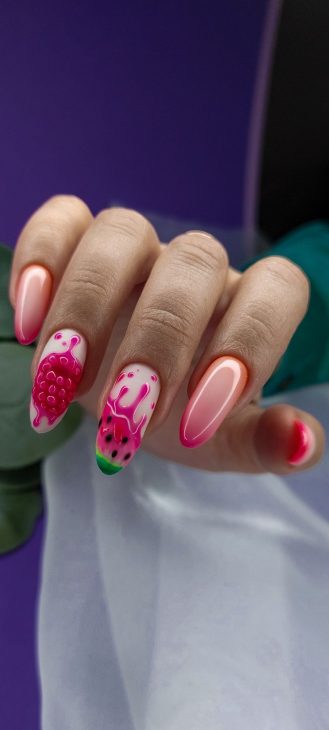
This fruity nail design is vibrant and whimsical, capturing the essence of summer fun. The mix of colors and textures creates a lively, eye-catching look that’s perfect for a tropical vacation or a beach party.
Consumables
- Pink and green nail polishes (e.g., Zoya’s Barbie and OPI’s Green Come True)
- Fine nail art brushes for detailed painting
- Nail art pens for intricate designs
- Clear top coat
DIY Instructions
- Start with a pink base on all nails.
- Use a fine brush to paint green leaves and stems on a few accent nails.
- Add fruit details using nail art pens for precision.
- Apply a clear top coat to protect and shine your design.
Lush Green Paradise
Vacation nails are all about bringing the vibrancy and relaxation of your getaway to your fingertips. The lush green paradise design perfectly captures the essence of tropical foliage with its detailed leaf patterns and rich green hues.

This design is a true homage to tropical beauty. The varying shades of green paired with black and white create a striking, sophisticated look that’s both elegant and refreshing. The intricate leaf details make this a standout design for any vacation setting, particularly for those tropical destinations.
Consumables
- Black nail polish (e.g., Essie’s Licorice)
- Green nail polish in various shades (e.g., OPI’s Don’t Mess With OPI, Zoya’s Jace)
- White nail polish for the base
- Fine nail art brushes for detailing
- Clear top coat
DIY Instructions
- Apply black polish to a few nails as the base color.
- Use white polish for other nails to serve as a canvas for the leafy designs.
- Once the base coats are dry, use fine nail art brushes to paint green leaves on the white nails.
- Mix different shades of green to add depth and realism to the leaves.
- Finish with a clear top coat to protect and shine your design.
Sunset Palms
When it comes to vacation nail art, capturing the magic of a sunset over the ocean can be incredibly captivating. The sunset palms design combines the warm hues of a sunset with palm tree silhouettes for a dramatic and beautiful effect.
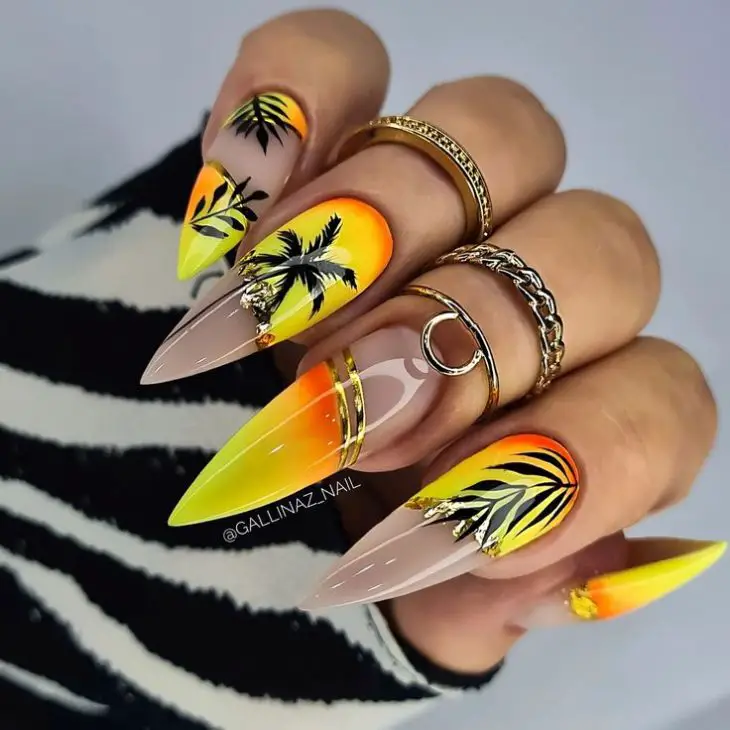
This design is a must-try for anyone who loves a bold and vibrant look. The gradient of orange and yellow mimics a stunning sunset, while the palm tree accents add a touch of tropical flair. This nail art is perfect for making a statement on your beach vacation.
Consumables
- Yellow nail polish (e.g., China Glaze’s Happy Go Lucky)
- Orange nail polish (e.g., OPI’s A Good Man-darin is Hard to Find)
- Black nail polish for palm tree details
- Gradient sponge for blending colors
- Clear top coat
DIY Instructions
- Apply a yellow base coat on all nails.
- Use a gradient sponge to blend orange polish into the yellow, creating a sunset effect.
- Once the gradient is dry, use a fine brush or nail pen to paint black palm tree silhouettes.
- Finish with a clear top coat to seal and protect your design.
Tropical Sunset Glow
A tropical sunset design is the epitome of vacation nail art, with its vibrant colors and serene imagery. This design features a beautiful blend of pinks and oranges, creating a stunning sunset backdrop with detailed beach scenes.
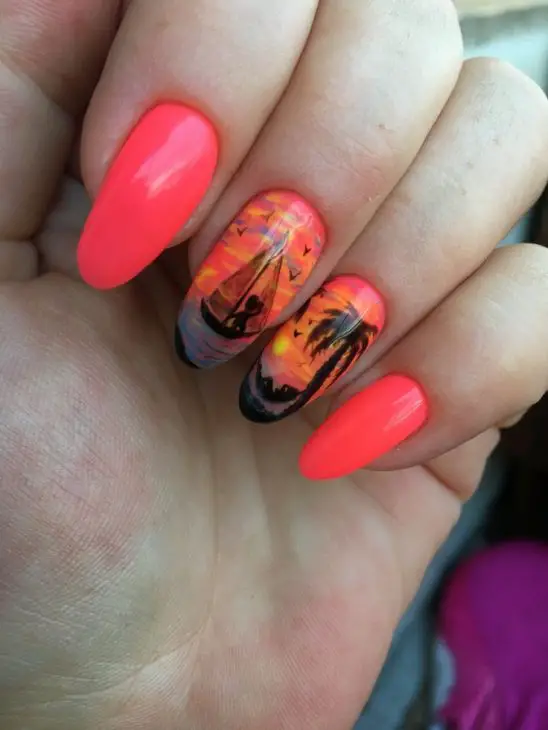
This design truly captures the essence of a tropical getaway. The vibrant gradient from pink to orange, combined with intricate beach scene details, makes for a visually stunning and unique nail art look. Perfect for any beach vacation, this design will surely turn heads.
Consumables
- Pink nail polish (e.g., Essie’s Fiesta)
- Orange nail polish (e.g., Zoya’s Arizona)
- Black nail polish for detailed scenes
- Gradient sponge
- Fine nail art brushes for detailed work
- Clear top coat
DIY Instructions
- Apply a pink base coat to all nails.
- Use a gradient sponge to blend orange polish into the pink, creating a seamless sunset gradient.
- Once dry, use a fine brush to paint detailed beach scenes in black.
- Seal the design with a clear top coat to add shine and protection.
Neon Beach Dreams
For those who love vibrant and bold colors, the neon beach dreams design is the perfect vacation nail art. The bright orange base with subtle black palm accents is sure to bring the beach vibes to your fingertips.
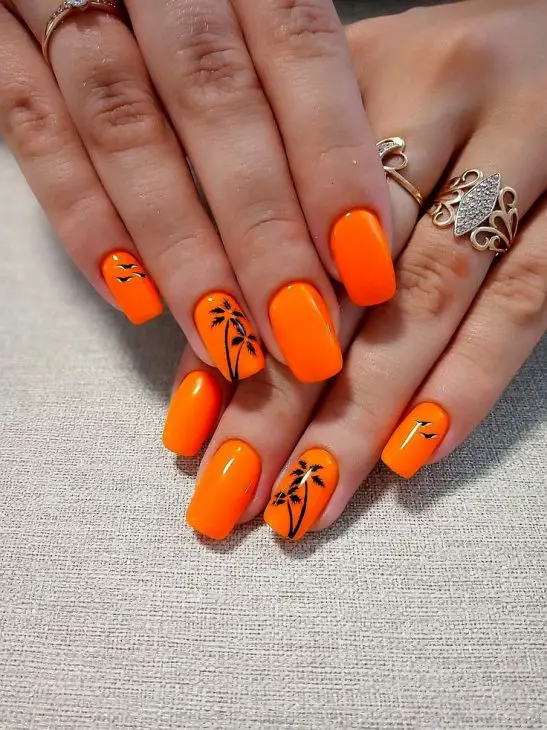
Neon colors are always a hit for summer and beach vacations. This bright orange shade is eye-catching and fun, while the minimalist black palm details add a touch of sophistication. This design is simple yet impactful, making it ideal for any sunny getaway.
Consumables
- Neon orange nail polish (e.g., China Glaze’s Pool Party)
- Black nail polish for palm tree details
- Fine nail art brushes or nail pens
- Clear top coat
DIY Instructions
- Apply a neon orange base coat to all nails.
- Once the base is dry, use a fine brush or nail pen to paint small black palm trees on a few accent nails.
- Finish with a clear top coat to protect your design and add a glossy finish.
Bright Tropical Fun
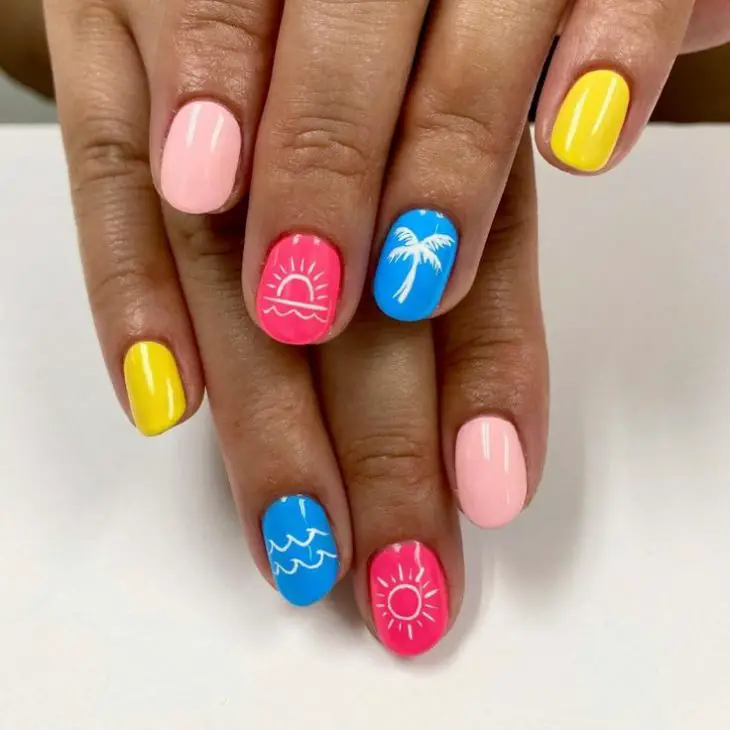
Vacation nail art should be as fun and vibrant as your holiday, and this bright tropical fun design fits the bill perfectly. The mix of bright pink, yellow, and blue with simple white tropical motifs creates a lively and playful look.
This design is an absolute delight for anyone looking to add a burst of color to their vacation style. The bright base colors are energetic and fun, while the white palm trees and sun motifs bring a touch of tropical elegance. It’s a versatile look that works well for both beach and city vacations.
Consumables
- Pink nail polish (e.g., OPI’s Strawberry Margarita)
- Yellow nail polish (e.g., Essie’s Sunshine State of Mind)
- Blue nail polish (e.g., China Glaze’s Pacific Blue)
- White nail polish for the motifs
- Fine nail art brushes or nail pens
- Clear top coat
DIY Instructions
- Apply pink polish to one nail, yellow to another, and blue to the remaining nails.
- Once the base colors are dry, use a fine brush or nail pen to draw simple white motifs like palm trees, suns, and waves.
- Seal the design with a clear top coat to ensure it lasts throughout your vacation.
Desert Sunset Cacti
Inspired by the serene beauty of the desert, this sunset cacti design combines warm sunset hues with silhouettes of cacti for a striking and unique vacation nail art look.

The gradient of warm colors transitioning into the dark silhouettes of cacti creates a stunning visual effect reminiscent of a desert sunset. This design is perfect for those who want a more subdued yet captivating look for their vacation nails. It’s a blend of natural beauty and artistic flair.
Consumables
- Orange nail polish (e.g., Zoya’s Arizona)
- Yellow nail polish (e.g., China Glaze’s Lemon Fizz)
- Dark brown nail polish for cacti silhouettes
- Gradient sponge
- Fine nail art brushes
- Clear top coat
DIY Instructions
- Start with a light yellow base on all nails.
- Use a gradient sponge to blend orange polish into the yellow, creating a sunset effect.
- Once the gradient is dry, use a fine brush to paint cacti silhouettes in dark brown.
- Apply a clear top coat to seal and protect your design.
Tropical Leaves and Gems
Combining the elegance of white polish with the lushness of tropical leaves and the glamour of gem accents, this design is perfect for those who want a sophisticated yet eye-catching vacation nail art.

This design strikes a beautiful balance between simplicity and extravagance. The white base provides a clean canvas for the detailed green leaf art, while the gem accents add a touch of luxury. It’s a perfect look for a tropical vacation, offering both style and elegance.
Consumables
- White nail polish (e.g., OPI’s Alpine Snow)
- Green nail polish for leaf designs (e.g., Essie’s Mojito Madness)
- Assorted nail gems
- Nail glue for gems
- Fine nail art brushes
- Clear top coat
DIY Instructions
- Apply a white base coat to all nails.
- Once the base is dry, use a fine brush to paint green tropical leaves on a few accent nails.
- Add gem accents to one or two nails using nail glue.
- Finish with a clear top coat to protect the design and add shine.
Palm Leaf Simplicity
For those who love a minimalist look with a tropical twist, this palm leaf simplicity design is the perfect choice. The white base with green palm leaf accents is clean, fresh, and effortlessly stylish.
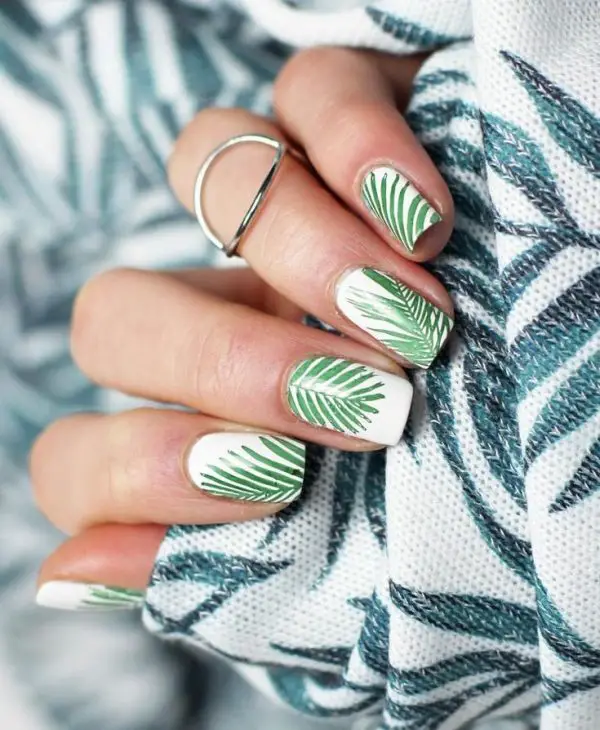
This design is ideal for anyone looking for a subtle yet stylish vacation nail art. The white base keeps it simple and elegant, while the green palm leaves add just the right amount of tropical flair. It’s perfect for any vacation, offering a touch of nature’s beauty.
Consumables
- White nail polish (e.g., Essie’s Blanc)
- Green nail polish for leaf designs (e.g., Zoya’s Josie)
- Fine nail art brushes
- Clear top coat
DIY Instructions
- Apply a white base coat to all nails.
- Once the base is dry, use a fine brush to paint green palm leaves on each nail.
- Seal the design with a clear top coat to ensure it lasts through your vacation.
Golden Sunset Delight
Embrace the warmth and beauty of a sunset with this golden sunset delight design. The gradient from yellow to pink combined with golden sun accents and palm trees creates a perfect vacation nail art look.
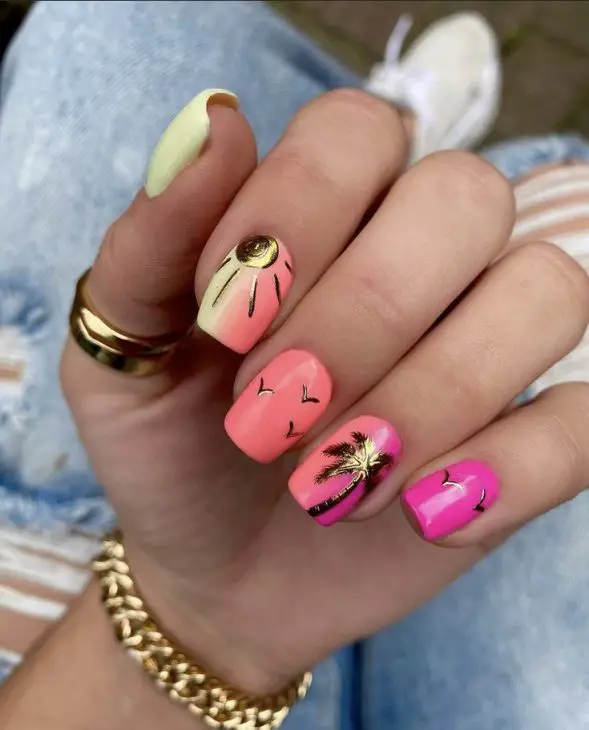
This design captures the serene beauty of a sunset at the beach. The gradient nails transitioning from yellow to pink are vibrant and warm, evoking the colors of a perfect sunset. The golden sun and black palm tree accents add a touch of elegance and sophistication, making this design ideal for any tropical vacation.
Consumables
- Yellow nail polish (e.g., Essie’s Sunshine State of Mind)
- Pink nail polish (e.g., OPI’s Strawberry Margarita)
- Black nail polish for palm trees and birds
- Gold nail polish for the sun accent
- Gradient sponge
- Fine nail art brushes
- Clear top coat
DIY Instructions
- Apply a gradient base using yellow and pink polishes, blending them with a sponge for a seamless transition.
- Once the gradient is dry, use a fine brush to paint black palm trees and birds on the accent nails.
- Add a gold sun accent on one nail.
- Seal the design with a clear top coat to protect and add shine.
Lemon Fresh
Nothing says summer quite like fresh lemons, and this lemon fresh nail design is the epitome of citrusy fun. Bright yellow lemons and green leaves on a white base create a fresh and zesty vacation nail art look.
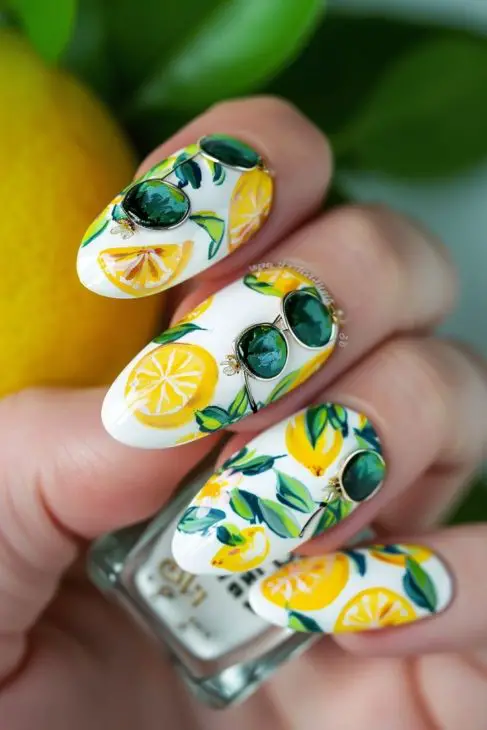
This design is refreshing and lively, perfect for capturing the essence of a sunny vacation. The detailed lemon and leaf motifs on a clean white base are both playful and sophisticated. Adding small 3D lemon accents makes this design stand out even more, perfect for a tropical or summer getaway.
Consumables
- White nail polish (e.g., OPI’s Alpine Snow)
- Yellow nail polish for lemon designs (e.g., Zoya’s Pippa)
- Green nail polish for leaves (e.g., Essie’s Mojito Madness)
- 3D lemon accents (optional)
- Fine nail art brushes
- Clear top coat
DIY Instructions
- Apply a white base coat to all nails.
- Once dry, use a fine brush to paint detailed yellow lemons and green leaves.
- Optionally, add 3D lemon accents for extra dimension.
- Finish with a clear top coat to seal the design.
Beach Day Vibes
Capture the essence of a perfect beach day with this vibrant and colorful design. Featuring a mix of bright colors and simple, beach-inspired motifs, this look is ideal for any seaside vacation.
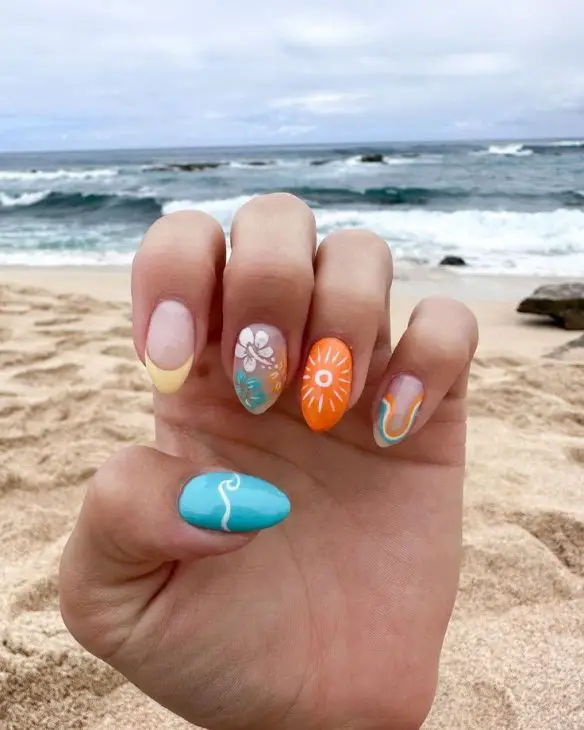
This design is fun and playful, perfectly reflecting the joy of a beach day. The use of bright colors like orange, blue, and yellow creates a cheerful and energetic vibe. Simple motifs like waves, suns, and flowers add to the beachy feel without overwhelming the design, making it perfect for a casual, fun vacation look.
Consumables
- Orange nail polish (e.g., China Glaze’s Orange Knockout)
- Blue nail polish (e.g., Essie’s Aruba Blue)
- Yellow nail polish (e.g., OPI’s I Just Can’t Cope-acabana)
- White nail polish for motifs
- Fine nail art brushes
- Clear top coat
DIY Instructions
- Paint each nail a different bright color as the base.
- Use a fine brush to draw simple beach motifs like waves, suns, and flowers in white polish.
- Apply a clear top coat to protect your design and add shine.
Sunset Beach Scene
For a more detailed and artistic approach to vacation nail art, this sunset beach scene design is perfect. With a detailed sunset, ocean waves, and palm trees, this design is a miniature work of art on your nails.
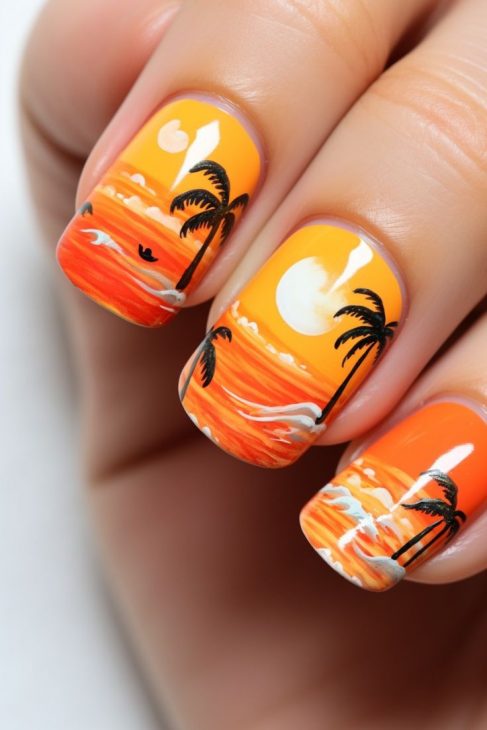
This design is intricate and beautiful, capturing the full beauty of a sunset at the beach. The gradient sunset colors and detailed silhouettes of palm trees and waves create a stunning visual effect. It’s a more advanced design but absolutely worth the effort for its eye-catching beauty.
Consumables
- Orange nail polish (e.g., Zoya’s Paz)
- Yellow nail polish (e.g., Essie’s Sun-shine State of Mind)
- White nail polish for waves and highlights
- Black nail polish for palm tree silhouettes
- Gradient sponge
- Fine nail art brushes
- Clear top coat
DIY Instructions
- Create a gradient base using orange and yellow polishes, blending with a sponge.
- Once dry, use a fine brush to paint detailed palm tree silhouettes in black polish.
- Add white highlights for the waves and sun reflections.
- Seal the design with a clear top coat to protect and add gloss.
Citrus Splash
Add a zest of freshness to your vacation nails with this citrus splash design. The bright and bold colors of oranges, lemons, and limes make this nail art look vibrant and perfect for a sunny getaway.
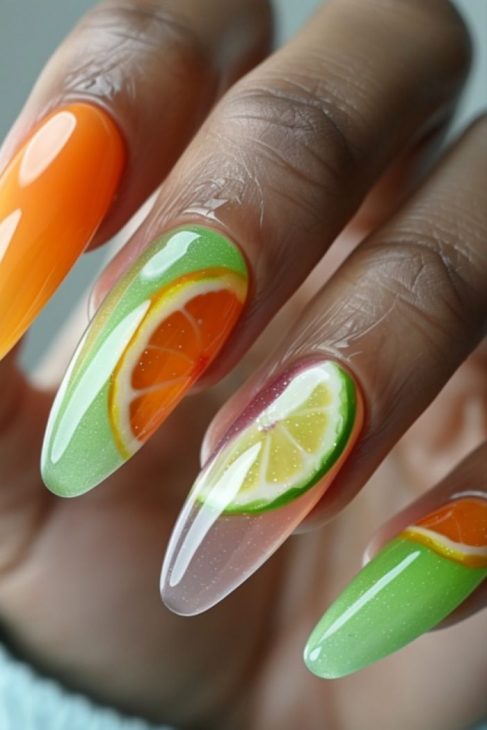
This design is incredibly fresh and lively, ideal for capturing the essence of summer. The combination of orange, green, and yellow colors is not only visually striking but also evokes a sense of refreshing citrus. The intricate detailing of the citrus slices adds a realistic touch, making your nails look like a work of art.
Consumables
- Orange nail polish (e.g., Essie’s Orange, It’s Obvious)
- Green nail polish (e.g., OPI’s Green Come True)
- Yellow nail polish (e.g., Zoya’s Pippa)
- White nail polish for the citrus slice details
- Fine nail art brushes
- Clear top coat
DIY Instructions
- Apply orange, green, and yellow polish to different nails, creating a base for each citrus slice.
- Once the base coats are dry, use a fine brush to paint detailed citrus slices on each nail.
- Add white accents to highlight the segments of the fruits.
- Finish with a clear top coat to protect the design and add shine.
Underwater Fantasy
Dive into an underwater fantasy with this stunning nail art. Featuring aqua hues and coral reef accents, this design brings the beauty of the ocean to your fingertips.
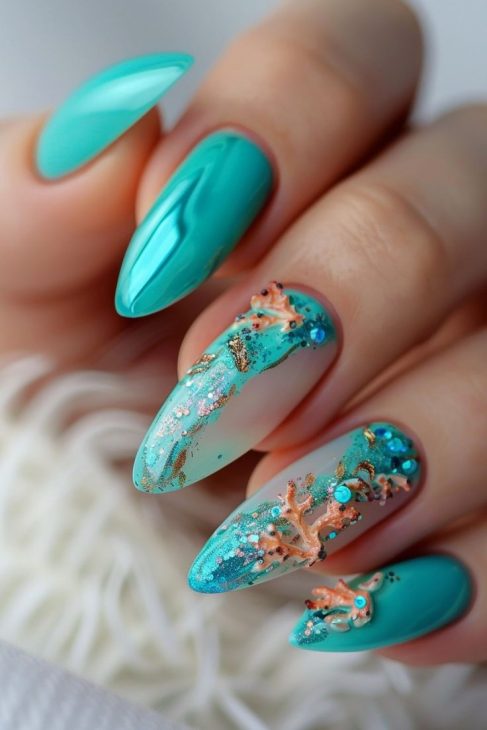
This design is both enchanting and glamorous, perfect for those who love the ocean. The combination of aqua and turquoise shades creates a beautiful underwater effect, while the coral reef and seaweed accents add depth and intricacy. The addition of glitter and rhinestones enhances the overall look, making it truly mesmerizing.
Consumables
- Aqua nail polish (e.g., Essie’s Turquoise & Caicos)
- Turquoise glitter polish
- Coral reef and seaweed nail stickers or decals
- Rhinestones for extra sparkle
- Nail glue for attaching rhinestones
- Clear top coat
DIY Instructions
- Apply an aqua base coat to all nails.
- Once dry, add a layer of turquoise glitter polish to create an underwater shimmer.
- Use coral reef and seaweed stickers or decals to add details.
- Attach rhinestones to some nails using nail glue.
- Seal the design with a clear top coat for protection and shine.
Sunshine Palms
Brighten up your vacation nails with this sunshine palms design. The vibrant yellow base with detailed palm leaf accents creates a cheerful and tropical look.
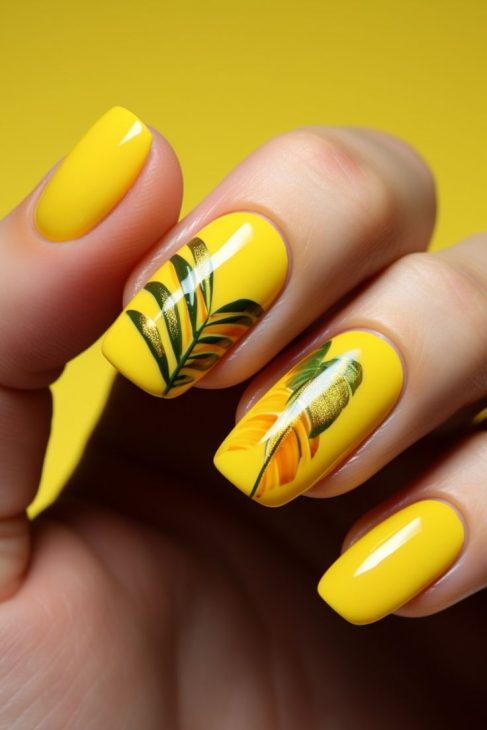
This design is perfect for capturing the sunny vibes of a tropical vacation. The bright yellow base is energetic and eye-catching, while the detailed palm leaves add a touch of nature’s beauty. It’s a simple yet striking design that works well for both casual and beach settings.
Consumables
- Yellow nail polish (e.g., OPI’s I Just Can’t Cope-acabana)
- Green nail polish for palm leaf details (e.g., Essie’s Mojito Madness)
- Fine nail art brushes
- Clear top coat
DIY Instructions
- Apply a bright yellow base coat to all nails.
- Once dry, use a fine brush to paint detailed green palm leaves on each nail.
- Apply a clear top coat to protect your design and add a glossy finish.
Gradient Dusk
Capture the serene beauty of dusk with this gradient dusk nail art. Featuring a gradient from blue to orange with delicate black plant silhouettes, this design is perfect for a tranquil vacation look.

This design beautifully captures the transition of colors seen during dusk. The gradient from blue to orange creates a calming and picturesque effect, while the black plant silhouettes add a touch of elegance. It’s a sophisticated and serene look that’s perfect for any evening event on your vacation.
Consumables
- Blue nail polish (e.g., Essie’s Bikini So Teeny)
- Orange nail polish (e.g., China Glaze’s Orange Knockout)
- Black nail polish for plant silhouettes
- Gradient sponge
- Fine nail art brushes
- Clear top coat
DIY Instructions
- Create a gradient base using blue and orange polishes, blending them with a sponge.
- Once dry, use a fine brush to paint black plant silhouettes on the accent nails.
- Seal the design with a clear top coat to protect and add shine.
Beachy Floral Bliss
For a whimsical and nature-inspired look, this beachy floral bliss nail art is a stunning choice. The combination of delicate flowers embedded in a clear blue base mimics the serene beauty of a day at the beach.

This design is absolutely enchanting and perfect for those who want to bring a touch of nature to their vacation nails. The clear blue base creates a refreshing ocean-like feel, while the embedded floral details add a touch of elegance and playfulness. This design is not only beautiful but also versatile, making it a great choice for any beach or summer vacation.
Consumables
- Clear blue nail polish (e.g., OPI’s GelColor in “Do You Sea What I Sea?”)
- Dried flower nail art decorations
- Fine glitter for added sparkle
- Clear builder gel or thick clear polish
- UV/LED lamp (if using gel)
- Clear top coat
DIY Instructions
- Apply a clear blue base coat to all nails.
- While the base is still tacky, place the dried flower decorations on the nails, arranging them as desired.
- Add a fine layer of glitter for extra sparkle.
- Seal the design with a layer of clear builder gel or thick clear polish to encase the flowers.
- Cure under a UV/LED lamp if using gel, or let dry thoroughly if using polish.
- Finish with a clear top coat to protect the design and add a glossy finish.
Save Pin
